Creating Conceptual mass in REVIT and Creation of Sinusoidal curve and a Parametric stadium using Dynamo
CHALLENGE WEEK - 10
REVIT
Question no. 1: Using Dynamo create a set of sinusoidal points and create a curve and create a surface out of the curve
- AIM:
- To create a set of sinusoidal point , curve and surface for the curve using the dynamo tool.
- Procedure:
- Initially open the revit software.
- In the revit go to manage tool bar.
- Through manage tool we can access the dynamo tool to create the parametric designs for the revit.
- So after opening the dynamo.
- Create a new workplane.
- First we need create the points as said in teh question.
- Hence to create points we need to choose certain command tools from the dynamo.
- so to choose the command tools we need search appropriate tools from teh search tab.
- First we are choosing the integer slider to control the number counts and other operation that can be controlled using the interger sliders.
- Three such sliders are chose first.
- These sliders in our case controls the points from its start , end and the steps.
- Hence after choosing teh integer sliders we are choosing appropeiate values needed for the design.
- After this we need to set range for the operation of the values from the integer sliders.
- Hence choosing the range tool containing the start, end and steps.
- Now we need to connect the start , ened , and steps to the respective parameters in the range.
- Then to set the points in teh coordinates we need point by coordinate tool .
- Point by coordianate tool that contains x,y,z is chosen.
- And then the range is connected to teh x coordinate.
- Then we are choosing a code block that defines the count of the points .
- In the code block the count of the points is entered.
- Then ato govern the angle of the points movement math..sin tool is chosen.
- the range in now connected to the math.sin.
- A product tab for x and y is chosen.
- Thne for the movemetsof the points toward to teh direction the point by coornate with x,y, z is chosen aagin.
- Now the range in connected to the x of teh new point by coordinates.
- The codeblock is connected to the z.
- The math.sin is connected to the y.
- Then the codeblock is connected to the prouct tool x.
- And the y of the product tool is connected to thecode block
- Now we go the points created.
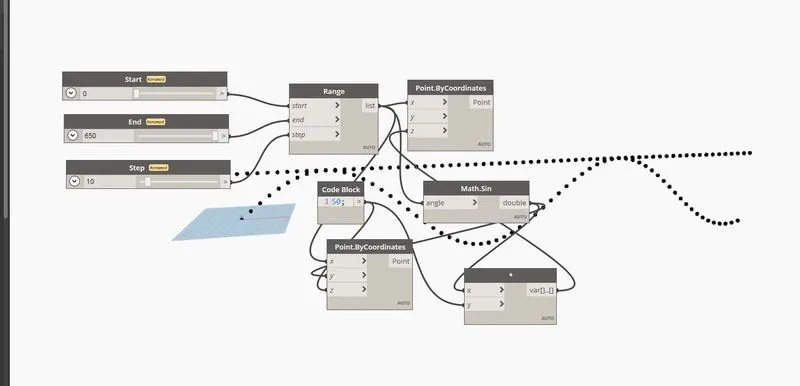
- After the points being created the curve and the surface need to be created.
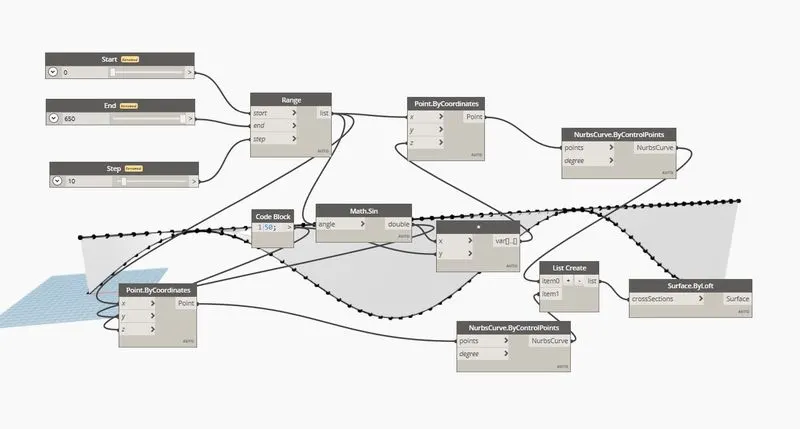
- Hence need to create a list that contains 2 items.
- Now to create the curve we need nurbscurve. by coordinates. with points and degree, we 2 of tehm.
- To create a surface we ned syrface by lost that contains crossection.
- nor connect the second points by coordinate to the one of the poinys of the nurbs curve by coordinate.
- And the first point by coordinate to be connected to the point of tehr curve creation tool.
- Now connect the cureve tools with the itmes tool to both items created.
- Now we go a curve.
- The to obtain a surface we need to create a tool of surface by loft.
- Connect the list to the surface by loft.
- Now we got the ponits connected by curve and a suface created out of curve.
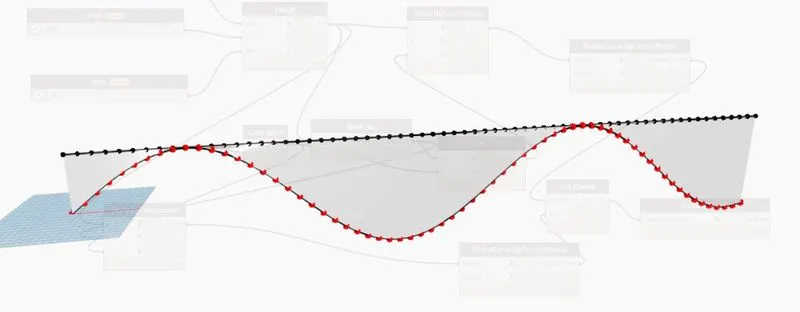
- Result
- Hence the points, curve and surface was created succesfully using dynamo.
Question no. 2: Create a conceptual layout of floor plan in dynamo . Using the tools available in dynamo link the lines to appropriate model elements in Revit by choosing the wall types and wall parameters. Make use of the sliders to slide through the height of the wall and length of the wall.
- AIM:
- To create a conceptual layout of floor plan in dynamo.
- To connect the floor to wall by creating wall type and wall parameters.
- Procedure:
- Initially open the revit software.
- In the revit go to manage tool bar.
- Through manage tool we can access the dynamo tool to create the parametric designs for the revit.
- So after opening the dynamo.
- Create a new workplane.
- First we need to choose integer sliders. two integer slider is created.
- So both the integer slider is given with the required values.
- Then 4 point by coordinates with x,y,z is created.
- Then the interger slider in connected with the x of first coordinates and y of second.
- In the same way the second slider is connected to the the x of first coornates and the y of third coordinates.
- Now we need to creat list by start point end point.
- then the first coordinates is connected to the first start point.
- And end point of the 4 the list.
- Then the second coordinates is connected with the first end point.
- Then connected to the start point of od 2nd list.
- THe thirs coordinate is connected to the start point of the 3rd list.
- Then the 4th coordinate is connected to the satrt point of the 4th list.
- Then a list containing 4 items were created.
- then all the list by start poinnt and end points were conneccted to the items in the new list.
- Now to create levels we need a level tool.
- And to govern the wall type a wall typer is chose.
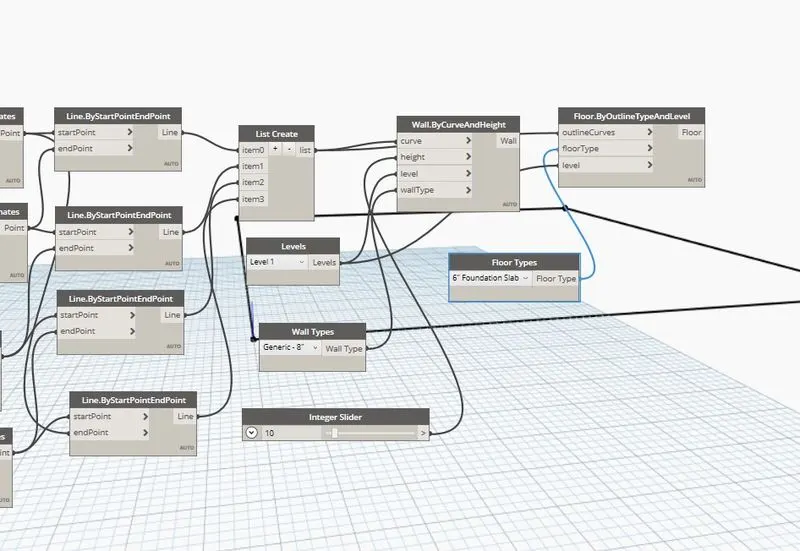
- The to creat the wall a tool that conatins the curve , height, level and wall type is created.
- And integer slider is created.
- Now the inetger slider is connected to teh height to govern the height of the wall.
- Then the wall type is connected to the wall type of the created new tool.
- Then the levels is connected to teh levels.
- Then the lsit created is connected to the curve .
- Now the walls are created.
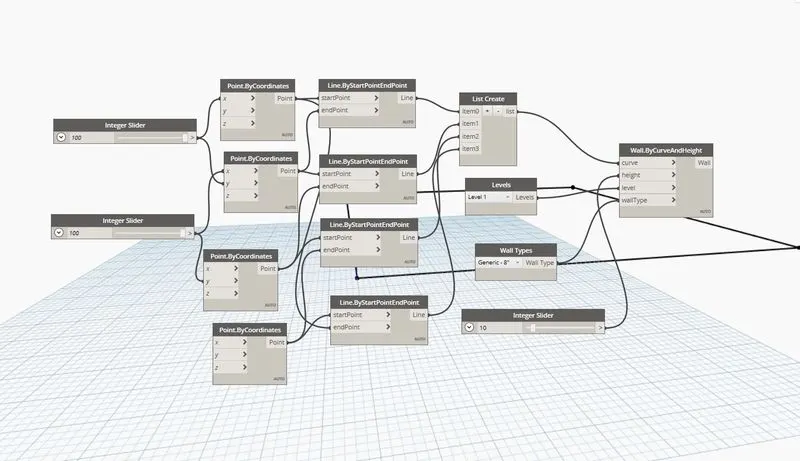
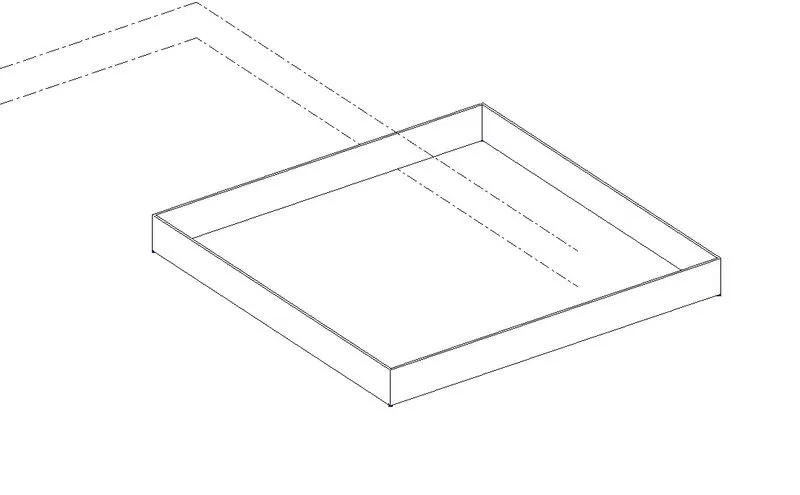
- To create a floor slab along with walls.
- We need certain tools.
- First is floor by outline tyoe and level.
- Then to gover floor type.
- Now the outline curve is connected with the lsiyt created before.
- Then the floor type is connected to the floor type in the floor creation tool.
- And the floor along with wall si creatd.
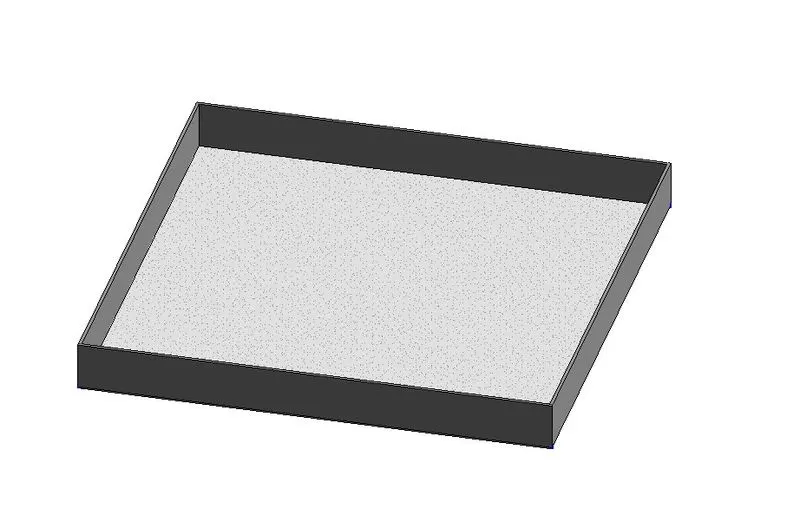
- Result
- The conceptual layout of floor plan in dynamo was created
- The floor to wall by creating wall type and wall parameters were connected.
Question no. 3: Create an array of model elements in Revit. Use dynamo to vary the properties of model elements by using the slider or code block
- AIM:
- To create an array of mocel elemenst in revit.
- To use dynamo.
- Procedure:
- Initially open the revit software.
- In the revit go to manage tool bar.
- Through manage tool we can access the dynamo tool to create the parametric designs for the revit.
- So after opening the dynamo.
- Create a new workplane.
- First need to creat column or any elements in the revit workplane.
- Then come back to dynamo.
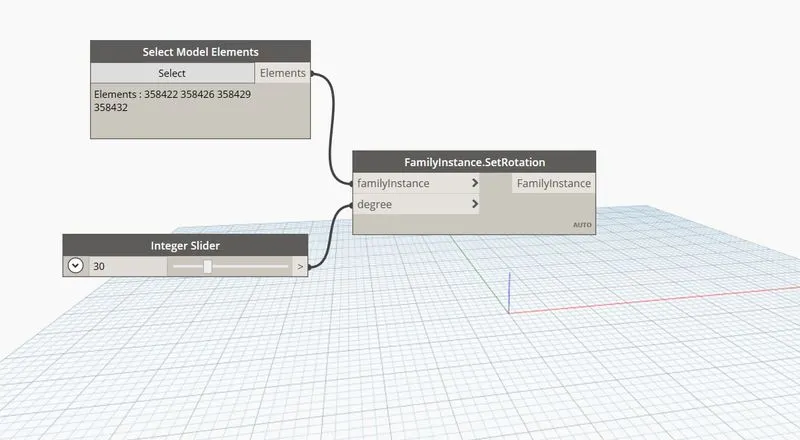
- In dynamo open slect model elements tool.
- Then no select the select button on the tool.
- Then slect the columns or the elements created on the revit workplane.
- Now we need integer sliders.
- And create a family instance set rotation tool.
- Connect the integer slider to the degree for ration.
- And the family instance to the select tooll.
- And now th required array is created .

- Result
- Hence the required array of the component was created.
Question no. 4: Create a conceptual mass in Revit and develop a parametric column by dividing the surfaces and apply the concepts similar to used in parametric walkway modelling. Use triangular bent or square shaped panels to add finish to the parametric column
- AIM:
- To create a conceptual mass in revit
- To develop a parametric column by dividimg surface.
- To use dynamo.
- Procedure:
- Initially open the revit software.
- Then opne the family creation template or the conceptual mass template.
- In this template.
- Initially set the levels in the elevation views.
- go to create option.
- in create option set the plane first.
- Then choose teh spline option.
- And after choosing spline option .
- Draw the shape required to be in the spline curve.
- then after creating the shape.
- select teh set plane options.
- And set planes on the required points.
- Then after this draw required shape of teh model on teh plane set.
- Thne select teh shape of teh model at once.
- And then select create form.
- in the drop down of the create forms.
- Choose the solid forms.
- Now we get a extrusion in soli of the required shape.
- And now choose the created form and then give divide surface.
- No we get the models gets various divided planes.
- Now we need to change teh pattern of the planes.
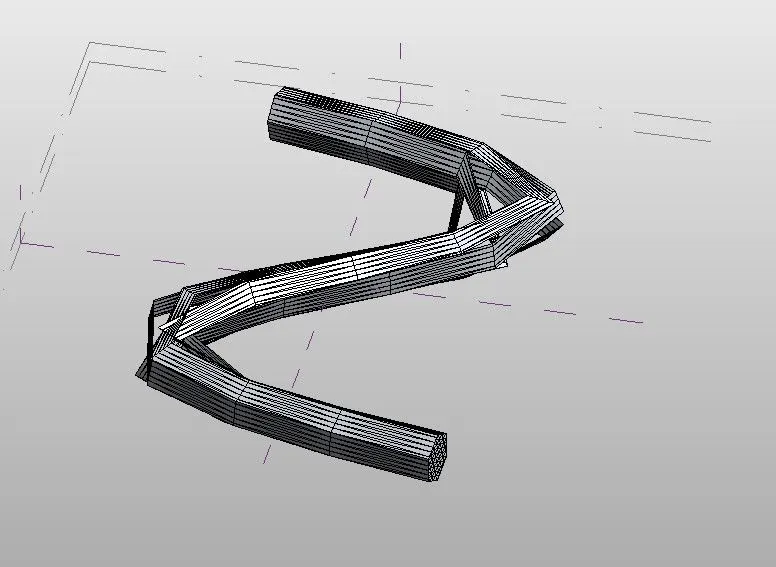
- then select triangular bent.
- And then you will get a paramtetric shape as shown below.
- Result
- Hence the parametric family model was created.
Question no. 5: Use Dynamo to work on developing a Parametric Stadium. List your parameters and use the visual programming approach to complete the modelling, You can use the concepts discussed in parametric high rise tower in class for reference.
- AIM:
- To use dynamo to create parametric stadium.
- Procedure:
- Initially open the revit software.
- In the revit go to manage tool bar.
- Through manage tool we can access the dynamo tool to create the parametric designs for the revit.
- So after opening the dynamo.
- Create a new workplane.
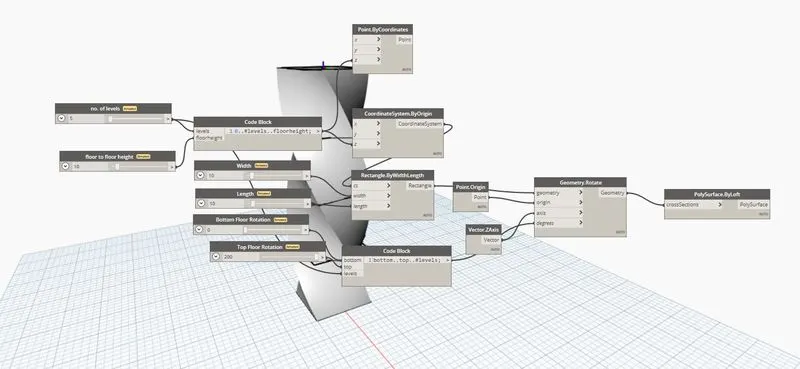
- Now we need to create two integer sliders to govern the floor to flor height and the levels.
- Now create a code block that contains conde to govern the before created integer sliders.
- Create another 4 interger sliders.
- Now name the integer sliders as width, length, top floor rotation, and bottom floor rotation.
- Now create point by coordinate containing x,y,z.
- and origin by coordination ssytem conatainig x,y,z
- then open a tool for creating rectangle that contains and a codeblock
- Now connect teh first codeblock with z of point by coordinates.
- thenagain connect it toz of coordinae by origin
- Now connect width adn length integer sliders to width and length of the rectangle creation tool.
- In code block create a code of bottom , level and top.
- now connect the integer slider of bottom and top rotations.
- Now create teh point.origin and vector z axis.
- And create a geometry roatate.
- Connect teh second code block with degree in teh geometry rotation.
- Then connect the vector axis to axis. And then origin to teh origin
- And connect teh rectangle to the geometry.
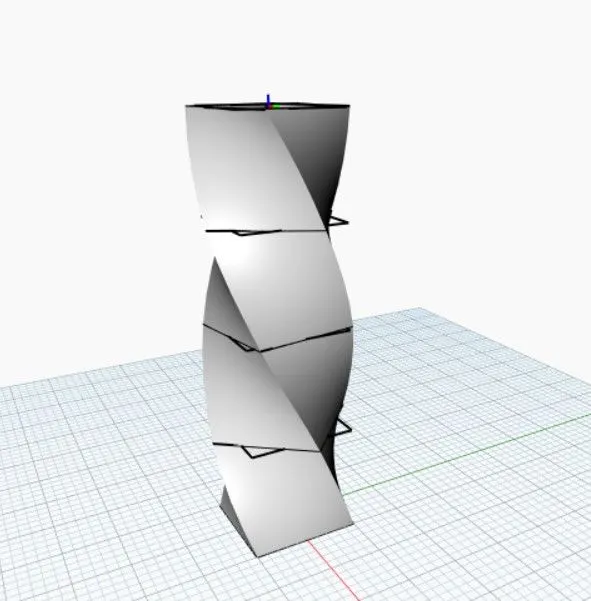
- And hence the parametric design was created.
- Result
- Hence the parametric design was created successfully uding dynamo.
- Required paramets were used.