Creating Bar Bending schedule, Different Door types, and Creation of standard drawing templates using AutoCad
AIM:-Creating Bar Bending schedule, Different Door types, and Creation of standard drawing templates using AutoCad
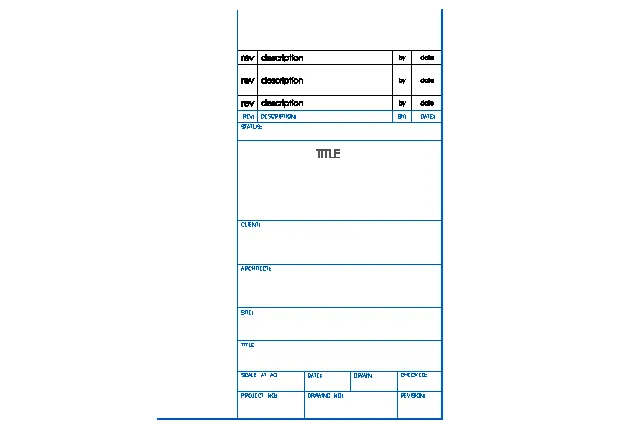
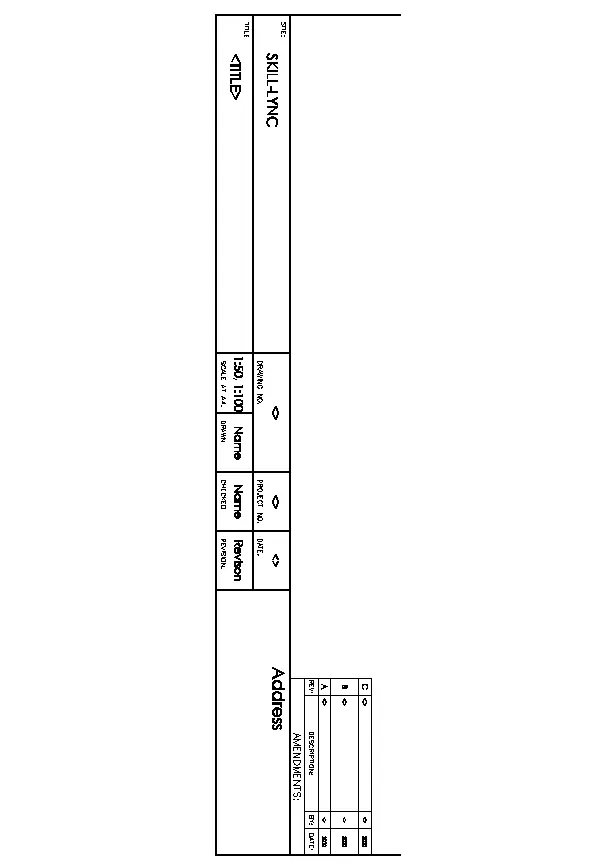
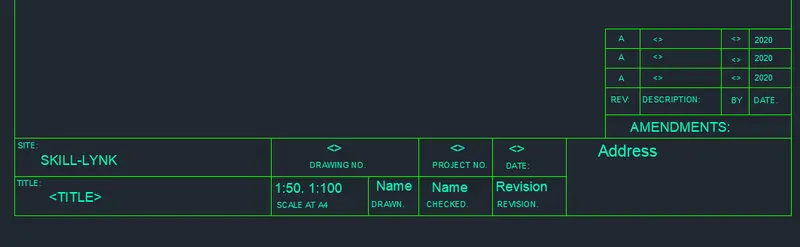
PROBLEM NO 1:- Create the templates as shown in Figures. Take the size of the title block as per industry standards or you can assume it as per the size of the paper. Use text and attributes wherever required. After creating the title block you need to save it as a block with names: Custom1_titleblock and Custom2_titleblock, respectively.
STEPWISE PROCEDURE ;-
TEMPLATE 1 :-
- Type Qnew enter
- Set unit as Decimal with 0 precision
- Scale of unit as< milimeter
- Click on layer properties
- Click on set the new layer
- Give the name as < template table
- Select color < 240
- Again click on create new layer
- Give the name as
- Select color <11
- Select the layer of template table < right click< click on set current
- Take line command
- Specify the first point randomly anywhere on screen
- Specify next point 300<0
- Specify next point 475<90
- Specify next point 300<180
- Specify next point 475<270 or close.
- Take the offset command
- Select the object
- Offset at 40,45,35,20,35, 80, 45, 45,35,35,30
- Select the object
- Offset at 70,70,70
- Select the object
- Offset at 60, 150, 40
- Press ESC.
- Take text command
- Justifying at left
- Specifying height as 12
- Write all the text in position as given in the question
- Select TITLE text and increase the height as 15mm by click right – properties
- To select as the Block
- Type B in command bar < press enter
- Dialog box will be open
- Give the name as Custom1_ titleblock
- Click on pick poin
- Select insertion point < click on any one corner of table
- Click on select object
- Select the entire object
- Press ENTER.
- Click on Retain
- Click on Exploding
- Click OK.
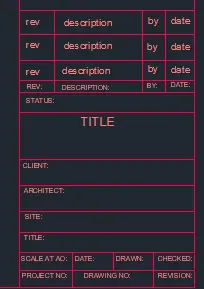
RESULT:-
TEMPLATE 2:-
- Set the unit as Decimal
- Unit of scale as milimeter
- Click the layer properties and set the layers as set for the template 1 using different colors
- Draw the table using line and offset command
- Trim all unwanted lines.
- Take the single line text
- Write all the text in the required position given in the question figure. By Selecting the different heights as 25 mm and 15 mm
- Then it shows as in figure below
- After writing all the text
- Type B press ENTER
- Give the Name-Custom2_titleblock
- Select pick point< any one corners of table
- Click on select object
- Select the object press ENTER
- Allow the exploding
- Press OK.
RESULT:-
PROBLEM NO 2:- Create the doors type for warehouse as shown in the Figure. You need to create each door type as per standard size or given dimensions. Create the blocks of this door type after creating them.
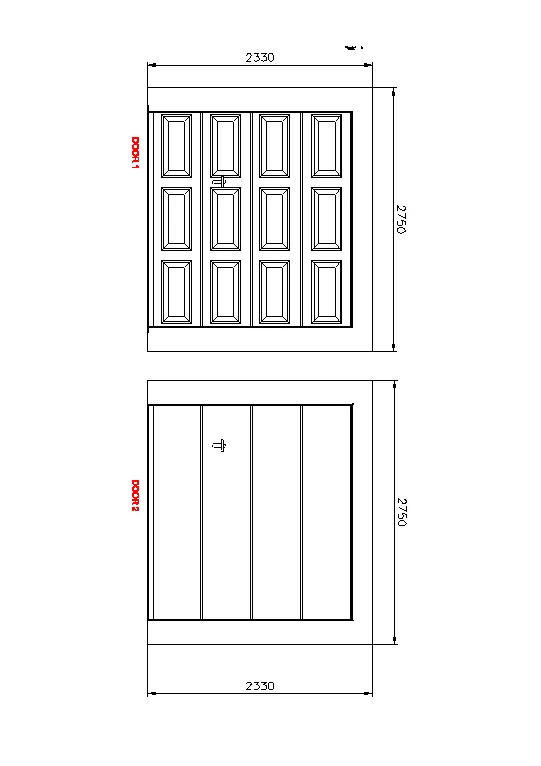
STEPWISE PROCEDURE:-
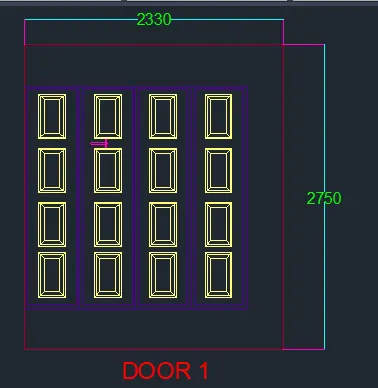
DOOR 1:-
- Set the units as Decimal – 0 precision and scale of unit as milimeter
- Click on layer properties
- Select the layers as :
- Take line command
- Specify start point randomly
- Specify next point 2330<0
- Specify next point 2750<90
- Specify next point 2330<180
- Take the line command again
- Draw the all lines for the panel by use of Offset command
- Trim all unwanted lines
- To draw the Handle
- Click on the layer properties
- Name < Handle
- Colour < pink set it current
- Take the rectangle command
- Specify the dimension ; length = 10mm and width = 65mm
- Press enter.
- Take line command
- Select start point < midpoint of left vertical line of rec.
- Specify next point 125mm<180
- Offset that line at 10mm at top and bottom side
- Trim the middle line
- Take arc command and select the both end corners of both lines
- Specify radius as 10mm
- Press ENTER
- Take the circle command click on the midpoint of right side v-line of rec.
- Specify the radius as 10mm
- Press ENTER.
- Take move command
- Select the object
- Specify bace point as center of radius at the left end
- Place it in the required position.
- Take B command
- Give the name < DOOR1
- Select the insertion point < at mid of base of the door
- Select the object
- Press OK.
RESULT:-
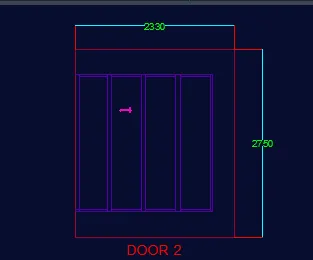
DOOR 2:-
- Set the units as Decimal – 0 precision and scale of unit as milimeter
- Click on layer properties
- Select the layers as :
- Take line command
- Specify start point randomly
- Specify next point 2330<0
- Specify next point 2750<90
- Specify next point 2330<180
- Take the line command again
- Draw the all lines for the panel by use of Offset command
- Trim all unwanted lines
- Take the copy command
- Select the handle as drawn previous
- Place it in proper position
- To create of block of DOOR2 , follow the same procedure as DOOR1
RESULT:-
DOOR 1 AND DOOR 2:-
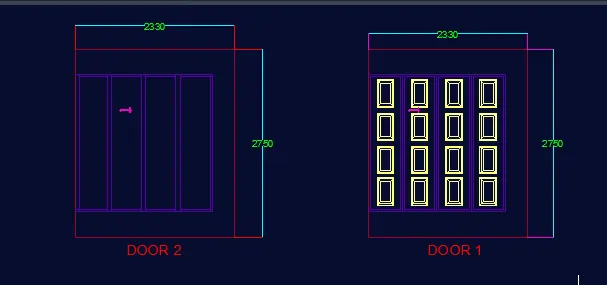
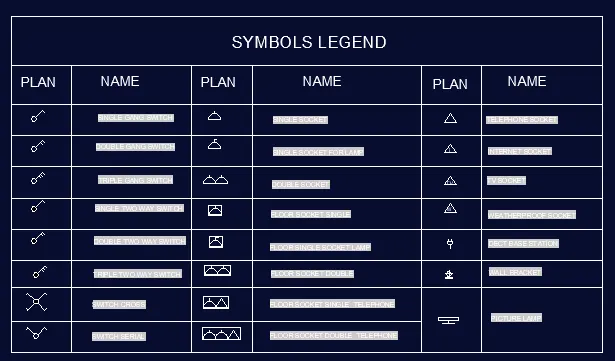
PROBLEM NO 3:- Create each symbol as a block with the name given in the legend. After creating the blocks arrange them in the legend as shown in the Figure.
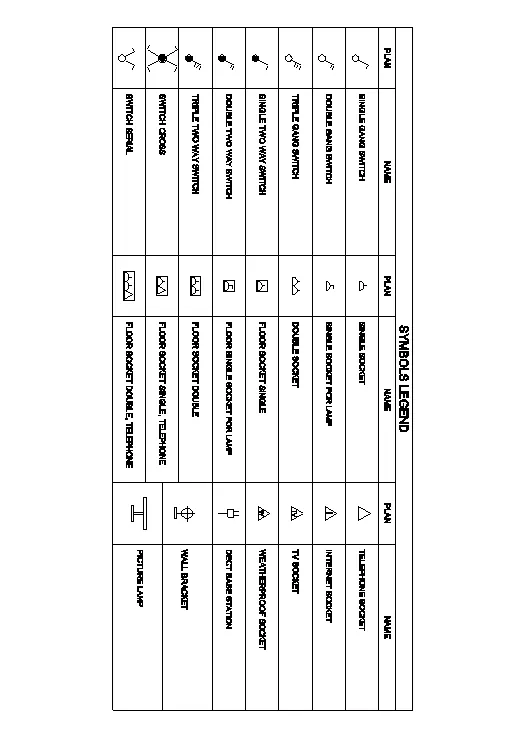
STEPWISE PROCEDURE ;-
- Set the unit mm
- Take the circle command
- Specify center point randomly
- Specify the dia <10mm
- Take line command
- Specify start point as center of circle
- Specify next point as 50<45
- Specify next point 10<-45
- Take offset command
- Select the object < 10 mm inclined line
- Trim the line remain in inside the circle
- TO set as the block
- Type B -ENTER
- Name
- Select the pick point < center of circle
- Select the object
- Press OK.
- Similarly create all the symbols given in the questions and save it as a block
- Take the line command
- Draw the table by use of line , offset , trim commands
- Take the single line text
- Specify the point
- Specify the height as 50mm for the headline as < SYMBOLS LEGEND
- Again take the single line text specify the height as 40mm
- Write all the text as shown in the table
- FOR the insertion of Names of blocks:
- Type FIELD press ENTER
- Dialog box will be open
- In the Field named
- Click on Named object
- Click on Names
- Click on Title case
- Press
- Place the name in the required position
- Similarly insert all the names
RESULT:-
PROBLEM NO 4:- Create the door type for residential building as a block. Save the name of the blocks as type. Use given dimensions or assume dimensions as per industry standards.
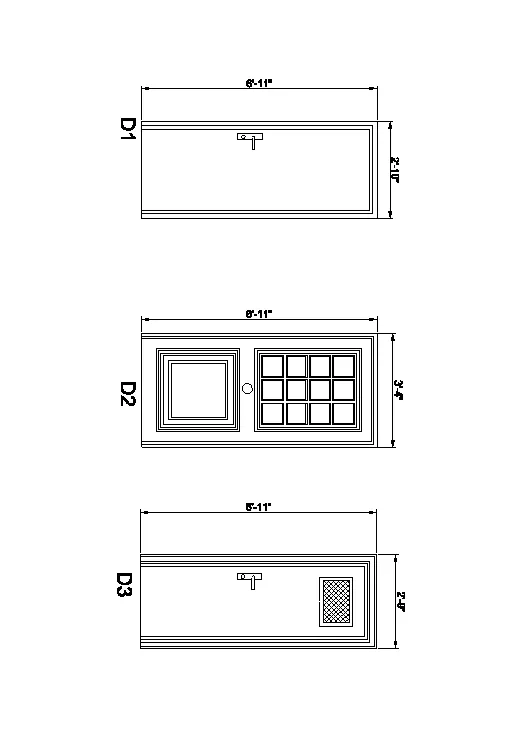
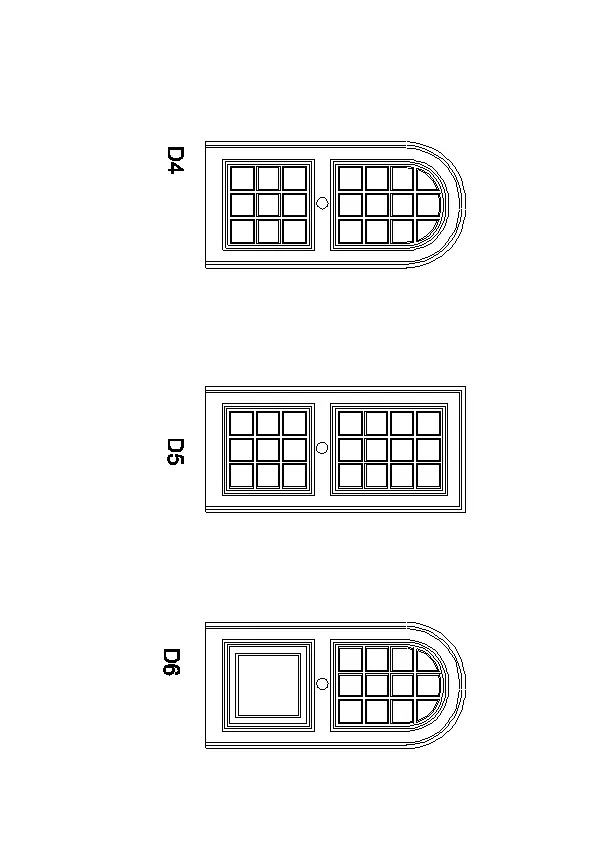
STEPWISE PROCEDURE:-
DOORS FOR THE RESIDENTIAL :-
D1:-
- Set the unit as Architectural
- Press enter
- Click on layer properties
- Set the layers as shown in below image:
- Take line command
- Specify point anywhere
- Specify the NEXT POINT 2’10’’<0
- Specify next point 6’11’’<90
- Specify next point 2’10’’<180
- Close
- Take again line command select first point at mid of top H-line
- Specify next point as 6’11’’<270
- Press ENTER
- Take offset command
- Specify distance 1’4’’
- Click on left and right of the line
- Trim the midline
- Take again offset command select the object< right side inner vertical line
- Take distance 1’’
- Click on left
- Select object
- Take distance 1’’
- Click on right
- Select object < top horizontal line
- Take distance 2’’
- Click on down
- Take distance 1’’
- Click at down
- Trim all unwanted lines
RESULT:-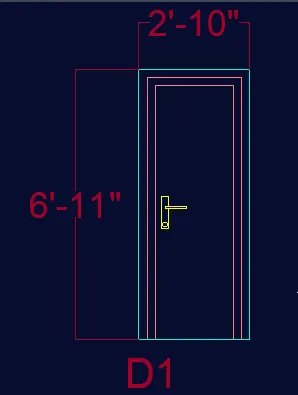
Similarlly draw the D2, D3,D4, D5, D6 and save all the doors as block with the attributes given
RESULT:-
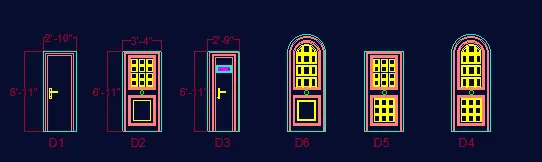
PROBLEM NO 5: Create each shape as a block as shown in the Figure. Save the block and insert them on the table as shown in the Figure.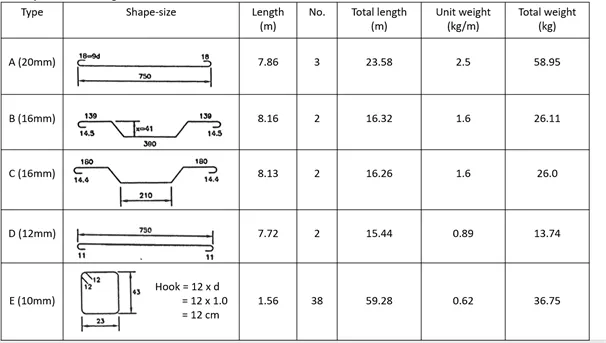
STEPWISE PROCEDURE :-
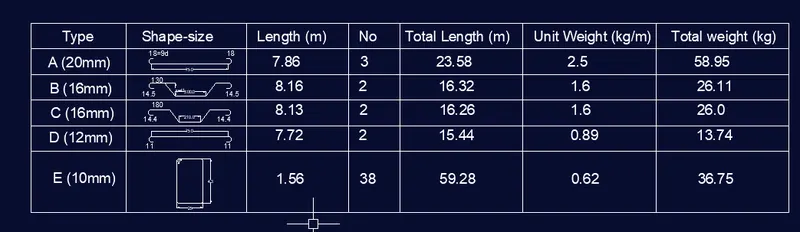
SHAPE OF BARS :
- Set the unit as decimal
- Scale of unit as milimeter
- Precision as 0
- Take line command
- Specify first point randomly
- Specify next point 18<180
- Specify next point 20<270
- Specify next point 750<0
- Specify next point 20<90
- Specify next point 18<180
- Close the command
- Take circle command
- Select the left side midpoint of vertical line specify the radius as 10mm
- Press ENTER
- Copy that circle in right side
- Trim all the part not in use
Simillary draw all the shape of bars that are given with following above procedure with the different dimension specified for the different shapes of the bars
To save the bar as BLOCK:
- Type B press enter
- Name< straight bar 20mm
- Select pick point as mid of the horizontal line
- Select the entire bar shape
- Press OK.
Simmilarly u can save all the created shape of bars as the block
- Take the line command
- Draw the table by use of line , offset command
- Trim unwanted line
- Click on text
- Single line text
- Specify the height 100mm write all the text as headlines to the columns
- Press enter
- Again give the single line text
- Give the text height as 50mm
- Write all the text ,
RESULT:-