Creating Bar Bending schedule, Different Door types, and Creation of standard drawing templates using AutoCad
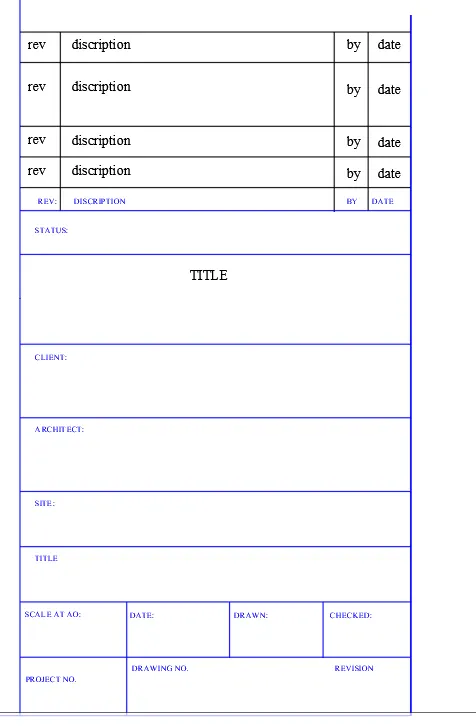
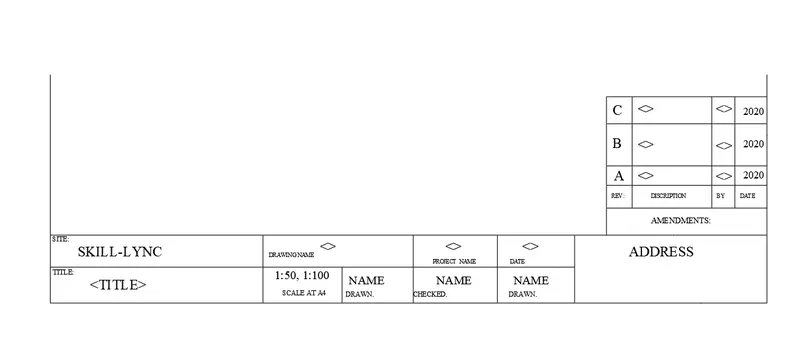
AIM - CREATE THE TAMPLETS AS SHOWN IN FIGURETAKE THE SIZE OF THE TITLE BLOCK AS PER INDUSTRY STANDARD
ANS -
PROCEDURE -
1. LAYERS - for craeting template taking two layers and giving a name is costom 1 and costom -2 for cutom 2 selecting a blue color custom -1 have also blue color but changing its line weight.
2. boxes - in according to given tamplet create box by selecting line tool and offseting lines according to its spece. and creating simmilar lines to create tamplets.
3. TEXT - for creating text inside the templet using multiline text and write text. after writing a text use scale tool to increase its size.
TEMPLATE-2
PROCEDURE -
1. LAYERS - FOR TEMPLATE 2 CREATING ONLY 1 LINE IT HAS ALSO BLACK COLOR.
2. TEXT - for creating text inside the templet using multiline text and write text. after writing a text use scale tool to increase its size.
AIM - CREATE THE DOOR TYPE FOR WAREHOUSE AS SHOWN IN FIGURE.
ANS -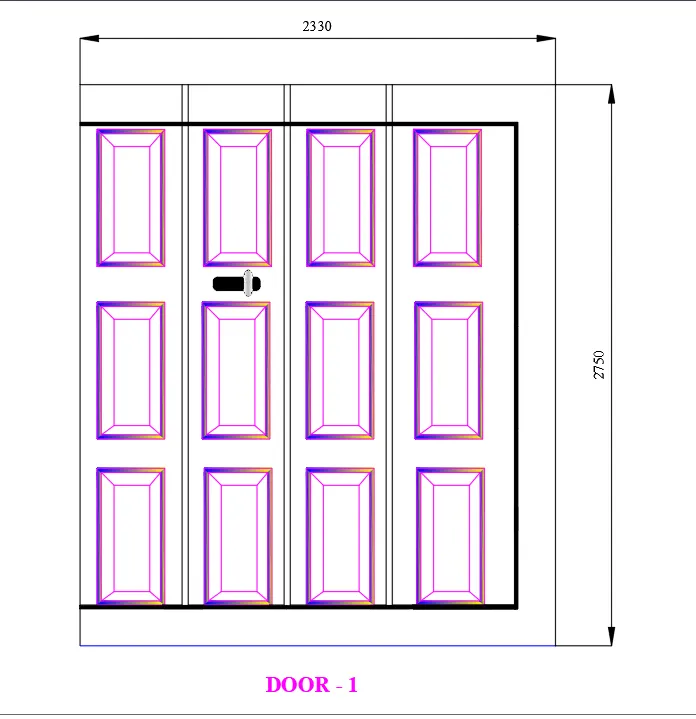
PROCEDURE -
1. LAYERS - FOR MAKING WAREHOUSE DOOR CREATYE LINE 1. FURNITURE 2. HATCH 3. ALSO HAVING A BYLAYER OF BLACK COLOR.
2. DOOR - FOR MAKING DOOR IN OUTER SIDE TAKING A LINE TOOL AND MAKE 2330 IN HORIZONTAL AND 2750 IN VERTICLE LINE AND CONNECT ALL LINE.
3. OFFSET - FOR CREATING DOOR TAKING 200 MM OFFSET FROM BOTH SIDE TOP AND BOTTOM. AFTER THAT TAKING INSIDE OFFSET FOR HATCHING IS 20 MM. IN TOP SIDE OF THE DOOR AFTER TAKING OFFSET HAVING WIDTH IS 2130 AND IT WILL BE DIVIDED INTO 4 PARTS AND TAKING OFFSET 530 MM AND OFFSETING PER LINE IN 20 MM.and also create a small rectangle inside the door and join its corner line to edge. and seting inside the door. and copying to its center of the block.
5. LOCK - FOR creating a lock who besides in the top portion the door. taking a rectangle and fillet it from providing 20mm radius and also create a small rectangle in verticle direction and also fillet it by 20mm radius.
6. TEXT - FOR TEXT USING MULTILINE TEXT. AND USING NEW ROMAN STYLE AND BOLDED TEXT.
DOOR- 2 SECTION
PROCEDURE -
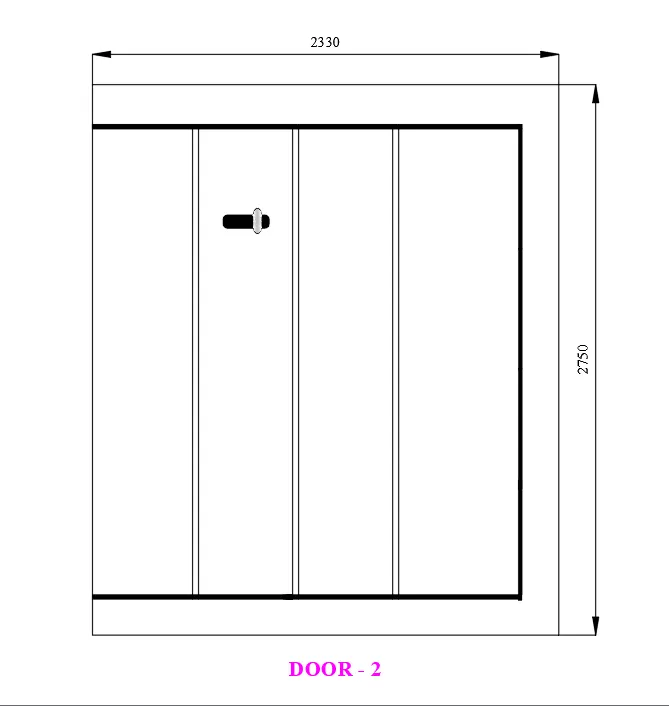
1. SECTION - For creating section of the door taking refrence from door-1. and create averticle line and making a door block.
2. DOOR - TO CREATE DOOR TAKING REFRENCE LINE FROM THE DOOR - 1 AND AND TAKE A LINE TOOL AND CREATE A HORIZONTAL LINE HAVING 2330 MM LENGTH AND 2750 IN VERTICLE DISTANCE AND MAKING A DOOR BLOCK.
3. HATCH - HATCHING IS ONLY USED IN OUTER SIDE OF THE DOOR.
4.TEXT - FOR TEXT USING MULTILINE TEXT. AND USING NEW ROMAN STYLE AND BOLDED TEXT.
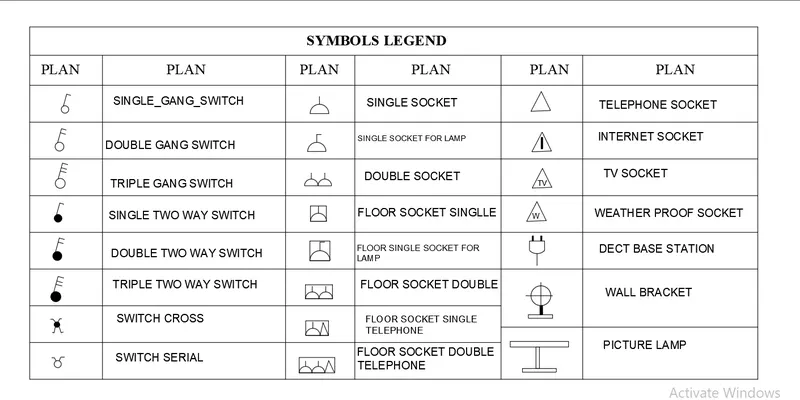
AIM - CREATE EACH SYMBOL AS A BLOCK WITH THE NAME GIVEN IN THE LEGEND. AFTER CREATING A BLOCK ARRANGE THEM IN THE LEGEND.
ANS -
PROCCEDURE -
1. LAYERS - taking one layer which is bylayer and creating all symbol.
2. TEXT - ALL TEXT WERE CREATE BY MULTILINE TEXT AND SCALE IT ACCORDING TO THERE SPACE.
- SYMBOLS -
3. SINGLE GANG SWITCH - FOR making single gang switch create a small circle and take line tool and create a small line over the circle in 45 degree and create a small line top of the line.
4. DOUBLE GANG SWITCH - FOR making double gang switch create a small circle and take line tool and create a small line over the circle in 45 degree and create a small two line top of the
5. TRIPLE GANG SWITCH - FOR making tripple gang switch create a small circle and take line tool and create a small line over the circle in 45 degree and create a small three line top of the
6. SINGLE TWO WAY SWITCH - FOR making tripple gang switch create a small circle and hatch inside the circle take line tool and create a small line over he circle in 45 degree and create a small ONE line top of the line.
7. DOUBLE TWO WAY SWITCH - FOR making tripple gang switch create a small circle and hatch inside the circle take line tool and create a small line over he circle in 45 degree and create a small two line top of the line.
8. TRIPLE TWO WAY SWITCH - FOR making tripple gang switch create a small circle and hatch inside the circle take line tool and create a small line over he circle in 45 degree and create a small three line top of the line.
9. SWITCH CROSS - for creating switch cross create a small circle. and take line tool and create a cross section line. after that creating a small line in x direction.
10. SINGLE SOCKET - FOR CREATING SINGLE SOCKET TAKING LINE TOOL AND CREATE A SMALL LINE. AFTERE THAT TAKING ARC TOOL AND CREATE A SMALL ARC OVER THE LINE. AFTER THAT TAKING LINE TOOL AND CREATE A SMALL VERTICLE IN Y DIRECTION.
11. DOUBLE SOCKET FOR LAMP - FOR CREATING SINGLE SOCKET TAKING LINE TOOL AND CREATE A SMALL LINE. AFTERE THAT TAKING ARC TOOL AND CREATE A SMALL ARC OVER THE LINE. AFTER THAT TAKING LINE TOOL AND CREATE A SMALL VERTICLE IN Y DIRECTION.
12. FLOOR SOCKET DOUBLE - FOR CREATING FLOOR SOCKET DOUBLE TAKING LINE TOOL AND CREATE A SMALL LINE. AFTER THAT TAKING ARC TOOL AND CREATE A SMALL ARC OVER THE LINE. AFTER THAT TAKING LINE TOOL AND CREATE A SMALL VERTICLE IN Y DIRECTION. AFTER THAT TAKE A RECTANGLE AND DRAW SOCKET INSIDE THE RECTANGLE.
13. FLOOR SOCKET SINGLE TELEPHONE - FOR CREATING FLOOR SOCKET SINGLE TELEPHONE TAKING LINE TOOL AND CREATE A SMALL LINE. AFTERE THAT TAKING ARC TOOL AND CREATE A SMALL ARC OVER THE LINE. AFTER THAT TAKING LINE TOOL AND CREATE A SMALL VERTICLE LINE IN Y DIRECTION. AFTER THAT TAKE LINE TOOL AND CREATE A SMALL TRANGLE AND SELECT RECTANGLE AND DRAW SOCKET INSIDE THE RECTANGLE.
14. FLOOR SOCKET DOUBLE TELEPHONE - FOR CREATING FLOOR SOCKET DOUBLE TELEPHONE TAKING LINE TOOL AND CREATE A SMALL LINE. AFTERE THAT TAKING ARC TOOL AND CREATE A SMALL ARC OVER THE LINE. AFTER THAT TAKING LINE TOOL AND CREATE A SMALL VERTICLE LINE IN Y DIRECTION.AND COPYING A OBJECT AGAIN AFTER THAT TAKE LINE TOOL AND CREATE A SMALL TRANGLE AND SELECT RECTANGLE AND DRAW SOCKET INSIDE THE RECTANGLE.
15. TELEPHONR SOCKET - FOR CREATE A TELEPHONE SOCKET TAKING LINE TOOL AND CREATE A SMALL TARNGLE.
16. INTERNET SOCKET - FOR CREATE A TELEPHONE SOCKET TAKING LINE TOOL AND CREATE A SMALL TARNGLE. AFTER THAT TAKE RECTANGLE TOOL AND CREATE A SMALL RECTANGLE INSIDE THE TYRANGLE AND HATCH IT BY BLACK SOLID COLOR.
17. TV SOCKET - FOR CREATING A TV SOCKET TAKING A LINE TOOL AND CREATE A SMALL TRANGLE. AND USE MULTILINE TEXT FOR WRITE TV INSIDE THE TRANGLE.
18. WEATHER PROOF SOCKET - FOR CREATING A TV SOCKET TAKING A LINE TOOL AND CREATE A SMALL TRANGLE. AND USE MULTILINE TEXT FOR WRITE (w) INSIDE THE TRANGLE.
19. DECT BASE STATION - FOR CREATING A DECTV BASE SATATION TAKE RECTENGLE TOOL AND CREATE A SMALL RECTANGLE TOOL AND TRIM IT IN BOTTOM SIDE AFTER THAT PROVIDE FILLET AT RADIUS 20 MM AND CRETAE A SMALL RECTANGLE TOP OF THE OBJECT AND HATCHIUNG INSIDE WITH SOLID BLACK COLOR.
20. WALL BARACKET - FOR CREATING WALL BARACKET TAKE A CIRCLE TOOL AND CREATE TWO LINE BOTH X AND Y DIRECTION AFTER THAT TAKE RACTANGLE TOOL CREATE A RECTANGLE BOTTOM OF THE CIRCLE AND ITS BASE.
21. PICTURE LAMP - FOR CREATING PICTURE LAMPTAKE RECTANGLE TOOL AND CRAETYE A RECTAGLE IN X DIRECTION AND ALSO CREATE A SAMALL THICKNESS RECTANGLE IN Y DIRECTION.
22. BLOCK - AFTER CREATING ALL SYMBOL USE COMMAND 'B' FOR BLOCK SELECT THE OBJECT SELECTING PICK POINT AND PROVIDING NAME TO THE OBJECTS. ANS SAVE IT. BY BLOCK.
23. INSERT - IN RIBBON OPEN INSERT TOOL AND OPRN FEILD OPTION SELECT OBJECT AND SELECT BY NAME AND CLICK ON THE OBJECT AND NAME IS CAME BY BLOCK AND NSERT T BY NAME.
AIM - CREATE A DOOR BLOCK FOR RESIDENTIAL BUILDING.
ANS. -
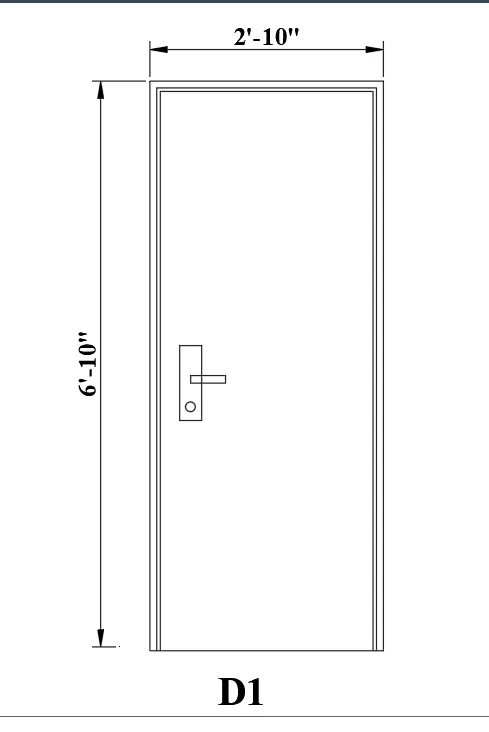
DOOR (D1)
PROCEDURE - before starting a creating object set units architectural in fit and inches.
1. LAYER - Taking by layer for making door D1.
2. DOOR - For making door using line tool and take a line 2'10" in x direction and 6'10" in y direction and make a door d1.and create a lock using rectangle tool and create a small circle inside the rectangle in bottom side.
3. OFFSET - Taking o for offset and take 1" offset fro both side and also taking from top side. after that taking .6" offset from last line.
4. TEXT - Using multiline text for door d1. and also use new roman times for multiline text from annotation pannel.
5. DIMSTYALE - Using liner dimension for door d1.
DOOR (D2)
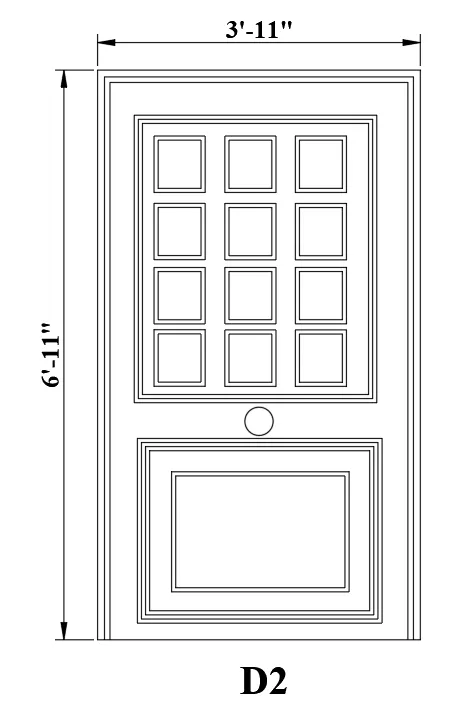
PROCEDURE - before starting a creating object set units architectural in fit and inches.
DOOR (D2)
1. LAYER - Taking by layer for making door D2.
2. DOOR - Taking line tool and create a line 3'11" in x direction and 6'11" in -y direction and make rectangle. and hatching 1" in both side also from top side and trim it extra line. after that inside the door draw a rectangle (3'6",2'11") size from the top and hatching .8" and .6" continuosly. inside the rectangle creating a 8"x7" rectangle and copying the three rectangle in x direction and four rectangle in -y direction. after providing same offset and create a small circle and create a rectangle below the circle having 2'3"x3' size and offseting it .6" in three times. after that create a rectangle inside the offset having 1'5",2'2" size and offseting the rectangle by .8"
3. TEXT - Using multiline text for door d2. and also use new roman times for multiline text from annotation pannel.
4. DIMSTYALE - Using liner dimension for door d2.
DOOR (D3)
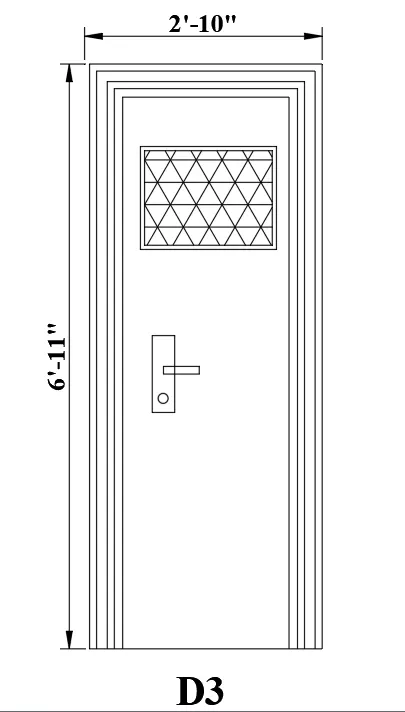
1. LAYER - Taking by layer for making door D3.
2. DOOR - For making door using line tool and take a line 2'10" in x direction and 6'11" in y direction and make a door d3. after that ofseting 1" and .6" continousely. and for mirrior or opening perpous create a rectangle and hatching inside the rectangle. and create a lock using rectangle tool and create a small circle inside the rectangle in bottom side.
3. OFFSET - Taking o for offset and take 1" offset fro both side and also taking from top side. after that taking .6" offset from last line.
4. TEXT - Using multiline text for door d3. and also use new roman times for multiline text from annotation pannel.
5. DIMSTYALE - Using liner dimension for door d3.
DOOR (D4)
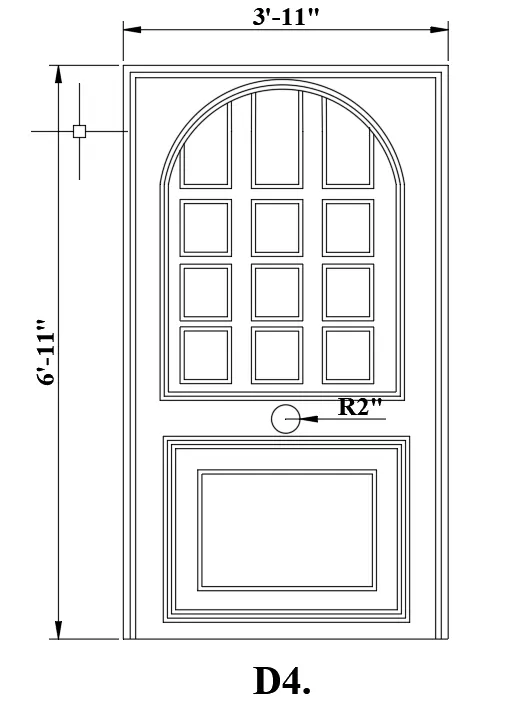
PROCEDURE - before starting a creating object set units architectural in fit and inches.
1. LAYER - Taking by layer for making door D4.
2. DOOR - Taking line tool and create a line 3'11" in x direction and 6'11" in -y direction and make rectangle. and hatching 1" in both side also from top side and trim it extra line. after that inside the door draw a rectangle (3'6",2'11") size from the top and hatching .8" and .6" continuosly. inside the rectangle creating a 8"x7" rectangle and copying the three rectangle in x direction and four rectangle in -y direction. after providing same offset and create a small circle and create a rectangle below the circle having 2'3"x3' size and offseting it .6" in three times. after that create a rectangle inside the offset having 1'5",2'2" size and offseting the rectangle by .8" after that create a arc over in to the top and and triming the extra crossing line. and also create 2" small circle between the offset.
3. TEXT - Using multiline text for door d4. and also use new roman times for multiline text from annotation pannel.
4. DIMSTYALE - Using liner dimension for door d4.
DOOR (D5)
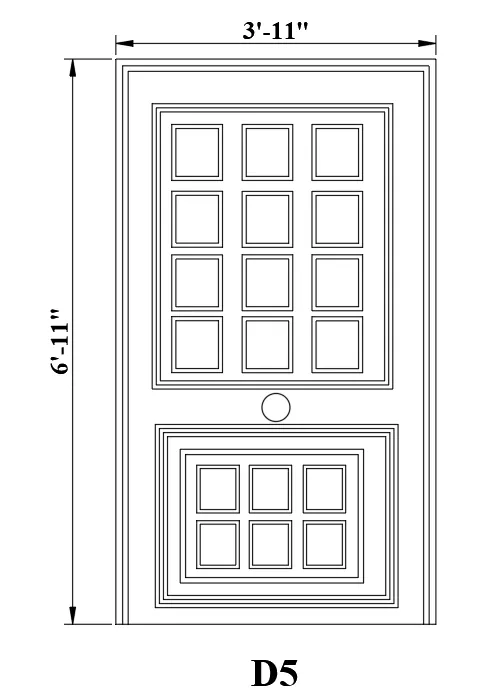
PROCEDURE - before starting a creating object set units architectural in fit and inches.
1. LAYER - Taking by layer for making door D5.
2. DOOR - Taking line tool and create a line 3'11" in x direction and 6'11" in -y direction and make rectangle. and hatching 1" in both side also from top side and trim it extra line. after that inside the door draw a rectangle (3'6",2'11") size from the top and hatching .8" and .6" continuosly. inside the rectangle creating a 8"x7" rectangle and copying the three rectangle in x direction and four rectangle in -y direction. after providing same offset and create a small circle and create a rectangle below the circle having 2'3"x3' size and offseting it .6" in three times. after that create a rectangle inside the offset having 1'5",2'2" size and offseting the rectangle by .8" after that create a arc over in to the top and and triming the extra crossing line. and also create 2" small circle between the offset. in bottom side of the door d5 create a small blocks using rectangle tool. and poffset it by .6".
3. TEXT - Using multiline text for door d5. and also use new roman times for multiline text from annotation pannel.
4. DIMSTYALE - Using liner dimension for door d5.
DOOR (D6)
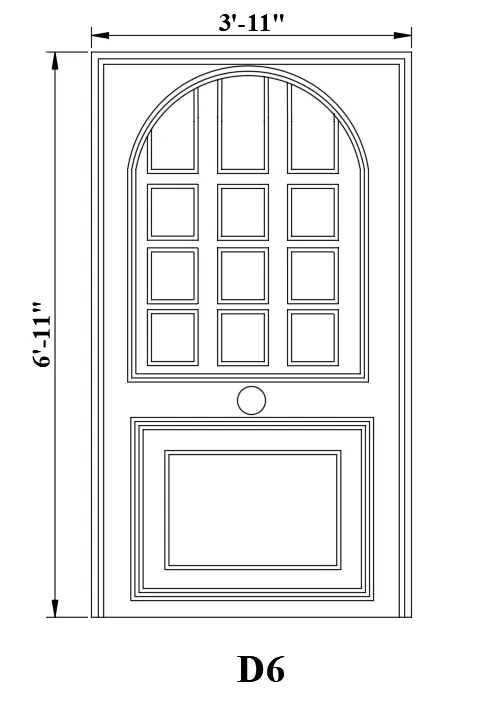
PROCEDURE - before starting a creating object set units architectural in fit and inches.
1. LAYER - Taking by layer for making door D6.
2. DOOR - Taking line tool and create a line 3'11" in x direction and 6'11" in -y direction and make rectangle. and hatching 1" in both side also from top side and trim it extra line. after that inside the door draw a rectangle (3'6",2'11") size from the top and hatching .8" and .6" continuosly. inside the rectangle creating a 8"x7" rectangle and copying the three rectangle in x direction and four rectangle in -y direction. after providing same offset and create a small circle and create a rectangle below the circle having 2'3"x3' size and offseting it .6" in three times. after that create a rectangle inside the offset having 1'5",2'2" size and offseting the rectangle by .8" after that create a arc over in to the top and and triming the extra crossing line. and also create 2" small circle between the offset.
3. TEXT - Using multiline text for door d6. and also use new roman times for multiline text from annotation pannel.
4. DIMSTYALE - Using liner dimension for door d6.
AIM - CREATE EACH SHAPE AS A BLOCK AS SHOWN IN THE FIGURE.
ANS. -
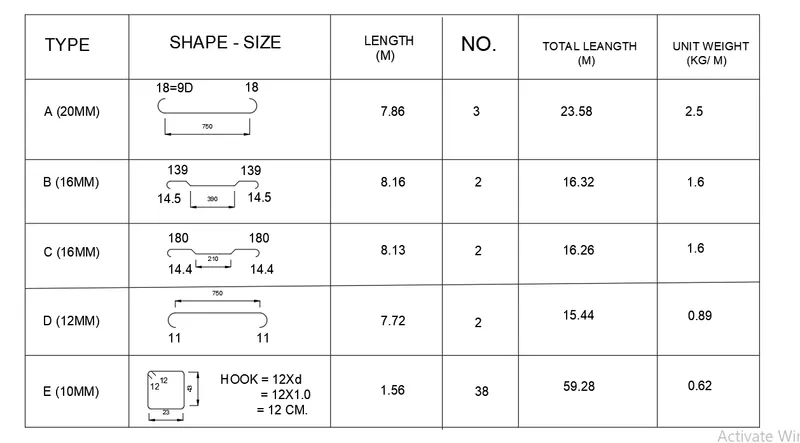
PROCEDURE -
1. LAYERS - FOR creating shape size of the bar using by layer.
2. SHAPE - FOR creating shape use layer and create a shape according to its length for providing curve use arc tool and create a arc outside the arc.
3. DIMENSION - For dimension using dimlinear tool and provide proper dimension where need.
4. TEXT - FOR text use inside the table create a text using multiline text using new roman text style.
5. TABLE - Creating table provide six block acording to its space type, shape-size, length,total leangth,unit weight,
6. BLOCK - AFTER CREATING ALL SYMBOL USE COMMAND 'B' FOR BLOCK SELECT THE OBJECT SELECTING PICK POINT AND PROVIDING NAME TO THE OBJECTS. ANS SAVE IT. BY BLOCK.
7. INSERT - IN RIBBON OPEN INSERT TOOL AND OPRN FEILD OPTION SELECT OBJECT AND SELECT BY NAME AND CLICK ON THE OBJECT AND NAME IS CAME BY BLOCK AND NSERT T BY NAME.