Creating a Wardrobe detailed drawing, Floor Plan, Kitchen Layout and Column Detail using AutoCad
Creating a Wardrobe detailed drawing, Floor Plan, Kitchen Layout and Column Detail using AutoCad
AIM:
To determine the elevation and details of a wardrobe ,floor plan, kitchen layout and column detail using autocad.
INTRODUCTION:
A collection of wearing apparel(as of one person or for one activity) a summer wardrobe, a collection of stage costumes and accessories working in the wardrobe department.
It originated from old French words warderobe, wardereube and garderobe, in which “ warder” meant “ to keep, to guard” and “ robe” meant “ garment”.
PROCEDURE:
- The column schedule are created with the help of lines, Also insert the d text command.
- It should be toolbar – insert the draw line command and draw it .
- And the strips details are make at auto cad and then insert the picture of strips .
- The column schedule is a schedule which the details of column will be collected in the construction for design purpose. The column scheduling is very important thing in column detalling.
- To create the schedule , open the schedules menu on the view tab and select the graphical column schedule tool. After the schedule is generated ,you can modify its attributes in the properties palette.
- Table graphics are automatically generated to fit the structural model column layout, and are defined in the graphical column schedule settings. The imported structural model grid and story elevation information is used to generate grid graphics and dimensions.
LIVING ROOM:
- Living room should be cluster free and it is the place where the family spends most time together .
- Living room should face East, North or North-West facing living room is also favourable.
- Heavy furniture should be kept in the west or south –west direction of the living room.
- If planning for a mirror in this room, ensure you place in the north wall.
BEDROOM:
- Never Sleep with your head in the north .
- Avoid hanging beams in the room to enjoy good health.
- Use solid wooden beds instead of hollow wrought-iron beds.
- Paint the bedroom walls in neutral or earthy shades that radiates positive energy.
- Bedrooms are the place for rest and repose and its good to have soothing wall colours for a peaceful aura
PROCEDURE:
STARTING AUTO CAD SOFTWARE,
START MENU: Auto CAD
INTERFACE OF AUTO CAD:
- File name
- Panel
- TAB
- START TAB
- Visual style control
- Viewport controls
- Command line
- Status bar
- View cube
- Navigation bar
- Drawing area
Command – Cursorsize (value)
DIMORDINATE Specific co-ordinate (x,y)
- Draw – Rectangle – view cube ( Rotate ) XYZ axis
- Relative co ordinate : choose the line command and specify the first point
- Specify the next point and more point to make the object an auto cad.
- Command : OFFSET for wall thickness =0.23m(9’’)
- Command : TRIM (TR -DOUBLE ENTER) to trim the unneccesary cut lines.
- Rooms are preferably be square or rectangle.
- Rooms should be airy, well lit, bright .
- Centre of the house should be an empty space.
- To decide the proper room dimensions as per vaastu shastra and proper required dimensions also.
- Split or separate the room with dimension controls.
- To provide proper wind flow based window access and opening access.
- To fix the size of doors and windows opening.
- To check out the utilities are where they came to decide the cupboard and necessary space for ventilating purpose.
- To separate and decide each rooms required of utilities, living room, store room. Bedroom, dining, kitchen, bathroom etc..,
- To make it an drawing where the utilities are came, proper dimensionally fixed.
Q1.Draw the elevation and details of a wardrobe as shown in the Figure below. After sketching, you need to provide the dimensions and text with the use of layers. Use proper text styles and dimension methods to document it. Also, assume dimensions, wherever needed.
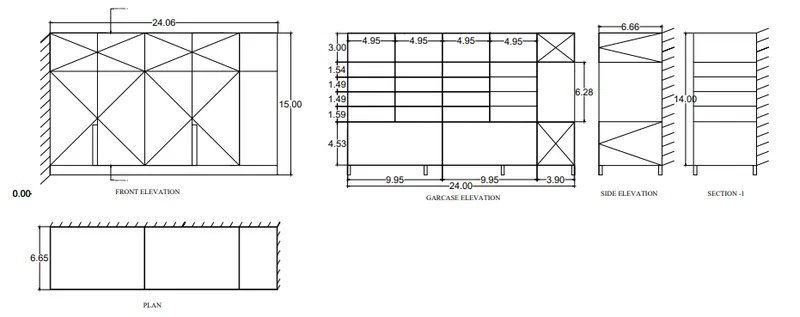
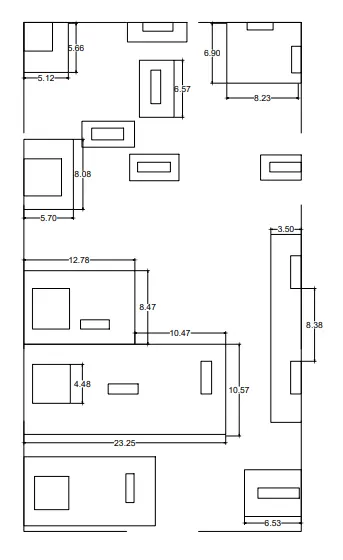
Q2. Draw the floor plan as shown in the Figure. Use the proper drafting tools to sketch the plan. Do not hatch or draw the furniture. You need to draw the floor plan with the following:
Note: You can also import the Floor_Plan.pdf into your current drawing and start working on the project. You need to scale the imported pdf file using reference option. All dimensions are in mm.
- Walls (Exterior and Interior)
Wall Thickness: Exterior Wall- 230mm, Interior Wall: 150 mm (Wherever Required)
- Doors and Windows: Assume the size of the doors and window.
2.1 Stairs: Tread-300mm, Riser-150mm
- Insert Text wherever required
- Insert the dimensions using proper dimension techniques
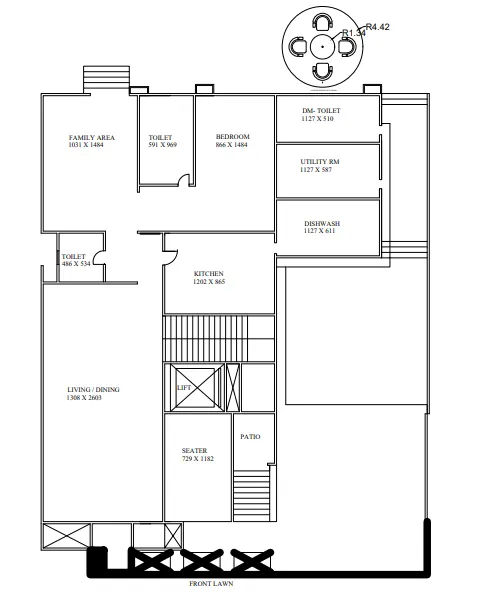
Q3. Create the Kitchen Layout as shown in the Figure below. Also, use proper dimension techniques to dimension the kitchen layout. Also, insert text wherever required. All dimensions are in mm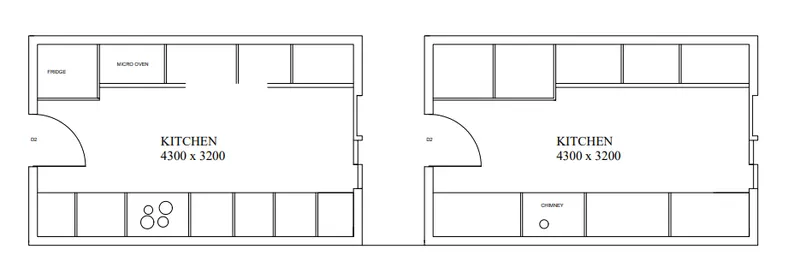
Q4. Sketch the column details as shown in Figure. Insert dimensions and text in the figure. Refer to the bar sizes from the schedule.
8mm ---- 0.31 Inches
25mm--- 1 inches
16mm—0.62 inches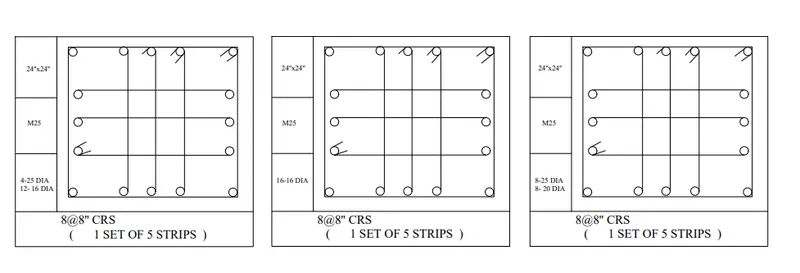
Q5. Draw the Raft Layout as shown in the Figure. Assume the column size as per your knowledge. You can take the sizes as: 24”x24”, 9” x 24”, 9” x 18”, and 9’ x 24”. You can import the raft_foundation.pdf to ensure the missing dimensions.
RESULT: To determined the elevation and details of a wardrobe ,floor plan, kitchen layout and column detail using AUTOCAD