Creating a Wardrobe detailed drawing, Floor Plan, Kitchen Layout and Column Detail using AutoCad
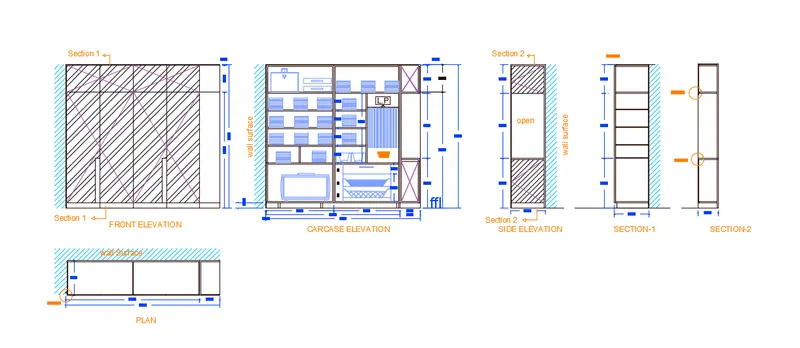
1.0. Creating Elevation, Plan of a Wardrobe.
:- First of all set the unit in Decimal system upto 3 digits of decimal.
:- Again set the layers for different works like dimension line, Text, Blocks, Panels, acesseries, etc. and provide different colors, line type, etc.
: Now witht he Help of Line and offset command draw the vertical lines at appropriate distances wit offset command.
:- Now with Line command draw Horizontal bottom Line and take offset from it as per the distances given in the figure.
:- Now trim the extra lines with 'Trim' Command.
:- Again with Line command draw blocks for clockes and drawer, suitcase, TV, and clothes, etc and trim out the extra line.
:- put the hatches as shown in the figur with 'HATCH' command.
:- Draw all the sections like front Elevation, Carcase elevation, side elevation, Section-1 and section-2, Plan in the same manner with proper Dimension.
:- Now show the dimensions of all sections and components.
:- Now give the details of section in Text with DT/MT command.
:- Finally put all the details in their respective Layers.
:- Finally a figure will be infront of us is , Wardrob Elevation and Plan.
:- Hence the Wardrob Elevation is created.
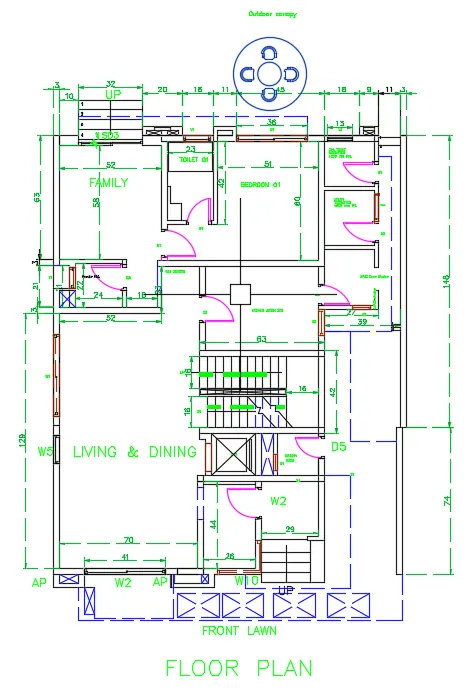
2.0 Creating Floor Plan as per the Requirement given.
:- First of all set the Units in decimal.
:- Now with Xline command draw horizontal and vertical lines and trim extra lines.
:- here with Offset and line command draw all the Rooms and walls and trim extra line with TRIM Comamnd.
:- Now draw staircase with line command and offset tool and trim extra lines.
:- Now with line, rectangle and Arc comamnd draw doors for each door.
:- With the help of Line and Offset command and Trim Command draw window at all given sections.
:- Also all Lift and Utility room are drawn with the help of line and offset comamnd and trimed extra lines.
:- Now with Circle, Arc, line, Fillet and trim command draw canopy outside the plan.
:- Now again with Line, Offset and trim command draw Srairs at doors.
:- Again with rectangle and line command creat Lawn.
:- Now create Layers for each indivisual components and put each pof them in their respective layers.
:- Now show the dimensions of each room and walls and lifts, etc.
:- Again write the texts for Room, Kitchen, Lift, Lawn, stair case, and canopy etc.
:- Write the symbols of doors and windows and show in front of each.
:- Furnitures are not shown as here it was asked not to show.
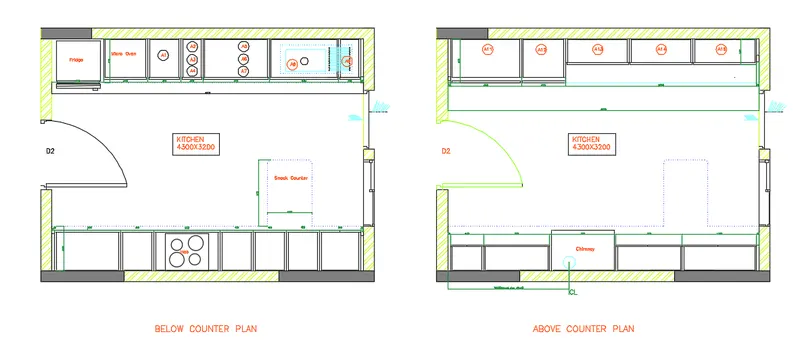
3.0. Creating the Kitchen layout as given in the figure.
:- First of all set unit in the decimal in millimeter.
:- Now take xline command and draw the Horizontal (300mm) and vertical(4300 mm) line intersecting each other at point.
:- Now trim the Extra lines.
:- Now take offset from bottom line to draw the kitchen furnitures as per the dimensions.
:- also take offset from vertical line for making boxes of given dimensionsa and panels.
:- trim the extra line with trim command and make panels and boxes as required.
:- again with line and trim command draw the refegerator.
:- Now with circle command draw circles for hob, below counter plan details and rectangle with rectangle command.
:- Again with Dt/ MT command write text of all parts of below counter plan.
:- Now with 'line', 'trim' and 'fillte' command draw wash basin and plate details.
:- give 150mm thick wall for kitchen plan all side and provide window details.
:- again with line', and 'Arch' command draw "door" of the kitchen.
:- Now provide hatching to the outer walls of the kitchen.
:- again createw layers for each components line walls, panels, door, window, text, dimension, etc. and put them into their respective layeers.
:- similarly Above counter plan is created and all details are provided.
:- Hence the finall Kitchen layout plan is ready.
4.0 Creating Column Footing Details as per the requirement.
:- First of all set he set the units in architecture with "inches"
:- Provide text heights, and Layers created for text, dimension and Reinforcements.
:- Now create rectangle with "Rectangle" command and take offset at 2" inside.
:- Now with line command divide rectangle into four equal parts in tranvers and horizontal direction.
:- Now take circle command and draw circle of diameter ", 0.62" and 0.8" for different dia fo Bars.
:- Again with Hatch command hatch the circle with solid.
:- Now copy the Circles and put inside the rectangle at intersection points, as per their places like 16 mm abr and 25 mm as per the details given in the figure.
:- Do follow the same procedure for all the three sections.
:- again with line command make rectangle around the column reinforcement, and give partitions for Column size, Grade of Cement, Reinforcement details and Texts.
:- Now give symbol at the reinforcement li "a".
:- again finall give dimension at corresponding sections and write texts and section size, concrete grade details and Reinforcement Details diameter wise.
:- Now put all them into thier layers to catogrise them.
:- Hence the Sketch of Column details is Ready.
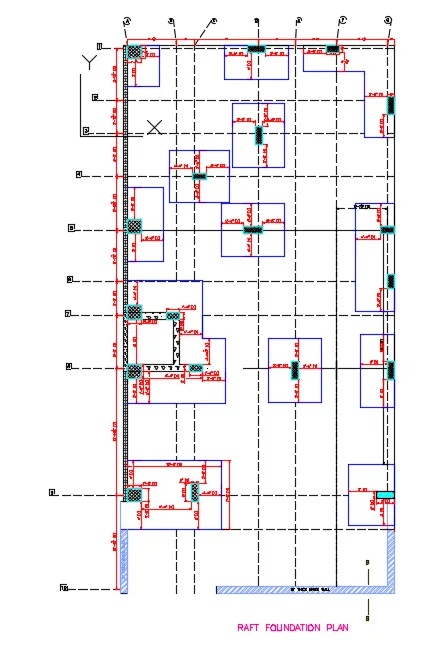
5.0 Creating Layout of the raft Foundation.
:- set units & dimension in architecture with fraction unit upto 1/2".
:- Again with xline command draw horizontal and vertical lines intersecting each other at point.
:- now trim the extra lines.
:- with "Offset" command take offset from vertical line at geven distances.
:- Similary take offset from horizontal line at give distances.
:- Now with the line command create columns of sizes, 24"X24", 24"X9", 18"X9", 18"X18" at given locations.
:- alos with line command creat footing with their respective sizes.
:- Also create the concrete walls and brick walls with lines and insert hatches for concrete and Bricks and Column sections.
:- Now with leaders provide details like A, B, C----- Upto G and numberings 1, 2, --- 9.
given dimensions for each footing and walls.
:- Give Hatches to the Brick walls and Concrete walls.
:- Create layers and put colors, line types, for hiden and wall lines.
:- Now put each components in their respective layers.
:- Hence we have created the plan of raft Foundation.