Creating a Wardrobe detailed drawing, Floor Plan, Kitchen Layout and Column Detail using AutoCad
Answer -1
Aim :
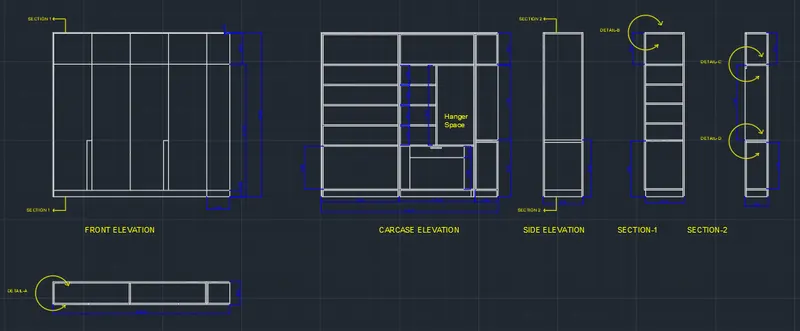
To be able to draw the elevation and details of a wardrobe and to learn to provide the dimensions and text with the use of layers using proper text styles and dimension methods to document it.
Introduction :
Generally, Interior Designer provides the drawing of wardrobe for carpenter or mason to begin with fixing plywood or marble so the drawing should be detailed and all the views of the drawing so that the design can be executed properly.
Figure :
Procedure :
- Turn on Autocad.
- Add 3 Layers separatey for Wardrobe, Dimension & Texts.
- Open Layer for Wardrobe.
- Draw the design of wardrobe with the given dimensions in the figure using Line, Offset, Trim, Extend etc commands.
- Extend the projections using Line & Extend command and draw the different views & section of the wardrobe as in the figure with the mentioned dimensions.
- Once the Different views and sections of the wardrobe is drawn, change the layer to the Dimension.
- Change the Layer color to Blue so as to separate the dimensions from the figure.
- Provide all the neccessary dimensions for the wardrobe for all the views and sections.
- Once the dimensions are provided, change the layer to the Texts.
- Change the Layer color to Yellow so as to separate the Texts from the figure.
- Provide all the neccessary texts for the wardrobe for all the views and sections.
- Use Leader to showcase the point of section.
Answer -2
Aim :
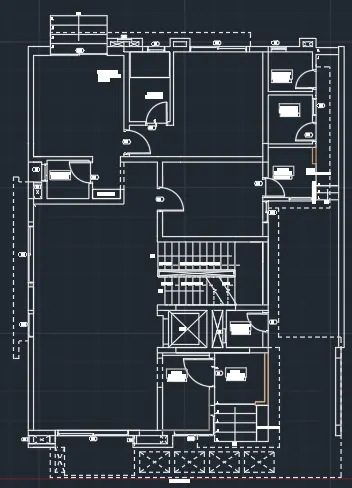
To learn to draw the floor plan as shown in the Figure using proper drafting tools of Autocad.
Introduction :
Floor plan is drawn using tools such as Line, Offset, Trim, Extend, Champher etc. Floor plan is generally used for the masonary work by the contractor.
Figure :
Procedure :
- Turn on Autocad.
- Add 4 Layers separatey for Walls, Doors/Windows, Dimension & Texts.
- Open Layer for Walls.
- Draw the lay out of walls & stairs with the given dimensions in the figure using Line, Offset, Trim, Extend etc commands.
- Change Linetype to draw outer wall of the given floor plan.
- Leave space for doors & windows.
- Change the layer to doors & windows.
- Add doors and windows as in the figure.
- Once the all doors and windows are added in the figure, change the layer to the Dimension.
- Change the Layer color so as to separate the dimensions from the figure.
- Provide all the neccessary dimensions for the figure.
- Once the dimensions are provided, change the layer to the Texts.
- Change the Layer color so as to separate the Texts from the figure.
- Provide all the neccessary texts in the figure.
Answer -3
Aim :
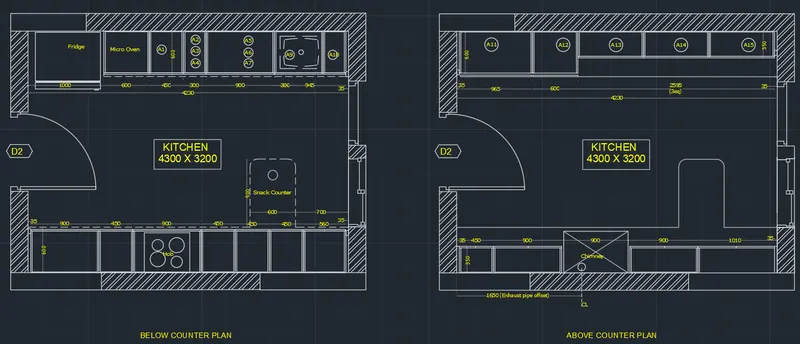
To learn to create the Kitchen Layout as in the provided Figure using proper dimension techniques to dimension the kitchen layout and to learn to insert text using Autocad.
Introduction :
Kitchen Layout is drawn using tools such as Line, Offset, Trim, Extend, Champher etc.
Figure :
Procedure :
- Turn on Autocad.
- Add 5 Layers separatey for Walls, Doors/Windows, platform, Dimension & Texts.
- Open Layer for Walls.
- Draw the lay out of walls & platform with the given dimensions in the figure using Line, Offset, Trim, Extend etc commands.
- Leave space for doors & windows.
- Change the layer to doors & windows.
- Add doors and windows as in the figure.
- Once all doors and windows are added in the figure, change the layer to the Platform.
- Change the Layer color so as to separate the platform from the figure.
- Draw the lay out of platform with the given dimensions in the figure using Line, Offset, Trim, Extend etc commands.
- Once the platform is drawn, change the layer to the dimensions.
- Change the Layer color so as to separate the dimensions from the figure.
- Provide all the neccessary dimensions for the figure.
- Once the dimensions are provided, change the layer to the Texts.
- Change the Layer color so as to separate the Texts from the figure.
- Provide all the neccessary texts in the figure.
Answer -4
Aim :
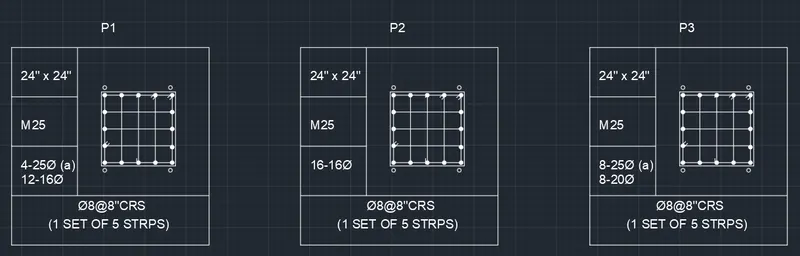
Aim of the given project is to be able to draw with all the details and understand the coumn schedule used at construction sites and comprehend the use of autocad to do so.
Introduction :
Column schedule is used on site by the contractor to estimate the quantity of concrete and steel so it is essential that all the details are self explanatory in the drawing so that the contractor or the site engineer can carry out the further work without the need to communicate with the structural consultant.
Figure :
Procedure :
- Turn on the Autocad.
- Draw the given table with the use of Line, Devide, Offset & Trim command.
- Write the given details using Dtext command.
- Copy, Move and Edit the texts as per the requirements.
- Draw the Column stirrups detail as shown in the figure using Line, Point command.
Answer -5
Aim :
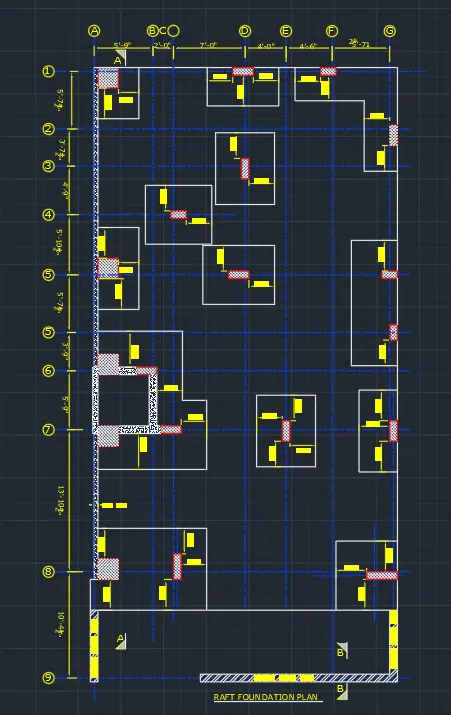
To learn to Draw the Raft Layout as in the provided Figure using proper dimension techniques to dimension the Raft Layout and to learn to insert text using Autocad.
Introduction :
Centreline Drawing is very important drawing to begin with so it is essential that the drawing is self explanatory with the required details.
Figure :
Procedure :
- Turn on Autocad.
- Add 5 Layers separatey for Rafts, Columns, Centreline, Dimension & Texts.
- Open Layer for Centreline.
- Change the Linetype for centreline.
- Change the Layer color so as to separate the centreline from the figure.
- Draw the lay out of Centreline with the given dimensions in the figure using Line, Offset, Trim, Extend etc commands.
- Change the layer to Columns.
- Change the Layer color so as to separate the Columns from the figure.
- Add Columns as in the figure.
- Once all Columns are added in the figure, change the layer to the Rafts.
- Change the Layer color so as to separate the Rafts from the figure.
- Draw the lay out of Rafts with the given dimensions in the figure using Line, Offset, Trim, Extend etc commands.
- Once the Rafts is drawn, change the layer to the dimensions.
- Change the Layer color so as to separate the dimensions from the figure.
- Provide all the neccessary dimensions for the figure.
- Once the dimensions are provided, change the layer to the Texts.
- Change the Layer color so as to separate the Texts from the figure.
- Provide all the neccessary texts in the figure.