Creating a Residence Layout, Seating plan, Toilet and Utility room plan using AutoCad
Challenge 1 :
AIM:- To sketch a residential plan using Auto CAD software .
PROCEDURE :-
. First create a new autocad file with metric settings .
. Set the limit by using LIMITS command specify the left corner point and then the right corner point and enter zoom all the press Z enter then A enter .
. Draw the construction lines by command " XL-V" for vertical and "XL-H" for horizontal .
. Now using trim command trim the left side and the top side of the construction line .
. first we draw the bedroom 1 :
. We take an offset of 9' of both the construction lines by using the offset command .
. then take a offset 11'7.5" in the horizontal direction and offset of 12' downward from the horizontal construction line
. Again give offset of 4.5" to both lines so that all thickness is created .
. Trim the extra lines .
. Now we draw the bedroom 2 :
. Now we give an offset of 11'6"from the wall of bedroom 1in the horizontal direction .
. offset this wall to 9" on the right side .
. Now using the extend command : extend the 12 ' line from bedroom 1 to this line .
. Trim off the rest of the line in horizontal and vertical direction .
. For trim command press TR and double enter .
. Now for Drawing toilet 1 :
. using the offset command : we offset 4'6" downward and then offset the 4.5" wall .
. Now we extend the left si'de wall towards the line 4'5" and the wall .
. Now from that line offset 8'3" towards +x direction and offset the wall of 4.5" .
. Trim off the extra lines using trim command .
. Now for drawing toilet 2 :
. Using extend command : extend the wall thickness of bedroom 2 to 4'6" line .
. Now using offset command : offset a distance of 8'1.5" in -x direction and also 4.5" wall thickness .
. Trim the extra lines using trim command .
. Now we are draw dinning and living room :
. Now using offset command : give offset of 11' from the wall of toilet and also the wall of 9".
. Now using the extend command : extend the left wall towards the 11' and 9" line .
. Now using fillet command : join this line and wall of toilet 2 .
. Now gives an offset of 8'7.5" to understand the partition between the dinning and living room .
. Trim off the extra lines of dinning and offset it as 4.5" .
. Now we draw the kitchen :
. using offset command : give an offset from the dinning wall 6'8" and give an offset of 9" for the wall thickness .
. extend the wall towards this line.
. Now give an offset of 11" towards + xdirection and offset the wall thickness as 9" .
. Now we draw the staircase room :
. We draw an offset of 12'6" to draw the parking and then give an offset of 9" towards inside .
. Now give an offset of 13'9.5" from the living wall in the downwards direction .
. Extend both lines towards this lined extend outer wall of kitchen so that the staircase room ids defined .
. Now we draw the staircase :
. size of thread : 1' Size of rise : 6"
. Give a wall thickness of 9" for the staircase room .
. for divinding the staircase give an offset of 3' from the front wall thickness .
. Give offset of 1' ( thread ) to draw the stair in plan view .
. Draw 9 offset as three are 9 risers for 8 steps .
. trim the lines between handdrails and gives the other side as dotted line which indicates it is 1 st floor stairs which
is not visible when viewing ground floor plan view .
. For the other side of stairs change line type to ISO dsh and mark the direction of stairs .
. Now draw the doors :
. Create the opening for respective doors using the width give in the table .
. Draw doors by creating an hinge of 0.5" from the midpoint of both the wall , then drawing a circle with one point
on the midpoint of hinge and other at the midpoint of another hinge .
. Now for the window :
. For living room take an offset of 1'3" as given in the figure .
. Using lines command draw a line of 6' from the centre of offsetted line inside the wall thickness .
. Trim all the extra line using trim command .
. Now draw kitchen slab and cupboard :
. offset a distance of 2' to make the kitchen slab .
. Draw the cupboard by creating a rectangle specifying the base point and give dimenssion as 5'X2'.
. copy this rectangle to the other bedroom .
. Now place each component in layers
. For layers creation : from layers property create new layers , create 6 layers each for wall , doors , window , kitchen
slab and cupboard , dimenssion and stairs .
. Give different colours so that it can distinguised easily .
. Now select the object and place it in indivisual layers .
Result :- The plan is drawn .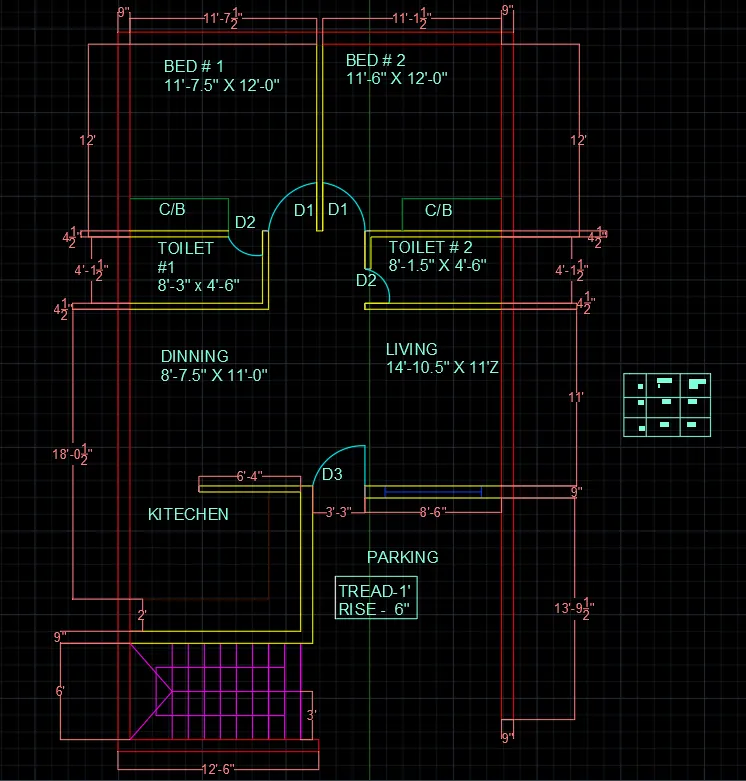
Challenge : 2
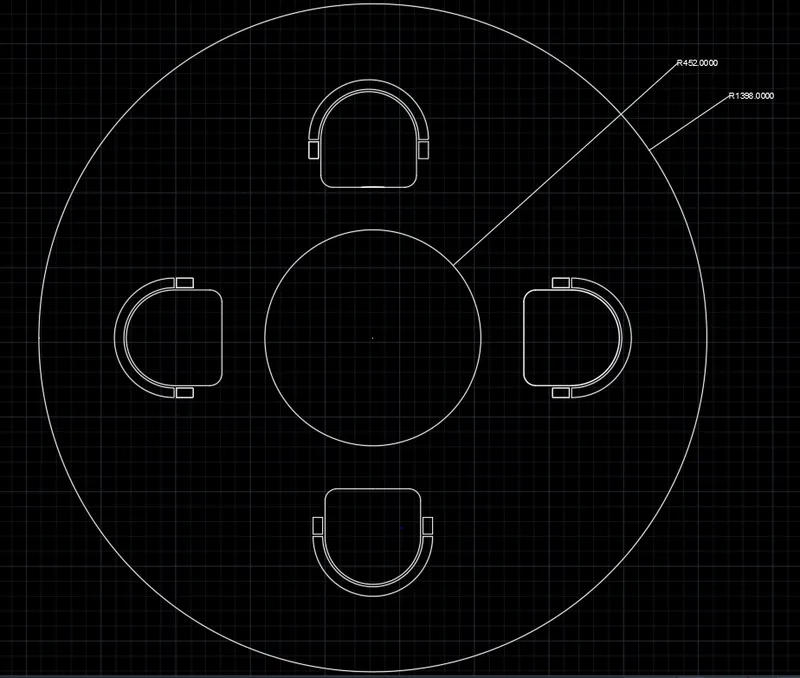
AIM :- To sketch the seating plan for an outdoor canopy .
PROCEDURE :-
. First create a new autocad file with metric settings .
. Set the limits by using LIMITS command specify the left corner point and then the right corner point and enter zoom
all the press z enter then a enter .
. Draw a circle using circle command of radius 1398 mm .
. Draw another circle with same centre of radius 452 mm .
. Draw an offset of 180 mm from inner circle .
. now draw line along the diameter of bigger circle .
. Now for drawing chairs : Draw a rectangle of length 400mm and width 200mm .
. Now draw an arc with start - centre - end with the endpoints and centre of the length of the rectangle .
. Now we give two offsets of 50mm using offset command from the arc and join the end point of the offset arc .
. Draw another rectangle of length 70mm and width 50mm using rectangle command .
. copy this rectangle to the another side using rectangle command .
. Now using fillet command fillet the corner of bigger rectangle giving fillet radius 50mmand trim the extra line .
. Now we move the chair and place it in such way that it touches the offsetted 180mmcircle and the referances
diameter line .
. using the move command : select the base point and move to the required place .
. Using mirror command : mirror the chair to the opposite side by selecting base point .
. Now using rotate command : rotate the chair and move it to the left side by selecting the base point .
. again mirroring it to create the chair in the right side .
. Now dimenssion the circle and trim off extra lines .
RESULT : The geometry id Drawn .
Challenge 3 :
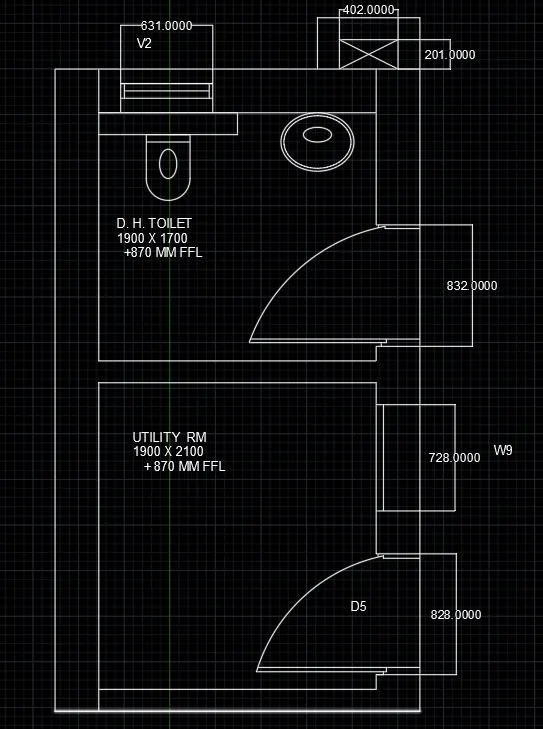
AIM :- To sketch the part plan for the toillers and Utilities room .
PROCEDURE :-
. First create a new autocad file with metric settings .
. Set the limits by using LIMITS command specify the left corner point and the then the right corner point and enter
zoom all press z enter and a enter .
. Draw the constrcuction lines by command "XL-V" for vertical and "XL-H" for horizontal .
. Now using trim command trim the left side and bottom side of the construction line .
. First we draw the utility room :
. draw an offset 300mm from the left side of vertical construction line and an offset of 150mm from the bottom
construction line .
. Now draw an offset of 2100mm upward and offset of 1900m towards the right side and give the wall thckness as
150mm.
. Now we Draw the DH toilet :
. Draw an offset of 1700mm upward and wall thickness of 300mm using offset command .
. Trim the extra lines using the trim command .
. Now we drawn the doors : for the utility room take offset distance from the wall and then give an offset of 828mm .
. Trim the extra lines and the opening is created .
. Now we create the doors : create a hinge of 25mm and then draw a circle to midpoint of other side of wall .
. Trim the extra circle to form an arc .
. Now we drwan the window of 728mm in the utility room and ventilator of 631mm in the toilet room .
. draw the duct behind the toilet by offsetting 201mm and 150mm wall thickness upward .
. Now extended the wall of toilet towards it and offset 402mm ,again offset wall thickness as 150mm.
. Now dimenssion th lines and trim off extra lines .
RESULT :- The geometry is drwan