Creating a Residence Layout, Seating plan, Toilet and Utility room plan using AutoCad
AIM : To create a residence layout, Seating plan, Toilet and Utility room plan using AutoCad
Introduction and Prerequisite :
- Open autocad application
- Type Qnew and open new drawing
- Set units according to drawing
- Switch on object snap and object snap modes : Endpoint, Midpoint, Center, Nearest, Intersection, Perpendicular and Node
- Ortho mode is ON
Problem 1:
Aim : To create a residential layout using AutoCad
Procedure :
- Set units to engineering and precision to 0'-0.0"
- Set dimstyle units to engineering and precision to 0'-0.0"
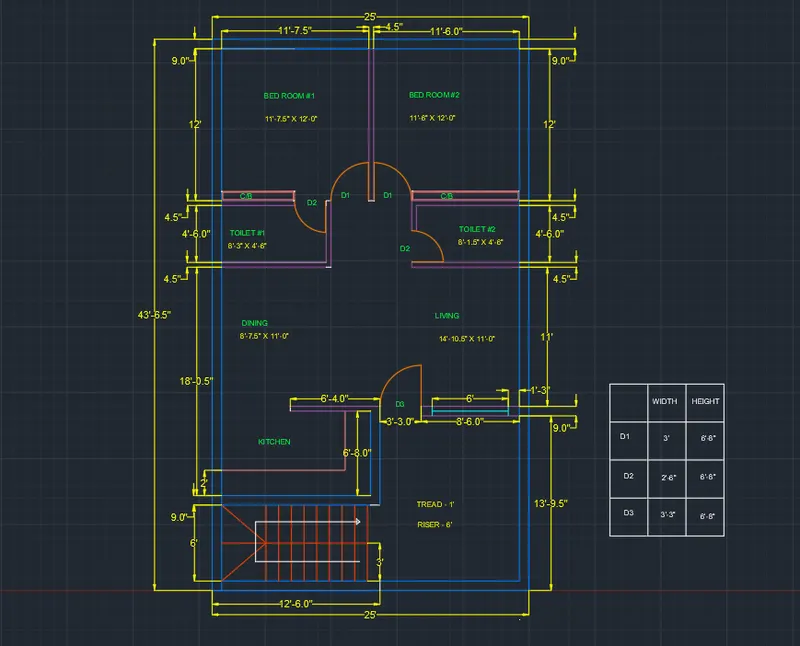
- Draw a line of length 43'6.5" vertically from origin and create an offset of distance 9" to it
- Similarly draw a line of length 25' horizontally from origin and create an offset of distance 9" to it
- Draw a line 12'6" horizontally and from that take an offset at a distance 6'
- Again draw a line using offset at a distance 9" from the last line
- Now create L shape 6'8" (thickness 9") and 6'4" (thickness 4.5")
- After that draw L shape kitchen slab with thickness 2'
- Draw stair case of riser 6' and tread 1' using offset tool at the entrance of layout
- Draw a line at point 9",25'6.5" of length 8'3" and draw offset line at a distance 4.5"
- Another line is drawn vertical to previous line of length 4'6" and thickness 4.5"
- Door D2 is drawn using arc and width of door is 2'6" with a gap of 0.5" between wall and door
- Internal wall is drawn by continuing from door and extended to exterior wall so that to get a toilet room #1
- After that cupboard is drawn 5'7" X 7" with thickness 1"
- Draw a line of 25' horizontally from the end of line 43'6.5"
- Create an offset line of distance 9" from previous line
- Draw internal wall of thickness 4.5" and length 12' vertically downward at distance 11'7.5" measured internally from left side to get two rooms of size 11'7.5" x 12' and 11'6" x 12'
- Draw two doors D2 using arc and width of doors is 3' with gap of 0.5" is between wall and door
- From the end of 25' line draw a line of 43'6.5" vertically downwards and create offset line of thickness 9" towards inside
- Toilet #2 is drawn (at a distance of 12'9" from top) of size 8'1.5" x 4'6" with thickness of 4.5"
- Door D2 for toilet #2 is drawn using arc and width of door is 2'6" with a gap of 0.5" between wall and door
- Draw cupboard beside toilet #2 of size 5'7" X 7" with thickness 1"
- Draw a wall of thickness 4.5" and length of 8'6" (towards left) at a distance of 13'9.5" from the end of first 25' line
- Inside wall draw a window of length 6' at a distance of 1'3" from the exterior wall
- After that draw a door D3 using arc and width of doors is 3'3" with gap of 0.5" is between wall and door
- Using trim tool, trimoff the unnecessary lines
- Using text command mention living, dining, kitchen, bedrooms, toilets, door numbers, window numbers and staircase along with its dimensions
- Draw a table mentioning doors dimensions
- Using dimlinear mark the dimensions according to diagram
- Now create various layers such as doors, windows, internal walls, external walls, text, dimension, furniture and staircase and assign them accordingly with various colours.
Result :
Problem 2
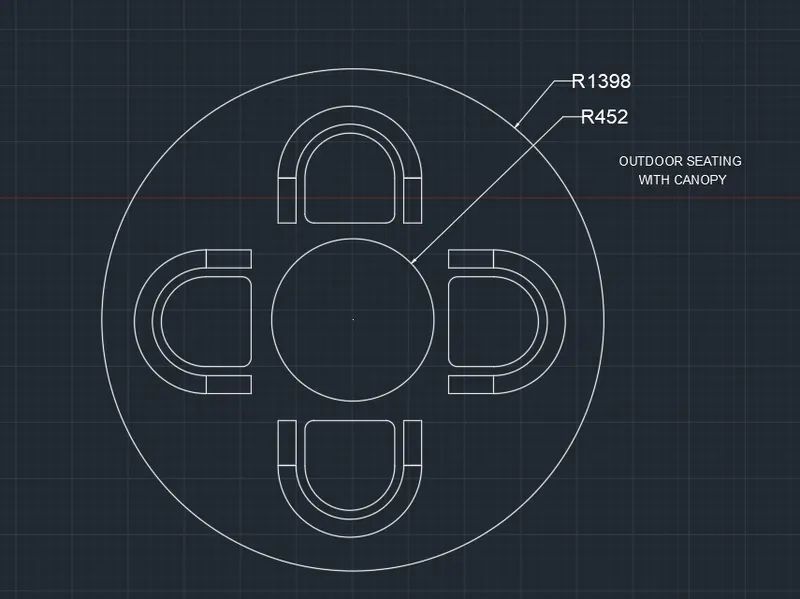
Aim : To create outdoor seating with canopy using AutoCad
(Some dimensions are assumed)
Procedure :
- Set units to decimal, scale as mm and precision to 0
- Set dimstyle units to decimal and precision to 0
- Draw a circle of radius 452 and 1398 taking origin as a center
- Draw a line of length 800mm vertically, horizontally, leftward and rightward from origin
- Draw a 4 sided polygon (circumscribed) with radius 250mm by taking center as end of 800 mm line which is drawn vertically
- Draw a midline horizontally to the rectangle
- Now draw an arc by taking midline of rectangle as start center and end
- Draw fillets of radius 50mm at bottom of rectangle
- Trim off the extra rectangle shape and midline of rectangle
- Now create an arc by taking offset of previous arc at a distance 50
- Similarly create another arc by taking offset of previous arc at a distance 100
- Draw rectangles on both sides of the arch of size 100 x 200
- Mirror the seating exactly below the origin
- Draw another 4 sided polygon (circumscribed) with radius 250mm by taking center as end of 800 mm line which is drawn leftside of origin
- Draw a midline horizontally to the rectangle
- Now draw an arc by taking midline of rectangle as start center and end
- Draw fillets of radius 50mm at bottom of rectangle
- Trim off the extra rectangle shape and midline of rectangle
- Now create an arc by taking offset of previous arc at a distance 50
- Similarly create another arc by taking offset of previous arc at a distance 100
- Draw rectangles on both sides of the arch of size 100 x 200
- Mirror the seating exactly on right side of the origin (that is on positive X axis)
- Erase 800 mm lines
- Using dimradius mark the dimensions
Result :
Problem 3
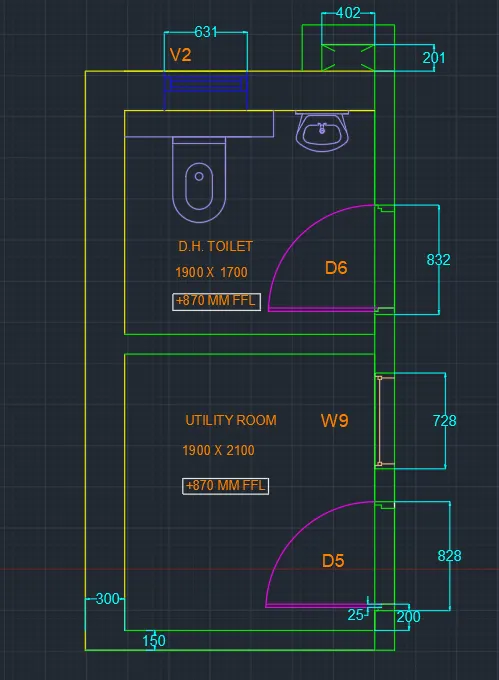
Aim : To create toilet room and utilities room using AutoCad
(Some dimensions are assumed)
Procedure :
- Set units to decimal, scale as mm and precision to 0
- Set dimstyle units to decimal and precision to 0
- Draw a line of 4400mm vertically from origin and create offset of that line with distance as 300mm (inward)
- Draw a line of 2350mm toward rightside from origin and create offset of that line with distance as 150mm (inward)
- Draw a line of 4400mm vertically (at point 2350,0) and create offset of that line with distance as 150mm (inward)
- Draw a line of 2350mm (at point 0,4400) and create offset of that line with distance as 150mm (inward)
- Now draw a internal wall off 150 X 200 mm (at point 2350,150)
- Then take offset of distance of 25 downward for 2 times
- Trim off to create L shape (2 times)
- Now draw door of length 828mm from first L shape as base (25mm)
- Draw a line of length 828mm vertically (at a point 2350,300)
- Take offset of 828mm line of distance 150mm
- Draw a horizontal line of 150mm and then 25mm downward (1st)
- From there continue drawing a line of 100mm and then again 25mm downward
- End the line perpendicular to internal wall
- Now draw an arc connecting end of door to 25mm line (1st)
- Draw a window of opening 728mm (at a point 2350,1378)
- Draw a internal wall of thickness 150mm (at a point 300, 2250)
- Draw a line of length 832mm vertically (at a point 2350,2550)
- Now draw similar door (length of 832mm and thickness 25mm) and internal walls as before
- Complete the walls by joining on
- Draw sanitary ware of any assumed dimensions which is fit to the toilet room
- Draw ventilator of opening 631mm at top of the layout
- Draw a rectangle of 402 x 201 at top right of the layout and create an offset of it with distance 150
- Using text command mention toilet room, utility room, door numbers, window numbers and ventilator number along with its dimensions
- Trom off the unnecessary lines
- Using dimlinear mark the dimensions according to diagram
- Now create various layers such as door, window, ventilator, text, dimension, internal walls, external walls and sanitary ware number assign them accordingly with various colours.
Result :