Creating a Residence Layout, Seating plan, Toilet and Utility room plan using AutoCad
-
. Residence Plan:
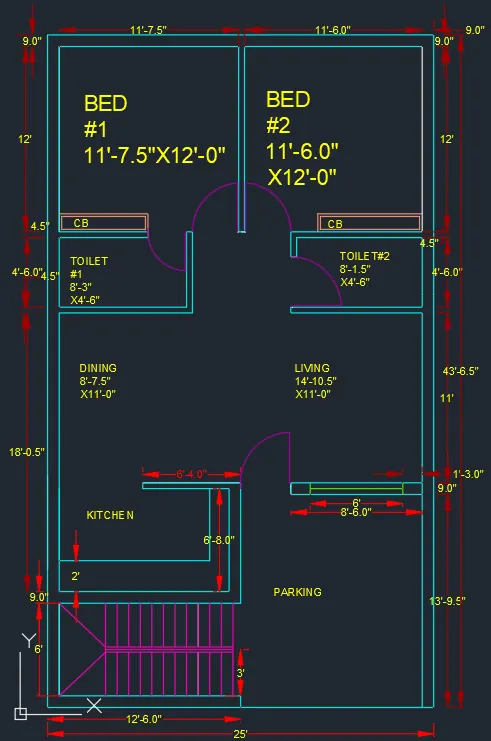
Sketch the layout of a residence as shown in the Figure 1. Consider all dimensions as reference to sketch the unit plan. Also the text in the layout are only for reference. Assume the missing dimensions. Also, refer the schedule for size of the doors
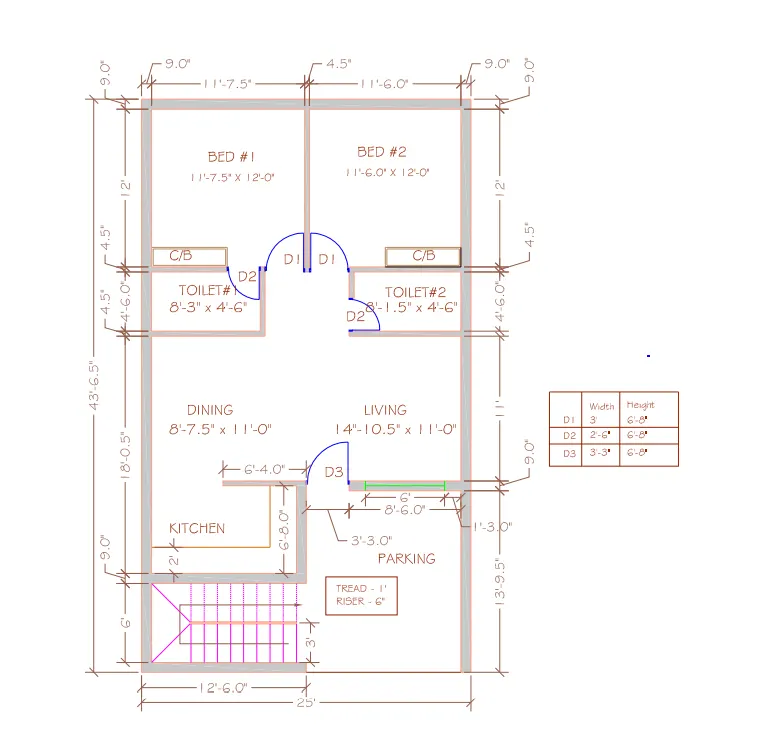
- SOFTAWARE USED : AUTODESK AUTOCAD 2021
- PROCEDURE :
- start the autocad software
- command : QNEW
- select the :IMPERIAL TEMPLATE
- Click on ADVANCE SETUP
- UNITS :ENGINEERING , PRECISION :0'-0-0"
- angle : DECIMAL DEGREE
- ANGLE MEASURE :EAST
- ANGLE MEASURE :CLOCKWISE
- SELECT AREA
- AND FINISHED IT
- command :LIMMX >70',70'
- command :LIMITS >0',0>UPPER RIGHT CORNER>70',70'
- command : Z ( zoom ) command all
- command :XL
- type v and mark vertical line
- press :ENTER
- COMMAND : XL
- type h and mark horizontal line
- command : O (for ofset )
- distance :9"
- give the ofset at both horizontal and vertical line
- command :o (for ofset)
- distance :6'
- select horizontal line
- and mark the ofset line at a distance of 6'
- command :o (for ofset )
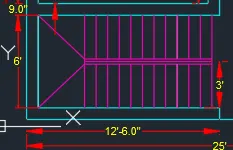
- distance :12'-6.0"
- select vertical line and mark line
- command :o (for ofset )
- distance :3'
- select the horizontal line
- and mark ofset line at a distance of 3'
- command : o (for ofset )
- distance :0.5"
- and mark 2 ofset line
- press :ENTER
- command :o ( for ofset )
- distance :9"
- select :MULTIPLE OPTION
- and give the 12 steps at a disttance of 9"
- command :TR (triem )
- triam the unessensial part
- command : o (for ofset )
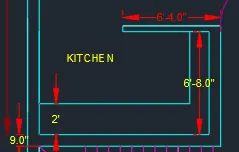
- distance :6'-8.0"
- select the horizontal line
- mark line at a distance of 6'-8.0"
- command :o (for ofset )
- distance :4.5"
- select line and mark ofset line at a distance of 4.5"
- command :o
- distance :12'-6.0"
- select vertical line and mark vertical line at a distance of 12'-6.0"
- command :o
- distance :2"
- mark horizontal and vertical ofset line at a distnce of 2'
- command :0
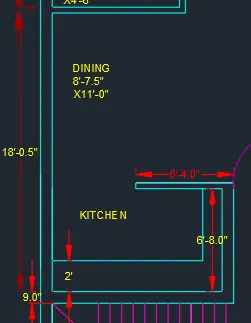
- distance :6'-4.0"
- mark ofset line at a distance of 6'-4.0"
- command TR (triam )
- triam the unrequired part .
- command :o
- distance :18'-0.5"
- select line
- and mark the vertical ofset line at adistance of 18;-0.5"
- command :o
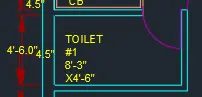
- distance :8'-3"
- select vertical line and mark the ofset line at a distance of 8'-3"
- again
- command :o
- distance 4.5"
- and mark line
- command : o
- distance :4'-6.0"
- select horizontal line
- and ofset line at a distance of 4'-6.0"
- command :o
- distance :4.5"
- mark line
- again command :o
- distance :2'-6" for door
- select the vertical line
- and mark ofset line at a distance of 2'-6"
- command :TR (for triam )
- triam the unrequired part
- command :o
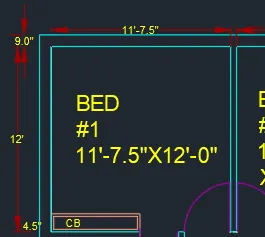
- distance :12'
- select horizontal line and mark 12' ofset line
- again
- command :o
- distance :0.9"
- mark ofset line
- command :o
- distance :11'-7.5"
- mark line at a distance of 11'-7.5"
- command :o
- distance :4.5"
- mark line at a distancre 4.5"
- command : F (filite )
- and join the line
- care should be taken filite radius is 0
- command :o
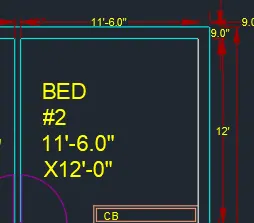
- distance :11'-6.0"
- mark hirizontal line at adistance of 11'-6.0"
- command :0
- distance :0.9"
- and matk line
- command :o
- distance 12'-0"
- and mark vertical line
- command :F (filite )
- and join the internal and external line of a wall
- care should be taken filite radius is 0
- command :0
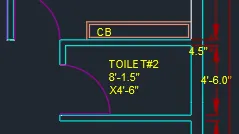
- distance :8'-1.5"
- mark horizontal line at a distance of 8'-1.5" distance
- command :o (for ofset )
- distance :4.5"
- select the line and mark the horizontal line distance of 4.5"
- again
- command :o
- distance :4'-6"
- command :0
- distance :4.5"
- command :TR (for triam )
- command : F (filite )
- join the external wall
- command :o
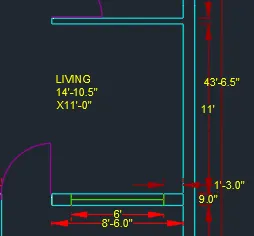
- distance :11'
- mark outer wall at a distance of 11'
- command :o
- distance :9"
- command :o
- distance :8'-6.0"
- commnad :o
- distance :9"
- and mark it
- command :o
- distance :1'-3"
- mark vertical ofset line at a distance of 1'-3"
- command :0
- distance :6'
- command :TR (triam )
- triam the unrequired lines
- command :o
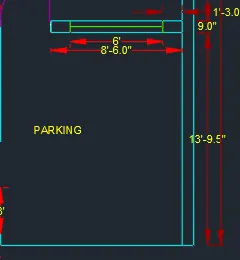
- distance :13'-9.5"
- mark verticel line at a distance of 13'-9.5"
- command :o
- distance :9"
- and mark it
- command :DIM (for dimensition )
- give the all dimension to all component of a building
- command :L
- create hinged of the door
- hinged dimension :1',0.5"
- command :C (for circle )
- starting point :center point of hinged and another point is other size of door
- command : EXTEND
- extend the line of hingerd
- commnd :TR ( triam )
- triam the unrequired part of a circle
- in this way all doors are created
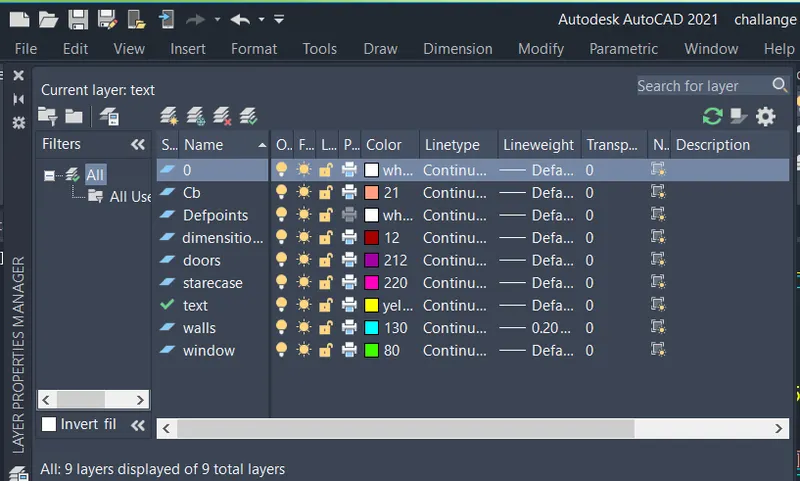
- then go to the layer propertices
- and create the new layers
- the layers are given below
- RESULTS :
- COMMAND USED :
- START THE DRAWING :QNEW
- UNITS :UN
- LIMITS :LIMAX
- OFSET : O
- FILITE :F
- TRIAM :TR
- CIRCLE :C
- DIMENSION :DIM
-
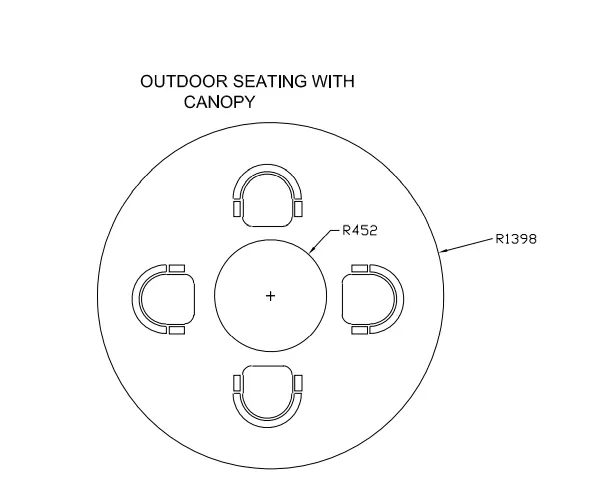
2. Sketch the seating plan for an outdoor canopy. Assume the dimensions for the seating. Also, consider the dimensions in mm.
- SOFTWARE USED : AUTODESK AUTOCAD 2021
- PROCEDURE :
- start the autocad software
- command : QNEW
- select the :IMPERIAL TEMPLATE
- Click on ADVANCE SETUP
- UNITS :DECIMAL , PRECISION :0.0
- angle : DECIMAL DEGREE
- ANGLE MEASURE :EAST
- ANGLE MEASURE :CLOCKWISE
- SELECT AREA
- AND FINISHED IT
- command : UN ( for units )
- units :mm , precision :0.0
- command :LIMMAX >100,100
- command :Z ( for zoom )
- Type : A FOR ALL
- press : ENTER
- command : C ( for circle )
- mode : circle , radius
- select starting point ,
- give radius :452
- again ,
- command : C ( for cirlce )
- mode : circle ,radius
- starting point : midpoint of inner circle
- radius :1398
- press : ENTER
- command : REC ( for rectangle )
- select starting point
- click on DIMENSION
- length :662.3
- width :298
- press :ENTER
- commad : F (filite )
- click on radius
- radius :100
- select the two line and give the filite at a radius of 100
- command : c ( for circle )
- mode : 2 point circle
- click on the endpoint of top horizontal line
- and mark the circle
- command : TR ( for triam )
- triam the extra portion
- comamnd : c ( for circle )
- mode : circle ,diameter
- click on midpoint of topline of rectangle
- diameter :719
- again
- command :C ( for circle )
- starting point : midpoint of top horizontal line
- diameter : 777.2
- mark a circle :
- command : TR ( for triam )
- triam the extra and half circle
- then
- command : F ( filite )
- mode :blend curves
- and give the filite
- command : REC ( rectangle )
- click on DIMENSION
- lenght :155.2
- width :27.3
- use the copy and rotate the command
- place this rectangle below the filite
- again
- select the object and rotate and place the iner size of large circle
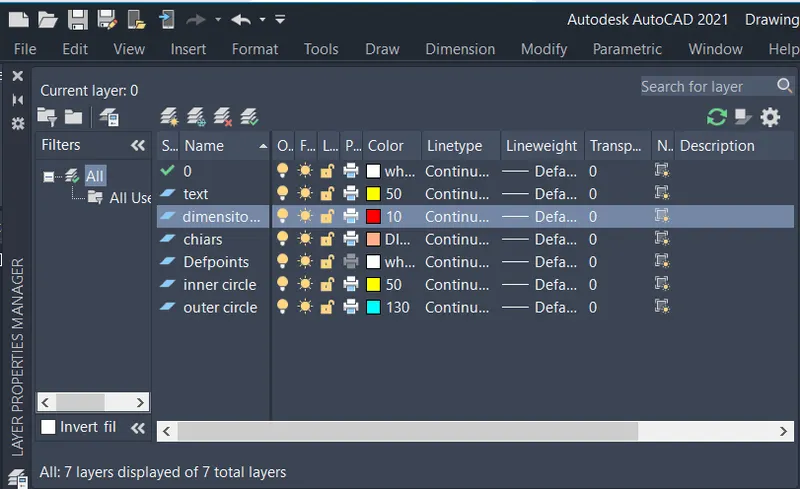
- go to layer properties
- and create the layers
- the layers are given below
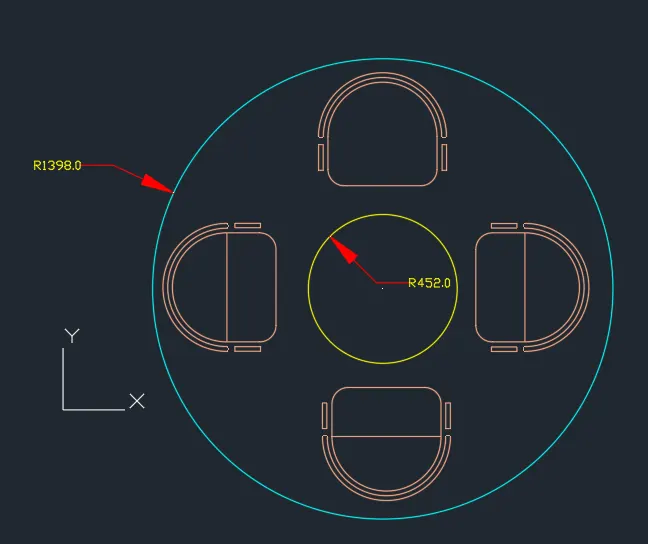
- RESULTS :
- COMMAND USED IN PROJECTS :
- START THE DRAWING :QNEW
- CIRCLE : C
- RECTANGLE : REC
- TRIAM : TR
- FILITE : F
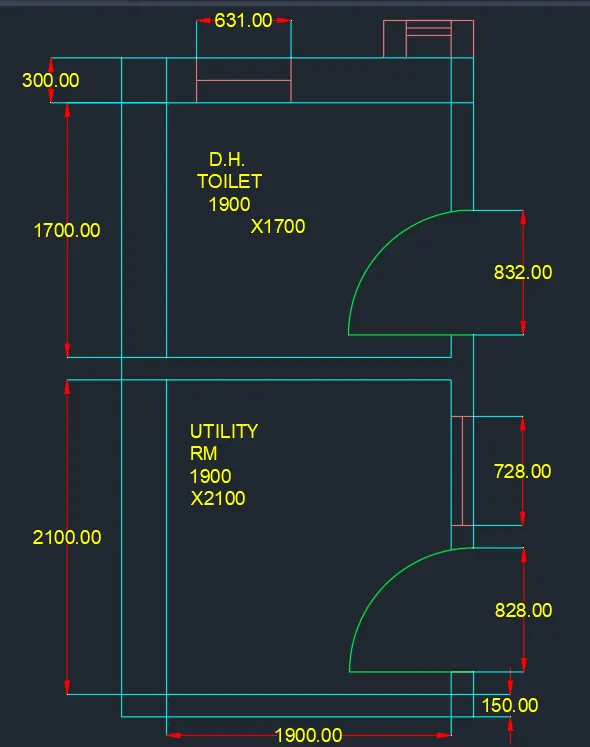
- 3. Sketch the part plan for the toilers and utilities room. Consider the outer wall thickness as 300mm and inner wall thickness as 150mm. Also, assume the missing dimension, Texts, dimensions, and hatches are only for references. Also, symbols for toilets and w/c are also for references.
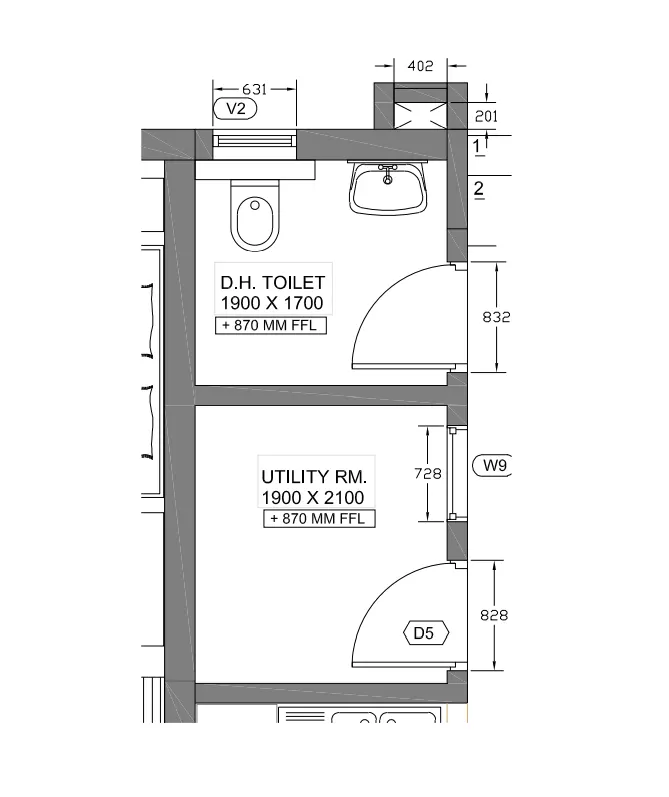
- SOFTWARE USED : AUTODESK AUTOCAD 2021
- PROCEDURE :
- start the autocad software
- command : QNEW
- select the :IMPERIAL TEMPLATE
- Click on ADVANCE SETUP
- UNITS :DECIMAL , PRECISION :0.0
- angle : DECIMAL DEGREE
- ANGLE MEASURE :EAST
- ANGLE MEASURE :CLOCKWISE
- SELECT AREA
- AND FINISHED IT
- command : UN ( for units )
- units :mm , precision :0.0
- command :LIMMAX >100,100
- command :Z ( for zoom )
- Type : A FOR ALL
- press : ENTER
- command : XL
- mark vertical line
- press : ENTER
- command : XL
- Mark horizontal line
- press: ENTER
- command : o (ofset )
- distance :300
- select line and mark vertical ofset line
- commnad : o ( for ofset )
- distance :150
- mark horizontal ofset line at a distance of 150
- commnad : 0 ( for ofset )
- distance :2100
- mark horizontal ofset line at a distance of 2100
- commnad : o ( for ofset)
- distance :150
- mark horizontal line at a distance of 150
- command : 0 ( for ofset )
- distance : 1900
- mark vertical line at a distance of 1900
- command : o ( for ofset )
- distance :150
- command : TR (for triam )
- triam unrequried line
- command :0 ( for ofset)
- distance :150
- mark horizintal line
- command :o ( for ofset )
- distance :828
- mark horizontal line
- command : TR ( for triam )
- and draw the door
- command :o ( for ofset )
- distance :150
- mark horizontal line
- command :o ( for ofset )
- distance :728
- mark horizontal line
- and draw the window
- command : TR ( for triam )
- triam the extra line
- command : L ( for line )
- select the center point of window and mark the window
- command : C ( for circle )
- mode : circle , diameter
- and draw the circle
- command : tr ( for triam )
- triam the extra line of a door
- command : o
- distance :1700
- mark the vertical line at a distance of 1700
- command : o ( for ofset )
- distance :1900
- mark horizontal line
- command : o( for ofset )
- distance :300
- mark the horizontal line a distance of 300
- command : TR ( for triam )
- triam the extra vertical and horizontal line
- command : o
- distance : 250
- mark vertical line at a distnace of 250
- command : o( for ofset )
- distance : 631
- mark the line
- command : TR ( triam )
- triam the extra line of window
- command : L ( for line )
- select the midpoint of a window and mark the center line of a window
- again
- command : o
- distance :150
- mark horizontal line
- command :o ( for ofset )
- distance : 832
- mark horizontal line of window
- command : TR ( for triam )
- triam the extra line
- command : c ( for circle )
- mode : circle , diameter
- and draw the circle for arc of dooe
- command : TR ( for triam )
- triam the extra line of a door
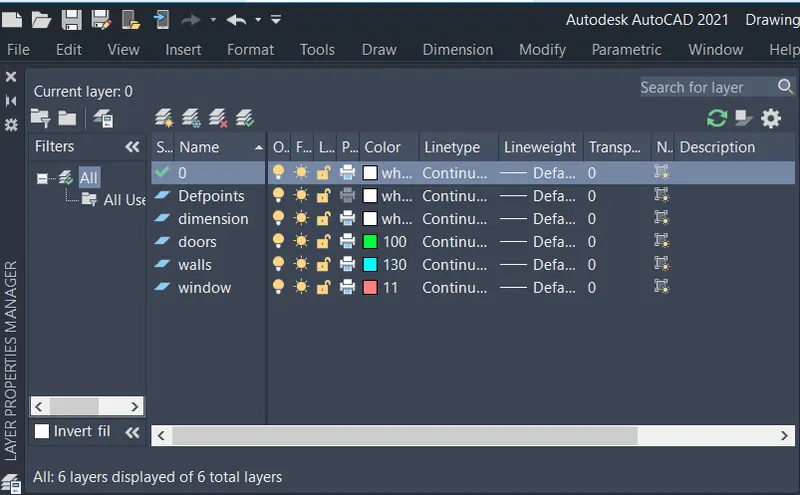
- then go to the layer properties
- create the properties
- layers are given below :
- RESULTS :
- COMMAND USED :
- START THE DRAWING : QNEW
- UNITS : UN
- LINE : L
- CIRCLE : C
- OFSET : O
- TRIAM : TR
- DIMENSION : DIM