Creating a Residence Layout, Seating plan, Toilet and Utility room plan using AutoCad
Aim: To draw the given drawings using Autocad 2023
Introduction: Autocad is a commercial Computer Aided Design(CAD), It is marked and developed as Autodesk. It was first released on december 1982. Autocad derived from a program, which was beganed in 1977 and then released in 1979 called as Interact CAD, and also called in early documents od autocad as microCAD, Auto desk cofounder was Michael Riddle.
The first version of cad was released in december 1982 and was supported on CP/M-80 computers, By march 1986 Aotocad has became most uniquitous cad program worldwide. The file format of autocad was .dwg, and its interchange file format to DXF, have become a standard. Autocad was included support for .dwf, a format developed and promoted by Autodesk, for publishing CAD date. In year 2022 the Autocad 36th major version was released and the 12th consecutive year of Autocad foe Mac.
CAD is a technology which replaces manual drawing with automated process, if you are a drafter, desingner, architect or engineer you have been used 2D or 3D CAD programs i.e., Autocad or Autocad LT software. Autocad helps you in draft construction documentation, explore ideas for design, viaualise concepts through photorealistic renderings and gives how a design performs in real world.
Autocad mailnly used by industries, architects, engineers, city planners, project managers, graphic designers and other professionals.
1. Residence plan:
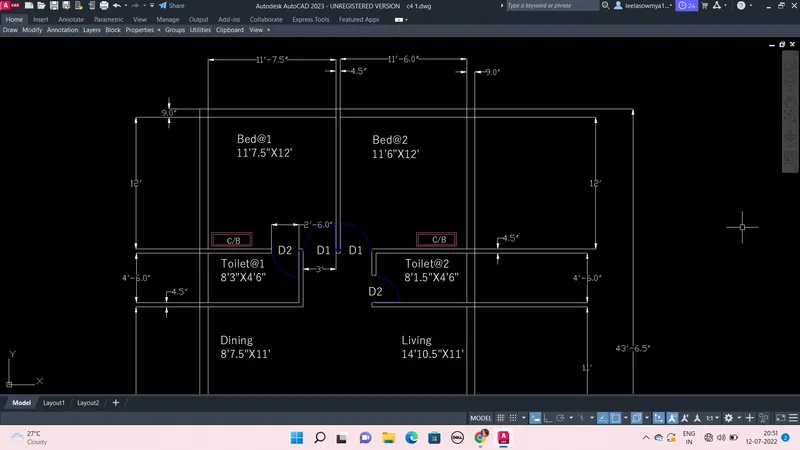
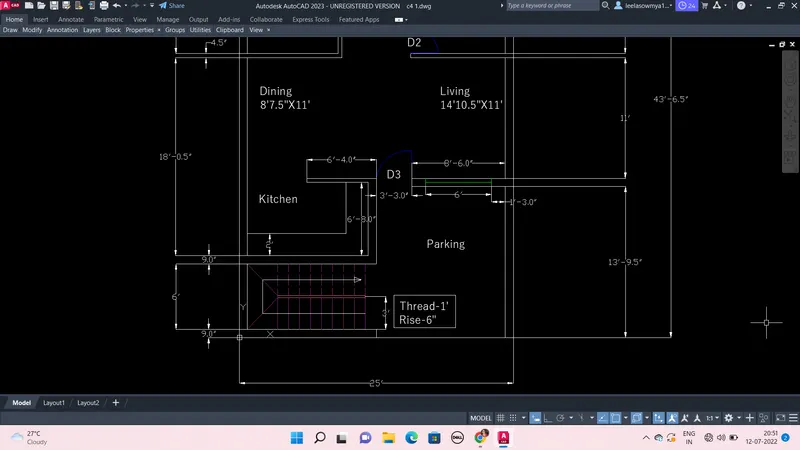
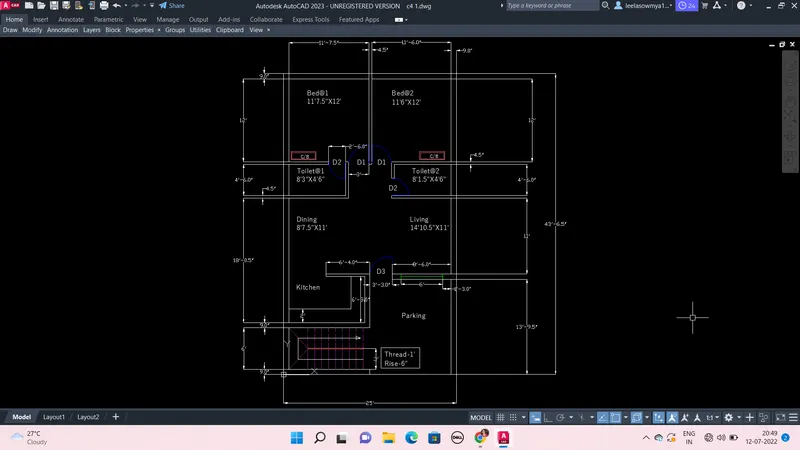
Steps:
- Open new file in Autocad 2023, Type UNITS, use Engineering and take inches
- Then LIMITS, Limits of lower left corner give (0,0) and limits of upper right corner (50,50)
- Type DS (drafting settings) and go to snap and grid ON snap and grid, give snap X and Y spacing as 0.1, and Grid X and Y spacing as 0.1 and major lines are taken at every 5 minor lines.
- Take Rectangular command and first point is (0,0) and opposite point as (25',43'6.5") and Offset at a distance of 9" inward, and now using Explode, explode the both rectangles into individual lines.
- Now the Top horizontal line is selected and Offsetted inward at a distances of 12', 4.5", 4'6" and 4.5" and again the left inward vertical line is Offsetted at a distances of 11'7.5", 4.5" and 11'6"
- Use Trim command and remove all unnecessary lines, By this the 2 bedrooms and toilets are created
- After bedroom, use Breakatpoint command and break the vertical lines at bedrooms corner, so it will be easy to do further drawing
- The bottom horizontal line is selected and Offsetted inward at a distances of 6', 9", 6'8", 4.5" and the right inward vertical line is Offsetted at a distances of 8'6", 3'3" and 9"
- Use Trim command and remove all unnecessary lines, By this the Dining, Living and Kitchen are formed
- Now to creat steps, Draw a line from midpoint of 6' line in X direction for 12'6" and draw 3' vertical line and offset the line at a distance of 1' for 9 times and change the line type to dotted and draw 3' line in other direction and offset at 1' for 9times.
- To create D3 and window, Now for reference draw a line 9" downward from right inward corner of Living room and offset it at a distance of 1'3" , 6' and again 1'3" and trim unnecessary lines
- To create D2, draw horizontal line of 4.5" at the inner corner of Toilet2 and offset it to a distance of 2'6" and also draw vertical line of 4.5" at top right corner of Toilet1 and Offset it at 2'6" and trim the unnecessary lines
- By triming the unnecessary line 3' doors D1 are created
- To create door, draw a vertical line 2'6" and draw Arc by using Start End Angle, click on start and end point and give angle as 90degrees
- In kitchen, the inner walls and Offseted at 2' distance and then Trim
- Use Trim command and remove all unnecessary lines in the total plan
- Then using Dimension and mark the lines dimension and angle by taking Dimangular and by Dimdia to mark diameter of circle, To modify dimensions- Go to dimenstion in tool bar and then to dimension style.
- Use MText command to write text at required places
2. Outdoor seating with canopy:
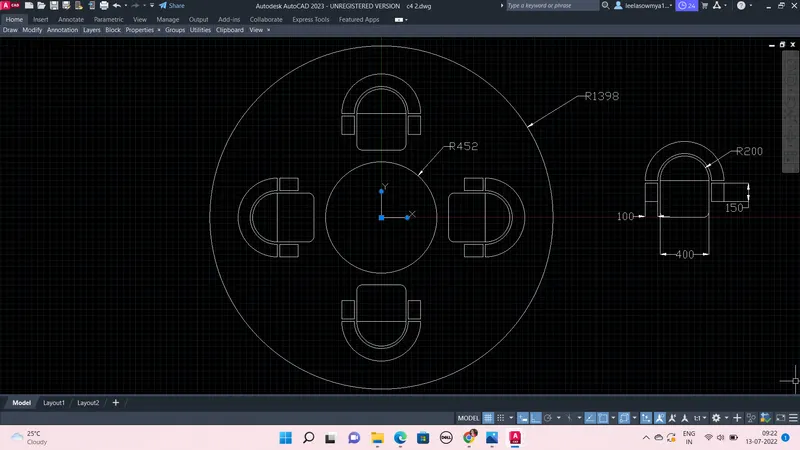
Steps:
- Open new file in Autocad 2023, Type UNITS, use decimal and take millimeters
- Then LIMITS, Limits of lower left corner give (0,0) and limits of upper right corner (420,297)
- Type DS (drafting settings) and go to snap and grid ON snap and grid, give snap X and Y spacing as 10, and Grid X and Y spacing as 10 and major lines are taken at every 5 minor lines.
- Take circle command and center point is (0,0) and Radius as 1398 and with same center draw another circle with radius as 452.
- To creat a chair, draw a Rectangle of 400X300 and with upper horizontal line as diameter draw a circle and use Trim to remove the bottom semicircle i.e., which is inside the rectangle.
- Now Offset the upper semicircle at a distance of 20 and 100mm, and using Line command join the 2 offseted semicircles.
- The horizontal line joined the offsetted semicircles, is offsetted on both sides at a distance of 20 and 150mm and join the offseted lines using Line command
- Now using Fillet, fillet the bottom corners of 400X300 rectangle with a fillet radius of 50 and chair is created
- Now draw a reference line from (0,0) to outer circle vertically, Then Move the chair base point as center point of rectangle and place it at the midpoint of reference vertical line
- Now using Polar Array, select the chair and array for 4 numbers at 90degree.
- Then using Dimension and mark the lines dimension and angle by taking Dimangular and by Dimdia to mark diameter of circle, To modify dimensions- Go to dimenstion in tool bar and then to dimension style.
3. Toilers and Utility room:
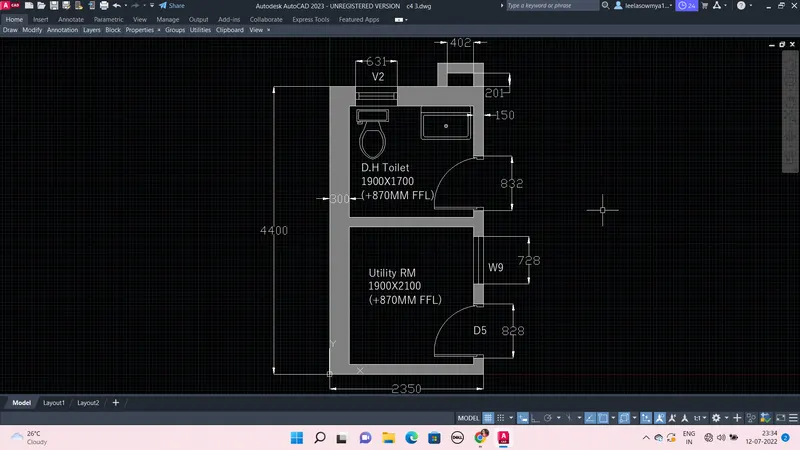
Steps:
- Open new file in Autocad 2023, Type UNITS, use decimal and take millimeters
- Then LIMITS, Limits of lower left corner give (0,0) and limits of upper right corner (420,297)
- Type DS (drafting settings) and go to snap and grid ON snap and grid, give snap X and Y spacing as 10, and Grid X and Y spacing as 10 and major lines are taken at every 5 minor lines.
- Take rectangle command and first point is (0,0) and opposite corner is (2350,4400), Now using Explode, explode the rectangle so that individual lines are formed.
- The left vertical line and top horizontal line is Offsetted to a distance of 300mm in inward direction and the right vertical line and bottom horizontal line are offsetted to a distance of 150mm inward direction.
- Trim the unnecessary lines at the corners.
- The bottom inside horizontal line is Offsetted in upward direction for a distances of 1900 and then 150mm
- To create D5 and W9, from the bottom inside horizontal line, a line of 150mm is drawn from right corner, Now Offset the line at a distances of 100, 828, 300 and 728mm. Then using trim remove the extra lines and by this D5 and W9 are formed
- To create another door, a line drawn from inner horizontal wall of toilet in right direction to 150mm and the line is Offsetted at a diatance of 100 and 832, and trim the reference line and extra lines.
- To create door, a horizontal line is drawn and by using Start End Angle of arc, an arc is drawn at 90degrees
- To create V2, draw a vertical line from left corner of inside wall in Y direction by 300mm, then offset that line by a distance of 100 and the 631mm, trim the ref line and extra lines.
- Now from upper most right corner draw lines by direct distance method, in Y direction 351 and in -X direction 702 and then in -Y direction for 351mm, Then using Offset, offset the lines by a distance of 150 in inward direction, trim the unnecessary lines.
- Type Design Center, from their we can import the required items. here we imported sink and toilet seater top view and placed in required position, by using Scale command then can be enlarged or decreased in size.
- Then using Dimension and mark the lines dimension and angle by taking Dimangular and by Dimdia to mark diameter of circle, To modify dimensions- Go to dimenstion in tool bar and then to dimension style.
- Use MText command to write text at required places.