Creating a Layout, Section and Elevation with dimensions using AutoCad
Aim: To draw the Plan and Sections as shown in the Figures.
Procedure: set the limits using limits command and units set to metric.
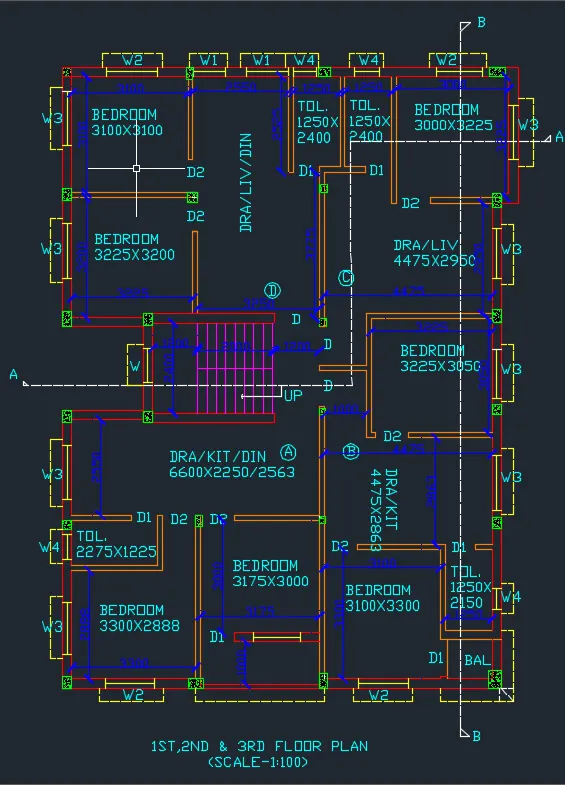
a) Plan:
- First we draw the plan.
- Give outer wall thickness as 250mm and inner wall thickness as 125mm.
- Draw the construction line in vertical and horizontal direction using XL command and give thickness of the wall.
- Give the dimensions of bedroom as 3100X3100 using offset command.
- Give the inner dimension as 125mm by offset command.
- Offset horizontally 2250mm,125mm,1250mm,125mm,125mm,1250mm(toilet C),3000mm(bedroom of C),250mm for external wall.
- Offset vertically 2400mm for toilet then 125mm for thickness,3225mm for bedroom C and thickness of 125mm.
- Offset vertically 2950mm for drawing from bedroom of C and give wall thickness of 125mm then offset 3250mm and 3200mm and give wall thickness of 250mm.
- Divide the rooms horizontally by offsetting 3225mm,125mm,3250mm,125mm,4475mm,250mm.
- Offset 2400mm vertically and 4400mm horizontally for the staircase.
- Offset 3050mm vertically and 3100mm horizontally for the front bedroom.
- Fillet the wall of the bedrroom with left side wall and give wall thickness of 250mm.
- Now offset 100mm from the outer wall and draw the verandah by offseting 1000mm and offset 3175mm for the bedroom of A.
- Offset 2888mm for the front bedroom of A and offset wall thickness of 125mm.
- Now offset 1225 and 2275mm for the toilet and then offset 2550mm for the drawing/kitchen/dining of A.
- Now create the doors with dimensions as :D-1000mm,D1-700mm,D2-900mm in width.
- Now create windows with dimensions as: W-600mm,W1-900mm,W2-1000mm,W3-1500mm,W4-500mm in width.
- Now place the doors and windows in required places.
- Now insert the text with multiline text and select standard as the text style and text height as 250mm.
b) Section:
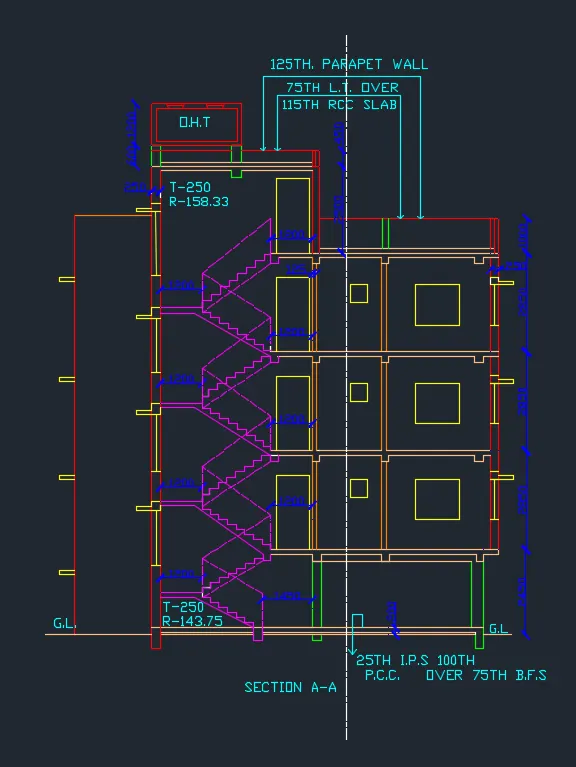
- First we draw the Section A-A
- Dimension assumed: slab thickness-125mm,Beam-250X300mm,Lintel thickness-150mm,Height of newel post-1000mm and landing slab thickness-100mm.
- Extend the wall thickness wherever the section cuts the plan.
- Then draw a horizontal line for the ground level and draw 150mm thickness from the ground level by offseting 150mm from ground level.
- Now offset a distance of 2450mm from the ground level for the ground floor height.
- Now give slab thickness as 125mm from the top level.
- Draw beams where walls are there of size 250X300mm.
- Draw columns of 400mm and 300mm width.
- Now we draw the stairs:
- Draw a beam of 250mm width and 270mm depth down the ground level.
- Draw a vertical line of 143.75mm at distance of 1450mm from the 300mm column and then a horizontal line of 250mm for riser.
- Now draw 8 similar steps and draw the landing from the 8th one.
- Draw an inclined line joining the riser of end of flight and offset 100mm from that line ,then join it with the landing slab.
- Mirror the steps to the oppsite side also.
- Give newel post height as 1000mm on both start and end of flight.
- For the first fllor offset a height of 2850mm and slab thickness of 125mm and beam of size 250X300mm.
- Extend the projected walls of 125mm and 250mm.
- Extend the doors and windows from the plan to get its width,then give height of 1200m for window and 50mm for ventilator.
- Draw a lintel slab of 150mm and projection of shade as 400mm.
- Show the section of window on one end of wall and stair case side as it is cut by the sectio line.
- Copy these to the three floors using copy command.
- On top for parapet give height of 1000mm and 2500mm for the top room.
- Draw a door of 900X2100m and wall thickness of 250mm on both sides.
- For the overhead tank draw a parapet height of 450mm.
- For tank draw a line of 1200mm as height of tank and 2300mm as width of tank.
- Write text using multileader by selecting it from the annotation tab.
- Give leader points as 5,text height as 250mm and arrow size as 1000mm.
- Now insert the text with multiline text and select standard as the text style and text height as 250mm.
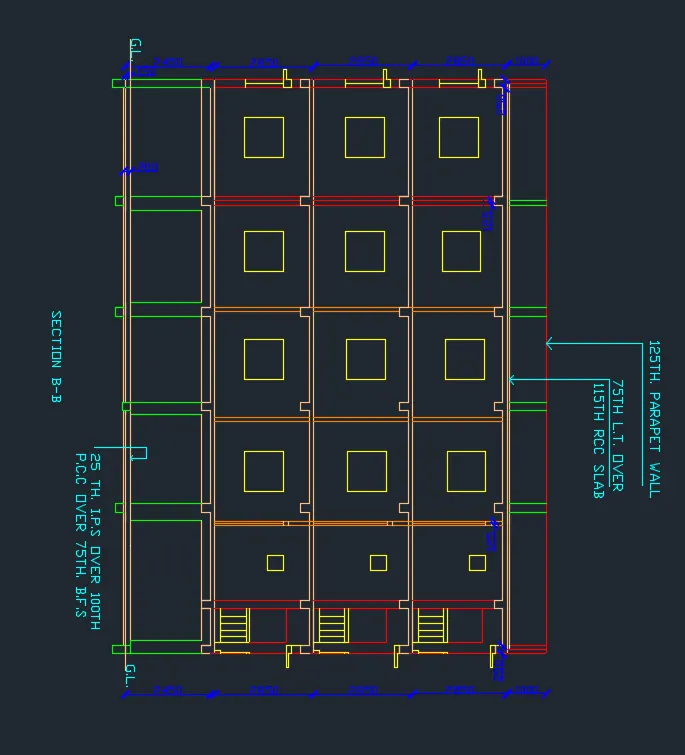
c) Section B-B
- Project the walls and columns from the plan using line command.
- Mark a vertical line showing ground level and take a offset of 150mm for P.C.C. and 200mm from the ground level to show the flooring level.
- Project the windows and ventilators and give height 2100mm.
- Offest slab of 100mm thickness and draw the beams.
- Show the section of windows wherever the section line cuts the windows.
- Now using the "DIMLINEAR" command dimension the rooms and then select "DIMCONTINUE" to select dimension continously.
- In case of two dimensions intersecting each other use the break command from the annotate toolbar.
- Select ISO 25 for dimension style.
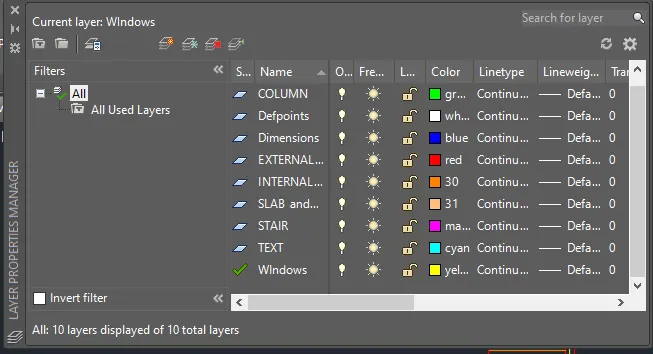
- Create the layer for each component with individual colours from layer properties.
- Layers for external wall,internal wall,windows,doors,text,dimesnsion,stairs,column,slab and beam are given.
Result: the plan,section A-A and section B-B are drawn according to scale.
Plan:
Section A-A
Section B-B