Creating a Layout, Section and Elevation with dimensions using AutoCad
QUE 1. CREATE PLAN AND SECTION AS SHOWN ON FIGURE.
ANS. - 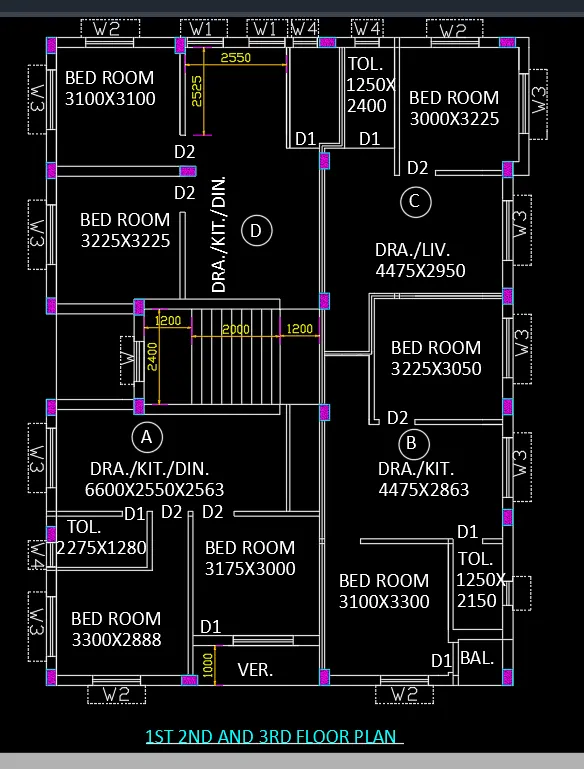
The following steps were use to create 1st 2nd and 3rd floor plan.
1. Taking construction line - to create floor plan and use both horizontal and vertical lines.
2. Exterior wall - to create all exterior wall using 250mm offset and installed windows inside the exterior wall.
3. interior wall - to create interior wall using both verticle and horizontal x line and provide 140mm offset to create all interior wall.
4. Bedroom - in bottom side create a bed having 3300*2888 size in x and y direction and using x line to create bedroom. In this floor plan total 7 bedroom are created and having different size like 3100x3300. 3175x3000. 3225x3000. 3000x3225. 3100x3100 also use in floor planning.
5. Door - following two types of door were use to create Door in the floor plan.D1 having 700mm and D2 having 1000mm width. And it installed inside the room D1 is also use to install in toilets and D2 are use in bedroom also.
6. Dining and kitchen room - there are two dinning room inside the floor plan and having 2550*2563 and 4475x2863 . 4475x2950 are creat by using construction line by using offset tool
7. columns - for create column using line tool and create a 400x400 of column and installed it in verticle or horizontal direction where it need. And create hatch inside the and fill color using by layer properties.
8. Toilets - for toilets also using a constructio line to create a toilets and it is has 4 toilets in the floor having different size. 2275x1226, 1250x2150,1250x2400,1250x2400 and provide interior wall having 140mm size.
9. windows - in all floors in the planning provide and different windows in the drawing having different size and name like w1 w2 and w3. For bedroom use w1 and w3 windows to create for drawing and also use to create a section.
10. varandah - in bottom midle side of the floor provide a 1000mm verandah. And install door inside the room.
11. Dimensions - provide standard dimension to the plan and set it according to its visuality.
12. Text - for create a text use multiline text and bolded by in anotate panel provide good visual text acoording to drawing.
13. chazza - for making chazza we use a hidden line tool and provide a chajja outside of the windows.
14. staircase - in floor plan staircase having 2400mm widh and 1200mm landing. it has trade 250 and having riser is 150mm create a steps by divided his total width.
SECTION A-A-
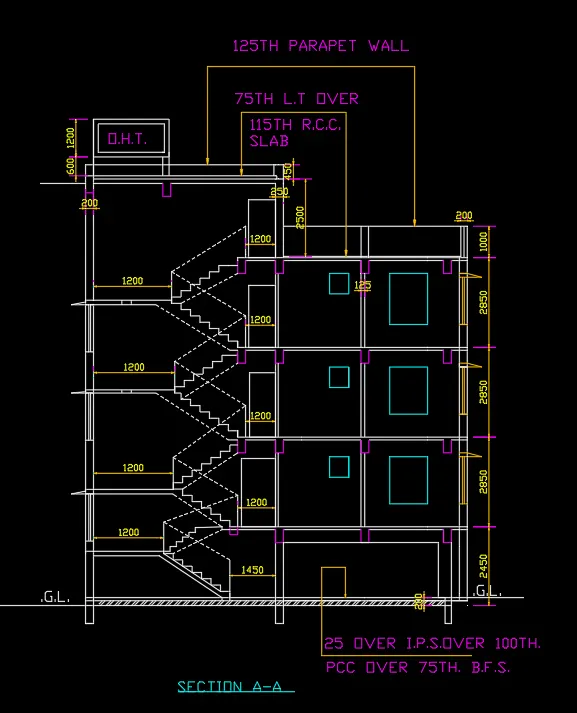
THE following steps were use to create section A-A.
1. costruction line - for making section A-A and also create a three floor section use horizontal x line from ground level take 2450 offset and after that above three floor continued provide 2850 offset. and also use 141 offset to provide thickness of the slab. for room projection also take a refrence from above floor plan and create rooms and windows inside the section by using verticle construction line.
2. p.c.c. - for shoving pcc of the bottom taking 200mm offset and hatching inside the lines to showe particular pcc.
3. Exterior WALL - For creating exterior wall On both side also taking refrence from floor plan and making in section A-A.
4. WINDOWS - FOR MAKING projection of the window using refrence from floor plan w2 and w1 windows are use to making projection of the section A-A.
5. BEAM - PROVIDING BEAMS HAVING size 250x250 and it is situated in cennter if the column or sides of the column.
6. OVER HEAD WATER TANK - providing overhead water tank in top side of the object and having a size 1200x2400
and offset it 100mm inside the tank.
7. STAIRS - FOR CREATE A Stair using trade 250mm and riser 150mm and provide 1200mm landing to the staircase and make door besides the staircase and showing there dimension.
8. R.C.C. - PROVIDE RCC slab in top of the object having 450mm thickness.
SECTION B-B :
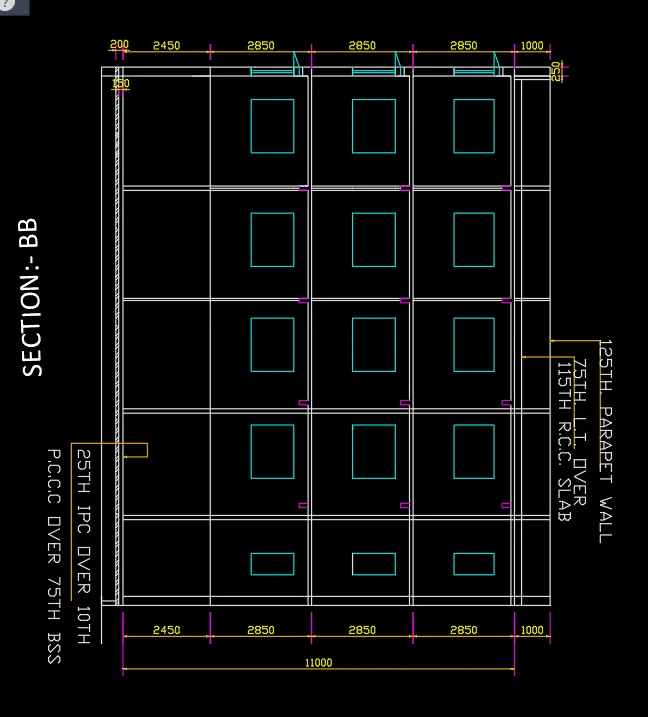
THE following steps were use to create section BB
1. SECTION BB- Section BB having two bedroom two dinning and kitchen and having one toilet projection And draw according to its width.
2. ROOM PROJECTION- IN bottom side use offset for room projection provide continue offset 2450 , 2850, 2850, 2850, 100 and create a room projection.
3. WINDOW - For creating a window use side projection and refrence of the floor plan. and set window in top side of the b section and use x line to create projection of the window and trim extra lines of the window.
4. DIMENSIONS - PROVIDE proper dimension to the base and top point of the project.
5. TEXT - Use multiline text to providee text and use scale tool to scale the text.