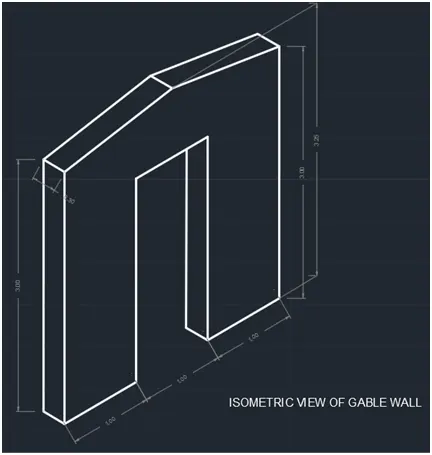
Creating a Floor plan, Footing detail and Isometric view using AutoCad
C-1
AIM:
To draw the following drawing by using one the system.
Procedure:
Step:1
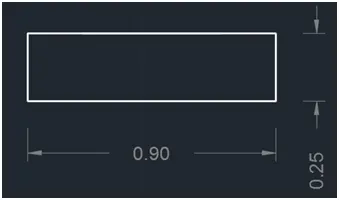
- Type Rec on the command line and press enter.
- Click the cursor on any point on screen (i.e Base point of Rectangu
Step:2
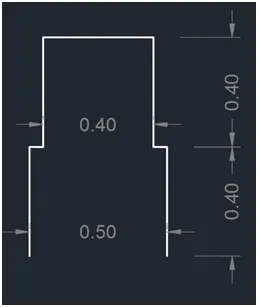
- Type L on the command line and press enter.
- Click the cursor on any point on screen (i.e Start Point of line).
- Type @0, 0.40 on the command line and press enter.
- Type @0.05, 0 on the command line and press enter.
- Type @0, 0.40 on the command line and press enter.
- Type @0.40, 0 on the command line and press enter.
- Type @0, -0.40 on the command line and press enter.
- Type @0.05, 0 on the command line and press enter.
Step:3
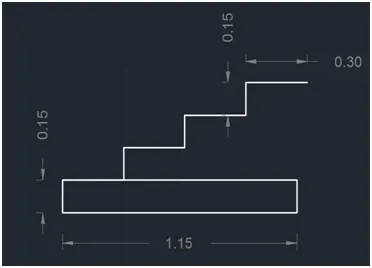
- Type Rec on the command line and press enter.
- Click the cursor on any point on screen (i.e Base point of the Rectangular).
- Type @1.15, 0.15 on the command line and press enter.
- Type L on the command line and press enter.
- Click the cursor on Left corner of the Rectangular (i.e Start Point of line).
- Type @0.30, 0 on the command line and press enter.
- Type @0, 0.15 on the command line and press enter.
- Type Co on the comment line and Press enter. Then select the object and enter.
- Click the cursor on the start point of the line and draw the mouse.
- Place the copied object at End point of the line and continue the same .
Step:4
- Type Rec on the command line and press enter.
- Click the cursor on any point on screen (i.e Base point of the Rectangular).
- Type @0.30, 1.65 on the command line and press enter.
- Type L on the command line and press enter.
- Click the cursor on Right corner of the Rectangular (i.e Start Point of line).
- Type @1.0, 0 on the command line and press enter
- Type @0, 0.60 on the command line and press enter
- Type @-1.0, 0 on the command line and press enter
- Type @-0.3, 0 on the command line and press enter
- Type offset on the command line and press enter
- Set the off distance as 0.05 and enter.
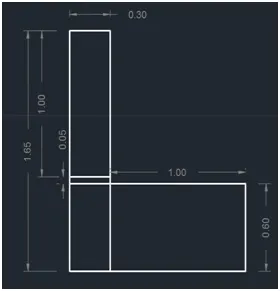
Result:
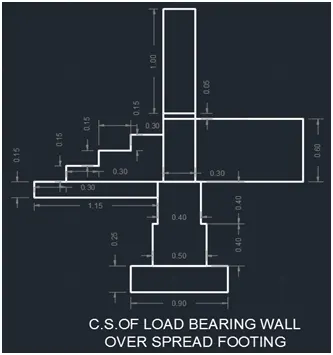
C-2
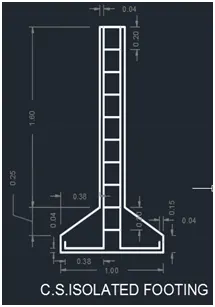
AIM:
To draw the following drawing by using one the system.
Procedure:
Step:1
- Type L on the command line and press enter.
- Click the cursor on any point on screen (i.e Start Point of line).
- Type @1.0, 0 on the command line and press enter.
- Type @0, 0.15 on the command line and press enter.
- Type @-0.38, 0.25 on the command line and press enter.
- Type @0, 1.60 on the command line and press enter.
- Type @-0.24, 0 on the command line and press enter.
- Type @0, -1.60 on the command line and press enter.
- Type @-0.38, -0.25 on the command line and press enter.
- Type C on the command line and press enter.
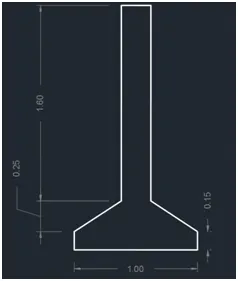
Step:2
- Type L on the command line and press enter.
- Click the cursor on any point on screen (i.e Start Point of line).
- Type @0, -0.06 on the command line and press enter.
- Type @0.38, 0 on the command line and press enter.
- Type @0, 1.96 on the command line and press enter.
- Type Mirror on the command line and press enter.
- Drag the mouse vertically and click it.
- Type L on command line and press enter. Click the cursor on top of the line and type @0.16,0 and enter.
- Type offset and give offset distance as 0.20.
- Offset the line up-to a distance of 1.96
- Type Move on comment line and select the base point.
- Drag the mouse and place the object in the previous drawing.
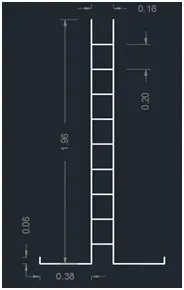
Result:
C-3
AIM:
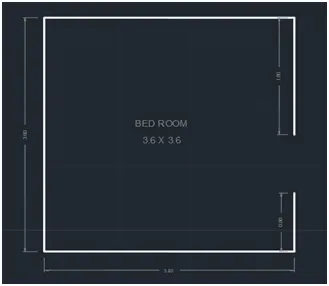
To draw the following drawing by using one the system.
Procedure:
Step:1
- Type L on the command line and press enter.
- Click the cursor on any point on screen (i.e Start Point of line).
- Type @0, -0.90 on the command line and press enter.
- Type @-3.60, 0 on the command line and press enter.
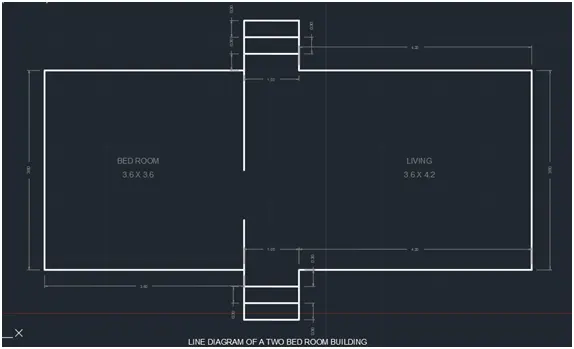
- Type @0, 3.60 on the command line and press enter.
- Type @3.60, 0 on the command line and press enter.
- Type @0, 1.80 on the command line and press enter.
Step:2
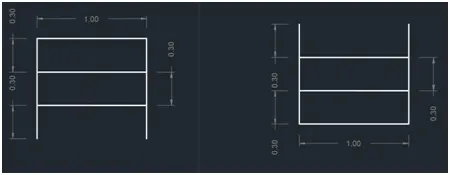
- Type L on the command line and press enter.
- Click the cursor on any point on screen (i.e Start Point of line).
- Type @0, 0.3on the command line and press enter.
- Type @1, 0 on the command line and press enter.
- Type @0, -0.3on the command line and press enter.
- Type copy on the command line and press enter.
- Select the object and copy the object twice and place it one over another.
Step:3
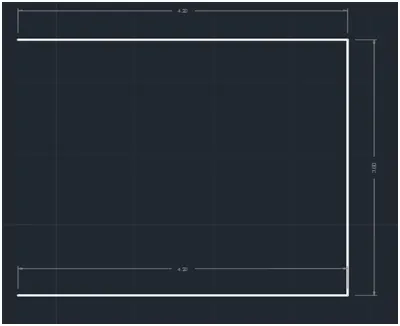
- Type L on the command line and press enter.
- Click the cursor on any point on screen (i.e Start Point of line).
- Type @4.20, 0 on the command line and press enter.
- Type @0, 3.00 on the command line and press enter.
- Type @-4.20, 0 on the command line and press enter.
Result:
C-4
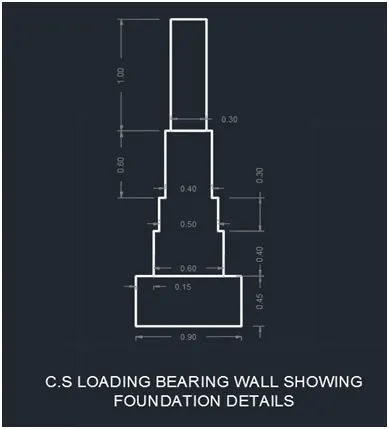
AIM:
To draw the following drawing by using one the system.
Procedure:
Step:1
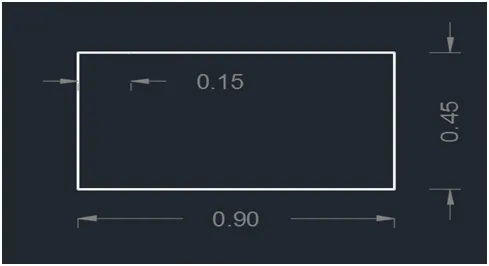
- Type Rec on the command line and press enter.
- Click the cursor on any point on screen (i.e Base point of Rectangular).
- Type @0.90, 0.45 on the command line and press enter.
Step:2
- Type L on the command line and press enter.
- Click the cursor on any point on screen (i.e Start Point of line).
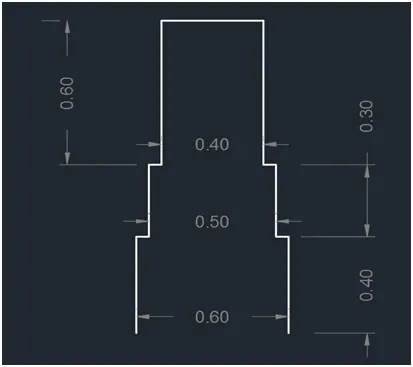
- Type @0, 0.40 on the command line and press enter.
- Type @0.05, 0 on the command line and press enter.
- Type @0, 0.30 on the command line and press enter.
- Type @0.05, 0 on the command line and press enter.
- Type @0, 0.60 on the command line and press enter.
- Type @0.4, 0 on the command line and press enter.
- Type @0, -0.60 on the command line and press enter.
- Type @0.05, 0 on the command line and press enter.
- Type @0, -0.30 on the command line and press enter.
- Type @0.05, 0 on the command line and press enter.
- Type @0, -0.40 on the command line and press enter.
Step:3
- Type Rec on the command line and press enter.
- Click the cursor on any point on screen (i.e Base point of Rectangular).
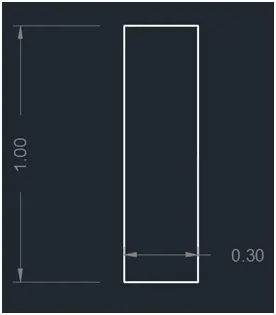
- Type @0.30, 1.00 on the command line and press enter.
Result:
C-5
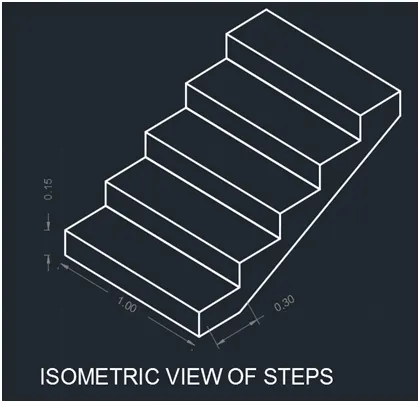
AIM:
To draw the following drawing by using one the system.
Procedure:
- Type DS on command line and press enter
- Table is open and changes the setting into isometric view from 2d view.
- Type L on the command line and press enter.
- Click the cursor on any point on screen (i.e Base point of Rectangular).
- Specify the next point by move the cursor in the back side and entre 1
- Move the cursor upward direction (if not move then Press F5) and entre 0.15
- Move the cursor Right direction and entre 0.30
- Move the cursor Forward direction and entre 1
- Move the cursor in the left side and entre 0.30
- Move the cursor Downward direction and entre 0.15
- Copy the object and place the one over another.
- Finally connect the line from top of the steps to first one.
Result:
C-6
AIM:
To draw the following drawing by using one the system.
Procedure:
- Type DS on command line and press enter
- Table is open and changes the setting into isometric view from 2d view.
- Type L on the command line and press enter.
- Click the cursor on any point on screen (i.e Base point of Rectangular).
- Specify the next point by move the cursor in the front side and entre 1
- Move the cursor upward direction (if not move then Press F5) and entre 2.42
- Move the cursor Right direction and entre 1
- Move the cursor downward direction and entre 2.42
- Move the cursor in the Right side and entre 1
- Move the cursor upward direction and entre 3
- Type @-1.5, 0.25 on the command line and press enter.
- Type @-1.5, -0.25 on the command line and press enter.
- Move the cursor upward direction (if not move then Press F5) and entre 3
- Type L on the command line and press enter.
- Move the cursor backward direction (if not move then Press F5) and entre 0.3
- Copy the last drawn line and place all the edges of the drawing.
- Move the cursor downward direction and entre 3
- Move the cursor backward direction (if not move then Press F5) and entre 0.3
- Type L on the command line and press enter.
- Connect the all the line
Result: