Creating a Floor plan, Footing detail and Isometric view using AutoCad
Creating a floor plan, Footing detail and Isometric view using Autocad
1) AIM :
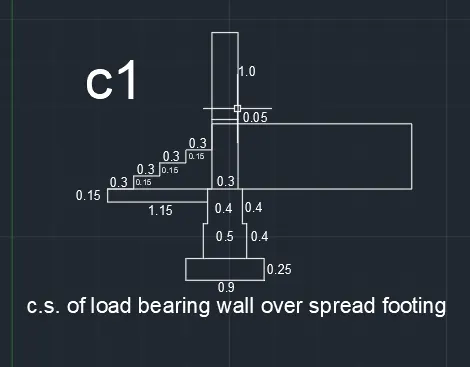
To draw cross section of wall over footing.
COMMAND USED :
Line
Rectangle
Trim
PROCEDURE :
STEP:1 Create a rectangle by typing "REC" in command box.
- Specify the first corner point as (5,5)
- Specify the length of rectangle 0.9 units in command box
- Specify width of rectangle 0.25 units in command box
STEP:2 Create another rectangle "REC" in the command box.
- Specify the first corner ponit which is 0.2 units from the starting point of the rectangle
- Enter the length of rectangle as 0.5 units the width of rectangle as 0.4 units.
STEP:3 Create the third rectangle command "REC"
- Specify the first corner point which is 0.05 units from the starting point of second rectangle.
- Enter the length of rectangle as 0.4 units. the width of rectangle as 0.4 units.
STEP"4 Line is drawn from the corner of third rectangle, command L
- Give the length as 1.15 units.
- Move curner downwards and give value 0.15 units and right and give length as 1.15 units
STEP:5 Fourth rectangle ids drawn, command "REC"
- Specify the first corner point at a distace of 0.05 from the third rectangle.
- Give the length as 0.3 and width as 0.6
STEP:6 From the line drawn in step 4 at a distance of 0.3, draw another line with the distance of 0.15 units vertically and 0.3 units horizontly
- Continue it two more times, units 3 steps are created
STEP:7 Draw another rectangle above fourth rectangle, command "REC" click an dimension give length as 0.3 units and width as 0.05 unit.
STEP:8 Drawn the fifth rectangle command "REC"
- Specify the corner point as the corner of fourth rectangular.
- Click on dimension give length as 0.3 units and with as 1 unit
- Erase the unwanted line by TRIM
RESULT :
The cross section of load bearing wall over spread footing is drawn.
2) AIM :
CROSS SECTION OF AN ISOLATED FOOTING
COMMAND USED :
LINE
OFFSET
TRIM
PROCEDURE :
STEP: 1 Draw a line with command "L" and give 1 units.
- Give command L and give the relative coordinate as @0,0.15.
- Give next coordinate as @0.38,0.25 next coordinate is given as @0,1.6
- Give @0.28,0
- Next coordinate @0,1.6
- Next coordinate @0.38,0.25
- Next @0,0.15(or) close.
STEP:2 Draw an offset with the command at a distance of 0.04 from the bottom line to up words
- Give command of "o"and select the object and give the offset distance as 0.04 trim the command lines
STEP:3
- Give offset from the top line with an offset distance of 0.02 units.
- Give the command "o" an select the object give the offset distance as 0.2 select multiple option at a such lines.
- Trim the excess lines.
RESULT:
CROSS SECTION OF ISOLATED FOOTING IS DRAWN.
3)AIM:
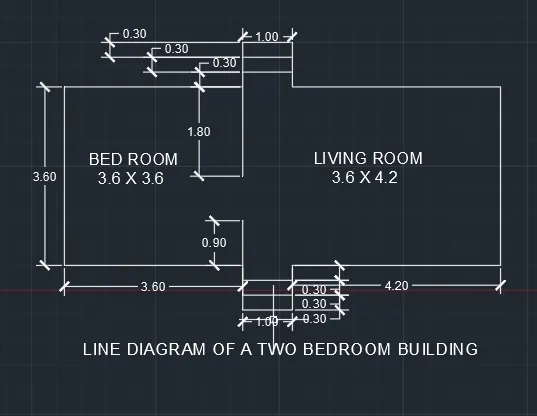
Line diagram of single bedroom building.
COMMAND USED:
LINE
RECTANGLE
OFFSET
TRIM
PROCEDURE:
STEP:1
- Creating bedroom 8.2 x 3.6 by rectangle
STEP:2
- Use the command explode and select the rectangle
- Draw an offset using the command "o"
- In the command line enter "o" and specify
- the distance of 3.6 units from the left bottom end.
- Draw an offset using the command "o'" at a distance of 4.2 units from the right bottom end
STEP:3
- Extend the two line in the bottom and in the top
- Draw an offset at a distance of 0.3 between the two line to bottom side.
- Repeat the same step and create two offsets.
- Do the same process in the top trim the unwanted lines.
STEP:4
- Using the line command draw a line at a distance of 3.2 units from the left bottom end to up wards 0.9 units.
- Using line command draw a line at a distance of 3.2 units from the left top end to down wards 1.8 units.
RESULT:
The line diagram of single bedroom building is drawn.
4)AIM:
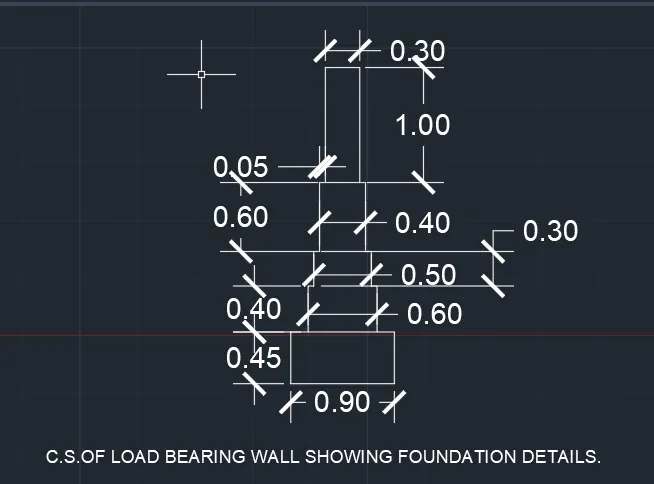
To draw the cross section of load bearing wall showing foundation details.
COMMAND USED:
LINE
RECTANGLE
TRIM
PROCEDURE:
STEP:1 Create rectangle by typing "REC" in command box.
- Specify the first corner point as (5,5)
- Specify the length of rectangle 0.9 units in command box.
- Specify width of rectangle 0.45 units in command box.
STEP:2 Create another rectangle "REC" in command box.
- Specify the first corner point which is 0.15 units from the starting point of first rectangle.
- Enter the length of rectangle as 0.6 units the width of rectangle as 0.4 units.
STEP:3 Crete the third rectangle command "REC".
- Specify the first corner point which is 0.05 units from the starting point of second rectangle.
- Enter the length of rectangle as 0.5 units the width of rectangle 0.3 units.
STEP:4 Create the fourth rectangle command " REC"
- Specify the first corner point which is 0.05 units from the starting point of second rectangle.
- Enter the length of rectangle as 0.4 units the width of rectangle as 0.6 units.
STEP:5 Drawn the fifth rectangle command "REC"
- Specify the corner point as the corner of fourth rectangle.
- Click on dimension give length as 0.3 units and with as 1 unit.
- Erase the unwanted line by " trim"
RESULT:
The cross section of a load bearing wall foundation details shown.
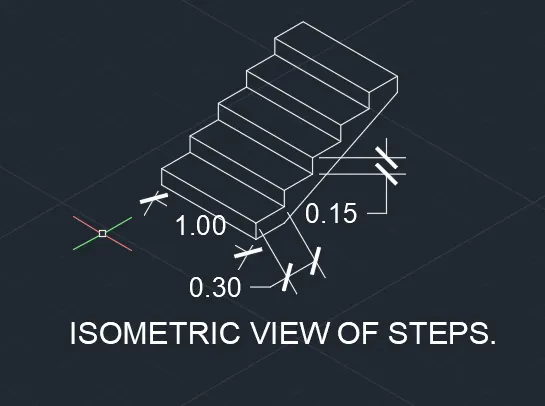
5) AIM: TO DRAW THE ISOMETRIC VIEW OF STEPS.
COMMAND USED:
LINE
ISOMETRIC PLANE
PROCEDURE:
- To work with isometric view command "ds"-snap off, grid off, put isometric snap on.
- Mke sure that ortho made is on.
STEP:1 From isometric drafting select iso plane left.
- Give command "L" and moving the cursor to +X- direction (left), give 1 units.
- Moving the cursor +Y direction (top), give 0.15 units.
- Moving the cursor to +X direction again give 1 unit and cursor to Y direction (down words) give 0.15 units.
STEP:2 Change the isometric drafting to iso plane top.
- Move the cursor to back and give 0.3 units from the last down point.
- Move the cursor to right direction and give 1 unit.
- Move the cursor to front and give 0.3 unit.
STEP:3 Change the isometric drafting to iso plane right.
- Copy the object drawn, ortho off.
- Command "co" and specify the base point and place it to new point.
- Repeat it until 4 steps are formed.
STEP:4
- With iso-plane right join the two ends with orthho off.
RESULT:
The steps are drawn in isometric view.
6) AIM:
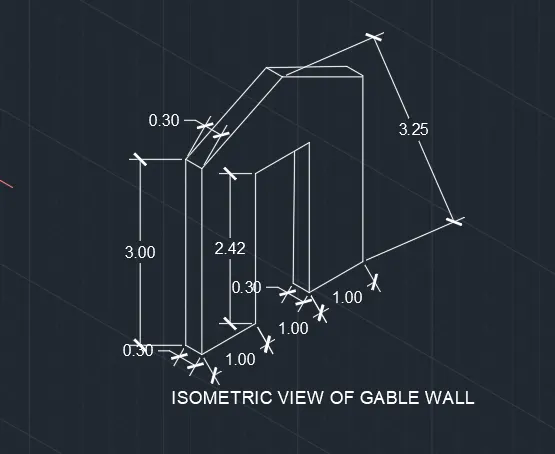
To draw the isometric view of gable wall.
COMMAND USED:
LINE
ISOMETRIC PLANE
PROCEDURE:
- To work with isometric view command "ds"snap off, grid off, put isometric snap on.
- Make sure that ortho mode is on.
STEP:1 From isometric drafting select iso plane left.
- Give command "L" and moving the cursor to right give 1 unit.
- Pointing the cursor upwards give 3 units draw 0.3 units to left and 3 units down words and 0.3 units to left.
STEP:2 Using isometric right, take line command and draw line upwards of 2.42 units from the starting point of step1
- Draw 1 unit towards the right and 2.42 units down wards.
- Using isometric left again,using side and draw a line which intersects the top line.
STEP:3
- Using isometric right with the line command draw 1 unit to right side 3.0 units upwards.
STEP:4
- By using the line command draw a line from bottom left corner @1.5units and extend line 4 units upwards i.e., total 3.25 units from bottom.
STEP:5
- With ortho off, draw a line between the corner of left side and the projected line done in STEP4
- Draw it to the other side also till it meets the right corner.
STEP:6
- Draw the vertical line with ortho on @0.3 and join the vertical line using line from left and right end same as in the step5 remove unwanted lines by using erase.
RESULT:
The isometric view of gable wall is drawn.