Creating a Floor plan, Footing detail and Isometric view using AutoCad
Project: Creating a Floor plan, Footing detail and Isometric view using AutoCad
Aim: Creating a Floor plan, Footing detail and Isometric view using AutoCad, draft the drawing
introduction: by using auto cad 2019 we draw diffrence construction thats required during execution and before execution for planing by using various commands on auto cad for fast and essential drafting
1) result: cross section of load bearing wall over spread footing
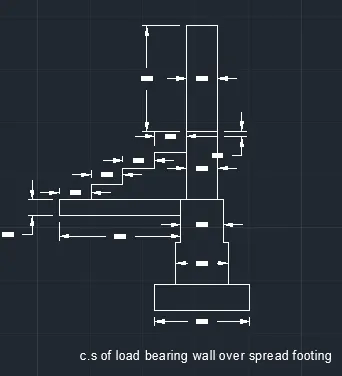
procedure, by direct distance entry method
1) first go for line command
2) draw a horizontal line with 0.9 distance by direct distance entry method
3) draw a vertical line with 0.25 distance on top side
4) complete the rectangle ( 0.9X0.25)
5) from any one upper side of rectangle give @0.2,0 ( i give from left side )
6) cursor at top side and distance 0.40
7) cursor at left side, 0.05
8) cursor at top side, 0.40 distance
9) cursor at left side with a distance 0.40
10) cursor at bottom side with a distance 0.40
11) cursor at left side with a distance 0.05
12) cursor at bottom side with a distance 0.40
13) now come to upper most poit on left side
14) cursor direction on left side 0.05
15) cursor above with 0.60 ditance
16) left side,0.30
17) upper side cursor and 0.05 distance
18) left side curso with 0.3 distance
19) bottom side cursor with 0.05 distance
20) go up with 1.05 distance
21) cursor right 0.3 distance
22) cursor bottom with 1 distance
23) now go bottom cursor with 0.2
24) go left with 0.30
25) bottom with 0.15 distance
26) go left with 0.30
27) bottom with 0.15 distance
28) go left with 0.30
29) bottom with 0.15 distance
30) go left with 0.30
31) bottom with 0.15 distance
32) draw right side line with 1.15 distance
33) top side cursor with 0.15 distance
34)left side cursor with a 1.15 distance
2) Result: C.S Isoltaed footing
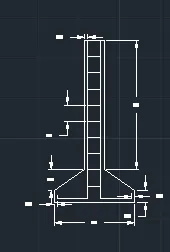
Procedure:
1) draw a horizontal line of 1 distance
2) 0.15 at top with cursor direction
3) by using relative coordinate take @0.38,0.25
4) go up with cursor at a distance 1.60 up
5) go left with 0.04
6) go bottom with 1.96
7) left side with distance 0.38
8) top side with distance 0.04
9) copy the whole section
10) rotate by 180degree with first we draw line at last end location
11) take a line between main stirrups bar and give offsets at a distance 0.2
12) upto whole length
13) complete above line with selecting line and draw betwwn upper most part of the drawing
3) Result: Line Diagram of a two bedroom building
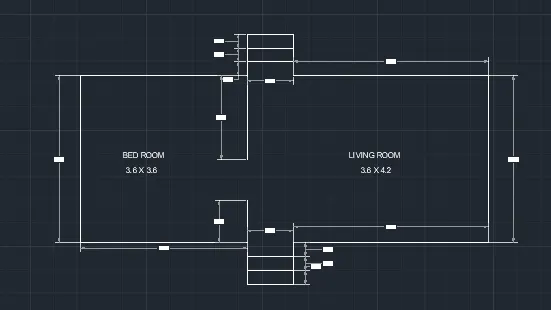
Procedure:
1) choose line command
2) draw horizontal line of 3.60 distance
3) again draw a line 0,3.60
4) again draw a line @3.60,0
5) go bottom with 1.80
6) go top again at a distance 1.80
7) go agin top with a cursor at a distance 0.9
8) draw a line parallel to 1
9) and give two offsets at a distance 0.3
10) go with left side at a distance 1
11) now go bottom with 0.9
12)go right side with a 4.20 distance
13) go bottome side with a 3.60 distance
14) go left side with a distance of 4.20 distance
15) go bottom with 0.9 distance
16) go left with 1 distance
17) go agin up with 0.9 distance
18) and between this 0.9X1 box draw line and give 1 offset with 0.3 distance
19) angin go up with 0.90 distance
4) Result: C. S of load bearing wall showing foundation details
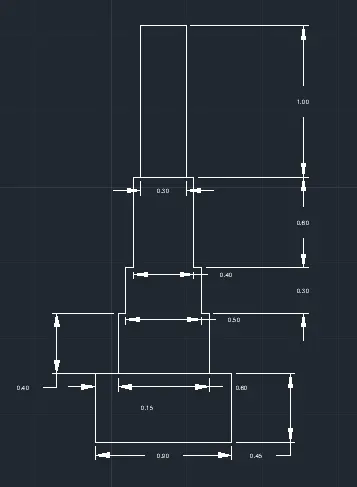
Procedure:
1) choose a line command
2) draw a horizontal line with 0.9 distance
3) top side, 0.45 distance
4) left side with a 0.15 distance
5) top at a distance of 40
6) left side with a distance of 0.05
7) top up with cursor at a distance of 30
8) left a distance of 0.05
9) top a distance with 0.6
10) left a distance with 0.05
11) top a distance with 1
12) left a distance with 0.30
13) bottom a distance with 1
14) left a distance with 0.05
15) bottom a distance with 0.6
16) left a distance with 0.05
17) bottom a distance with 0.3
18) left a distance with 0.05
19) bottom a distance with 0.4
20) left a distance with 0.05
21) bottom a distance 0.45
5) Isometric View Of Steps:
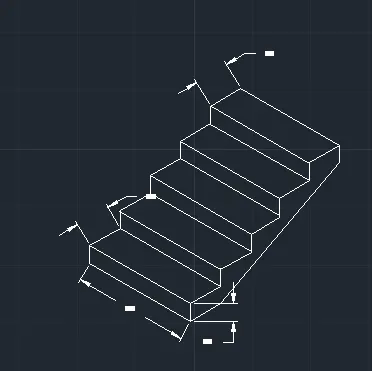
Procedure:
1) select isometri command
2) draw a line left 1distance
3) top with 0.15 distance
4)left with 1 distance ( left selct from isomatry setting)
5) agine with top 0.15 distance ( top select from isometry setting)
6)left with 1 distance ( left selct from isomatry setting)
7) agine with top 0.15 distance ( top select from isometry setting)
8)left with 1 distance ( left selct from isomatry setting)
9) agine with top 0.15 distance ( top select from isometry setting)
10)left with 1 distance ( left selct from isomatry setting)
11) agine with top 0.15 distance ( top select from isometry setting)
12) then go right from isometry with distance 1
13) then below right with distance 0.3
14) agin below with 0.5
15) then below right with distance 0.3
16) agin below with 0.5
17) then below right with distance 0.3
18) agin below with 0.5
19) then below right with distance 0.3
20) agin below with 0.5
21) then below right with distance 0.3
22) agin below with 0.5
23) go below from right side with 0.15
24) go left top with 0.3
25) now join the line with above 0.15 deep line for west slab of staircase
6) Isomatric View of Gable Wall
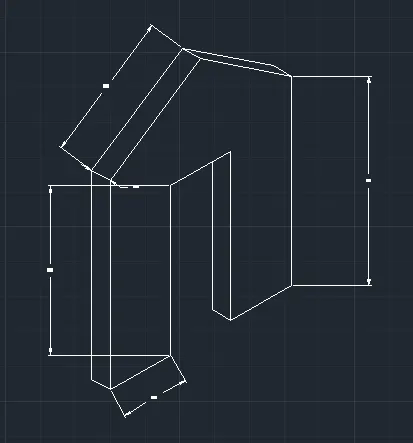
Procedure: 1) on isometry draft
2) right with distance 1
3) top with a distance 3
4) select left from isometry view and left side with 0.3
5) below with 3 m
6) just touches line with 1 coordinate point
7) then go with right side with 1 distance
8) top with 2.42 distance
9) left with 1 distance
10) bottom with 2.42 distance
11) left with 0.30 distance
12) top upto toches with upper line
13) now go bottom
14) and agian right with 0.3
15) again top right with 1 distance
16) then top with 3 distance
17) by draw line at a origin at 3 distance horizontal
18) by that line refrence we draw upper portion of wall by closing ortho
19) trim the extra lines from that