Challenge 5
1.Explain the procedure of transverse analysis of deck slab of a metro viaduct.
Transverse analysis of a deck slab in a metro viaduct involves evaluating the structural integrity and performance of the horizontal slab that forms the top surface of the viaduct. This analysis is crucial to ensure the safety, durability, and efficiency of the viaduct structure. Here's a general overview of the procedure for conducting a transverse analysis of a deck slab in a metro viaduct:
-
Gather Design Information: Obtain detailed design information, including the architectural and engineering drawings, material specifications, loading conditions, and any relevant design codes and standards.
-
Geometry and Dimensions: Determine the geometry and dimensions of the deck slab, such as its width, length, thickness, cross-sectional shape, and any variations along the length of the viaduct.
-
Loadings: Identify the various loads that will act on the deck slab. These can include dead loads (self-weight of the slab), live loads (passenger and train loads), wind loads, seismic loads, and temperature effects. The loads should be applied according to the relevant design codes and standards.
-
Finite Element Analysis (FEA): Perform a finite element analysis using specialized software. FEA divides the deck slab into smaller elements to simulate its behavior under different load conditions. This analysis helps to predict how the slab will deform, the stresses and strains it will experience, and any potential failure modes.
-
Material Properties: Assign appropriate material properties to the deck slab, including the modulus of elasticity, yield strength, and other relevant mechanical properties. These properties influence how the slab responds to applied loads.
-
Boundary Conditions: Define the boundary conditions for the analysis. These conditions specify how the slab is connected to the supporting elements, such as piers, abutments, or columns. Properly modeling these connections is crucial for accurately predicting the behavior of the viaduct.
-
Load Application: Apply the identified loads to the model. These loads may include the dead load of the slab itself, as well as live loads representing the weight of trains and passengers. Wind loads and temperature effects should also be considered.
-
Analysis Results: After the analysis is complete, review the results. These results include stress distribution, deflections, bending moments, shear forces, and other relevant parameters. Pay close attention to critical areas, such as supports and areas with abrupt changes in geometry.
-
Evaluation: Compare the analysis results with design criteria specified in relevant codes and standards. Check for factors of safety, limit state conditions (such as bending, shear, and deflection limits), and overall structural stability. If the analysis results meet the design criteria, the deck slab is considered safe and suitable for construction.
-
Iterative Process: If the analysis indicates that the deck slab does not meet the design criteria, the design might need to be modified. This can involve adjusting the thickness of the slab, reinforcing critical areas, or altering the geometry to achieve the required structural performance.
-
Documentation: Document the analysis process, results, assumptions made, and any design modifications. This documentation is crucial for review by regulatory authorities, project stakeholders, and future maintenance and inspection purposes.
The transverse analysis of a deck slab in a metro viaduct is just one aspect of the overall structural analysis and design process. It ensures that the viaduct can safely carry the loads and provide a durable and reliable transportation infrastructure.
2.Explain the STAAD steps how the nodes & beams are created, and supports being assigned to those nodes for a slab in transverse modelling.
Steps to create nodes, beams, and assign supports for modeling a slab in a transverse analysis:
1. Model Creation:
- Launch the STAAD software and create a new project.
- Define the project settings, units, and other relevant parameters.
2. Geometry and Nodes:
- Define the geometry of your viaduct or slab structure by specifying the coordinates of the nodes. Nodes represent points in space where beams and supports will connect.
- Use the command to define nodes. For example, you might input something like:
NODE 1 0 0 0, where "NODE" is the command, "1" is the node number, and "0 0 0" are the X, Y, and Z coordinates of the node.
3. Beams:
- After defining nodes, you need to create beams that connect these nodes. Beams represent the structural elements that carry loads between nodes.
- Use the appropriate commands to define beams. For instance:
BEAM 1 1 2, where "BEAM" is the command, "1" is the beam number, and "1 2" are the node numbers at each end of the beam.
4. Assigning Supports:
- To model the supports, assign appropriate boundary conditions (constraints) to the nodes. This represents how the slab is supported or connected to its surroundings.
- Use the SUPPORT command to assign supports. For example:
SUPPORT 1 PINNED, where "SUPPORT" is the command, "1" is the node number, and "PINNED" indicates a pinned support.
5. Loads and Load Cases:
- Define the load cases that will be applied to the structure. These load cases represent different loading scenarios, such as dead loads, live loads, wind loads, etc.
- Assign the loads to the relevant nodes and beams using appropriate commands, such as LOAD.
6. Analysis Setup:
- Define the analysis parameters, such as the type of analysis (static, dynamic, etc.), analysis method (finite element, etc.), and any specific settings.
7. Perform Analysis:
- Run the analysis using the analysis command provided by STAAD. This command will initiate the calculation of forces, displacements, and other structural responses.
8. Review Results:
- After the analysis is complete, you can review the results, which include reactions at supports, bending moments, shear forces, and deflections of nodes and beams.
3) Explain how the loading values for SIDL, Dead lead, plinth load live load is calculated for assigning them in STAAD along with load combinations
To calculate and assign loading values for different load types and load combinations in STAAD-Pro:
1. Self-Weight (Dead Load):
- Calculate the self-weight of the structural elements, including beams, columns, slabs, and any other components. This involves multiplying the volume of each element by its unit weight.
- Assign the calculated dead loads to the respective elements in STAAD. Use the appropriate commands to define the self-weight loads for beams, columns, and other members.
2. Superimposed Dead Load (SDL):
- Superimposed dead loads include permanent non-structural elements such as finishes, cladding, and fixed equipment.
- Calculate the total weight of these non-structural components and distribute the loads to the appropriate locations on the structure.
- Assign the superimposed dead loads to the structure in STAAD, similar to the dead loads.
3. Live Load:
- Live loads are transient loads that vary based on the occupancy and usage of the structure. They include the weight of people, furniture, vehicles, and equipment.
- Determine the live load intensity based on the building code or standards relevant to your project. This could be specified in terms of a uniformly distributed load (UDL) or a concentrated load.
- Distribute the live loads on the structure as per the prescribed guidelines.
- Assign the live loads to the structure in STAAD using the appropriate commands.
4. Plinth Load:
- Plinth loads are concentrated loads due to walls, columns, or other vertical elements supported by the structure.
- Calculate the loads from the walls or columns and distribute them to the beams or slabs below.
- Apply the plinth loads to the corresponding nodes in STAAD.
5. Load Combinations:
- Load combinations are different combinations of various load types that represent realistic and extreme loading conditions that the structure might experience.
- Refer to the relevant design codes (e.g., IRC, IS code,Eurocode) to determine the required load combinations. These codes provide guidelines on how to combine different loads based on their probabilities of occurrence.
- Define these load combinations in STAAD using the LOAD COMBINATION command. Each load combination is a linear combination of individual loads with appropriate load factors.
6. Load Factors:
- Load factors are used to account for uncertainties in load magnitudes and ensure a certain level of safety in the design.
- Load factors are specified by the design code and depend on the load type and the intended performance level of the structure (e.g., serviceability or ultimate limit state).
- Apply appropriate load factors to the loads in each load combination.
4)Create a slab in STAAD as per the video, assign the supports & loadings and extract the moments, perform the section checks, there by calculate the reinforcement for the slab.
-
Model Creation:
- Open the software (e.g., STAAD) and create a new project.
- Define the project settings, units, and material properties.
-
Geometry and Nodes:
- Define the geometry of the slab by specifying the coordinates of nodes.
- Use appropriate commands to create nodes and define the slab's shape and dimensions.
-
Beams and Supports:
- Create beams between the nodes, representing edges of the slab.
- Assign supports to nodes where the slab is supported or connected to other elements. Define fixed, pinned, or roller supports using the SUPPORT command.
-
Loadings:
- Define the loadings that the slab will experience. This includes dead load, live load, and any other relevant loads.
- Use appropriate commands to define the load cases and apply loads to nodes or beams.
-
Load Combinations:
- Define load combinations based on relevant design codes and standards.
- Combine different load cases with appropriate load factors to represent various scenarios.
-
Perform Analysis:
- Run the analysis to calculate internal forces and moments in the slab and supporting elements.
- The software will calculate bending moments, shear forces, and other relevant results.
-
Moment and Shear Extraction:
- Review the analysis results to extract the maximum bending moments and shear forces at critical sections of the slab.
- Note the locations where moments and shear forces are highest.
-
Section Checks:
- Based on design codes (such as ACI, Eurocode, etc.), determine the critical sections for moment and shear checks. These are typically locations where the slab experiences the highest loads.
- Compare the extracted moments and shear forces to the design code's allowable limits.
-
Reinforcement Calculation:
- Use the extracted moments and shear forces to calculate the required reinforcement for the critical sections.
- Apply design equations from the chosen design code to determine the area of reinforcement needed.
- Take into account the properties of the reinforcement material (e.g., rebar).
-
Reinforcement Layout:
- Design the layout of reinforcement bars for the critical sections of the slab.
- Follow design guidelines for bar spacing, cover, and detailing.
5) Explain the situations where mid diaphragms are provided in a viaduct.
Mid diaphragms, also known as cross frames or transverse bracing, are structural elements used in viaducts and bridges to connect the main longitudinal girders or beams. They are typically perpendicular to the main girders and provide additional lateral stability and structural integrity to the overall bridge or viaduct system. Mid diaphragms are particularly important in certain situations to enhance the performance and safety of the structure. Here are some situations where mid diaphragms are commonly provided in a viaduct:
-
Lateral Stability: Mid diaphragms help enhance the lateral stability of a viaduct by resisting lateral forces such as wind loads and seismic forces. They prevent the individual girders or beams from swaying or buckling sideways, which could compromise the overall stability of the structure.
-
Torsional Resistance: In viaducts with complex geometry or irregular loading conditions, torsional effects can occur, leading to twisting or rotation of the bridge. Mid diaphragms can help counteract these torsional forces and provide rotational stiffness to maintain the alignment of the structure.
-
Reduction of Girder Flange Deflection: Longitudinal girders in a viaduct are subject to bending moments, which can lead to deflection of their flanges. Mid diaphragms can be strategically placed to reduce the span length between supports, thereby reducing the girder's effective span and deflection.
-
Seismic Performance: In regions prone to earthquakes, mid diaphragms can significantly improve the seismic performance of a viaduct. They help distribute seismic forces more evenly across the structure, reducing the likelihood of localized damage or collapse.
-
Traffic Loads: Viaducts often carry heavy vehicular loads, especially in urban areas. Mid diaphragms help distribute the concentrated loads from vehicles to the main girders, preventing local overloading and ensuring that the load is efficiently transferred through the structure.
-
Prevention of Longitudinal Movement: Mid diaphragms can prevent unintended longitudinal movement of the girders caused by thermal expansion and contraction. This ensures that the girders remain properly aligned and don't shift longitudinally due to temperature changes.
-
Maintenance and Inspection Access: Some mid diaphragms are designed with considerations for maintenance and inspection access. They may provide platforms or walkways for personnel to access different parts of the viaduct for maintenance and assessment purposes.
-
Enhanced Load Distribution: Mid diaphragms help distribute live loads and other dynamic forces more evenly across the structure, thereby minimizing localized stress concentrations that could lead to fatigue or other forms of damage over time.
It's important to note that the decision to include mid diaphragms in a viaduct design depends on various factors, including the viaduct's length, geometry, loading conditions, design codes, and intended service life.
6) Explain the STAAD procedure for design of diaphragm how the results are extracted and explain the formula for hogging & sagging moment of the metro viaduct.
The design of diaphragms in STAAD.Pro involves ensuring the stability and strength of these elements, which are crucial for the overall structural integrity of a viaduct. Diaphragms provide lateral support to the main girders and help distribute loads efficiently. Here's a general procedure for designing diaphragms in STAAD.Pro and an explanation of hogging and sagging moments in a metro viaduct:
Design of Diaphragms in STAAD.Pro:
-
Modeling:
- Create a 3D model of your metro viaduct in STAAD.Pro, including main girders, crossbeams, diaphragms, and supports.
-
Define Properties:
- Assign material properties to the structural elements, including main girders and diaphragms.
-
Loads:
- Apply appropriate loads to the model, including dead loads, live loads, wind loads, seismic loads, and temperature effects.
-
Analysis:
- Perform the structural analysis to determine the internal forces and moments in the main girders and diaphragms.
-
Design Criteria:
- Define the design criteria based on relevant design codes and standards. These criteria will specify the maximum allowable stresses, deflections, and other design parameters.
-
Diaphragm Design:
- STAAD.Pro does not have a direct feature for diaphragm design like it does for individual members. Diaphragms are typically designed using engineering judgment and code requirements.
-
Review Results:
- Review the analysis results to ensure that the diaphragms meet the design criteria. Check for excessive deflections, stress concentrations, and stability issues.
Hogging and Sagging Moments:
Hogging and sagging moments refer to the bending moments that cause a beam to bend upwards (hogging) or downwards (sagging) along its length. In a metro viaduct, these moments arise due to the distribution of live loads, dead loads, and other applied loads.
-
Hogging Moment: This occurs when the bottom of the beam is in tension and the top is in compression. In a metro viaduct, hogging moments typically occur at mid-span where the load is maximum and causes the center of the beam to bend upward.
-
Sagging Moment: This occurs when the top of the beam is in tension and the bottom is in compression. In a metro viaduct, sagging moments occur near the supports where the load causes the beam to bend downward.
Calculation of Hogging and Sagging Moments:
The bending moment in a simply supported beam can be calculated using the basic formula:
M=wL^2/8
Where:
- M is the maximum bending moment.
- w is the load per unit length (uniformly distributed load).
- L is the span length of the beam.
7) Where jacks can be placed for lifting the sections under the diaphragm. Also, what is the distance between the center of the girder to center of the jacks.
Placing jacks for lifting sections under a diaphragm in a viaduct requires careful consideration to ensure safety and proper lifting. The placement of jacks and the distance between the center of the girder to the center of the jacks depend on various factors, including the structural configuration, load distribution, and engineering judgment. Here are some general guidelines:
Placing Jacks:
-
Symmetry: Whenever possible, place the jacks symmetrically under the diaphragm to ensure uniform lifting and minimize the risk of tilting or instability.
-
Support Points: Place the jacks at or near the support points of the diaphragm to ensure stable lifting. Placing jacks too far away from the supports can lead to excessive stresses and instability.
-
Diaphragm Type: The type of diaphragm will affect the jack placement. If the diaphragm is a solid structural element, consider placing jacks at points that allow for even distribution of the load across the diaphragm.
-
Engineering Judgment: Consult with structural engineers or experts who are familiar with the specific design and load distribution of the viaduct. They can provide guidance on the most appropriate locations for placing jacks.
Distance Between Center of Girder and Center of Jacks: The distance between the center of the girder and the center of the jacks will depend on the structural geometry, load distribution, and the desired lifting strategy. There isn't a fixed value for this distance, as it can vary based on project-specific considerations.
However, some general points to consider are:
-
Load Distribution: The jacks should be placed in a manner that ensures even distribution of the lifting load across the diaphragm and girders. This might involve placing the jacks symmetrically and adjusting their positions to align with the main load paths.
-
Structural Integrity: The jacks should be positioned to avoid creating excessive local stresses or causing unintended deformation of the diaphragm or girders.
-
Clearance and Accessibility: Ensure that there is sufficient clearance and accessibility for the jacks to be placed and operated effectively.
-
Consultation: Consult with structural engineers or lifting experts to determine the appropriate distances based on the specific characteristics of the viaduct.
8) Prepare a line model for jacking case, considering the distance between the center of the girder to center of the jacks as 650mm & other inputs mentioned in the video session.
Let's assume you have a viaduct with girders and a diaphragm. Here is a simplified line model for the jacking case, considering the specified distance between the center of the girder and center of the jacks as 650mm:
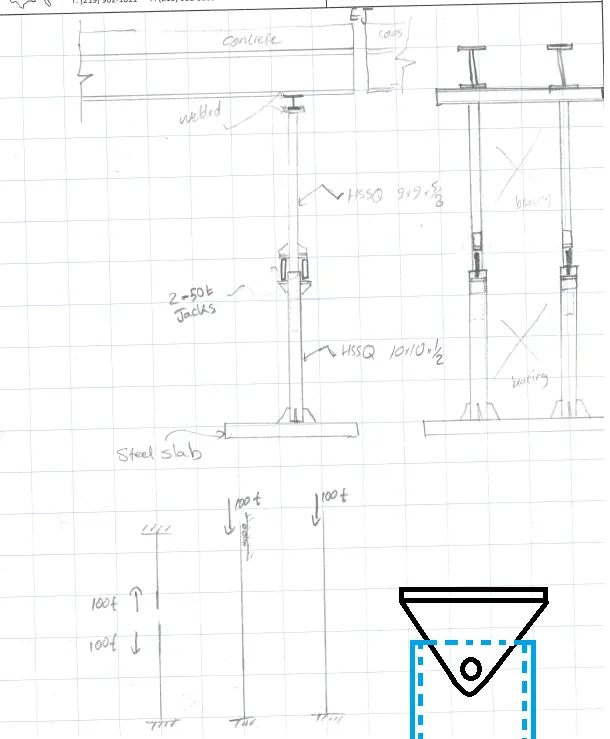
Jack--------------Girder------------- Diaphragm------------------Ground Level
In this representation:
- The "Girder" represents the main girders of the viaduct.
- The "Diaphragm" represents the diaphragm connecting the girders.
- The "Jack" represents the lifting jacks.
Assuming the "Girder" is modeled as a straight horizontal line, you can position the "Jack" directly underneath the "Diaphragm" and aligned with the center of the girder.
Here's how we can describe this setup :
- Place the "Girder" line horizontally, representing the main girder of the viaduct.
- Position the "Diaphragm" line below the "Girder," representing the diaphragm.
- Place the "Jack" underneath the "Diaphragm," aligned with the center of the girder. The distance between the center of the girder and the center of the jack is 650mm.
9) As a result of moment extraction & sectional check, what are the values we attain to check that our design is safe.
When performing moment extraction and sectional checks as part of structural analysis and design, there are certain values that we compare against design criteria to ensure that our design is safe and meets the required standards of structural integrity. These checks are essential to verify that the structural elements, such as beams or columns, can withstand the applied loads without experiencing failure. Here are some key values and checks typically involved:
Bending Moments (Positive and Negative): Bending moments are a measure of the internal forces that cause a structural member to bend. They are calculated at various sections along the length of a member and are typically expressed in force times distance (N-m or lb-ft). The key values and checks include:
- Maximum Moment: The highest positive and negative bending moments in a member.
- Moment Capacity: Compare the calculated maximum moments with the moment capacity of the member's cross-section. The moment capacity is determined based on material properties and design codes.
Shear Forces: Shear forces are internal forces that cause a structural member to slide along its length. They are calculated at various sections and are typically expressed in force (N or lb). Key values and checks include:
- Maximum Shear Force: The highest shear force in a member.
- Shear Capacity: Compare the calculated maximum shear forces with the shear capacity of the member's cross-section. The shear capacity is determined based on material properties and design codes.
Deflections: Deflections refer to the amount of bending or deformation a structural member experiences under load. While they don't directly indicate failure, excessive deflections can affect the structural performance and user comfort. Key checks include:
- Maximum Deflection: The highest deflection at critical sections.
- Deflection Limits: Compare the calculated deflections with design limits specified in codes. These limits ensure that the deflections are within acceptable ranges.
Sectional Checks: Sectional checks involve comparing the calculated internal forces (moments and shear forces) to the capacity of the member's cross-section. This is typically done using a resistance factor (safety factor) to ensure that the member can safely carry the applied loads.
Stadd-Pro Model and All Results
Given Data:-
- Slab laid on top of 4 I-girders.
- Having supports spaced at 2.0m each.
- Having the following geometrical properties
Thickness of slab = 0.240m
Width of slab = 1.0m
Step by Step Procedure:-
Step (1) - Creating Grid Modeling in STAAD.Pro.
Creating node (0,0,0) -> Create another node using coordinate X ( 1.250,3.250,3.250,7.250,8.50)
Now Add Beam using the beam tab.
Step (2):- Assigning Support
Specification -> Support -> Create -> Pinned -> Add -> Select support 2 -> Select node -> Assign to selected nodes -> Assign.
Step (3):- Assign Property to Model.
Specification -> Property -> Define -> Rectangle -> YD:0.24, ZD:1 -> Add -> Select the property -> Select the beam -> Assign to selected beam -> Assign.
3D Model
Step (4):- Applying Loading on Model
I. Dead Load.
Loading -> Load & Defination -> Load Case Detail -> Tital ( Dead Load ) -> Add -> Select Dead Load -> Add -> Self Weight Factor -1 -> Add -> Select Selfweight - 1 -> Assign to view -> Assign.
II. Edge Load.
Loading -> Load & Definition -> Load Case Detail -> Title ( Edge Load) -> Add -> Select Edge Load -> Add -> Nodal Load -> Node -> Fy: -24 -> Add -> Select Load -> Selclect Node -> Assignto selected Node --> Assign
For the moment Mz: 12 and for another side Mz: -12.
III. Plinth Load.
Loading -> Load & Definition -> Load Case Detail -> Title ( Plinth Load ) -> Add -> Select Plinth Load -> Add -> Member Load -> Uniform force (W: -7 , d1:0.75 , d2:1.25, GY) -> Add -> Select Load -> Select Suitable beam -> Assign to selected beam -> Assign.
For Different member beams according to suitable loads
Uniform force (W: -7 , d1:0 , d2:0.5, GY)
Uniform force (W: -7 , d1:1.5 , d2:2, GY)
IV. Live Load (A).
Loading -> Load & Definition -> Load Case Detail -> Title ( Live Load A ) -> Add -> Select Live Load A -> Add -> Member Load -> Uniform force (W: -80 , d1:0.75 , d2:1.25, GY) -> Add -> Select Load -> Select Suitable beam -> Assign to selected beam -> Assign.
For Different member beams according to suitable loads
Uniform force (W: -80 , d1:0 , d2:0.5, GY)
Uniform force (W: -80 , d1:1.5 , d2:2, GY).
V. Live Load (B).
Loading -> Load & Definition -> Load Case Detail -> Title ( Live Load B ) -> Add -> Select Live Load B -> Add -> Member Load -> Uniform force (W: -80 , d1:0.75 , d2:1.25, GY) -> Add -> Select Load -> Select Suitable beam -> Assign to selected beam -> Assign.
For Different member beams according to suitable loads
Uniform force (W: -80 , d1:0 , d2:0.5, GY)
Uniform force (W: -80 , d1:1.5 , d2:2, GY).
VI. Live Load (A + B).
Loading -> Load & Definition -> Load Case Detail -> Title ( Live Load A + B ) -> Add -> Select Live Load A + B -> Add -> Member Load -> Uniform force (W: -80 , d1:0.75 , d2:1.25, GY) -> Add -> Select Load -> Select Suitable beam -> Assign to selected beam -> Assign.
For Different member beams according to suitable loads
Uniform force (W: -80 , d1:0 , d2:0.5, GY)
Uniform force (W: -80 , d1:1.5 , d2:2, GY)
VII. SLS Load Combination.
Loading -> Load & Definition -> Load Case Detail -> Define combination -> Create title as SLS Case 1 -> Select Load -> Insert Factor -> Add.
- According to Loads create 4 Types of the case in SLS condition.
- All the Load factor is referred from Table 12 IRS CBC code.
- Impact factor is first calculated then add with Live Load factor which is given in the code.
VIII. ULS Load Combination.
Loading -> Load & Definition -> Load Case Detail -> Define combination -> Create title as ULS Case 1 -> Select Load -> Insert Factor -> Add.
- According to Loads create 4 Types of cases in SLS condition.
- All the Load factor is referred from Table 12 IRS CBC code.
Step (5):- Analysis And Result
Analysis And Design -> Analysis Commands -> Run Analysis -> Go to post-processing mode -> Done
1) Dead Load
2) Edge Load
3) Plinth Load
4) Live Load
5) Maximum SLS Case
6) Maximum ULS Case