Assignment 2-RADIOSS Engine File Editing & 3D Meshing Challenge
IMPORTING AND READING RADIOSS STARTER FILE TO ANSWER THE GIVEN QUESTION:
Firts, we have to check the material properties of the rail component. there are two multiple way to ceck the material properties. one of the way is to import the file in radioss and check for the material properties. so after opening the hypermesh, we will choose our user profile as RADIOSS. then we will import the starter file in radioss. in our case, the given file name is FIRST_RUN_0000.rad, we will import this file under import solver deck browser as ahown below,
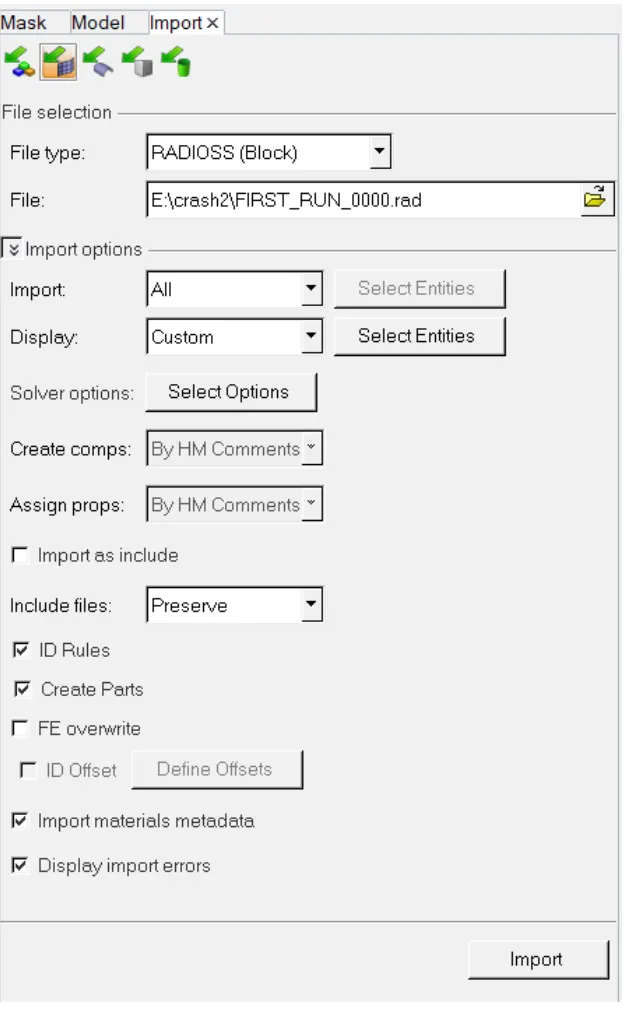
Then we will click on import command after importing the component we can se that rail component in the hypermesh graphics area now to calculate the speed of sound in steel rail, we have the following formula,
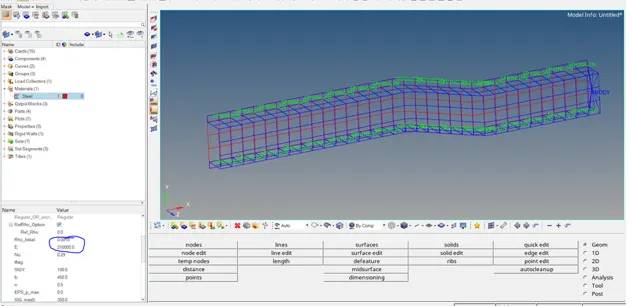
Where, c is the speed of sound, e is the young's modulus, and is density. so based on the formula we will need the value of e and ..of the rail component. we can find these value of rail component in the material properties of the model as shown below,
CALCULATIONS:-
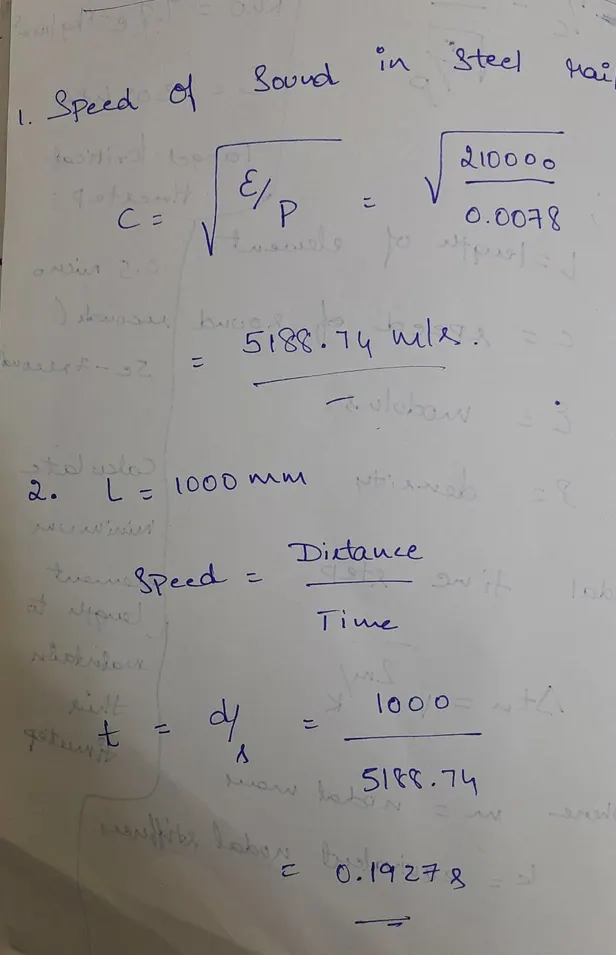
thus the speed of sound in steel rail is 5188.7452 m/s or 5188.7452 mm/ms.
the time required for sound to travel length of rail is 0.1927ms.
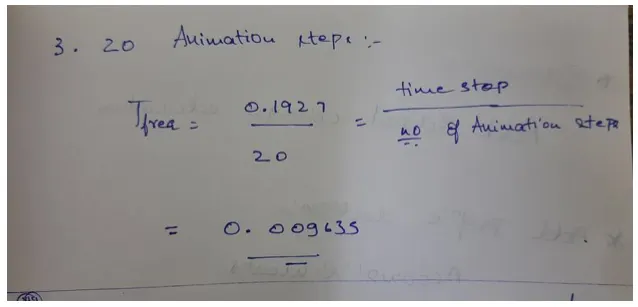
so, the animation has to be captured for every 0.009635 ms.
Now, we have to insert these value in the engine file. we can do this by directly typing these values in the engine file.
RADIOSS engine file editing in notepad:-
We will open FIRST_RUN_0001.rad file in notepad. here we have to idenitify and change the value of termination time and animation frequency.
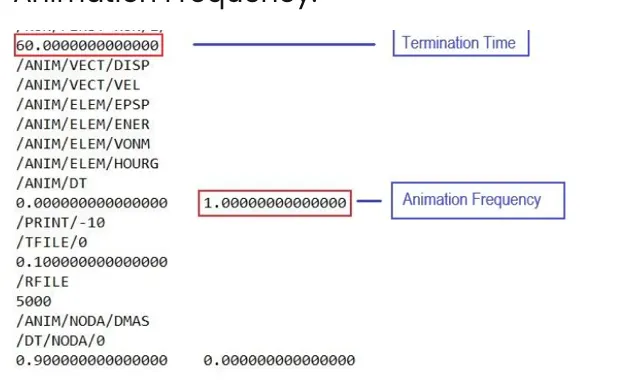
After identifying these values, we will edit them by inputting the values of termination time animation frequency which we got through calculations.
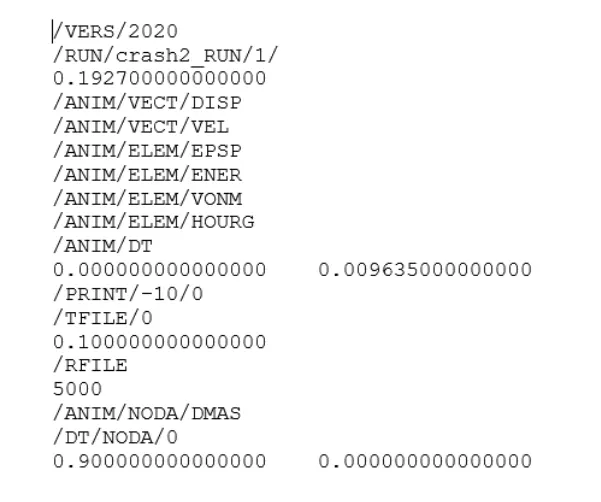
The value edited in the engine file are in green box in the figure above then we will save this file to complete the editing of the engine file.
3D MESHING:-
1. Housing model (tetramesh) - The given is as follow,
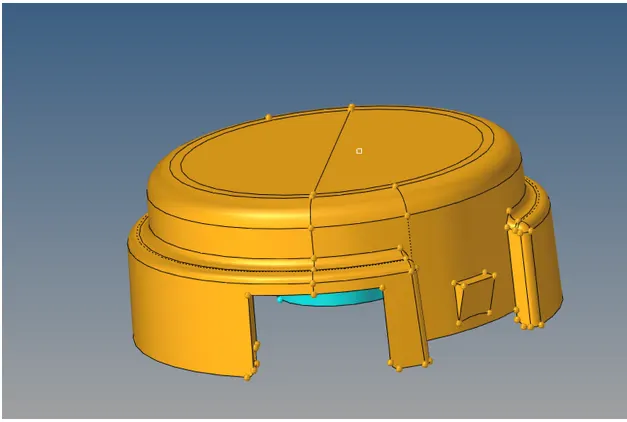
After importing the model in hypermesh, we will look for surface defects in the model in order to perfrom geometry celanup as there were no surface defects in the model, we will proceed for meshing there sre two components in the model which are hub and cover. so we will mesh them one by one in general there are three methods to generate tetra meshing as given below.
. coversion of 2D tria to tetraedral elements, by using tetra mesh panel.
. using the quick tetra mesh from utility panel.
. using volume tetramesh panel.
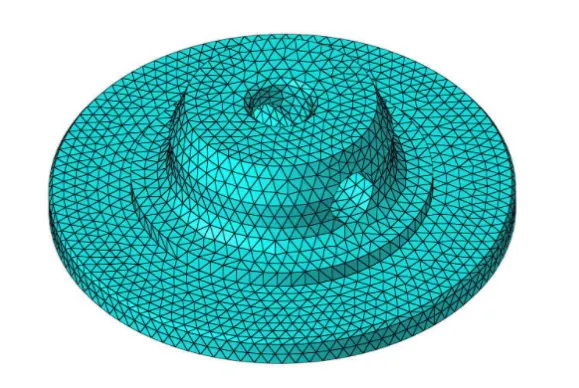
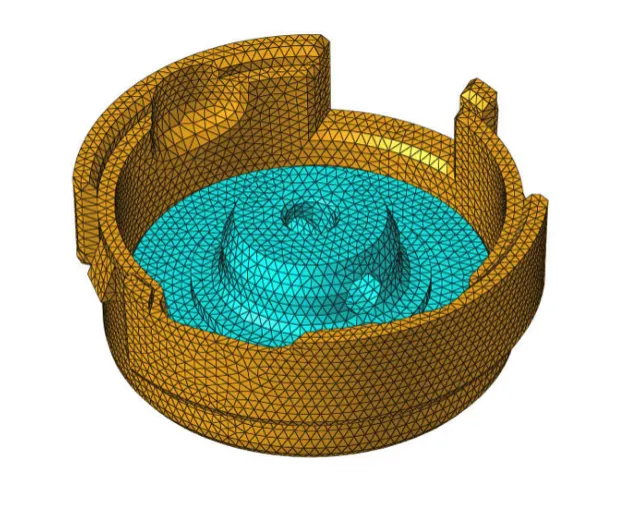
so for hub component we will perfrom meshing by first method i.e converting 2D tria to 3D tera elemnt we will make hub component as our currnt compoent and hide other compoent and them navigate to 2D automesh panel by F12 shortcut key. here we will select the dispalyed surface and enter the value of target elemnt size as 5 mm. the importent thing is we have to select the mesh type as trias only and click on mesh. after element 2D tria elemnt on the hub, we have to convert to 3D tetra elements. for this we will go to tetramesh panel in 3D page where we will select the 2D tria elemnt under fixed trias/quads to tetra mesh option. here we have maintain tet collapse crieria as >0.15 which we will specify before meshing in tetramesh parameters sub-panel.
Now, we can see that mesh element in tetramesh sub-panel. thus the 3D tetra mesh will be create on the model. to verify the 3D mesh, we will mask some elemnet in the mask panel and verify. on order to cheek for tet collapse criteria, we will navigate to check elems panel by F10 shortcut key and check for tet collapse in 3D sub -panel in tetramesh panel before meshing, the we have zero element failling i tet collapse. thus the meshing result of hub component in showing below.
Now we will perform 3D meshing on cover component. we will make it as our current componet and hide all other compoents. we will mesh this compoent by third method i.e volume tetramesh. so we will navigate to volume tetra sub-panel tetramesh panel in 3D page. here we will select the displayed surface, mention elemnent size as 5 and then we will click on mesh. this feature wil craete 3D tetra in the enclosed volume of the component now we will again check for tet collapse criteria. as we specified the tet collapse critria to be greater than 0.15 in tetranmesh panel before meshing, we have zero element failing in tet collapse. thus the meshing result of cover component in shown below.
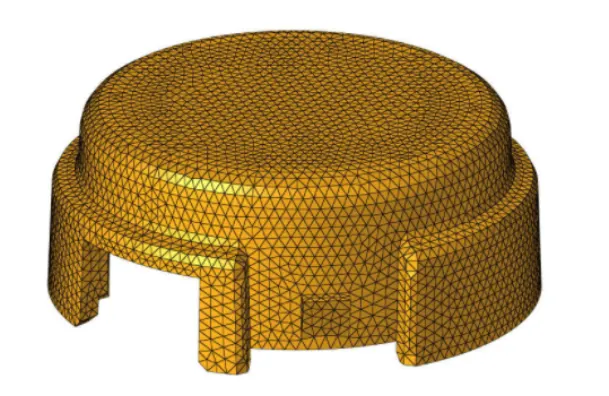
At the end we delet the 2D tria elemnt which we create earlier on hub component. to do this we will navigate to delete panel by F2 shortcut key. here we will select elemnets by config as tria 3 and click on select entities which are displayed this will select all the 2D tria elements. then we can click on delete entity option to delete all the 2D trias and have only 3D tetra in our model.
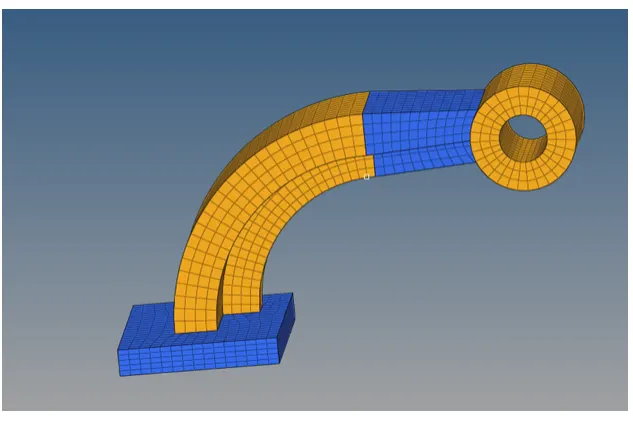
2. Arm bracket (hexamesh)-the given model is as follows,
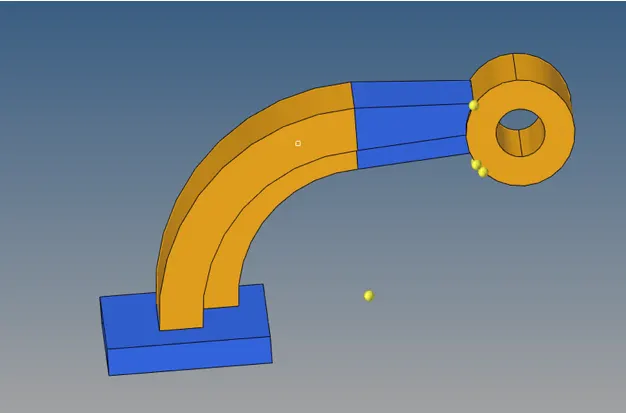
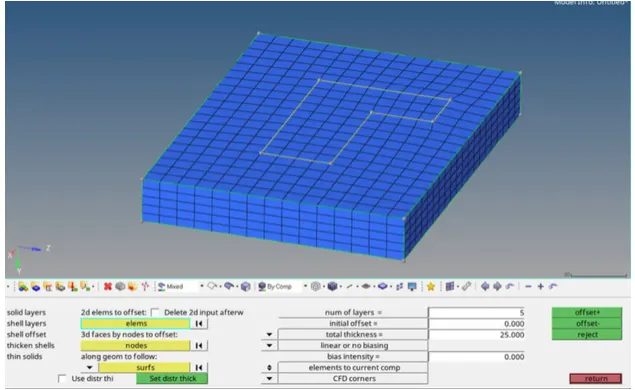
After importing the model in hypermesh, we will look for surface defects in the model in order to perfrom geometry cleanup. as there were no surface in the model, we will proced for meshing. there are four component in the model which are base, arm curve arm straight and boss so we will mesh them one by one. at first, we will mesh base componet as it can then be useful to mesh the other tree component. we will make as it as our current component an hode all other component. for base component, we create 2D mesh on its to surface by selecting the mesh type as mixed so basically we will create all 2D quad elemnt, we will offset these element so we go to elem offset panel in 3D page. here under solid laters panel, we will select the 2D elemnet to offset, mention the number of layers as 5 and totlal thickness which is measuered as 25 and click on offset command this will create 3D hexa element by offsetting the 2D elements in 5 layers to a thickness of 25.
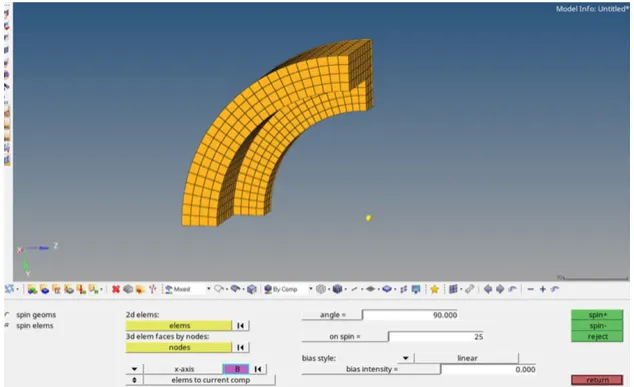
Now, we will mesh the component connecting the base which is arm_curve as the base component has the imprint topology arm_curve component. we will make it as our current component and hide all other component. the geometric for this component is ike a partial torus. so we can spin panel the element to obtain 3D hexa mesh. so we will navigate to spin panel in 3D page. here under spin elem sub-penel we will select the element from the imprint area, enter angle as 90, on spin as 25 and select x-axis as our rotation axis for base point we will navigate to distace panel by F4 shortcut key and create a center node with the help of three nodes option. this center nodes will be used as the base point and then we will use spin option to spin the elments. thus the 3D hexa elements will be create along the geometry profile in 25 layers.
Now, we will mesh the component connecting the arm_curve which is arm_straight. as this component has tapered geometry, we will perfrom liner solid command to obtain 3D mesh. we will need 2D elements or faces to create linear solid. so we will create faces from the 3D hexa element of arm_curve component. we select the element of arm_curve elemnt. on the other tapered of the arm_straight component, we will create 2D mesh in such a way that the node and element are exactly corresponding to the opposite face as shown below.
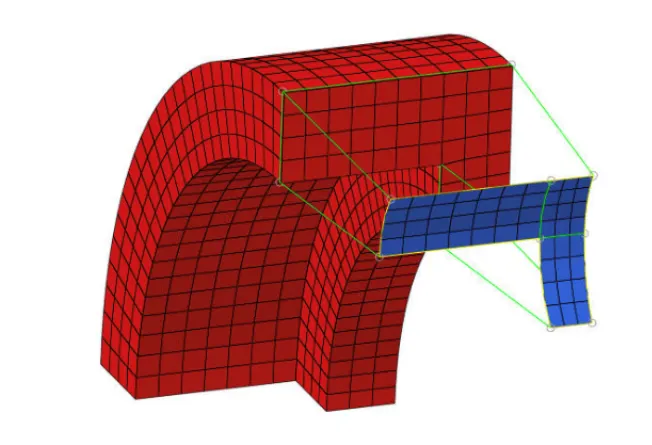
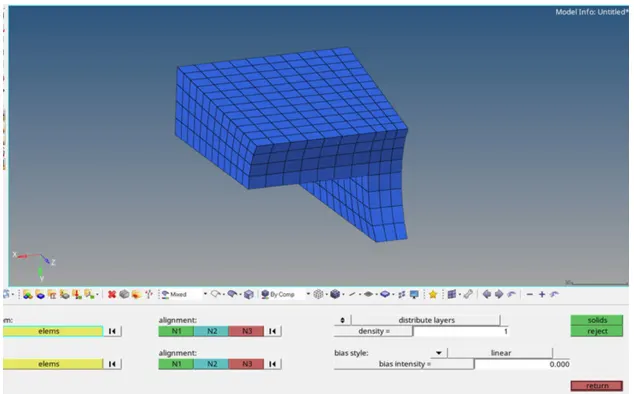
The we will go to linear soild panel in 3D page. here we will select from element as the face element present on the joining surface of both the component which are in red and to element as the tapered surface element which are which are in blue. we have to make sure that there is proper node alignment, we will set the density to 12 and solid hexa elements connnecting both the mesh. now we will delete the face create earlier and get the final result as follows,
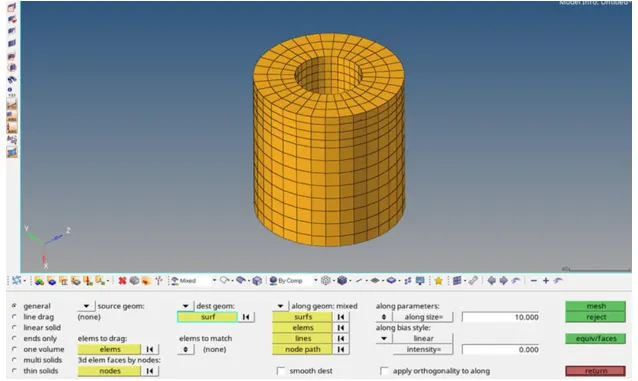
Now wewill perfrom meshing on boss component we can mesh this compoent using general solid map since we also have to connect the mesh to the element of arm_straight component. at first, we will project an outermost node to one of the plane surface of the component using project commnant. then we will create 2D mesh on the other palne surface. then we will navigate to general sub-panel under solid map panel in 3D page. here we will specify source geom to none, dest geom to be the opposite surface, elems to drag will be the 2D create elements, along geom to be node path and the click on mesh. this will create 3D hexa element connecting the element of arm_straight component. these elements will be stored in a new component named solidmap. we will move these elements to boss component using organize command thus the is ass follows,
At the end, we will delete al, the 2D shell elements present in the model to do this we navigate to delete panel by F2 shortcut key. here we will select element by config as quad4 and click on select entities which are displayed. this will select all the 2D quad elements then we can click on delete entity option to delete all the 2D quads and have only 3D hexa in our model.
FINAL RESULT:-
CONCULATION:-
The speed of the sound in steel and the time taken by the sound wave to travel through the lengh the stell rail has been successfully calculated. these calculate valued are given as the terminalation time and the frequency of the animation output in the engine input file by editing the rad file directlty. then the two component (housing and arm bracket) are meshed using the 3D solid elements (tetra and hexa) with the required quality and mesh flow.