Week 8:- 3D Finishing - Challenges 1
1) What do you understand by the 3D finish process?
3D finish Process
It is a process where the design is being completely finish and ready for final simulation and 2d detailing.
- While finishing the design the nominality is checked which ensures the easy assembly of all the units.
- The hole concentricity and holes sizes are checked which ensures the assembly of different parts.
- The gaps between the different units are checked to ensure the proper individual working of different units.
- Design the rough locators, which helps to loading a panel in correct orientation.
- Design the pneumatic lay outing for pneumatic connection.
- Gun study is major and most important part in 3d finishing.
- Selection of sensors, Solenoid valves as per the requirement and implementing in design.
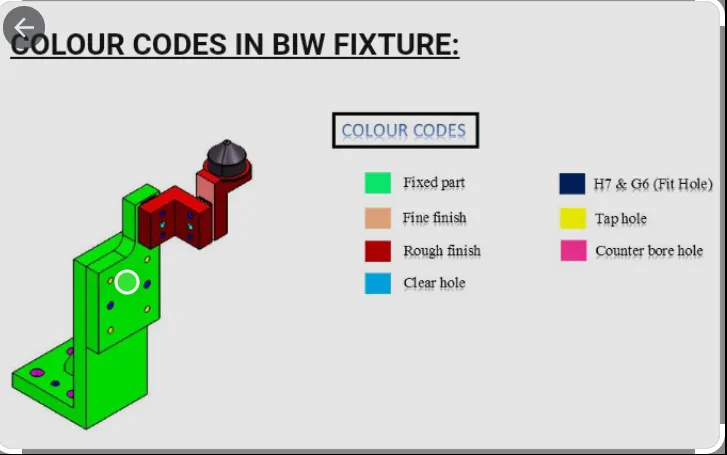
- Fasteners are implemented as per the hole size and the standard colour codes as per the customer requirement are applied to differentiate the type of hole whether its dowel hole, Threaded hole or clearance hole.
- Renaming of the assembly and the part is done to give every part a different identity so everyone can identify in which assembly this part is going to be fit.
- After doing all these things the model is sent for simulation and 2d detailing.
2) What are the points need to be taken care of while finishing the design?
The following are the points taken into consideration while finishing the design
- Hole Concentricity and Hole Sizes-
All part holes concentricity and hole sizes are checked for easy assembly while finishing the parts.
- Machining Area-
The machining area in every part should be defined and the machining area should be highlighted by using standard colour code. Machining is to be done on parts to properly Mount with mating parts. Machining only on desired faces reduces cost and save time. And also Machining increases accuracy of dimension. So before going to simulation or detailing machining area should be defined.
- Nominality-
All unit’s dimension should be maintained nominal to facilitate easy assembly of the unit.
- Holes Colouring Standard-
- In a 3D finish hole colouring should be done because it helps to identify what type of hole it is. It depends on customer standards. Customer specific colour like:
- Dowel hole should be given blue colour.
- Threaded hole should be coloured with yellow.
- Counterbore, open hole should be given cyan blue colour.
- Pneumatic Lay outing-
Pneumatic lay outing is collection of different pneumatic pipes which work as a inlet to the pneumatic cylinder. It should be done properly for proper functioning of the units.
- Gaps Checking-
The gaps between the different units are checked to ensure the proper individual working of different units.
- Fasteners Implementation-
Fast should be implemented in all the units as per the requirement and load on the part.
- Avoiding Clash Between Different Parts-
Proper gap should be maintained between units to avoid the clashes between the different units.
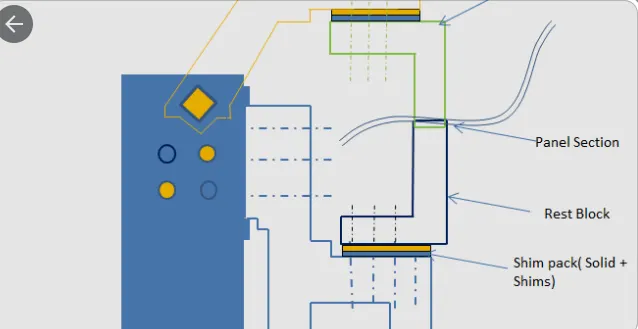
- Mylar Splitting as Per Panel Profile-
Mylar splitting as for panel profile should be confirmed while finishing the design.
- Proper Renaming of Parts or Assemblies as Per the Standards-
Proper renaming of parts and assembly should be done while finishing the design and hence we can identify each and every part easily with Unique Identification.
3) What are Rough Locators & What is their use?
Rough Locators
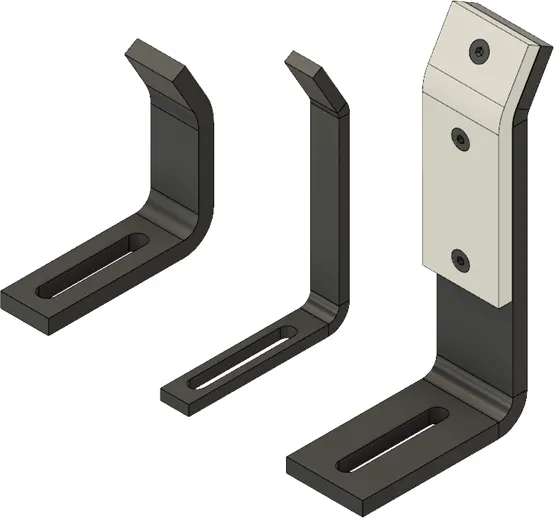
- A rough locator is a part designed to guide the panel, to locate the car panel on to the pins accordingly. A rough locator can be of standard part or a make part.
- Rough locators also work as Poka yoke. Poka yoke is a Japanese concept used for mistake proofing.
- Rough locators are also used to help to locate the work pieces in the automation process. Locating refers to the desired location where you want the workpiece to be when it is getting worked on either by a person or a team or a robot.
- The accuracy of the locating components directly affects the consistency and how the final product will come out. This is why these components are essential to our setup.
- It can be also called as fool proofing method. Because without rough locator the part cannot be loaded in correct position.
- The rough locators are set accordingly to the angle of the respective panel and hence the part can be loaded in a defined direction and orientation only.
4)What are the points you need to consider while designing a rough locator?
The following points needed to be considered while designing the rough locator
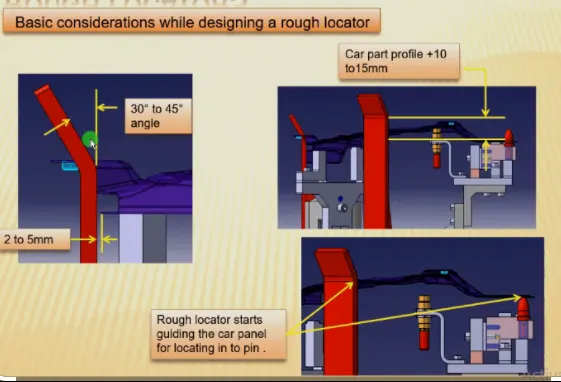
1.Rough locator should be placed at the edges of the car panel, which it has to guide.
2.Applicator has to be placed in the same angle of the car part edge with a minimum distance of 2-5 mm from the edge of the car part.
3.Rough locator should guide the panel in pin arresting direction.
4.Rough locator should start guiding the panel before 10 to 15mm to the start of the pin engagement.
5.Applicator should be designed with entry angle for the car panel. Generally, it ranges between 30-45 degree.
6.Rough locator should be designed with two slots to mount the easy adjustment.
7.The slot should be in the direction of car part guiding.
5) What is the Gun study process?
Gun Study Process:
- Welding is predominantly used in automobile industries and requirements for fixtures that ease the welding process is a continuous development task in any industry.
- Car Body-In-White (BIW) is a complicated steel-structure including 300-500 sheets with complex shape and are assembled by means of welding in a high rhythm through 55-75 robotic work-stations.
- The foremost step taken before starting the design of welding fixture is to arrive at the spot weld locations.
- The location and orientation of other critical units of the fixture including clamps, locators etc., are decided based on the weld spot distribution.
- The weld spots for Front door inner panel - side bracket assembly are located with respect to the body line of car.
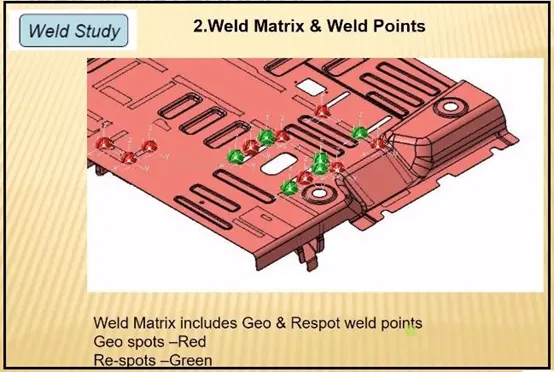
- It includes information of weld gun detail, weld matrix & weld points. There are two types of weld points geo weld point & re-spot weld point.
- Geo weld points defines the geometry of part & re-spot do all other remaining weld points also add strength to geo weld points. The spots can be geo spots or re-spots.
The front door inner panel and side bracket of GM sedan car are to be spot welded as shown . The previously spot-welded inner panel assembly is then welded with the cross bracket as shown below in fig 2-
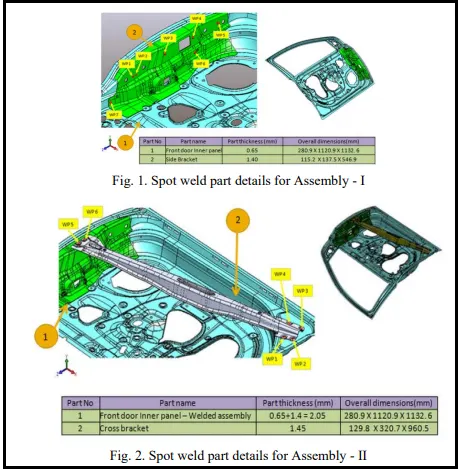
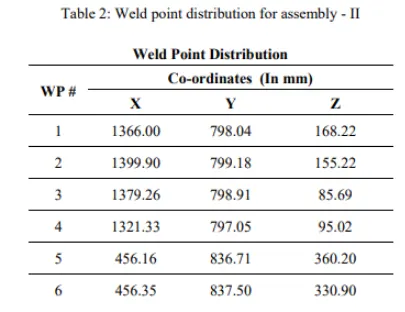
Weld spots for each weld assembly are highlighted in Figure 1 and 2 as WP1, WP2, WP3 and so on.
The Weld points forms the base for fixture design, the clamping plan & locating plan are done based on the weld spot distribution.
The weld spots for Front door inner panel - side bracket assembly are located as shown in Table 1 with respect to the body line of car.
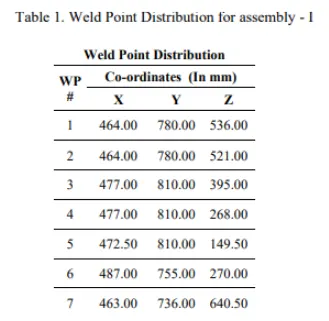
The weld spot locations with respect to the body line of car are-
It includes the study of weld gun (A portable device for semiautomatic welding of parts of various articles) which is going to be used for the operation depending on the size of the part, thickness of the part etc.
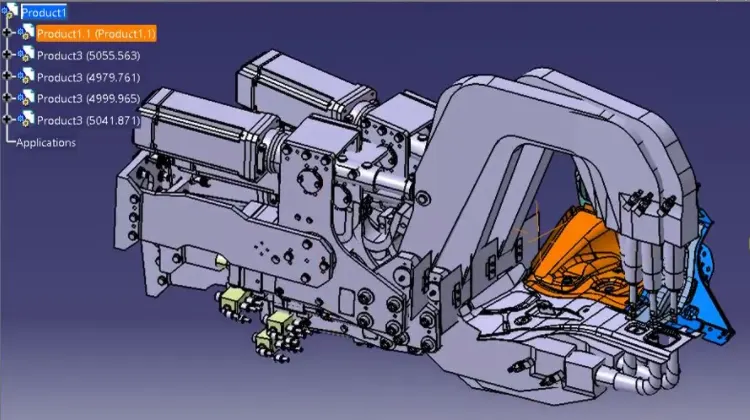
- In weld gun study the gun which is going to be used while spot welding is checked over the panel by using the 3D software.
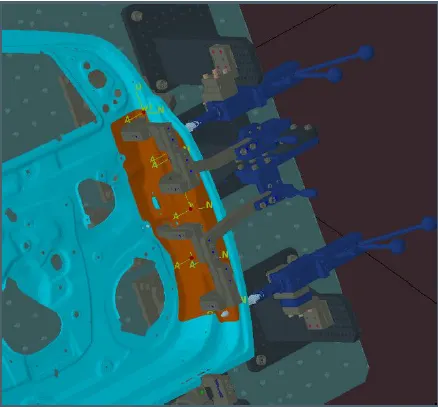
- The fixture is designed for the car panel to hold it on the position, the weld gun position is checked over the predefined spot weld points, whether the gun fall to the fixture unit or not.
- If weld gun falls to the fixture unit then redesigning of that unit or the repositioning of that unit is done & again confirmed whether the gun is falling or not
- Fixtures are redesigned if the gun falls to the fixture unit, the weld spot positions remain same.
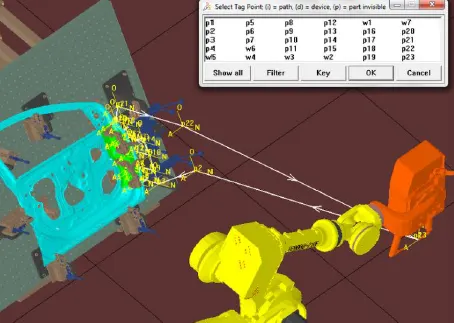
- The weld spots are defined on the prescribed locations as shown in figure. The axis of weld spot along welding direction must be normal to the weld surface. To ensure this, the weld spot co-ordinates are created using “SURFACE” option under tags in layout menu.
- In the IGRIP layout, the motion destination position of a device model is represented by a tag point in a Cartesian co-ordinate frame with N, O & A (or X, Y & Z) axes. To calculate the position of a tag point in the layout, it is attached to a part model. With the attachment, the position of a tag point can be determined with respect to the base coordinate system of the part model to which the tag point is attached. In the database, all tag points in the layout are stored with different names.
6) What are the points need to consider during the gun study?
Points needed to consider during gun study:
Weld gun study is very time-consuming process, the entire welding cycle time study depends on the no. of spots & weld gun study.
Following are the points need to consider during gun study.
- The axis of weld spot along welding direction must be normal to the weld surface.
- The no. of weld spots for the panel, the time required to spot each weld & the total time required to complete all weld spots.
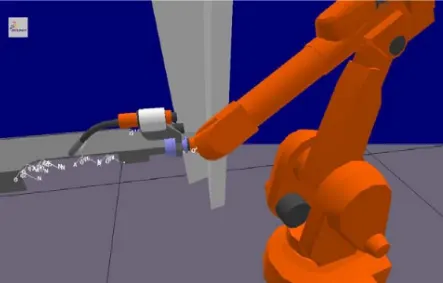
- If we have one or more device models & we want to program, the behaviour of each model in the work cell can be simulated over time. Instructions for each device are coded by giving sequences. The sequence defines the motion, manipulation & action of the devices. Based on the distance of each tag point from home position, motion type, speed & acceleration one can obtain cycle time for each device assigned with sequences. This way robot cycle time is precisely calculated.
- After sequencing all the devices, a simulation is run with “collision check” ON & made sure that the welding operation is collision free.
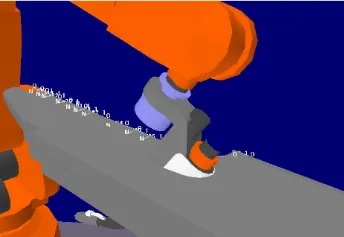
The above image shows collsion while operation
7) What is pneumatic routing?
Pneumatic Routing
Pneumatic systems should be efficient & leak free. Sometimes, they are not, because of improper tube line routing- the result of either lack of knowledge, or corners cut on planning time, or both.
What can go wrong if routing is not done properly? All kinds of thing! From not being able to access fitting for efficient maintenance all the way to leaking connections, inefficient or poor tube routing can create unintended issue that need to be addressed. An ounce of planning is worth a pound of trouble shooting.
Planning tube line routing is a time investment, but can have a big ROI especially for complex systems. During system design, routing should be developed as the next step after sizing the tube lines & selecting the appropriate fittings.
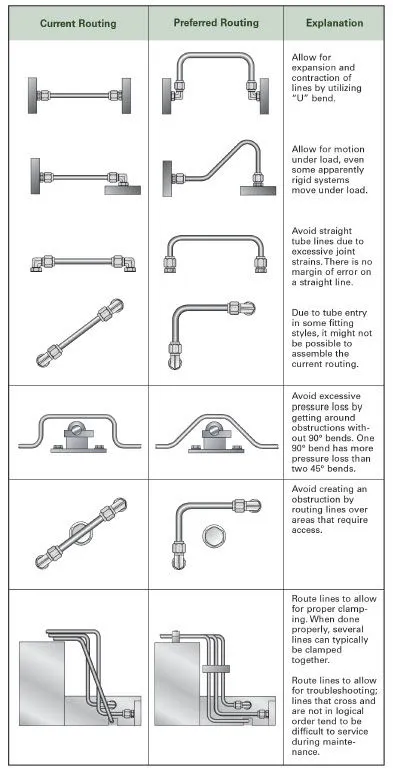
Here are guidelines for planning appropriate tube line routing:
- Leave fitting joints as accessible as possible. Inaccessible joints are difficult and time-consuming to assemble, tighten and service.
- Use software tools to make labour intensive calculations such as pressure drop.
- Employ U-bends to allow for line contraction and expansion.
- Include offset bends to allow for motion under load, regardless of how ‘rigid’ the system seems.
- Favour bends rather than straight tube lines, because a straight-line tube assembly with no bends, like the example of the test stand mentioned above, can cause joint stain, which may lead to leaking.
- Make sure routing design allows room for assembly of any connections required.
- Minimize pressure drop by getting around obstructions with as few 90° bends as possible. One 90° bend has more pressure loss than two 45° bends.
- Route lines around rather than over areas that require regular access or maintenance.
- Design routing with clamping in mind. Appropriate design leads logically to proper clamping.
- Keep troubleshooting and maintenance in mind: focus on logical design and avoid crossed lines.
- Design the tube line routing to reduce likelihood of users standing or climbing on plumbing.
8) What is the solenoid valve?
Solenoid Valve
A solenoid valve is an electromchanically operated valve.
Solenoid valves differ in the characteristics of the electric current they use, the strength of the magnetic field they generate, the mechanism they use to regulate the fluid, and the type and characteristics of fluid they control.
The mechanism varies from linear action, plunger-type actuators to pivoted-armature actuators and rocker actuators. The valve can use a two-port design to regulate a flow or use a three or more-port design to switch flows between ports. Multiple solenoid valves can be placed together on a manifold.
Solenoid valves are the most frequently used control elements in fluids. Their tasks are to shut off, release, dose, distribute or mix fluids. They are found in many application areas. Solenoids offer fast and safe switching, high reliability, long service life, good medium compatibility of the materials used, low control power and compact design.
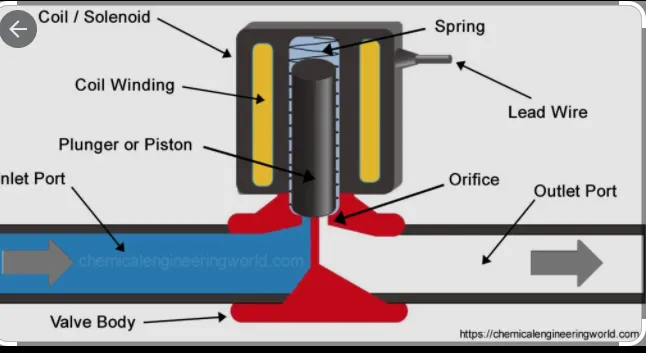
Working-
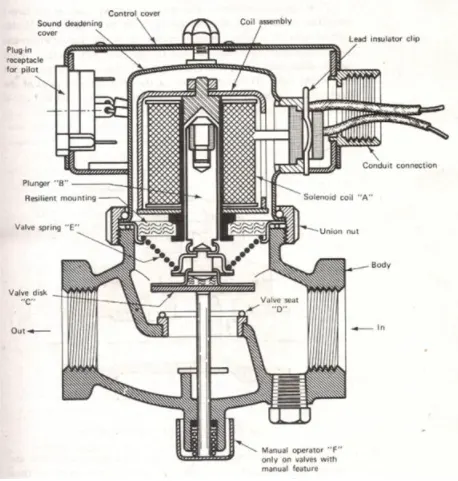
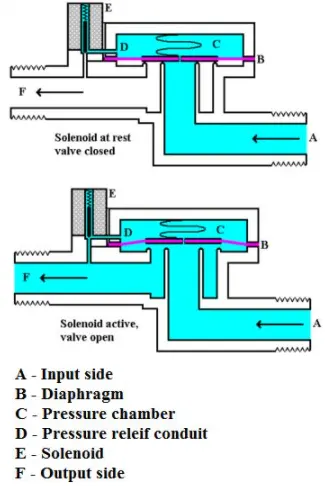
Initially the sensor senses the process towards the outlet side of the solenoid valve. When it senses that certain quantity of the flow of the fluid is required, it allows the current to pass through the solenoid valve. Due to this the valve gets energized and the magnetic field is generated which triggers the movement of the plunger against the action of the spring. Due to this the plunger moves in upwards direction, which allows the opening of the orifice. At this instant the flow of the fluid is allowed from the inlet port to the outlet port.
If the current passing through the solenoid valve is constant, the position of the plunger and hence opening of the orifice remains constant. If the sensor senses that more flow of the fluid is required, it allows the increase in current passing through the solenoid valve, which creates more magnetic field and more upwards motion of the plunger. This leads to further opening of the orifice and more flow of the fluid from the inlet port to the outlet. If the required flow of fluid is less, the sensor allows passage of the lesser current to the solenoid valve.
When the sensor senses that the fluid is no more required in the process, it stops the flow of the current to the solenoid valve completely. Due to this the solenoid valve gets de-energized and the plunger reaches the bottom most position and closes the orifice completely thus stopping the flow of fluid from the inlet port to the outlet port.
In this way the solenoid coil operates the valve as if it is being operated by the human being. When the flow of certain quantity of fluid is required it opens the valve to required extent and when the flow is not required it shuts the valve entirely.
9) What is the valve bank?
Valve Bank
Valve bank is the arrangement of no. of solenoid valves.
Valve bank will have common inlet port, a single servo line to each of the pneumatic valves, and independent vent passages for each solenoid.
On the solenoid bank, each of the solenoid valves separately controls the feed of high-pressure servo air to a single pneumatic valve.
The valve is actuated by selectively energizing the corresponding solenoid to allow servo air to the servo port of the valve. To return the valve to its fail-safe position, the solenoid is de-energized to vent the servo port of the valve to ambient.
The solenoids are two-stage pilot valves and are normally open with the solenoid de-energized, allowing high pressure supply air to the servo ports of the downstream pneumatic valves. Energizing the solenoid blocks high pressure air supply and simultaneously vents the pneumatic valve servo chamber to atmosphere, closing the respective pneumatic valve.
The two-stage solenoid are designed to provide fast response times. The electrical configuration is a dual-coil redundant design providing an isolated circuit topology housed in a single package. Each coil is independent and identical in function.
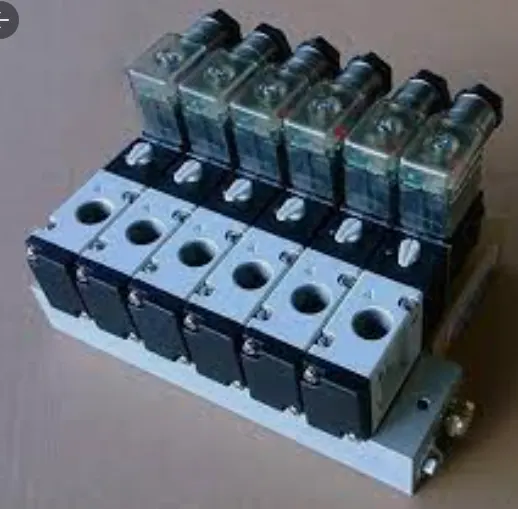
Common Features of Valve Bank
- These are Designed for high vibration levels
- It Uses aluminium alloy manifolds for light weight
- These are Designed for high-temperature environments
- Design architecture allows easy selection of two to six solenoid valves.
10) What is sensor & brief about its application in automation?
Sensor
A sensor is a device that detects and responds to some type of input from the physical environment. The specific input could be light, heat, motion, moisture, pressure, or any one of a great number of other environmental phenomena. In a mercury-based glass thermometer, the input is temperature.
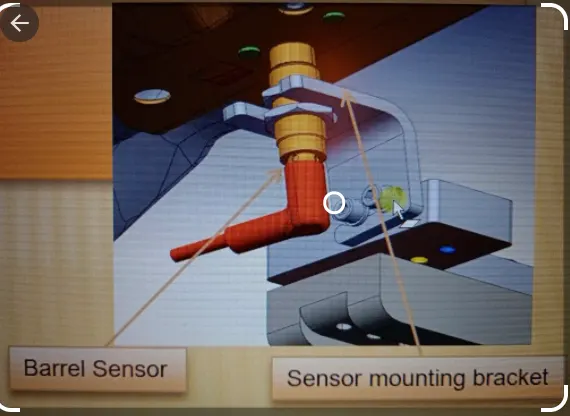
A unit designed to sense car panel using electrical sensors is called sensor unit. It is designed to sense car panel using electrical sensor. This signal the sensor will be fed to the PLC & so next process will be executed.
Sensor unit are used actually in sensing whether panel are there or not or particular component are there or not. Suppose there are 9 no’s of part require for assembly then we have that no. of sensor at least. Whenever operator manually assemble entire component, they do the process like fastening, gluing. The sensor will show that particular component is there or if component is missing it will give an error.
Sensors used in Automation-
- In the industrial automation, sensors play a vital part to make the products intellectual and exceptionally automatic. These permit one to detect, analyse, measure and process a variety of transformations like alteration in position, length, height, exterior and dislocation that occurs in the Industrial manufacture sites.
- These sensors also play a vital role in predicting and preventing numerous potential proceedings, thus, catering to the requirements of many sensing application.
- The various types of sensor used in automation industry are proximity sensors, vision sensors, ultrasonic sensors, position sensors, photoelectric sensors, temperature sensors, inclination sensors etc.
- The applications for position sensors as a whole are broad. They can be used in anything from motion control of a robot, tank level sensing or even in semiconductor process equipment.
- Displacement sensor is used in the precision of objects at the nanometre level & in the measurement of precision thickness of disk drives, assembly line testing & machine tool metrology. It is widely used in machining.
Sensors in autopilot System-
Almost all civilian and military aircrafts have the feature of Automatic Flight Control system or sometimes called as Autopilot.
An Automatic Flight Control System consists of several sensors for various tasks like speed control, height, position, doors, obstacle, fuel, manoeuvring and many more. A Computer takes data from all these sensors and processes them by comparing them with pre-designed values.
The computer then provides control signal to different parts like engines, flaps, rudders etc. that help in a smooth flight. The combination of Sensors, Computers and Mechanics makes it possible to run the plane in Autopilot Mode.
All the parameters i.e., the Sensors (which give inputs to the Computers), the Computers (the brains of the system) and the mechanics (the outputs of the system like engines and motors) are equally important in building a successful automated system.
11) What are the types of the sensor?
Classification of sensors
- There are several classifications of sensors made by different authors and experts. Some are very simple and some are very complex. The following classification of sensors may already be used by an expert in the subject but this is a very simple classification of sensors.
- In the first classification of the sensors, they are divided in to Active and Passive. Active Sensors are those which require an external excitation signal or a power signal.
- Passive Sensors, on the other hand, do not require any external power signal and directly generates output response.
- The other type of classification is based on the means of detection used in the sensor. Some of the means of detection are Electric, Biological, and Chemical, Radioactive etc.
- The next classification is based on conversion phenomenon i.e., the input and the output. Some of the common conversion phenomena are Photoelectric, Thermoelectric, Electrochemical, Electromagnetic, Thermo optic, etc.
- The final classification of the sensors is Analog and Digital Sensors. Analog Sensors produce an analog output i.e., a continuous output signal with respect to the quantity being measured.
- Digital Sensors, in contrast to Analog Sensors, work with discrete or digital data. The data in digital sensors, which is used for conversion and transmission, is digital in nature.
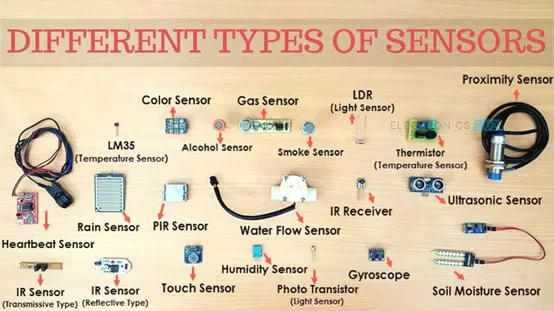
Different Types of Sensors
The following is a list of different types of sensors that are commonly used in various applications. All these sensors are used for measuring one of the physical properties like Temperature, Resistance, Capacitance, Conduction, Heat Transfer etc.
- Temperature Sensor
- Proximity Sensor
- Accelerometer
- IR Sensor (Infrared Sensor)
- Pressure Sensor
- Light Sensor
- Ultrasonic Sensor
- Smoke, Gas and Alcohol Sensor
- Touch Sensor
- Colour Sensor
- Humidity Sensor
- Tilt Sensor
- Flow and Level Sensor
12) What are the fundamental points that need to consider while designing or selection of sensor?
Designing a Sensor
The fundamental points to be considered while designing sensor are-
- Sensor unit is unit designed to sense the car panel by using Electrical sensors.
- The signal from sensors will be fed to the PLC and so the next process will be executed will be this signal.
- Sensos are used for the confirming there is panel/component present or not.
- it should help to avoid human error.
- Basically, sensors should be equal numbers as compare to numbers of panels in a assembly. for ex. if 9 panels are in assembly, so there should be at least 9 sensors used.
- sensors should be Slot is designed in such a way that it can be adjusted in 3 direction.
- Sensors should provide safety to the operator.
- Typically, Proximity, LASER, Photo electric Sensors are used in fixtures.
- Some Major sensor manufactures are IFM, Pepperi-funchs, SICK, OMERON, etc
Selecting a Sensor
Automated test systems have to interact and measure things in the real world. Data on size, distance, strength, weight, pressure, temperature, colour, surface finish, and more may be required to perform the test and analyse the results.
- Accuracy & Precision –These two terms do not mean the same thing, though they are often related. Accuracy has to do with how close the sensor reading is to the true value while Precision refers to the ability of the sensor to detect small changes. (As an example, a temperature sensor that measures boiling water at 97.53°C has high precision but low accuracy.) Both the accuracy and precision of a given instrumentation system must be appropriate for the requirements of the system. Too high of precision can give a false impression that the reading is also accurate or can result in the system detecting noise rather than the actual desired data. A sensor with more accuracy than necessary will be more expensive and more difficult to use properly than one more appropriate to the measurement required. Additionally, both accuracy and precision are affected by errors incurred throughout the system. Transducer error, wiring, signal conditioners, and the gauges or converters used to read the value each add their own errors into the system that must be understood in order to select the appropriate sensors.
- Environment –The selection of the proper sensor requires a good understanding of the environment in which the instrument will be operated. Many sensors can be affected by the non-ideal conditions of a production floor (such as temperature variation, vibration, humidity, chemicals, etc.) It is important to take the environment into account when selecting the sensor and its packaging, mounting, and other options.
- Excitation –Many transducers require power to produce an output signal and it is important to provide a power source that will not introduce additional errors.
- Signal Conditioning –Unfortunately, the world is full of non-ideal realities in sensors. Electrical noise is always present, often more so on production floors, and can cause erroneous readings. Signal conditioners and other protection circuits can provide some protection from these effects before conversion. Sometimes these are useful, but other times it is possible or preferred to process the signals after conversion, so the use of conditioners must be evaluated during the instrumentation design process.
- Conversion –In modern systems, it is often preferred that the instrumentation system provides digital data (rather than analog gauges or chart recorders). The analog to digital converters must be evaluated and matched appropriately to the sensors or errors can be introduced, or money wasted by overpaying for precision in one that is not present in the other. Make sure to properly handle radiometric and non-radiometric sensors by properly matching with converters that are the same.
- Processing –Even if signal conditioning is performed, the sensor and conversion process is full of various sources of error. Some of these errors are linear (consistent effect across the measurement range), while others are non-linear. There are various methods and algorithms that can be used to compensate for these errors or to extract the best possible signal from the system.