Week 2 Challenge
ANSWER:
Aim:-
To write the answers briefly on given essay questions and the analysis practical model on Staad Pro software.
Introduction:-
On this week 2 challenge model 1st question was how to assign the circular section of column, how to assign the unit system in .std file, parameters specifying on bay frame, codal standards and how to specify the compreshive stength. The second one was "input" steps involved in staad pro, difference between fixed and enforced support conditions. The third one was steps involved in analysis of model, two ways of structural frame work, different support condition, how will extract the stress distribution for staircase slab and different ways to view SFD & BMD in staad pro. Finally the practical challenge was create a model on simply supported beam span 20m, point load was 50kN and load located on 5m from each support and the fixed beam of span 16m of UDL was 9kN/m.
Procedure:-
1). Ans:
1. Assign circular section to column:
- Open the staad pro and create a geometry section of column on two node with add beam command.
- After create the geometric model goto proprty option then choose define command, then appear the property window.
- select the circular property the enter the sizes and assign it.
2. Assign unit system to .std model:
- On the view tab we have the option called display option and choose it.
- After selecting goto the structure unit, section unit, force unit and dimension option and choose what you want then assign the unit type you want.
- Then select apply and OK.
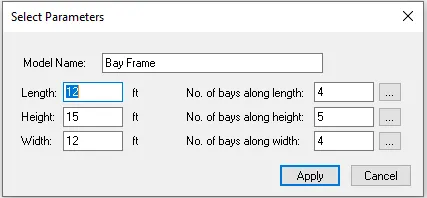
3. Parameters to be specified while using bay frame:
- Model name.
- length, height and width.
- number of bay along length, height and width.
4. Name a few codel standards in staad pro:
- Us
- German
- Eurocode
- British
- Indian
- frensh
- Japan
- Chinese
we used only indian standard codes.
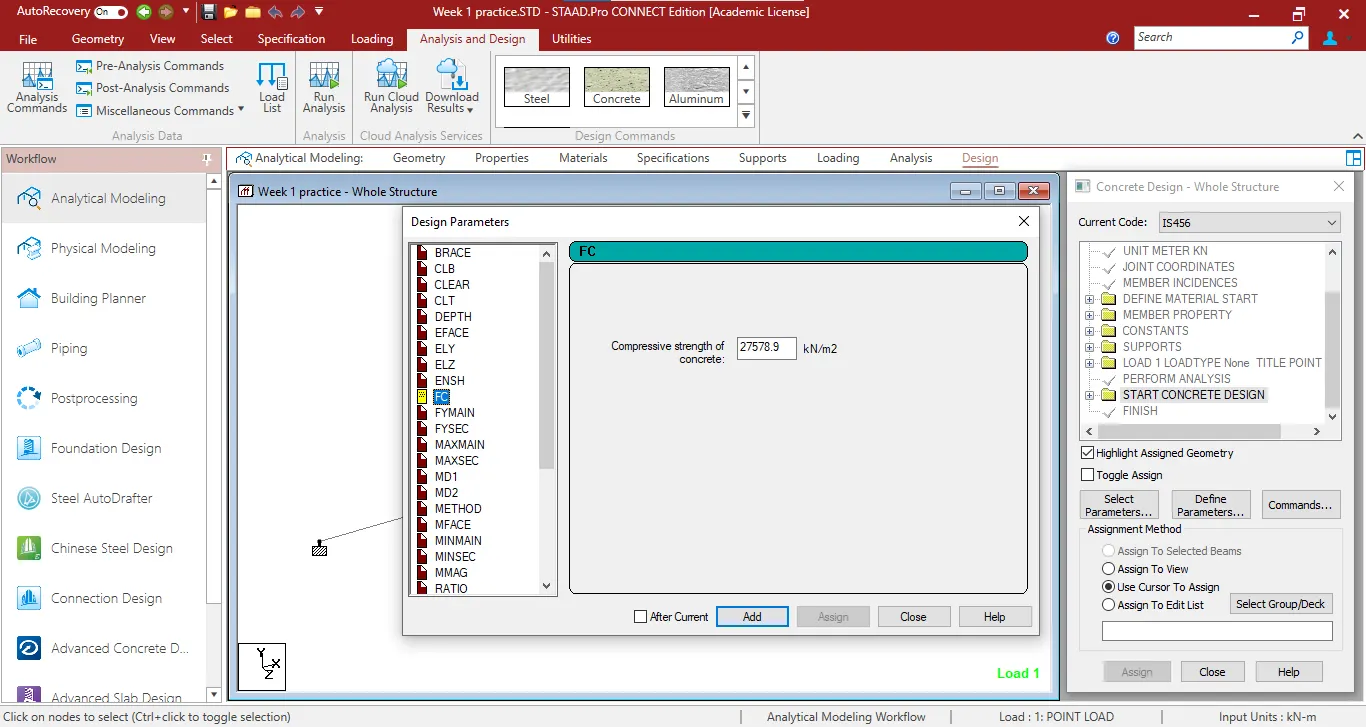
5. Specify the design of compressive strength of RCC:
- Goto analysis and design tab on the top menu bar and choose concrete material,
- we have dialoge box on right side was concrete design - whole structure,
- Then switch the current code as IS 456 and another option called define parameters and click it,
- Appears the design parameter dialoge box and we have the option was FC on left side panel,
- That was the compressive strength of RCC and enter the value.
2). Ans:-
1. Input steps involved in RCC design:
- Geometry: Create the geometry model of the structure use node and beam method.
- Properties: Define the propertie was the which type and which shape and sizes of beams.
- Materials: Assign the type of material on the geometry structure.
- Specifications: the specification are given.
- Supports: assign the supports which one could be adopted.
- Loading: Assign the load type.
- Analysis: Analyse the structure which type you want.
- Design: Finnaly use the design tab to Design the structure.
2. Difference between fixed and enforced supports in Staad pro:
- Fixed support condition: The support displacement load cannot be applied on such models.
- Enforced Support Conditions: There is no provisions to specify a spring constant. the only choices which are built into the program are zero stiffness or very high stiffness. so, its user plan to assign own spring constant.
3). Ans:-
1. Steps involved in analysing the model:
- Before analysing the model assign the support conditions and load types
- Then choose analysis option and define commands used to select the analysis method,
- Various methods like perform analysis, P-delta analysis, perform cable analysis etc,.
- Analysis selection depends upon the support conditions.
2. Two ways of structural/frame work creation:
- Creating model by node by node
- creating model by bay frame
Node by Node way:
- Open staad pro software and create a analytical metric model.
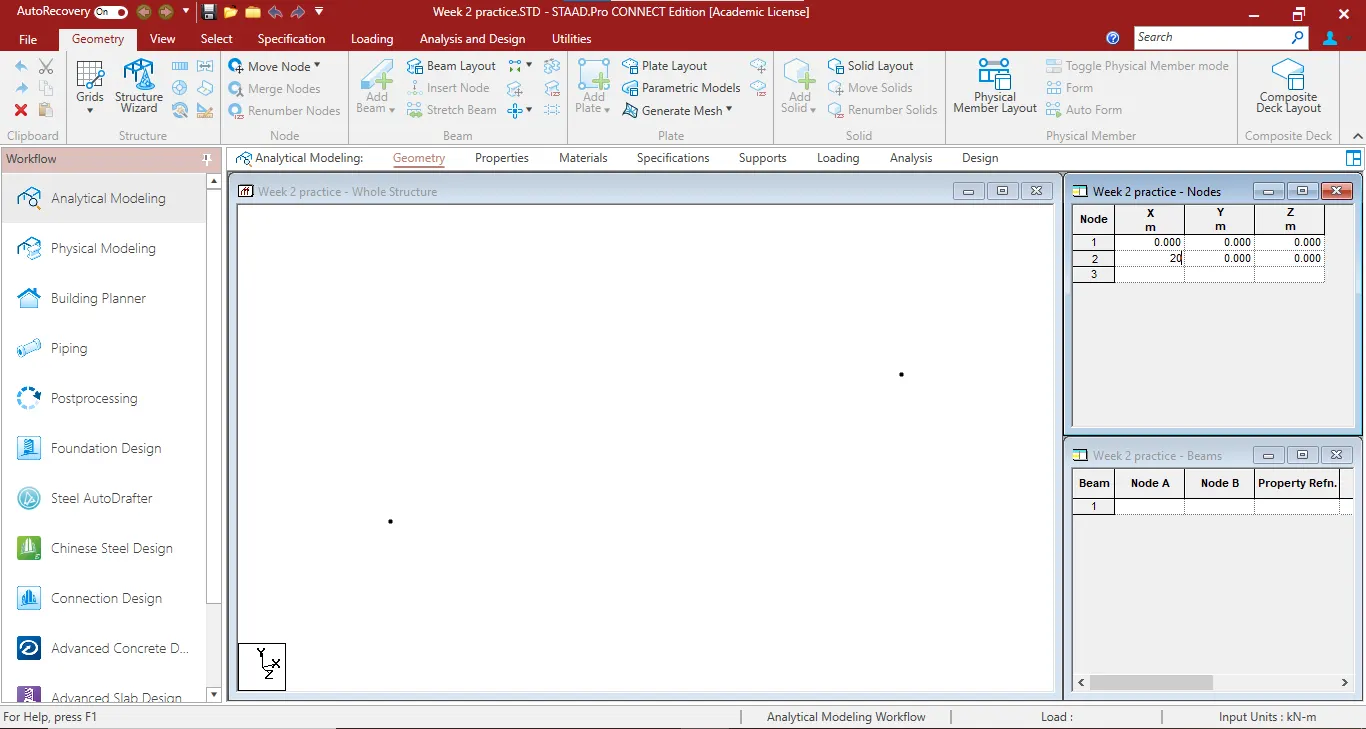
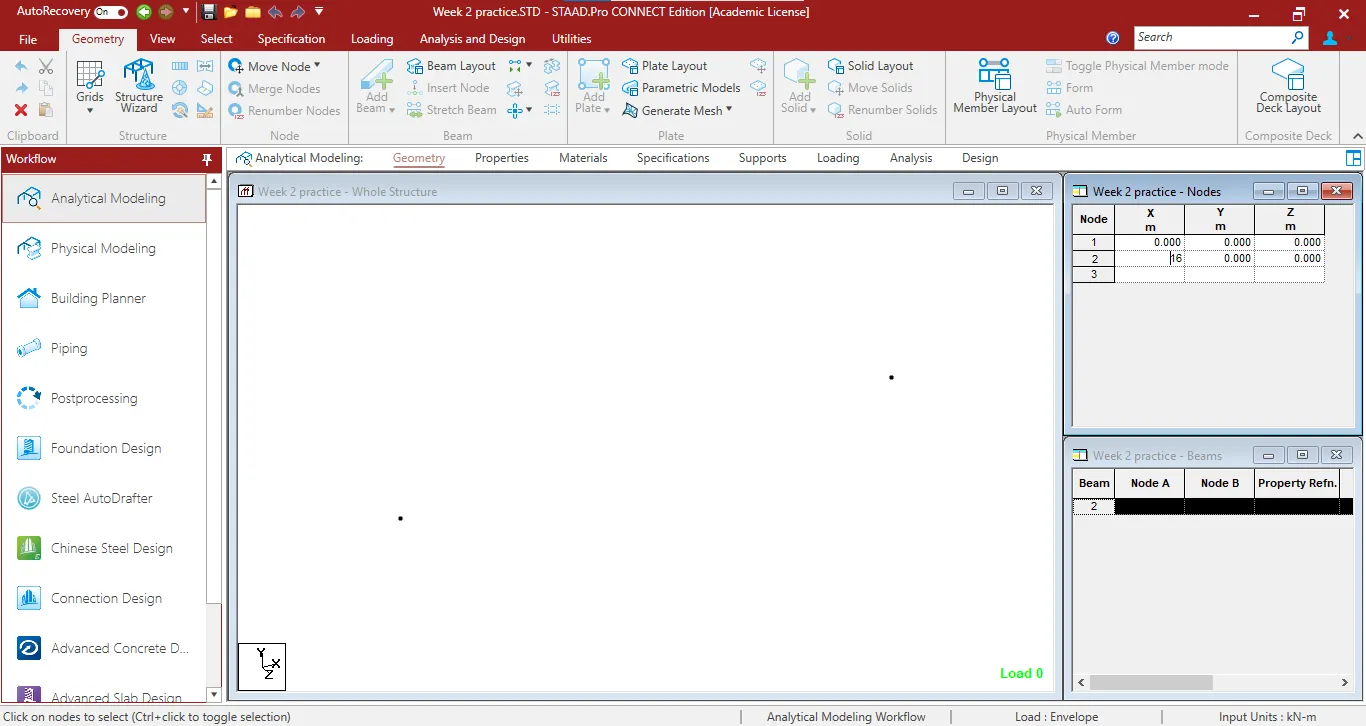
- Goto geometry and select the nodel window enter the nodel values manually on x,y and z axis repectively,
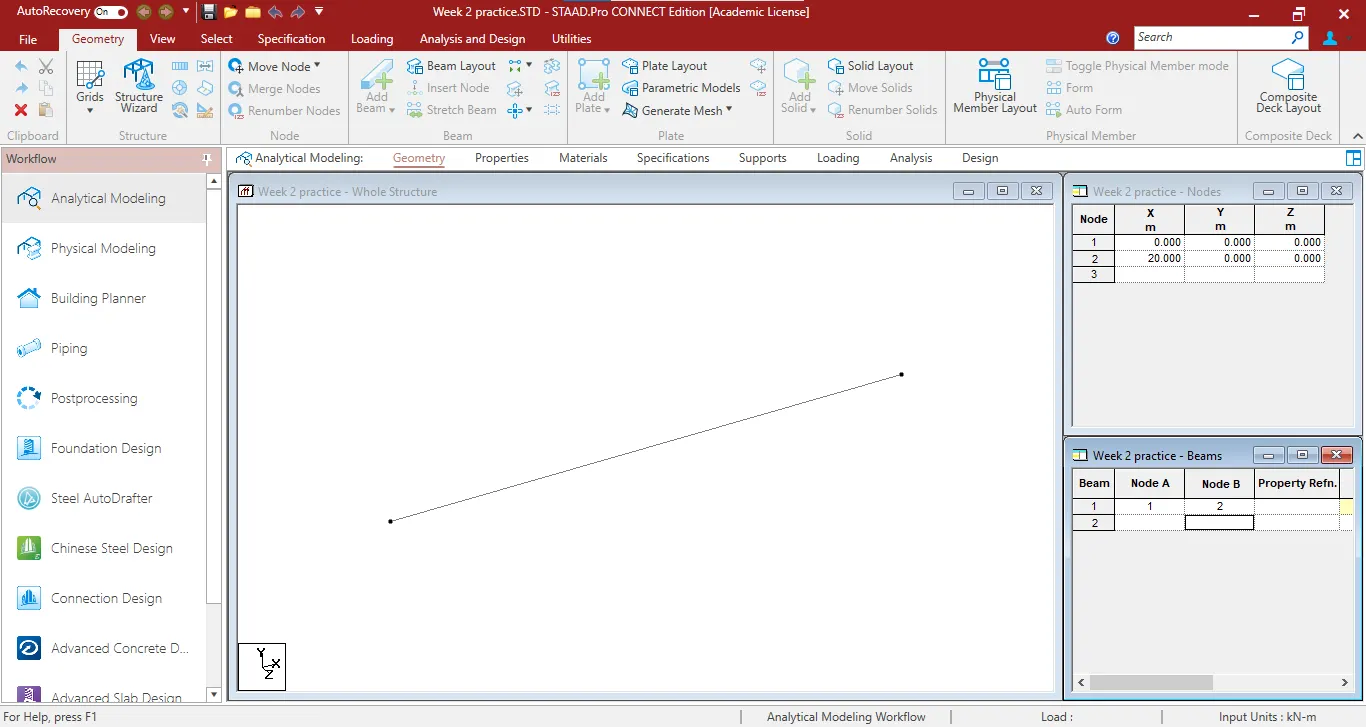
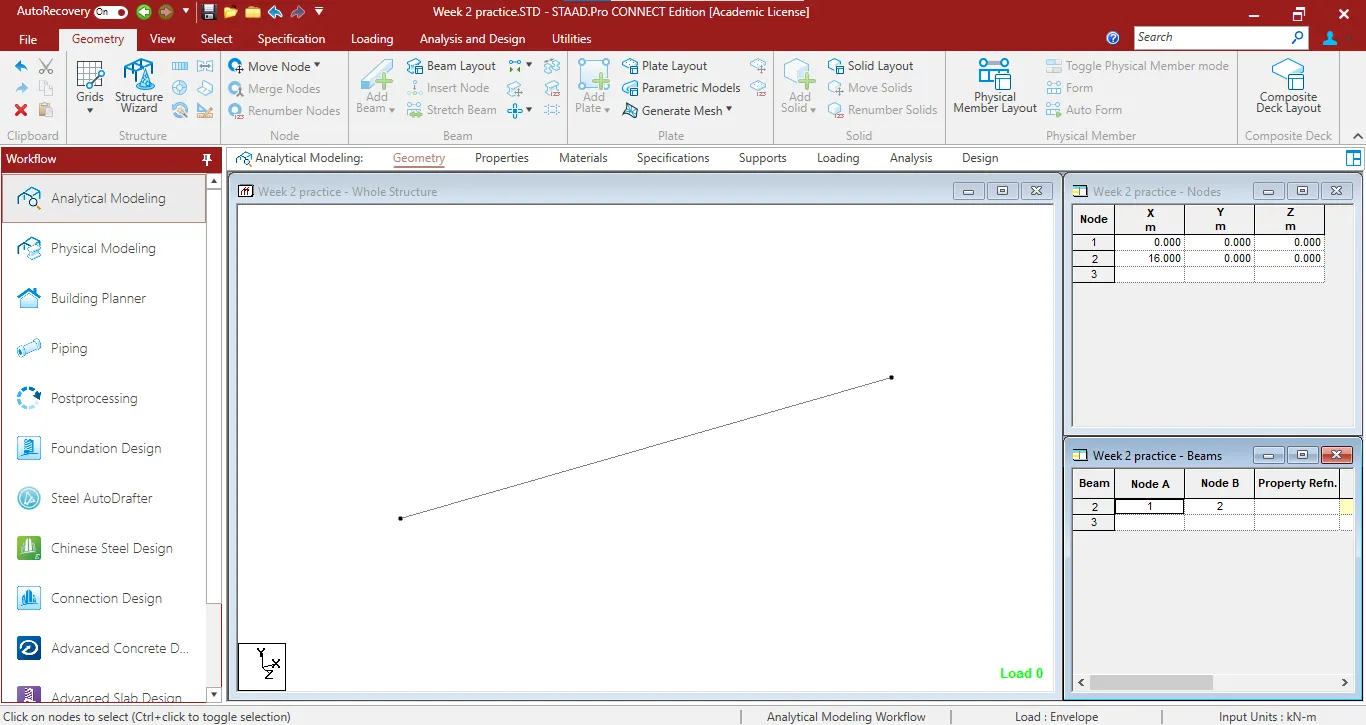
- After the nodel creation goto the beam window or add beam option.
- Enter the nodel numbers and connect the beams.
- The structure creation has been done.
Bay Frame Way:
- Open staad pro software and create metric analytical model.
- Then select aoption called structural wizard on top menu bar and default window will be appeared,
- Select the frame model on the model type,
- Then choose the bay frame and double click it,
- Enter the parameter values manually and select apply,
- The structural frame work was created.
3. Elaborate the different support conditions:
Fixed Support:
- In this type of supports they are fixed and this support the shear force and bending moments are restrained.
Pinned Support:
- In this type of support the shear force are restrained and the bending momemts are releaed.
Fixed But support:
- In this type of support both the bending moment and shear force are release and the spring values are added.
Enforced support:
- In this support condition both the bending moment and shear force condition are restrained.
Enforced but support:
- In this support condition both the bending moment and shear force released.
4. Extract the stress Distribution for a staircase slab:
- Create a stair model using node and add beam method,
- After creation of stair structure use add plate method to create a plate,
- Define the property value of beams and plates,
- Then define materials and specification and support condition and also apply the load conditions too,
- Then analyse the structure,
- Afrter analysing goto post processing work and select the plate result on the ribbon tool bar,
- The plate stress contour diagrams window will be appeared and select the stress options and apply it,
- The stress distribution value will appeared on right side of window,
- Select the plates and stress values are shown.
5. different ways to view SFD and BMD:
- After analysing the structural model,
- Goto the postprocessing method and select the reaction tab on ribbon tool bar to see the SFD and BMD,
- Another one was select the layout option on the result tab on top menu bar to view the SFD and BMD Diagrams.
Practical:-
A. Simply supported Beam:
- Open a staad pro software and create a metric analytical model,
- On the geometry tab use node and add beam or beam window option to create a span length of 20m beam structure.
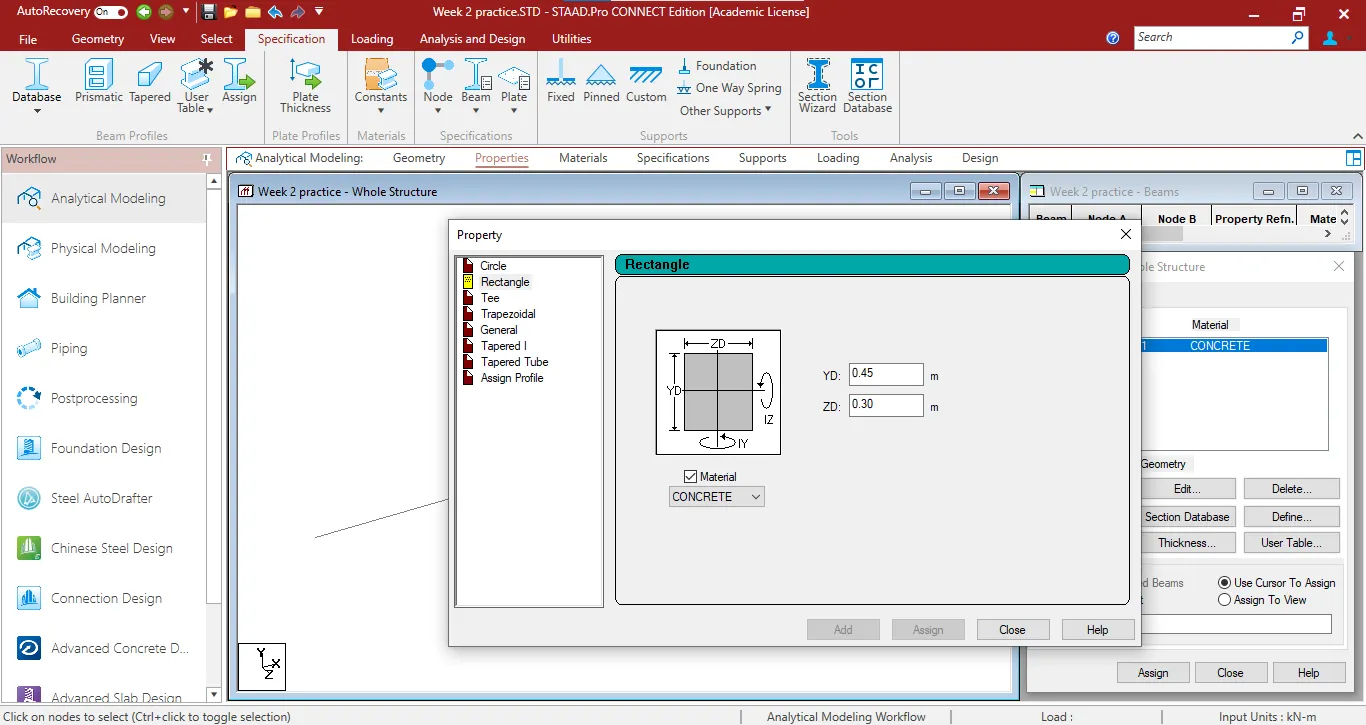
- After define the properties, materials and specification as per standars.
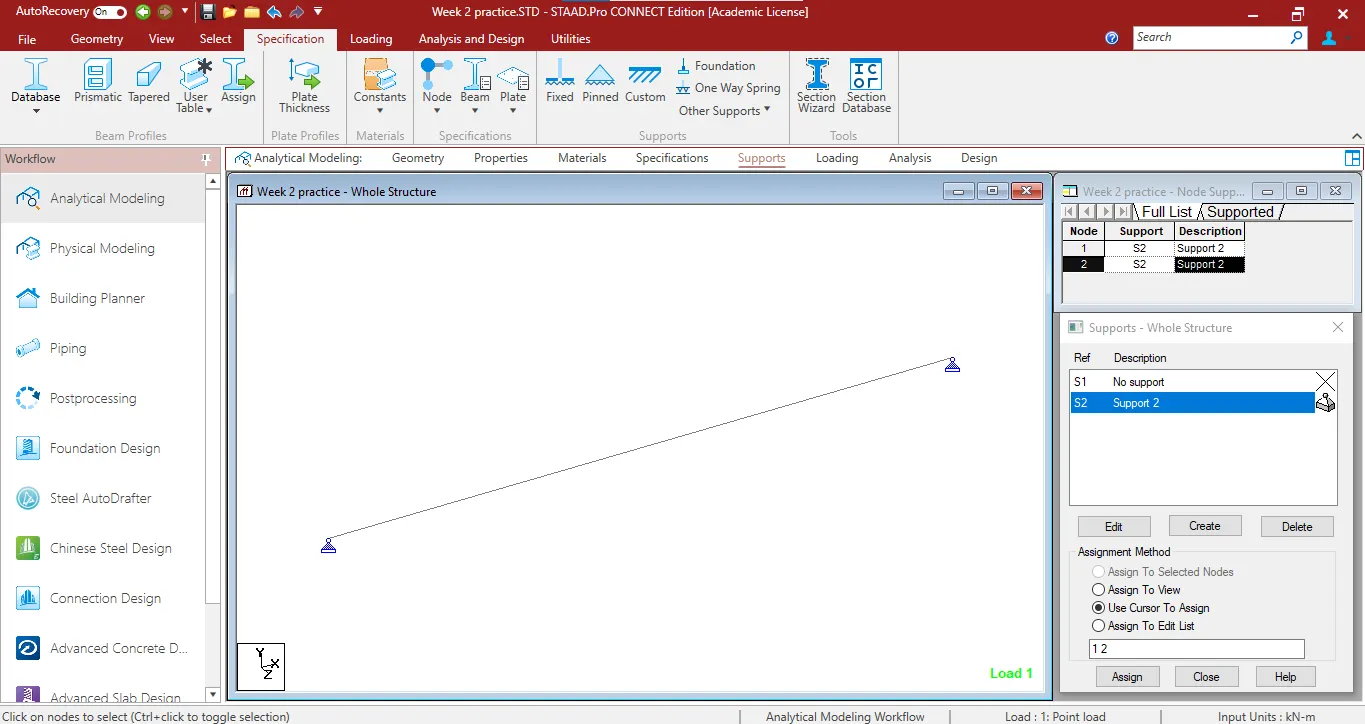
- Assign the support condition as simply support of the pinned support on both ends.
- After goto loading option and add the load case details of point load
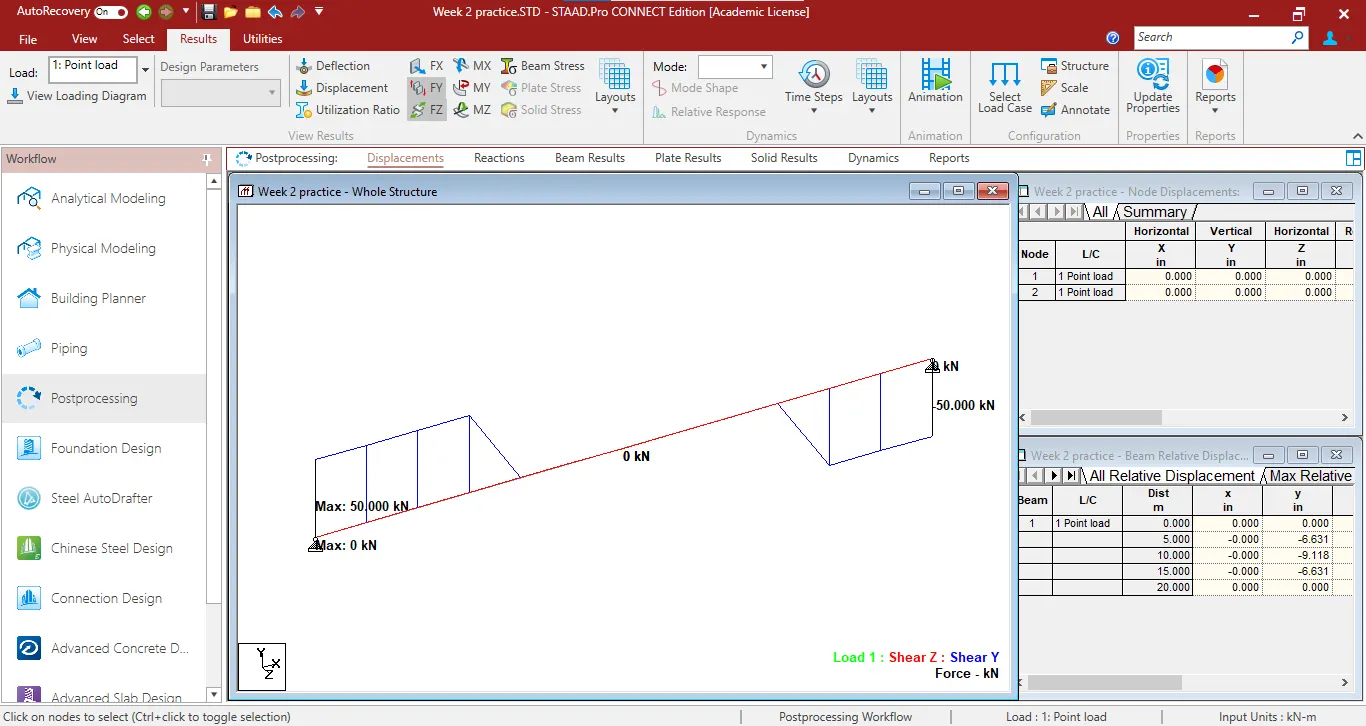
- Add the point of 50kN acting downwards of y axis on the distance from 5m from each support,
- Enter the load value 50kN and distance of 5m and 15m respectively.
- Assign the both point loads on using assign to view method.
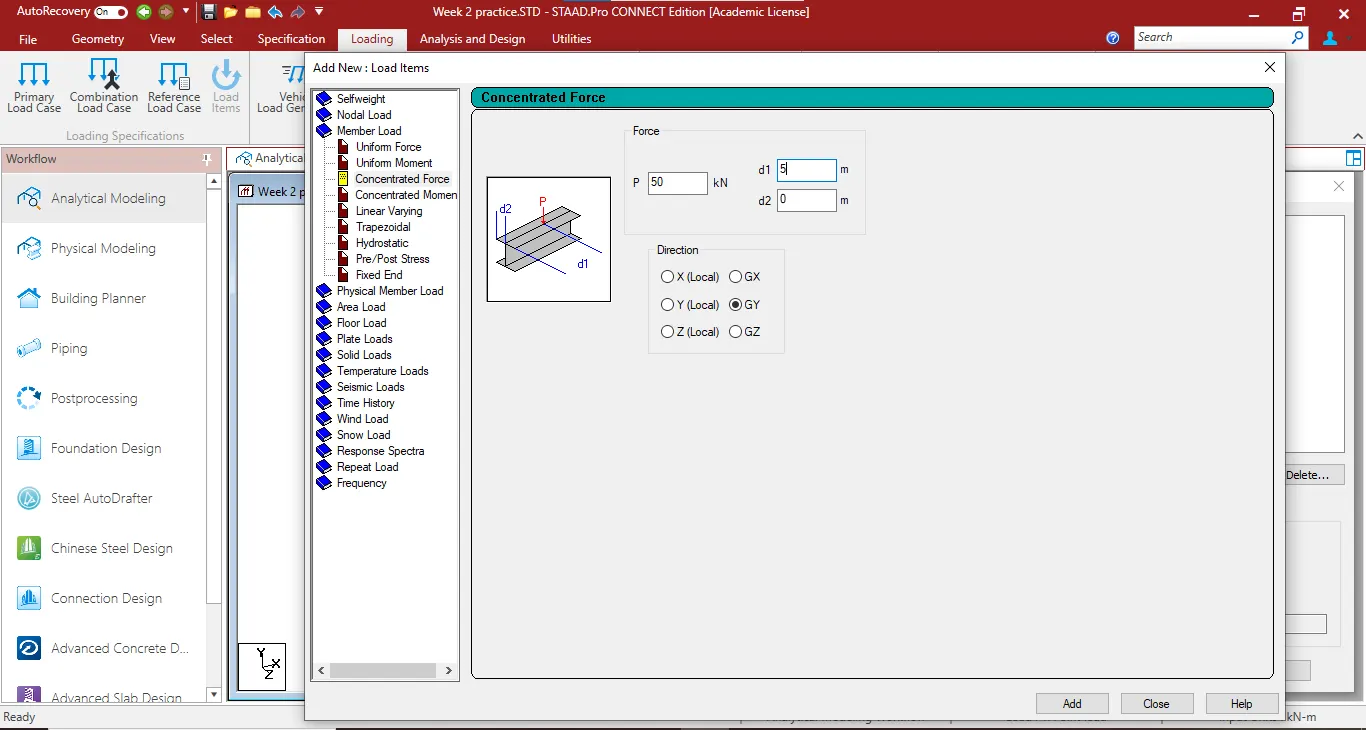
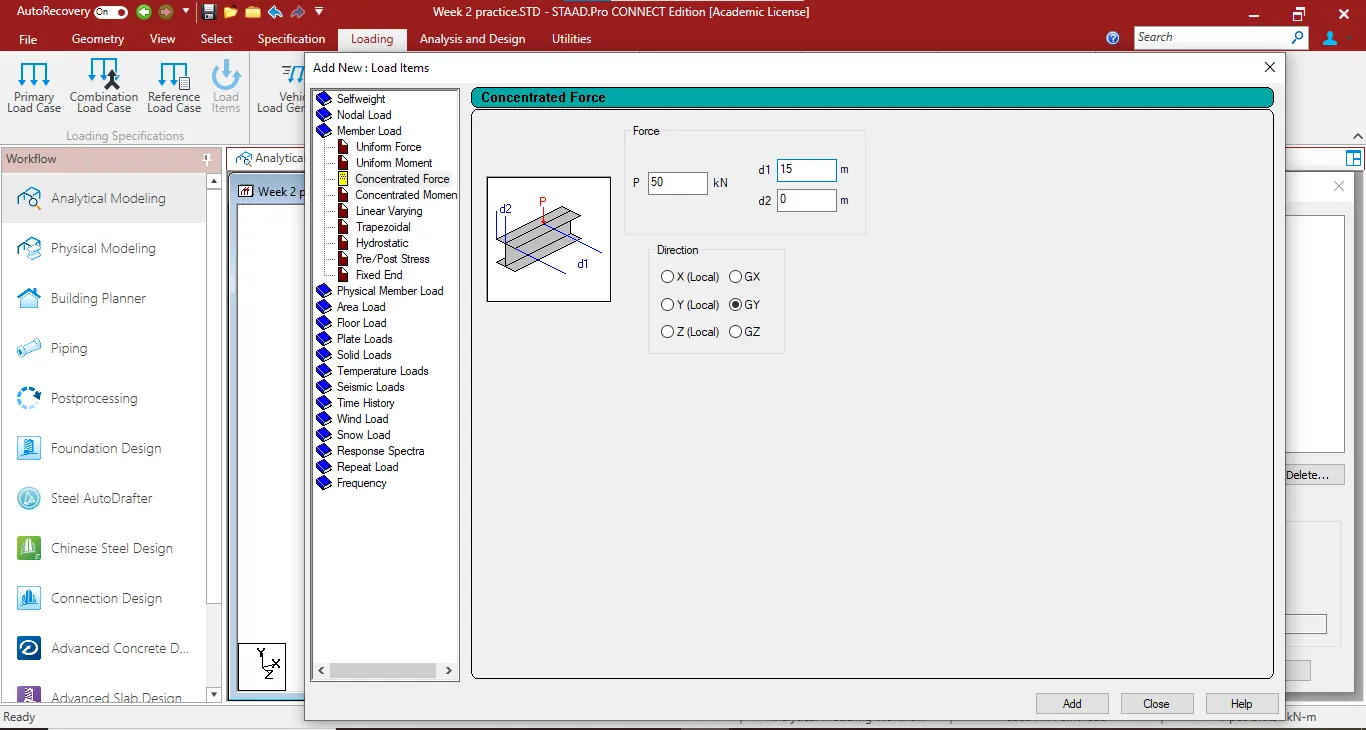
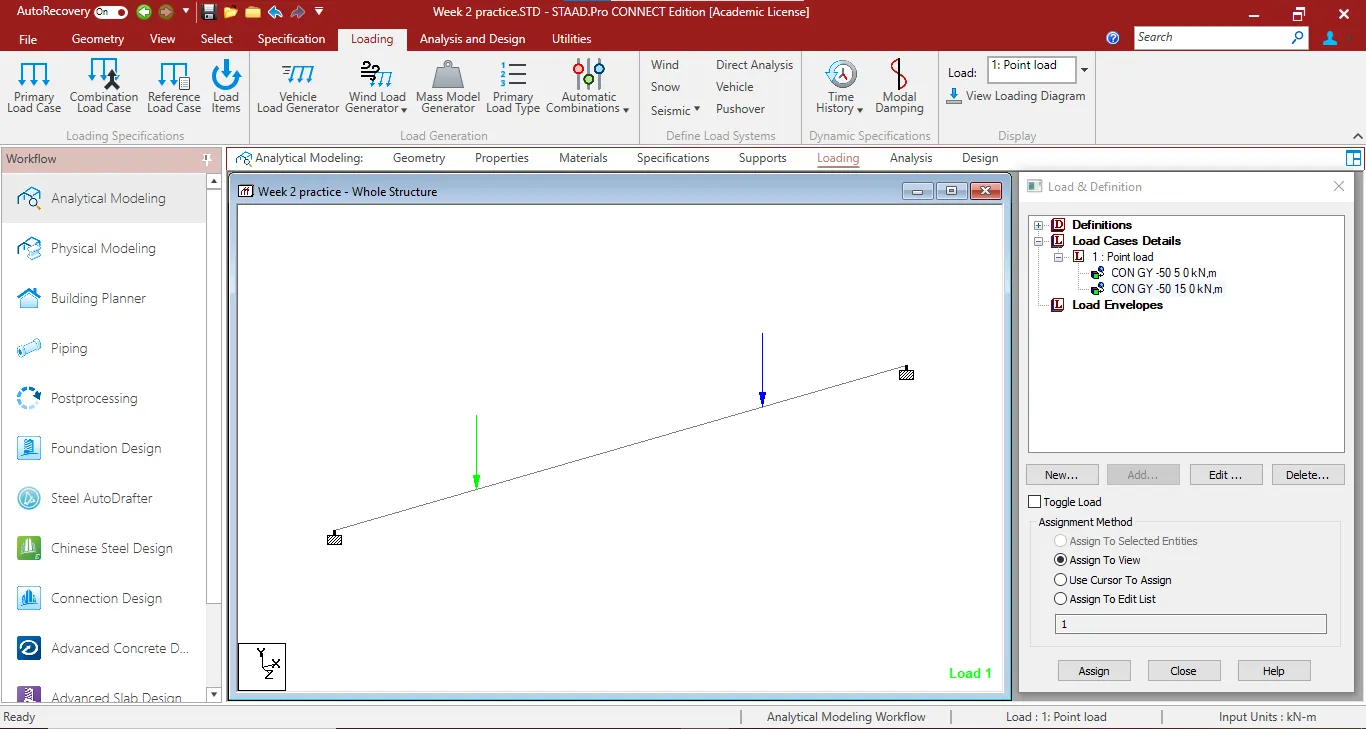
- Then goto analysis option on ribben tab give the analysis command as perform analysis and run the analysis
- After analysing select goto postprcessing mode then select done.
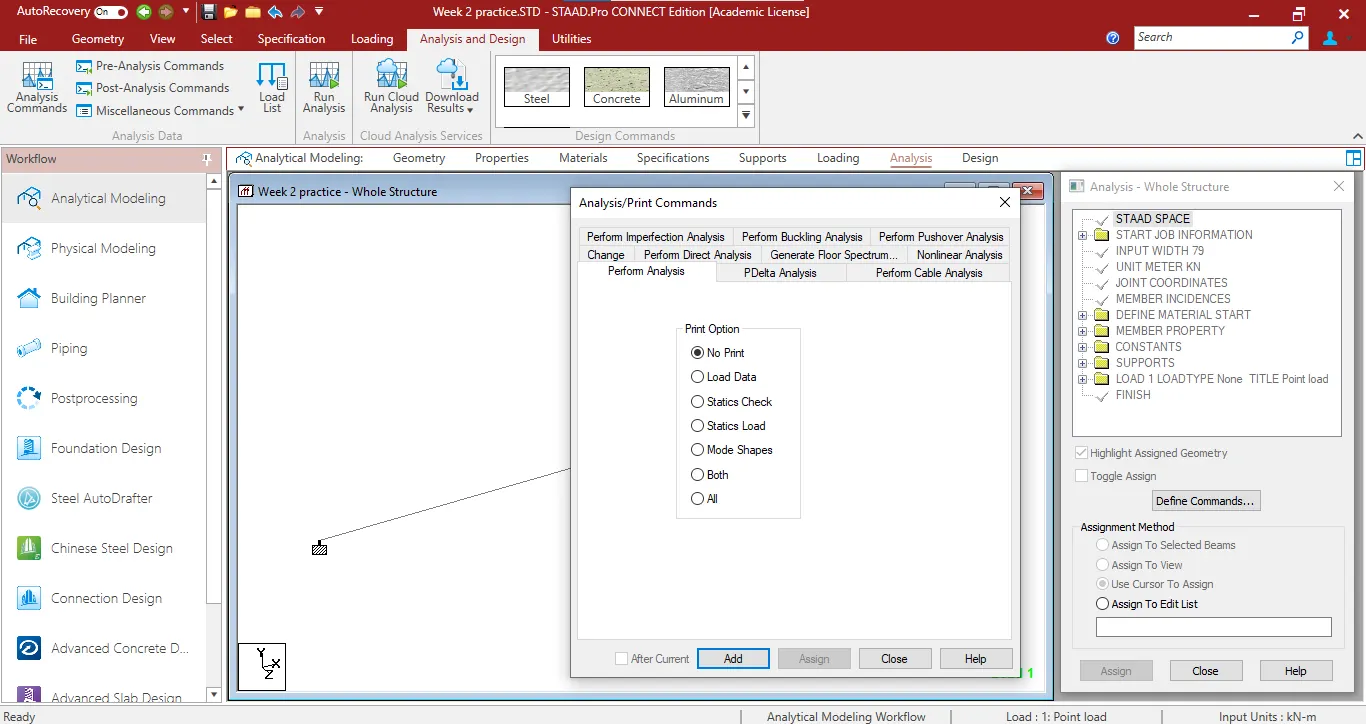
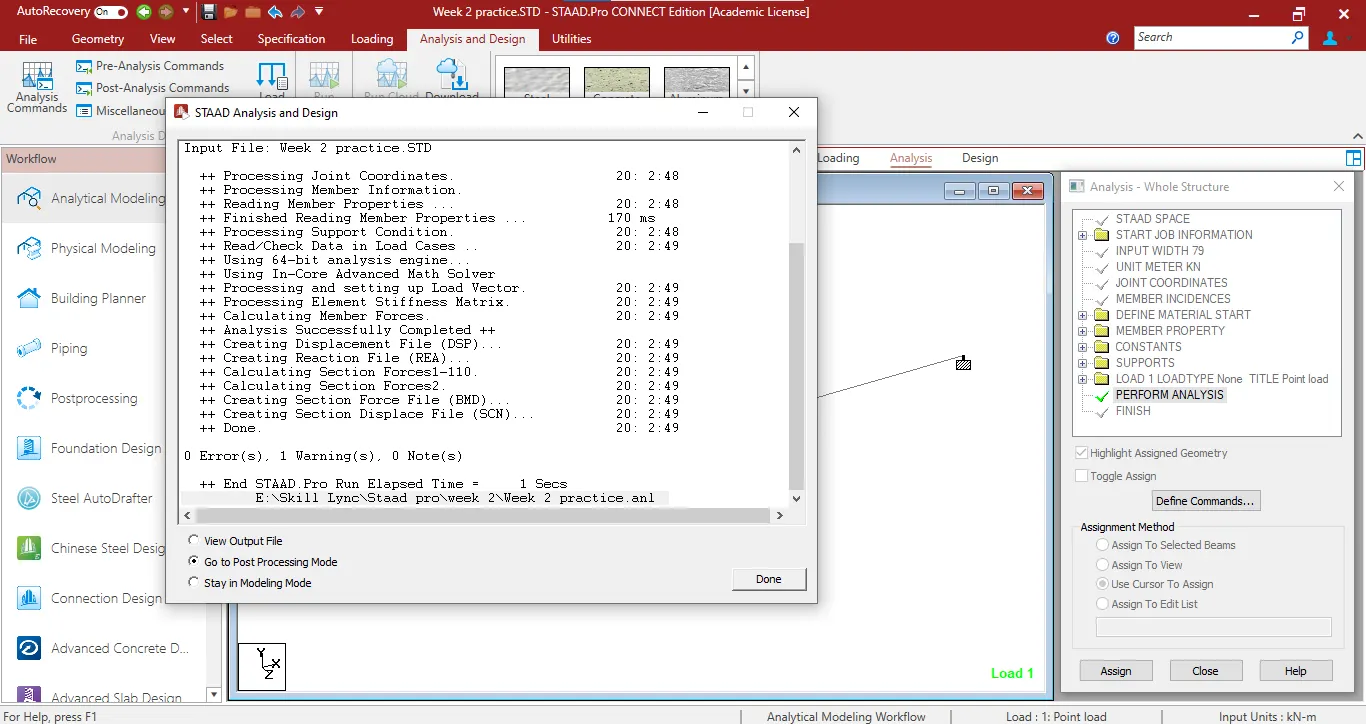
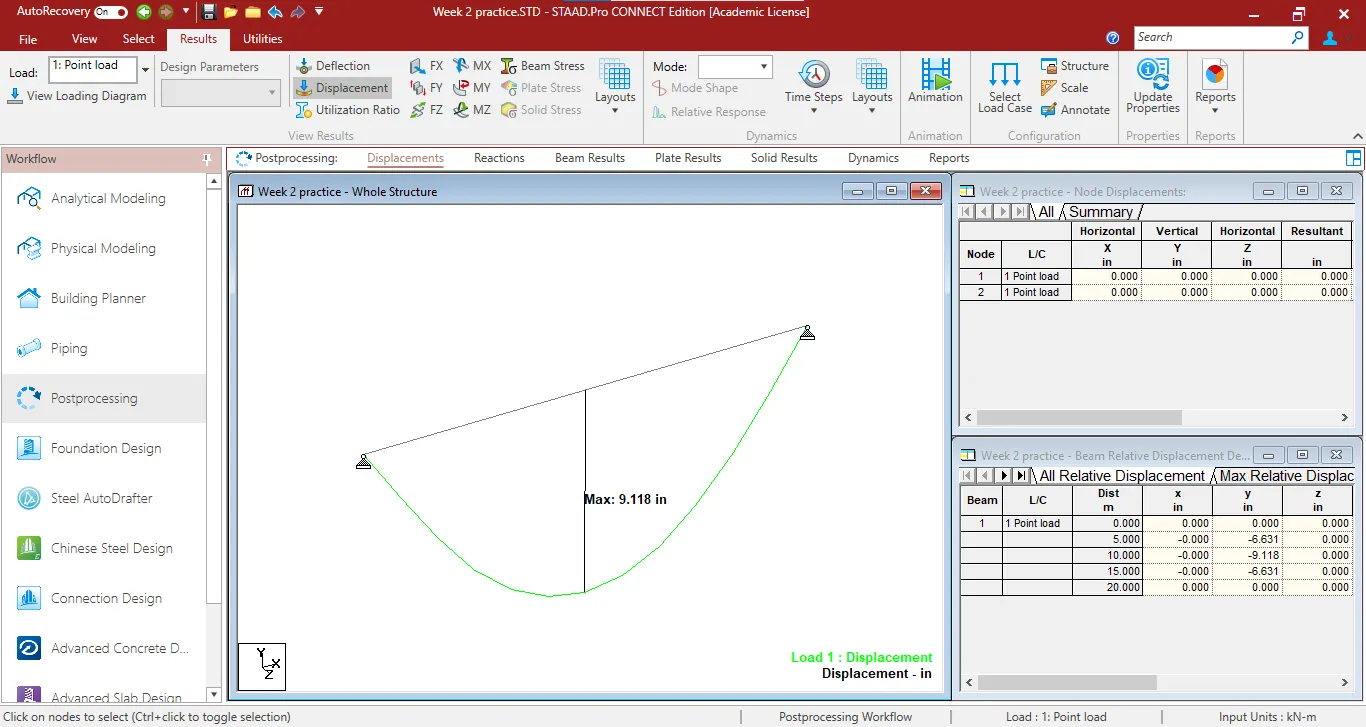
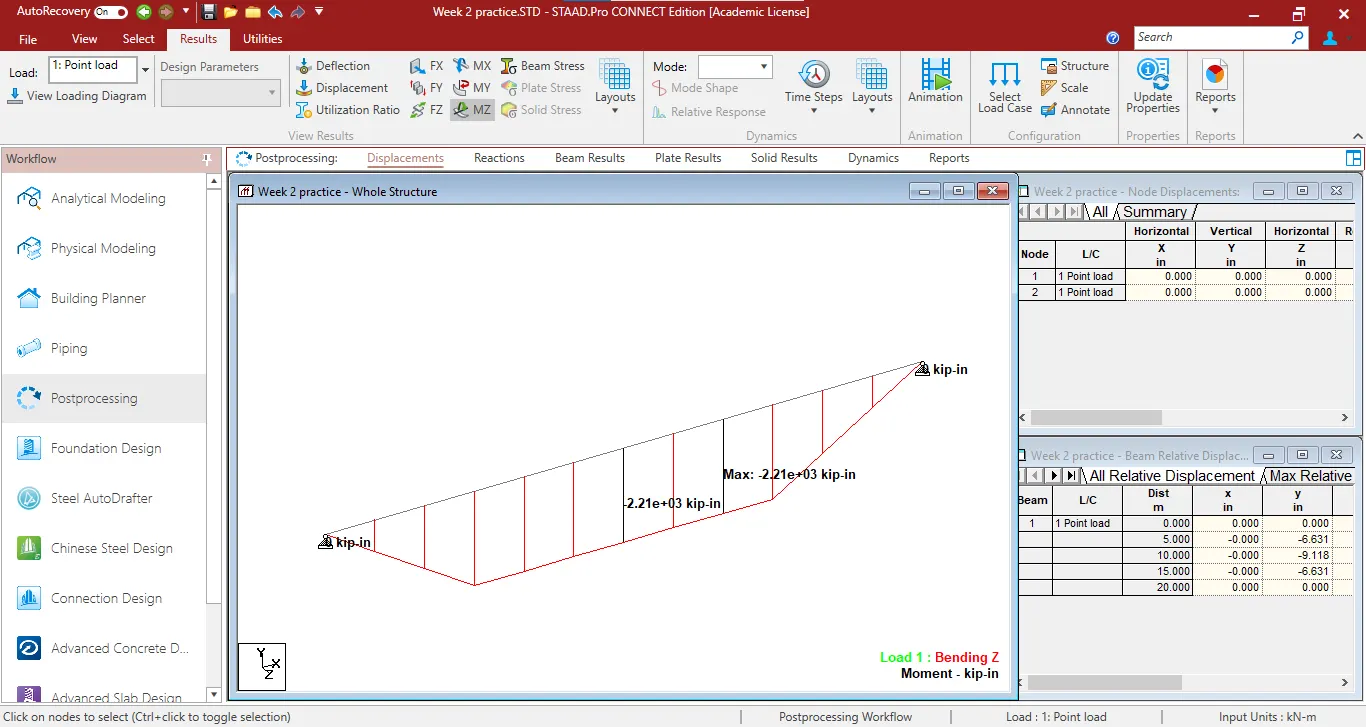
- Then select the displacement, shear forces and bending moments on the result tab of top menu bar,
- Goto labes to change scales to clear visible and goto annoate to see the displacement, SFD and BMD values.
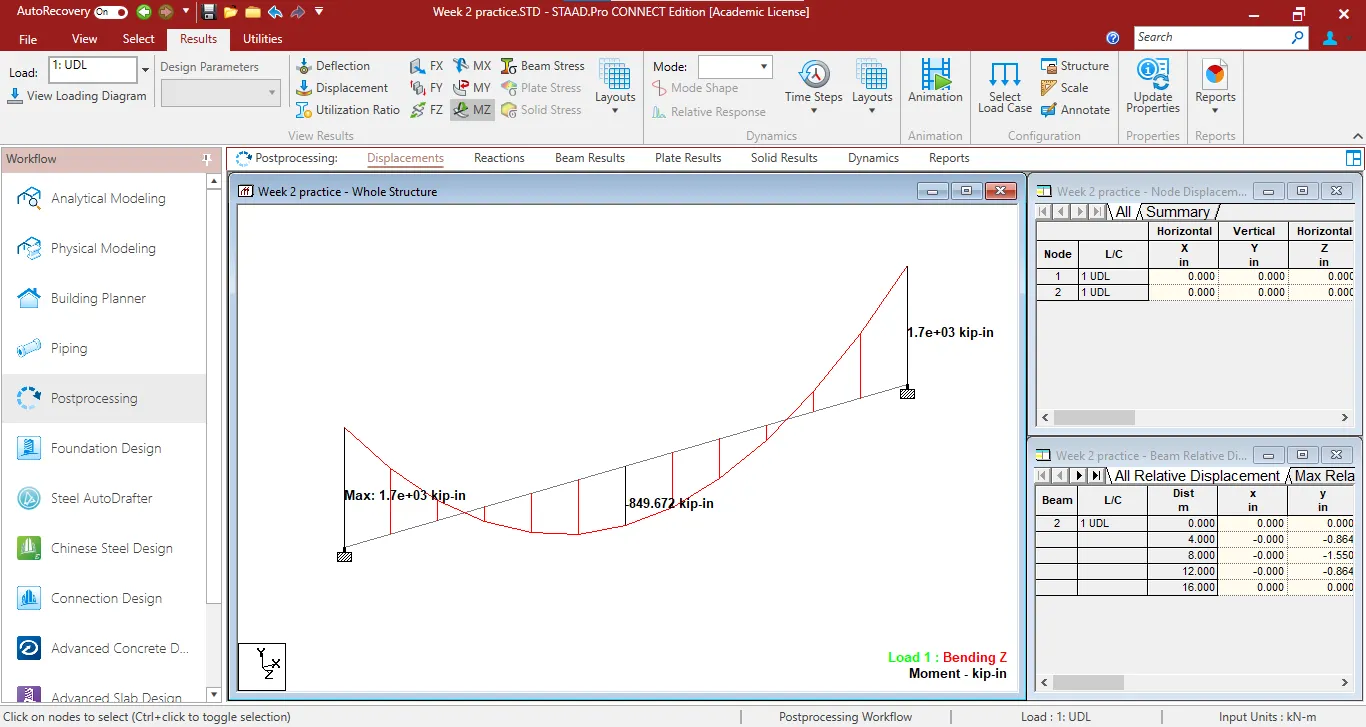
B. Fixed Beam:
- Create the new metric analytical model,
- On the geometry panel, create a beam structure of span length 16m, using node and beam windows,
- After structure creation define the properties, materials and specifications,
- Then assign the support condition as fixed support on the both ends,
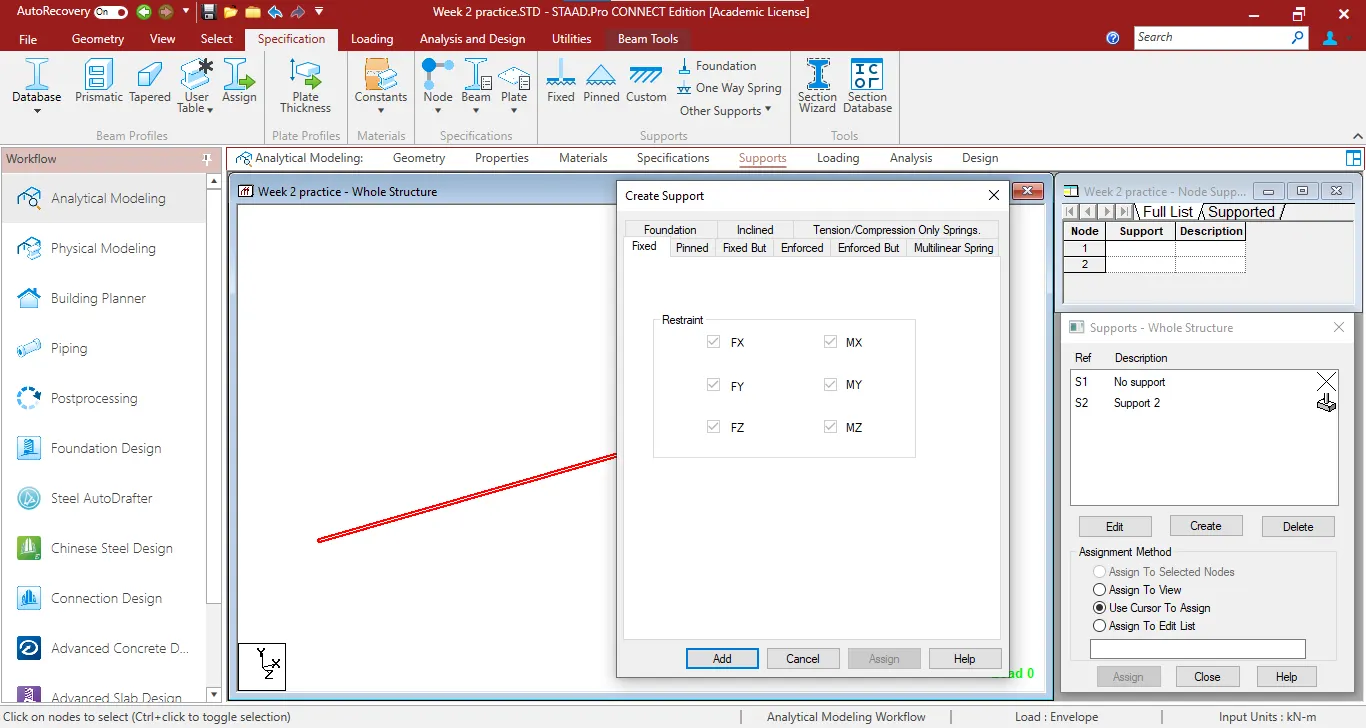
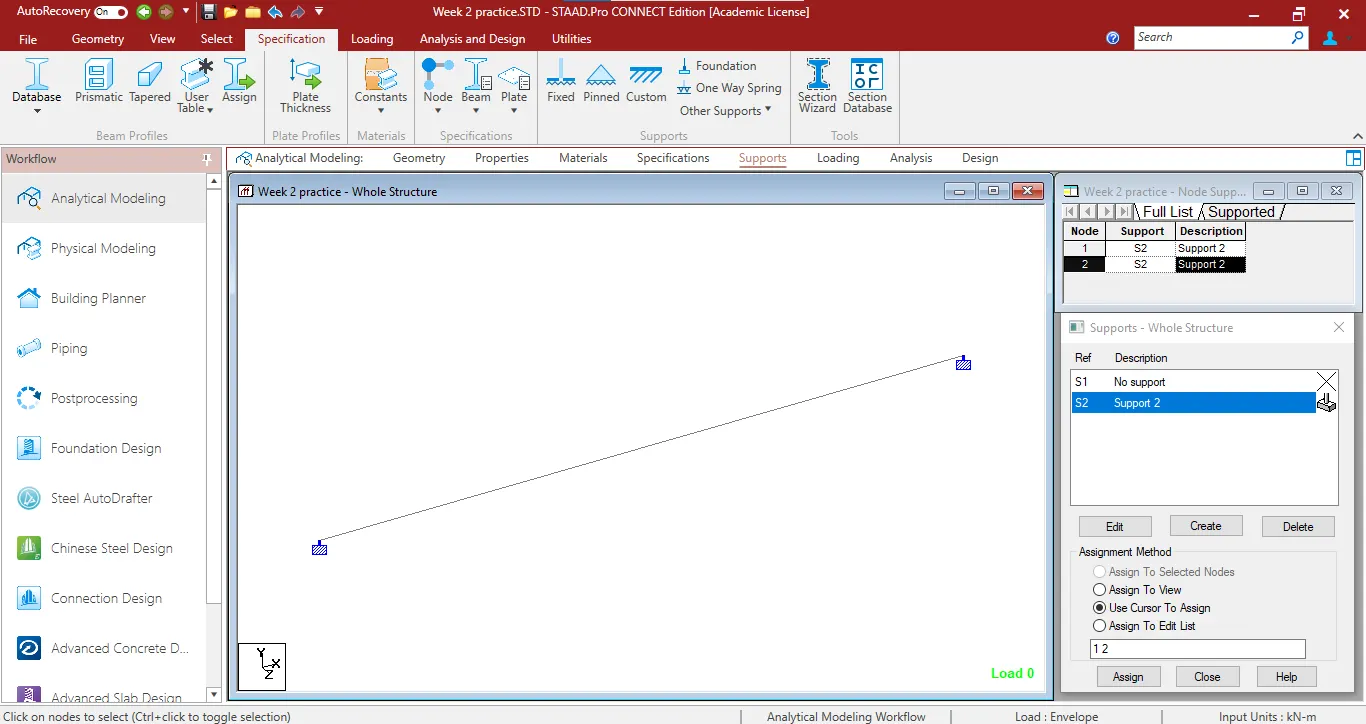
- Then add the load casses on UDL and assign the UDL load of 9kN/m on the span.
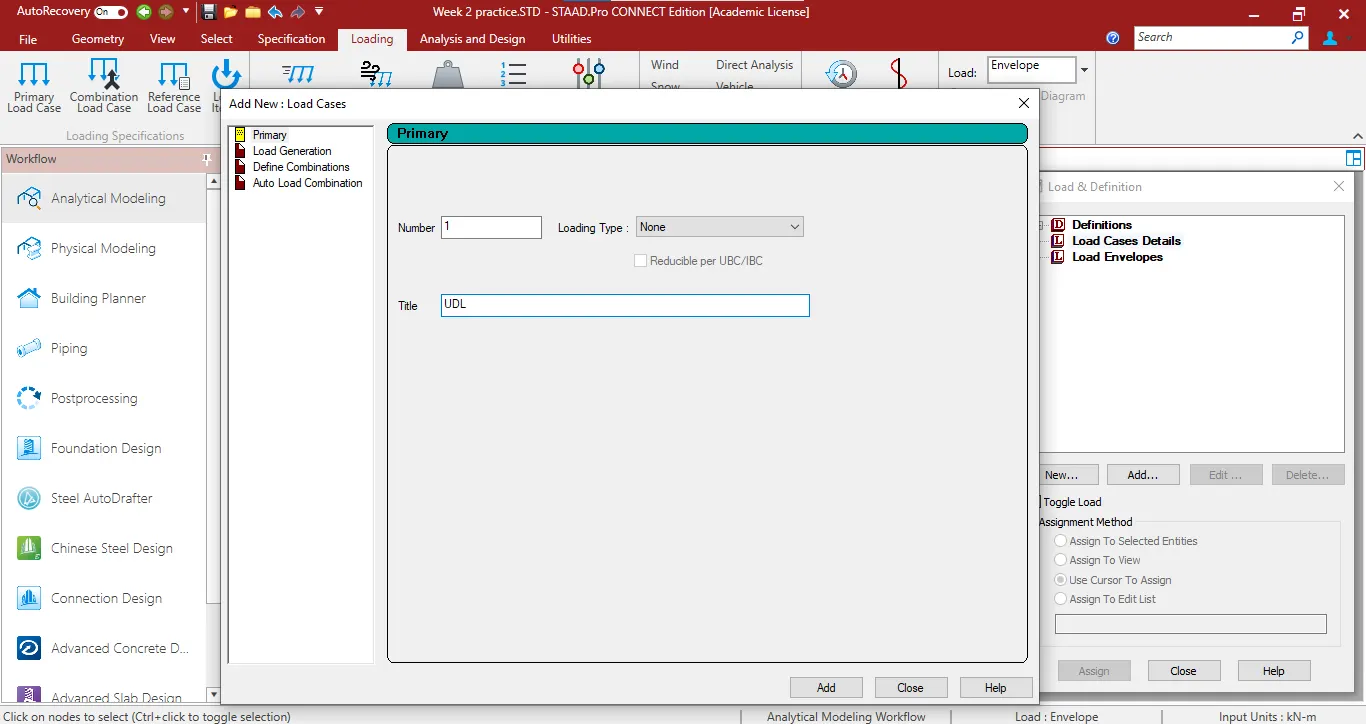
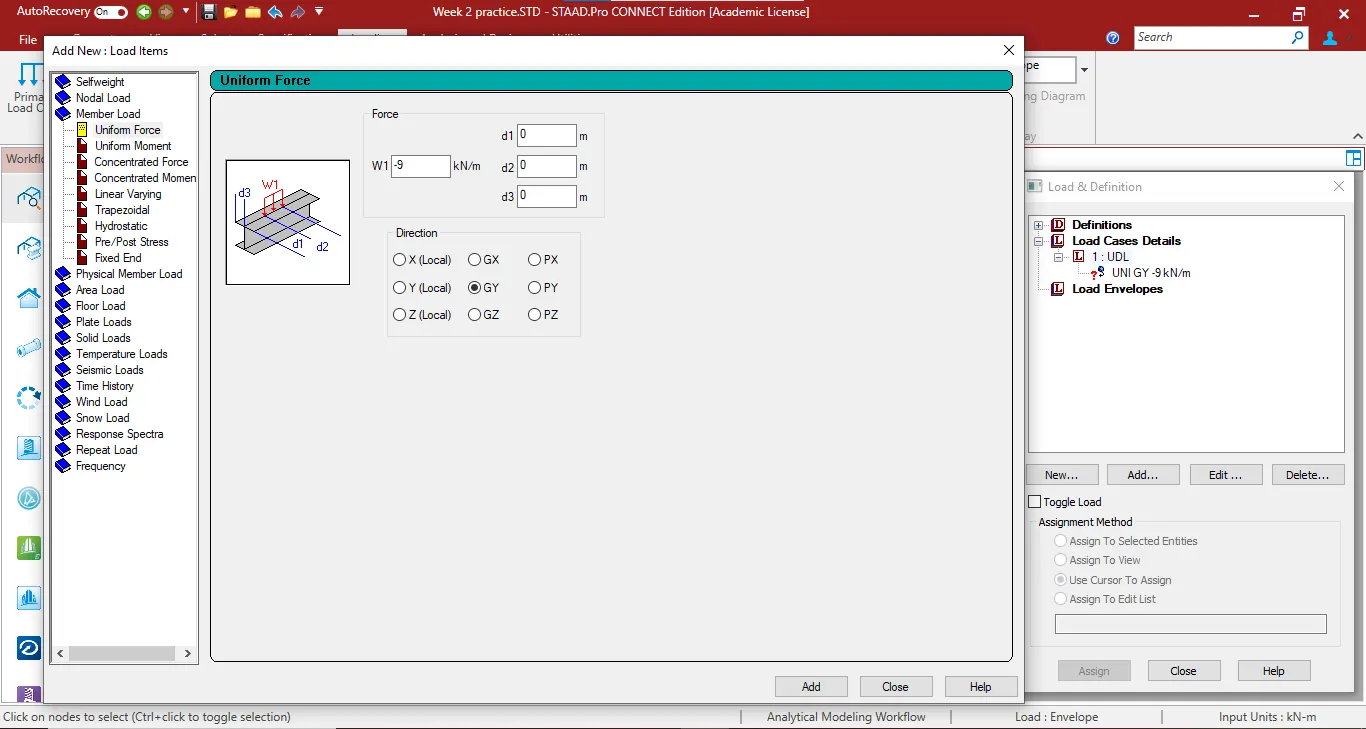
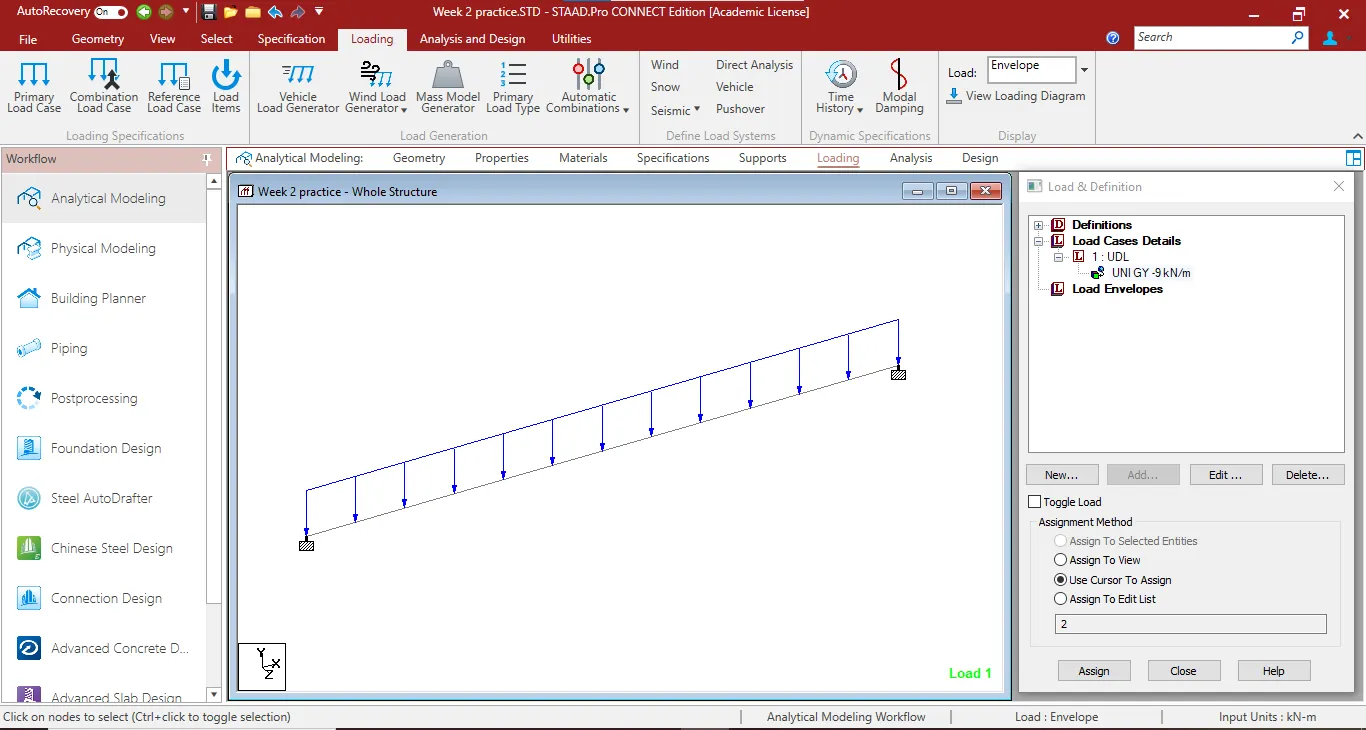
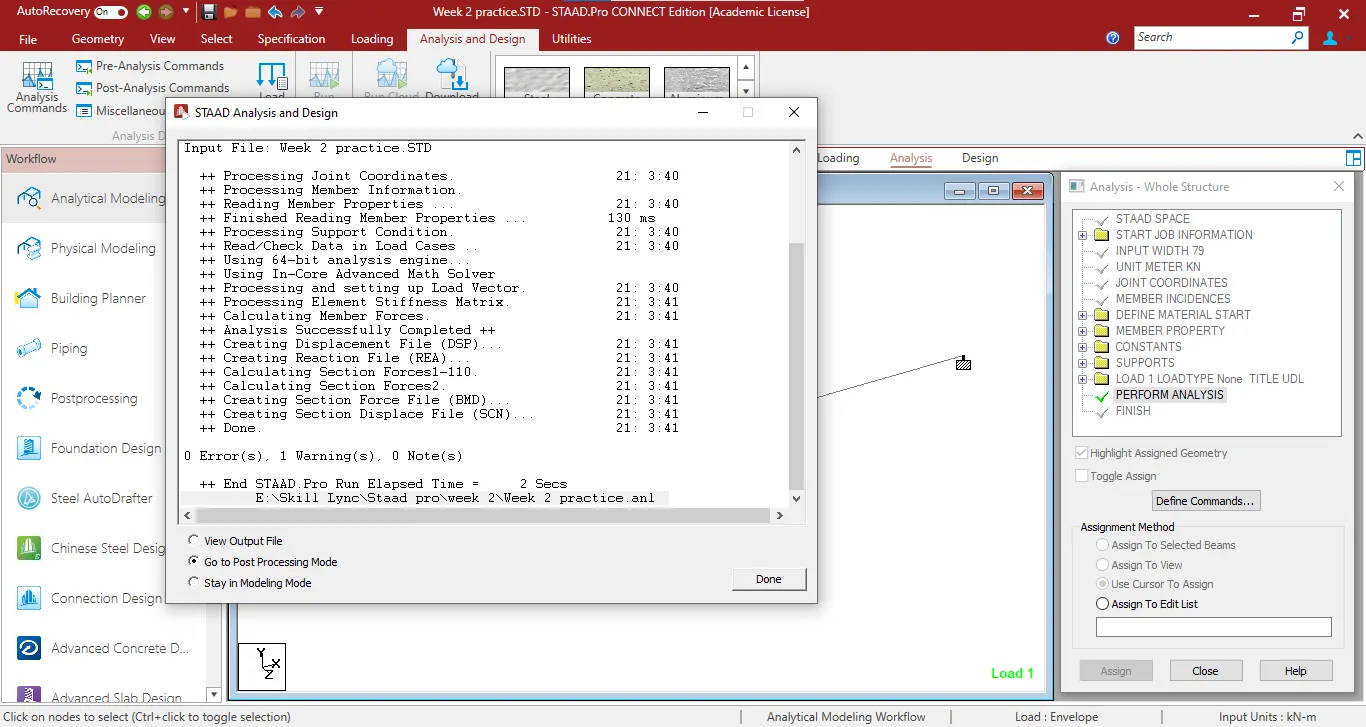
- And switch to analysis panel and give the analysis command as perform analysis,
- Then run the analysis and select goto post processing mode and select done.
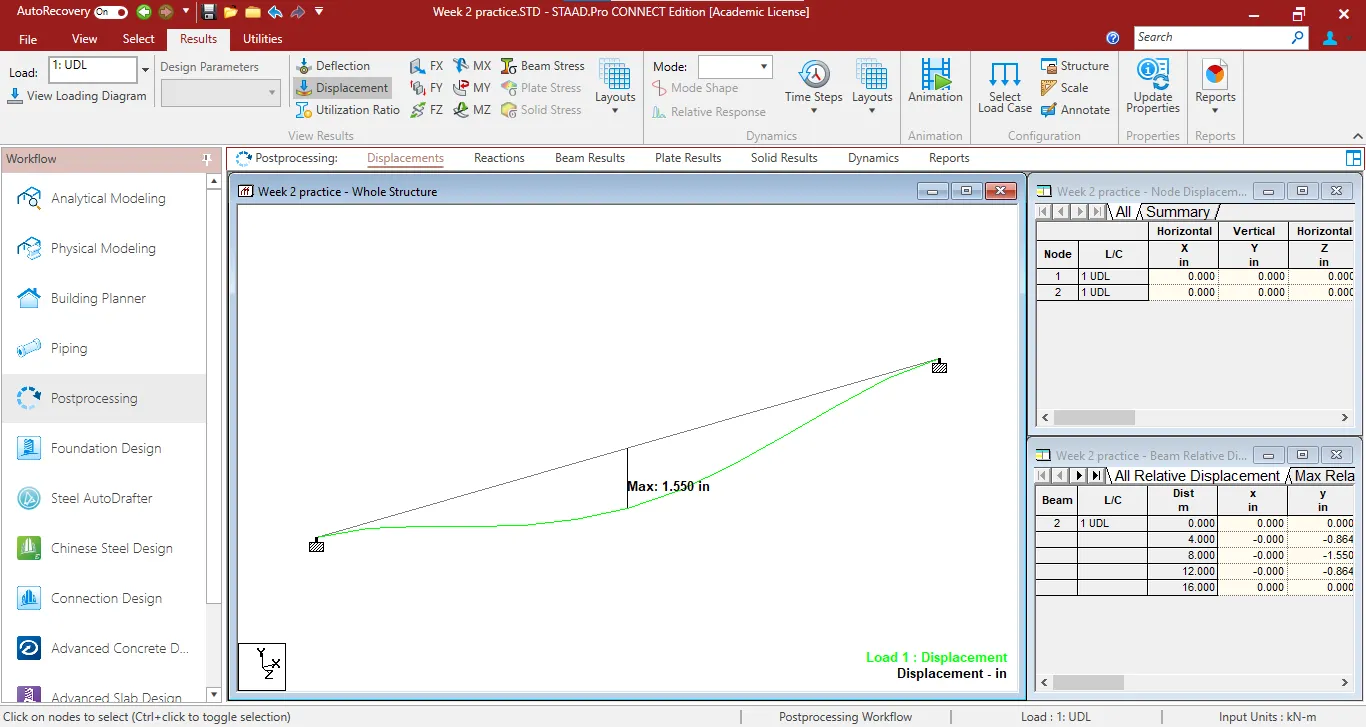
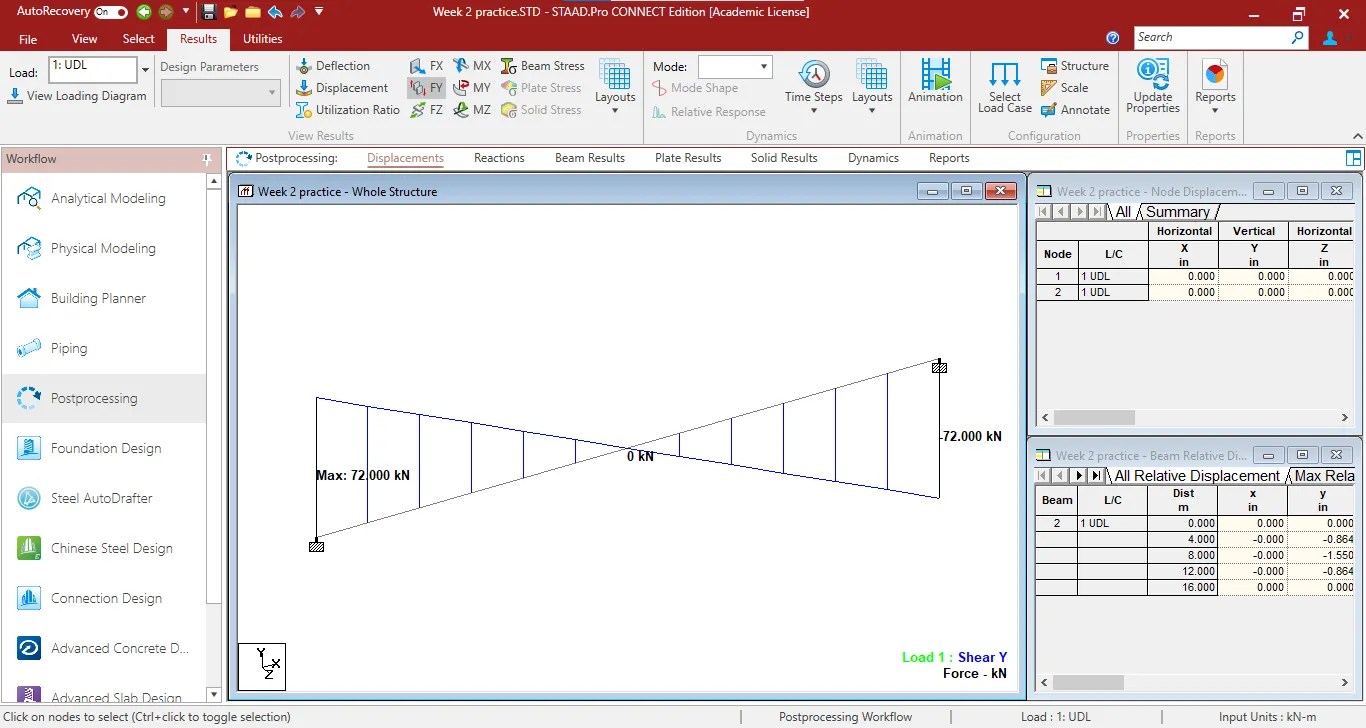
- Select the displacement, shear forces and bending moment on result tab of top menu bar,
- The SFD and BMD values are visible clearly.
Result:-
Written the answer breifly on given essay questions and the analyzed the structural elements and results also valited succesfully.
THE END