Week -2
- Make a Simulink model of Doorbell using solenoid block with the following details:
Our primary objective is to give a signal to the solenoid block for two seconds. So the required input is given using Pulse generator block. We can customize the signal using this. An ideal translational motion sensor is used to observe the equivalent plunger movement. Arrangement of doorbell model is given below.
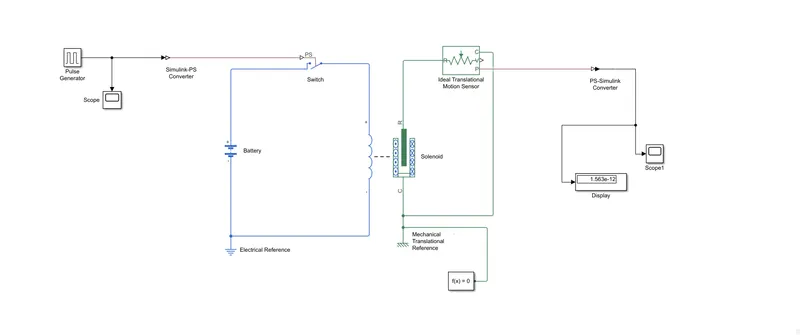
Results
As we customised, the output from pulse generator is given below.
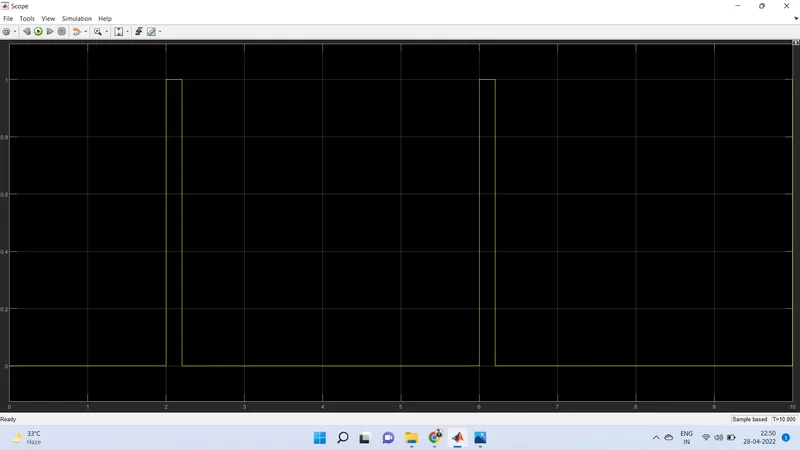
Signal makes the switch closed in the circuit for two seconds.
A scope block as arranged to the ideal translational motion sensor to observe the position of plunger.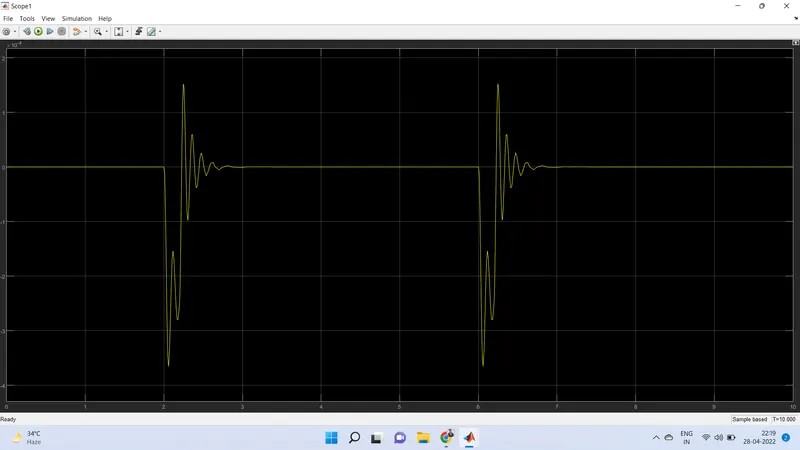
From the plot, we can observe that the plunger got excited due to the electromagnet. After two second it returned to its initial position after some vibrations. We can control that also by providing more damping values.
A chime doorbell uses a specialized sort of electromagnet called a solenoid. A solenoid is just an electromagnet where the coiled wire surrounds a metal piston. The piston contains magnetically conductive metal, so it can be moved backward or forward by the electromagnetic field.
The common chime design uses a solenoid to hit two tone bars in sequence.
In many instances, the solenoid piston consists of an iron core mounted to a non-magnetic metal bar. When there is no power to the electromagnet, a spring pushes the piston to the left, and the iron core extends outside of the wire coil. When you turn the electromagnet on (by pressing the doorbell button), the iron core is drawn to the magnetic field, so it slides into the center of the coiled wire.
As the iron core slides to the right, the end of the piston strikes the right-hand tone bar. The tone bar vibrates, producing a particular note. This is the "ding" sound.
As long as you hold the doorbell button, current will flow through the electromagnet and the piston will remain in this position. But when you release the button, the current will stop flowing through the electromagnet and the magnetic field will collapse. The spring snaps the piston back to the left, where it hits the tone bar on the other side. The second tone bar produces the "dong" sound.
You can make more elaborate tone sequences by adding more solenoids and tone bars. Some variations on this design produce a different tone pattern when someone rings the back doorbell than when someone rings the front doorbell. Each doorbell button closes a separate circuit, connected to separate solenoids in the doorbell mechanism. In the simplest design, one of the solenoids hits a bumper instead of the second tone bar. In this way, one doorbell button will trigger a "ding-dong" tone and the other button will trigger only a "ding" tone.
In recent years, more and more people have been installing electronic doorbells in their homes. An electronic doorbell doesn't have any electromagnets or tone bars. Instead, it has an integrated circuit (IC) that registers when the button has been pressed. The IC triggers a digitally recorded song or message. A lot of electronic doorbells have a wireless control system so the doorbell mechanism doesn't have to be specially wired.
Electronic doorbells are growing in popularity, but most homes still use conventional electromagnet doorbells. This classic design may not play elaborate songs or messages, but it is so simple and sturdy that it should be around for a long time to come.
THERMISTOR
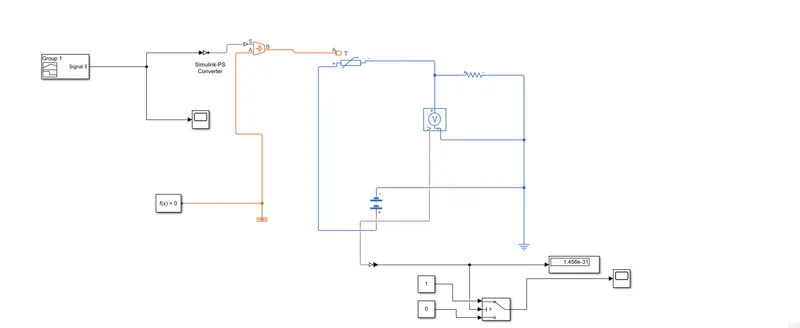
Block model
As the name implies, the thermistor (i.e., thermal resistor) is a temperature-sensing device whose resistance is a function of its temperature.
Thermistors are available in two types: PTC (positive temperature coefficient) and NTC (negative temperature coefficient). The resistance of a PTC thermistor increases as the temperature increases. In contrast, the resistance of an NTC thermistor decreases as temperature increases, and this type seems to be the most commonly used thermistor. See Figure 1 below.
Figure 1. PTC and NTC thermistor electrical symbols.
It's important to realize that the relationship between a thermistor's resistance and its temperature is very non-linear. See Figure 2 below.
Figure 2. An NTC thermistor resistance vs. temperature. Image courtesy of Maxim Integrated.
The standard equation for an NTC thermistor's resistance as a function of temperature is given by:
RT=R25C⋅e{β[(1/(T+273))−(1/298)]}RT=R25C⋅e{β[(1/(T+273))−(1/298)]}
where
-
R25C is the thermistor's nominal resistance at room temperature (25°C). This value is normally provided in the datasheet.
-
β (beta) is the thermistor's material constant in Kelvin. This value is normally provided in the datasheet.
-
T is the thermistor's actual temperature in Celsius.
HERE
Primarily, we want to create a signal which obeys the temperature conditions. Pulse generator will not be enough in this situation. So we use a signal builder and provide the conditions. Temperature is given in Kelvin and a desired signal is created. The output is given below.
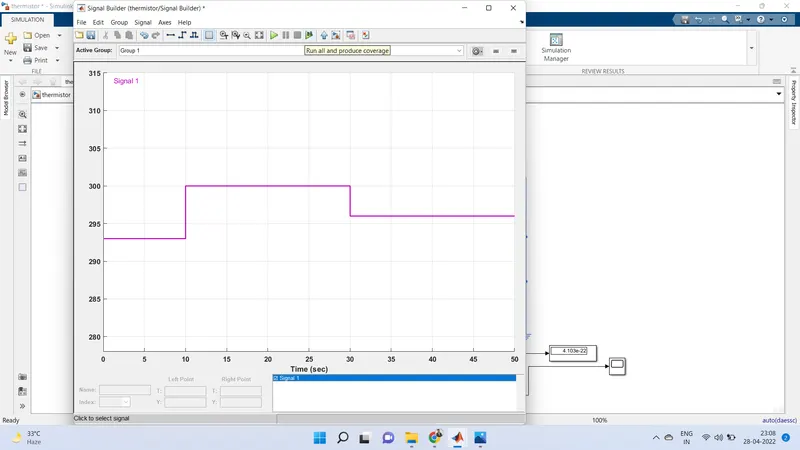
ults
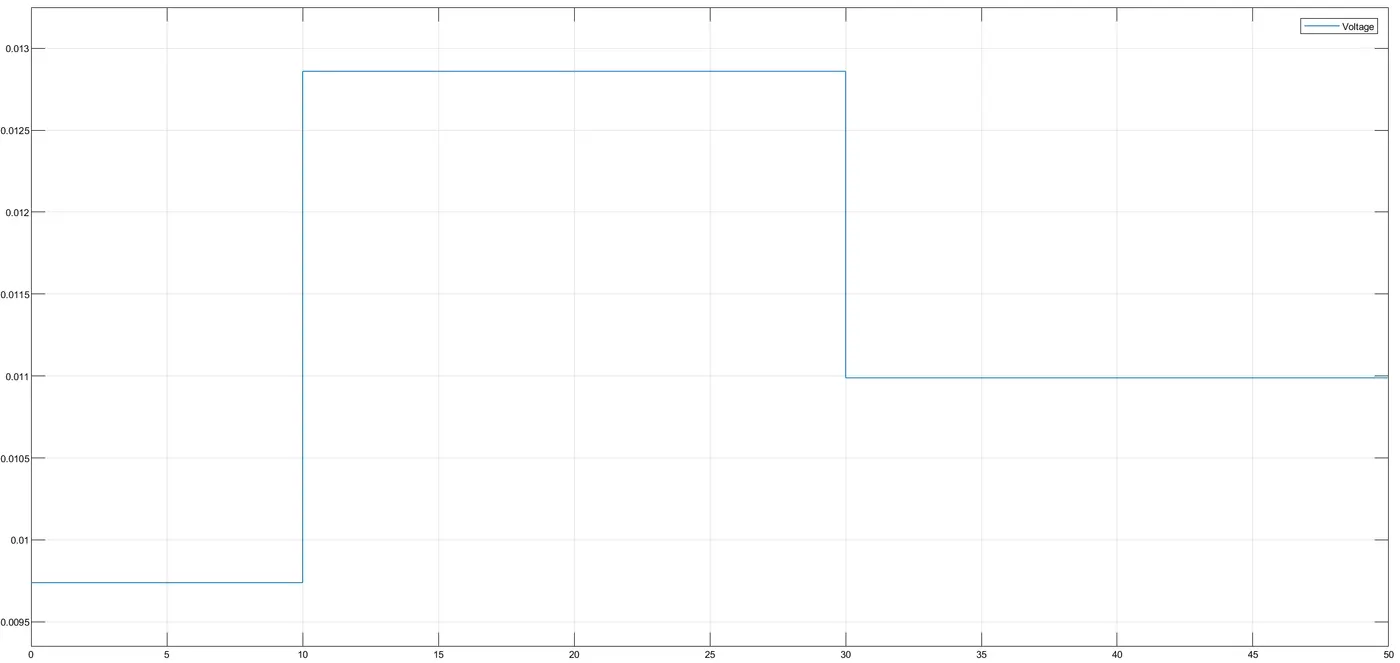
This signal is given to a controlled temperature source. It will create temperatures according to our condition. That output is given to a termistor. A resistor is connected serially to thermistor and a voltage sensor is connected to that resistance parallel. By this we will obtain the variation of voltage according to the change of temperature. Output can be observed from a scope block which is connected to voltage sensor. The result is given below.
This input is given to a switch which will control our dc fan. We have a condition that, fan should on when temperature is above 250C and off otherwise. So this condition is given to this switch by providing 0 and 1 as constant. Condition is again specified in switch configuration by adjusting the threshold value.
Output of the switch is given to a controlled voltage source which will provide enough voltage to the fan according to our input conditions. An ideal rotational motion sensor is connected to the dc motor to observe the motion of the fan. Motion is plotted and displayed in the scope block. It is given below.
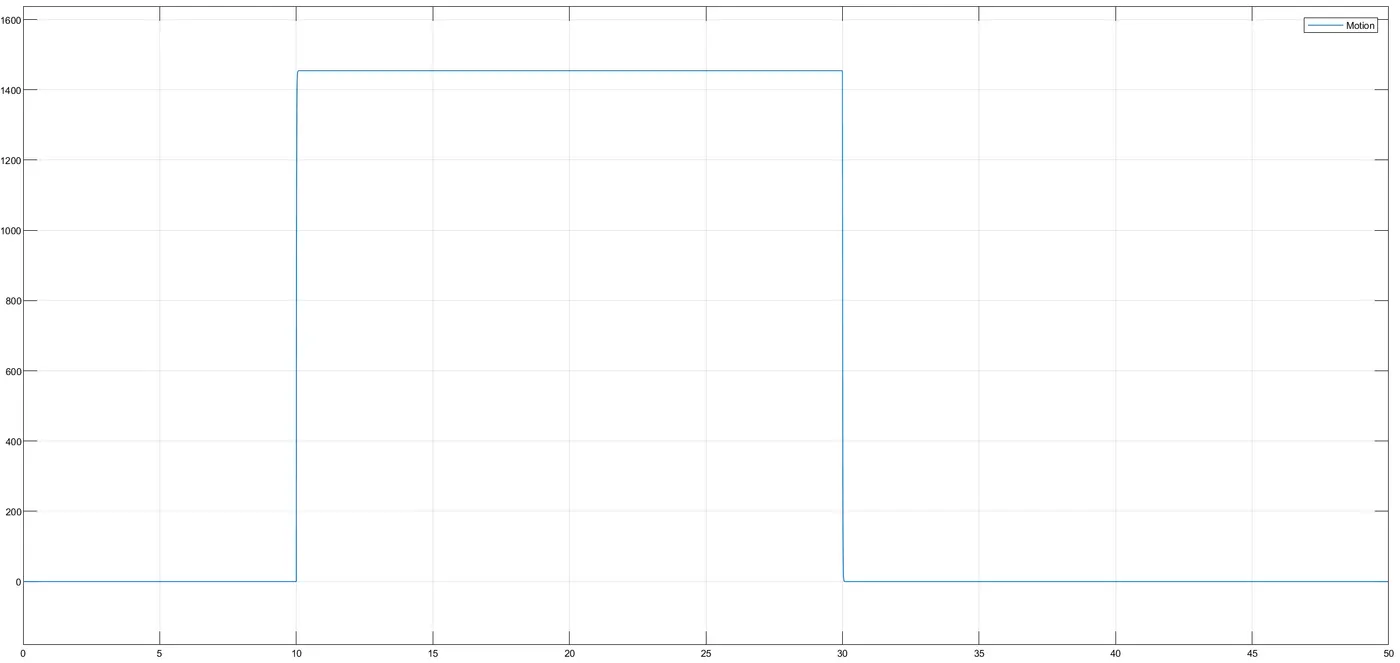
As we can see, from 10 to 30 seconds the fan got on and in other situation it remained off
Conclusion
Simulation for a doorbell was made and the plunger motion were plotted. Automatic thermistor control for dc fan created.