Week -2
Question1 - Make a Simulink model of Doorbell using solenoid block
Solenoid -
A solenoid is a long coil of wire wrapped in many turns. When a current passes through it, it creates a nearly uniform magnetic field inside.It is a type of electromagnet in which an acturator assembly with a sliding ferromagnetic plunger inside the coil. Without power, the plunger extends for part of its length outside the coil; applying power pulls the plunger into the coil. Electromagnets with fixed cores are not considered solenoids.
It has a multiturn coil of magnet wire surrounded by a frame, which is also a magnetic flux carrier to enhance its efficiency.a solenoid converts electrical energy into mechanical work. In solenoid helix generates a controlled magnetic field.
Doorbell -
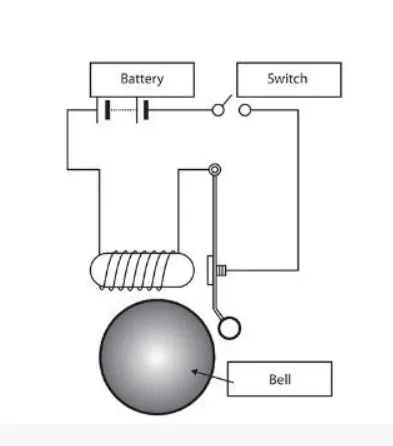
In the above fig there are four component are used, these are-
- Solenoid
- A bell with plunger
- Battery
- switch
Simulink model for doorbell
Explanation of simulink model
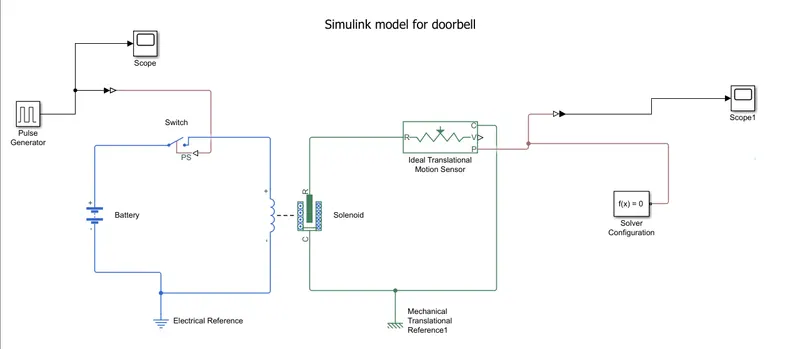
- To make a doorbell by using simulink, we need solenoid, battery, switch,pulse generator, ideal translational motion sensor,electrical reference, mechanical translational reference, solver , simulink to PS convertor and PS to simulink convertor.
- The solenoid connected with the negative terminal of the battery and these are connected with electrical reference i.e to the ground for earthing.
- Positive terminal of the battery is connected with switch and switch is connected the pulse generator throuh simulink PS converter.
- R and C of solenoid represented as plunger and fixed point respectively.
- R is connected to the Ideal translation motion sensor which senses the translation motion to plunger and gives the output.
- Ideal translation motion sensor gives the outputs as 'V' and 'P' which represnt the velocity and position of the plunger , but only P is connected because we need only position of plunger output.
- C of solenoid is connected to Ideal translation motion sensor through mechanical translation reference which gives to and fro motion i.e the mechanical process starts from R and ends at C and again it starts at R and ends at C and cycle goes on.
- There is a condition is the question that the switch is closed for 2 seconds and then released for this situation we have to keep some changes dusring use of pulse generator.
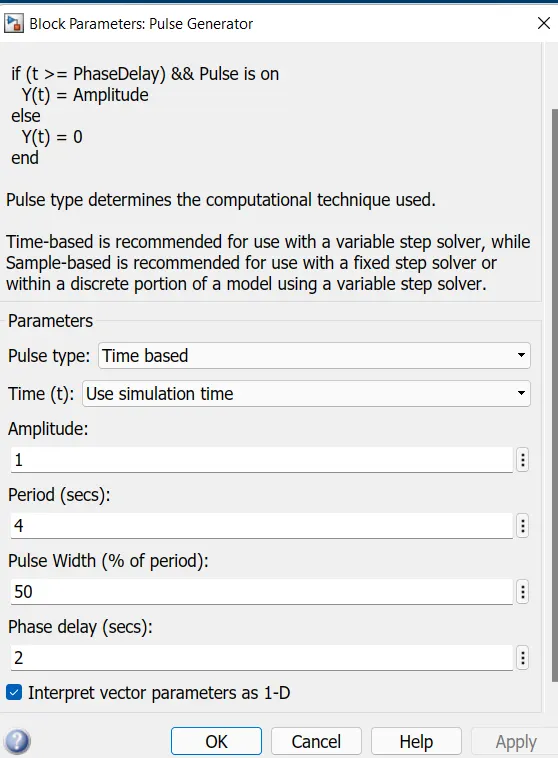
- we have gave inputs as period value as 4 amplitude by defalut is 1 pulse width as 50 and phase delay as 2.
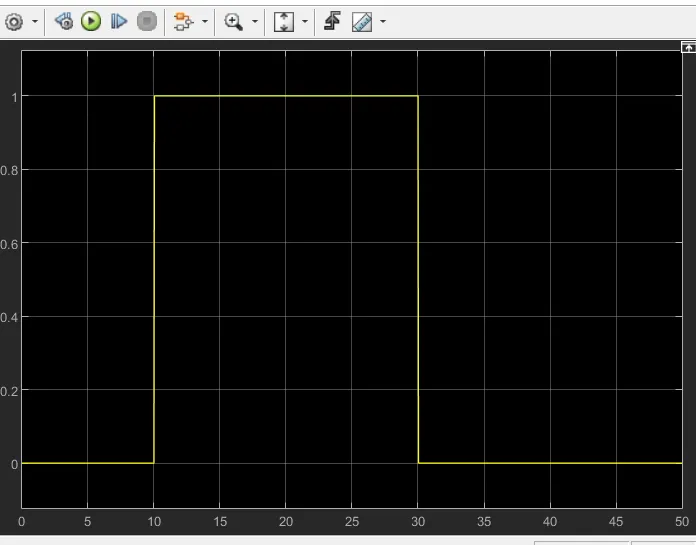
- The above inputs are showed that initially the pulse will be zero till 2 sec as we have gave thw phase delay is 2 and at 2 sec the pulse will start from zero to 1 on y-axis displacement as the amplitude is 1 and as phase width is 50% i.e pulse width will half of period, so for the next two sec the pulse will be at amplitude 1 , then it will comes down at 4 sec as we mention period is 4 sec and the it will be zero for next 2 secs, and this process will repeat again.
Click on pulse generator scope block we got the graph as explain above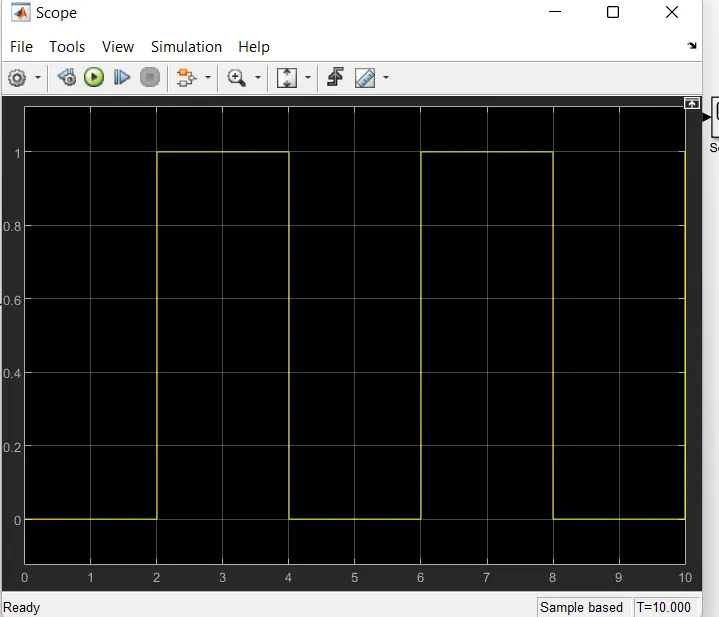
- P of Ideal translation motion sensor is connected to another scope and a solver configuration which generates qeuations and solve the whole model internally to give the results of whole simulink model as output.
- Click on scope 1 we will get the position graph of plunger
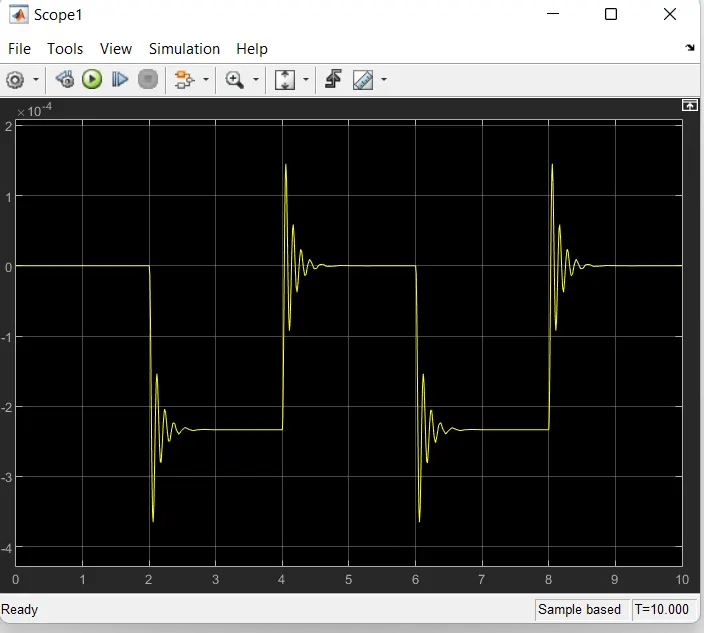
- From the above fig we can observe that the initial position of the plunger is at 0 and start motion as a pluse generated at 2 so inthe position of the plunger is also chnaging at time 2 sec and time till which the pulse amplitude is 1 till that time the plunger is also at same position after the chnage from initial position.
Question2- Use a thermistor to sense the temperature of a heater & turn on or turn off the fan
Thermistor -
A thermistor is a type of resistor whose resistance is strongly dependent on temperature, more so than in standard resistors. Thermistor is the word of a combination of thermal and resistor. Thermistors are widely used as inrush current limiters, temperature sensors (negative temperature coefficient or NTC type typically), self-resetting overcurrent protectors, and self-regulating heating elements (positive temperature coefficient or PTC type typically). An operational temperature range of a thermistor is dependent on the probe type and is typically between −100 ⁰C and 300 ⁰C (−148 °F and 572 °F)
Depending on materials used, thermistors are classified into two types:
- With NTC thermistors, resistance decreases as temperature rises; usually due to an increase in conduction electrons bumped up by thermal agitation from the valence band. An NTC is commonly used as a temperature sensor, or in series with a circuit as an inrush current limiter.
- With PTC thermistors, resistance increases as temperature rises; usually due to increased thermal lattice agitations particularly those of impurities and imperfections. PTC thermistors are commonly installed in series with a circuit, and used to protect against overcurrent conditions, as resettable fuses.
Thermistors are generally produced using powdered metal oxides. With vastly improved formulas and techniques over the past 20 years, NTC thermistors can now achieve accuracies over wide temperature ranges such as ±0.1 °C or ±0.2 °C from 0 °C to 70 °C with excellent long-term stability. NTC thermistor elements come in many styles such as axial-leaded glass-encapsulated (DO-35, DO-34 and DO-41 diodes), glass-coated chips, epoxy-coated with bare or insulated lead wire and surface-mount, as well as rods and discs. The typical operating temperature range of a thermistor is −55 °C to +150 °C, though some glass-body thermistors have a maximal operating temperature of +300 °C.
Thermistors differ from resisatance temperature dedectors(RTDs) in that the material used in a thermistor is generally a ceramic or polymer, while RTDs use pure metals. The temperature response is also different; RTDs are useful over larger temperature ranges, while thermistors typically achieve a greater precision within a limited temperature range, typically −90 °C to 130 °C.
Thermistor
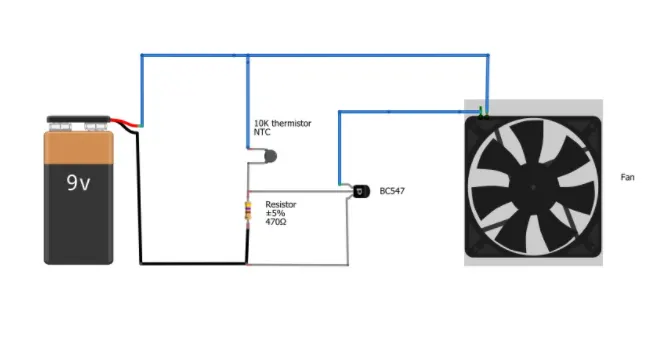
Components
- Battery
- Themistor
- Fan
- Transistor
- Resistor
Model of Thermistor
Explanation of simulink model of Thermistor
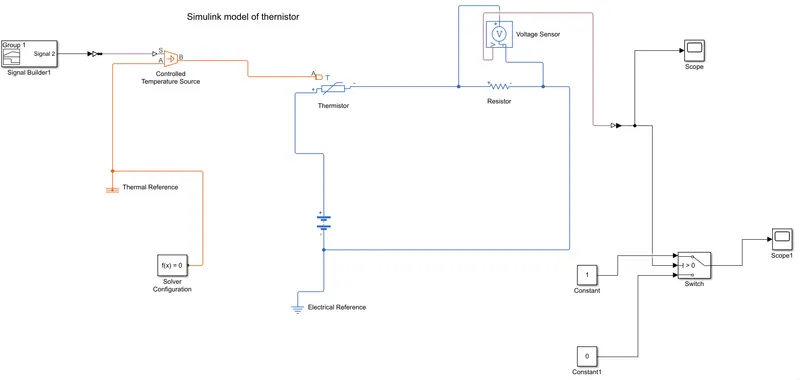
- To make the Cooling fan model using Thermistor we need a thermistor, battery , voltmeter, resistor , switch.
- First take Thermistor and connect its positive terminal to the positive terminal of battery.
- The negative terminal opf the Thermistor is connected with positive terminal of the 'Resistor block'.
- The negative terminal of the Resistor is connected with the negative terminal of the battery which represents the earthing of the real time circuit.
- Now connect 'Voltage Sensor' in parallel combination with the resistor because to measure voltage across any component then voltmeter should always connected parallel to that component.
- We need some physical quantities to as signal for the thermistor to work.
- As per the condition in this case we need the fan ON and OFF at different temperature. So we have to used 'Controlled Temperature Source' which only gives a specified temperature as output even though heat flow is more.
- To give different temperature to the 'Controlled Temperature Source' we need to send temperature signals, so we used 'Signal Builder'
- Double click on the 'Signal Builder Block' to set the required signal as per the condition.
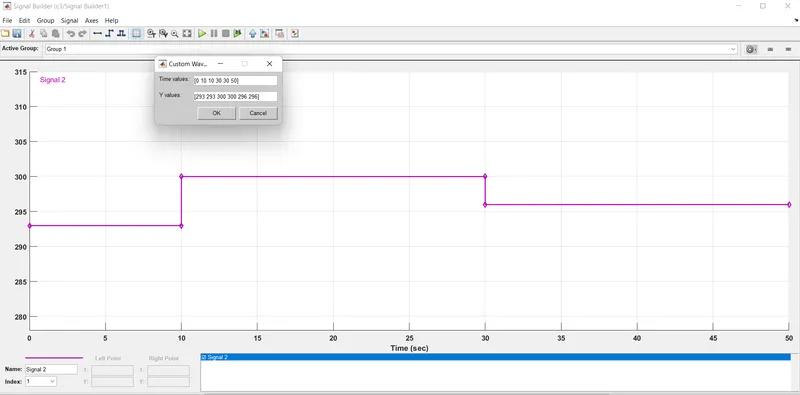
- As double click on 'Signal builder block' the above figure shown as above
- On the top of this box there is a option 'axes' which is used to set the time (x axis) value (Range)as the our case required.
- Then click on Signal option which is at the top of the box and then select 'New' then select ' Custom' and then enter the Y-axis and X-axis values as our requirement.
- Signal builder is connected with 'controlled temperature source through the Simulink PS converter.
- Port B of the 'controlled temperature source' is connected to Port A of the 'Thermistor' and Port A of the 'controlled temperature source is connected to the 'Thermal reference block'
- In 'controlled temperature source block' a positive temperature difference causes the temperature at Port B to be greater than the temperature at port A.
- 'Voltage Sensor is connected to 'scope' through PS simulink converter.
- Run the simullation and double click on the scope we will get the following graph
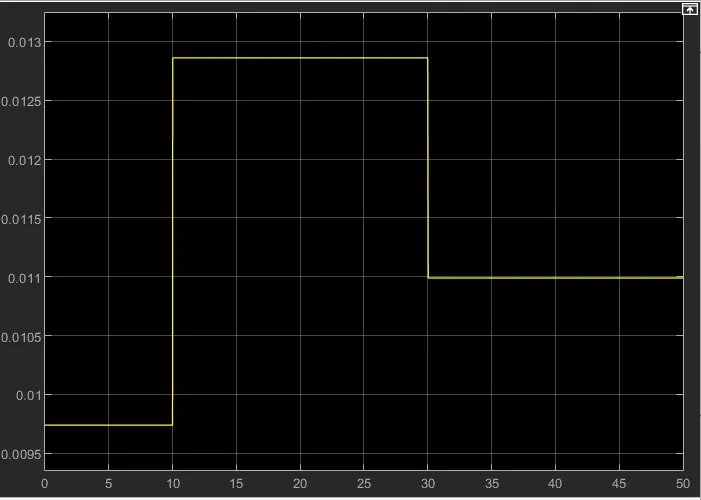
- from the we observe that from time 0 to 10 seconds when temperature is 293K, voltage is between 0.0095 and 0.01 and from time 10 to 30 seconds when temperature is 300K, voltage is between 0.0125 and 0.013 and from time 30 to 50 seconds when temperature is 296K, voltage is nearly 0.011.
- As per the condition fan should be ON when temperature is more 25 degree celsius, from the above graph when voltage is below 0.011, fan should be OFF.
- The centre port of 'Switch block' is connected to output of PS Simulink converter which gives the voltage values.
- The top of the switch is connected to constant value 1 and bottom port of the switch is connected to constant value of 0.
- To set the threshold value of the Switch we have to double click on the Switch and then we can change the value of threshold value which is 0.011 because switch to be ON only when temperature is 300K so the threshold is given as 0.011.
- When the voltage is more than 0.011 the switch will give value 1 as output which means fan will ON and when voltage gets less than 0.011 the switch will give 0 value as output i.e fan will be OFF.
- Switch is connected to another Scope to get the required results as graph given below