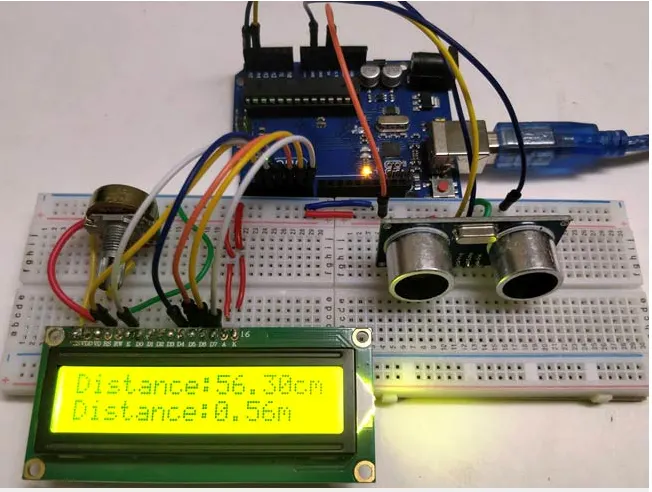
Project 2 - Measuring the distance of an object using ultrasonic sensor and also smoothen the sensor data using moving average filter
Overview of the Project:
In this project the implementation of code for “Measuring distance of an object using ultrasonic distance sensor (28015 Ping) and also smoothen the sensor data using moving average filter”.
Goals:
- Measuring the distance in terms of inches of an object using Ultrasonic Distance Sensor (28015 Ping).
- The sensor data is smoothened by using Moving average filter technique to eliminate the high frequency variations from the sensor data.
Key Highlights of the Project:
- Measuring the distance travelled by the wave to the object and gets bounced back from the object to sensor.
- Smoothening the sensor data by moving average filter technique, the filter has a window of certain size. That window determines that how many data the filter can take.
Deliverables of this project:
- The distance travelled by a wave to the object for which we want to measure the distance using Ultrasonic Distance Sensor (28015 Ping).
- Eliminate the high frequency jitters from the sensor data by Moving Average filter to smoothen the sensor data.
Expected Outcomes:
The students will get the Knowledge on Ultrasonic sensor (28015 Ping) to measure the distance travelled by wave to the object, the hardware connection of 2 Arduino’s connected to the sensor and smoothening the sensor data by removing high frequency variations using Moving Average Filter Technique.
Your Answers
ABOUT THIS PROJECT
Distance Measurement using Arduino Ultrasonic Sensor is a very easy project to measure shorter distance precisely. Before getting started you must know about Ultrasonic Sensor HC SR-04, which is a low-cost sensor. The ultrasonic sensor is consists of Transmitter and Receiver modules. Transmitter part ejects the pulse out and the receiver part receives the pulse. If an obstacle is placed before the sensor, the transmitted pulse ejected strike the obstacle and reflected back. The reflected pulse is received by the receiver part. The time between transmission and reception is calculated. This data is processed to calculate distance.
In this project, we are going to interface Ultrasonic sensor HC-SR04 with Arduino and LCD Display. The ultrasonic sensor is used to measure the distance. It acts as a Sonar. It sends an ultrasonic wave of a certain frequency that comes back after hitting the object and calculates the time traveled by it. So let’s learn about Distance Measurement Using Arduino & HC-SR04 Ultrasonic Sensor.
Components Used
- Arduino Uno or Pro Mini
- Ultrasonic sensor Module
- 16x2 LCD
- Scale
- Bread board
- 9 volt battery
- Connecting wires
Ultrasonic Sensor Module
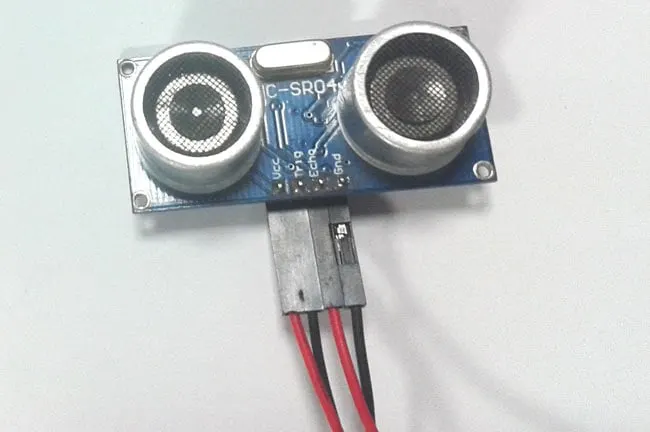
There are many types of Arduino distance sensors, but in this project we have used the HC-SR04 to measure distance in range of 2cm-400cm with an accuracy of 3mm. The sensor module consists of an ultrasonic transmitter, receiver and control circuit. The working principle of ultrasonic sensor is as follows:
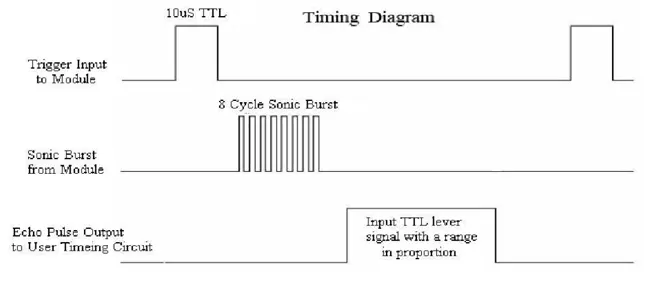
- High level signal is sent for 10us using Trigger.
- The module sends eight 40 KHz signals automatically, and then detects whether pulse is received or not.
- If the signal is received, then it is through high level. The time of high duration is the time gap between sending and receiving the signal.
Distance= (Time x Speed of Sound in Air (340 m/s))/2
Timing Diagram
The module works on the natural phenomenon of ECHO of sound. A pulse is sent for about 10us to trigger the module. After which the module automatically sends 8 cycles of 40 KHz ultrasound signal and checks its echo. The signal after striking with an obstacle returns back and is captured by the receiver. Thus the distance of the obstacle from the sensor is simply calculated by the formula given as
Distance= (time x speed)/2.
Here we have divided the product of speed and time by 2 because the time is the total time it took to reach the obstacle and return back. Thus the time to reach obstacle is just half the total time taken.
Ultrasonic Sensor Arduino Circuit Diagram and Explanation

The circuit diagram for arduino and ultrasonic sensor is shown above to measure the distance. In circuit connections Ultrasonic sensor module’s “trigger” and “echo” pins are directly connected to pin 18(A4) and 19(A5) of arduino. A 16x2 LCD is connected with arduino in 4-bit mode. Control pin RS, RW and En are directly connected to arduino pin 2, GND and 3. And data pin D4-D7 is connected to 4, 5, 6 and 7 of arduino.
First of all we need to trigger the ultrasonic sensor module to transmit signal by using arduino and then wait for receive ECHO. Arduino reads the time between triggering and Received ECHO. We know that speed of sound is around 340m/s. so we can calculate distance by using given formula:
Distance= (travel time/2) * speed of sound
Where speed of sound around 340m per second.
A 16x2 LCD is used for displaying distance.
Find more about the working of distance measurement project in this tutorial: Distance measurement using ultrasonic sensor and AVR Microcontroller.
Arduino Ultrasonic Sensor Code for Distance Measurement
The complete code for this ultrasonic distance measurement project is given at the bottom of this page. In the code we read time by using pulseIn(pin). And then perform calculations and displayed result on 16x2 LCD by using appropriate functions.
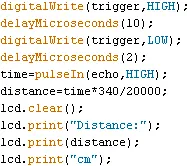
#include
#define trigger 18
#define echo 19
LiquidCrystal lcd(2,3,4,5,6,7);
float time=0,distance=0;
void setup()
{
lcd.begin(16,2);
pinMode(trigger,OUTPUT);
pinMode(echo,INPUT);
lcd.print(" Ultra sonic");
lcd.setCursor(0,1);
lcd.print("Distance Meter");
delay(2000);
lcd.clear();
lcd.print(" Circuit Digest");
delay(2000);
}
void loop()
{
lcd.clear();
RESULT;