Project 2
Raspberry pie and DHT11 Sensor
To use DHT11 sensor with Raspberry Pi, we need to install Adafruit Python DHT Sensor Library files. We can download the same by using following commands:
sudo apt-get install git-coregit clone https://github.com/adafruit/Adafruit_Python_DHT.gitcd Adafruit_Python_DHTsudo apt-get install build-essential python-devsudo python setup.py install
After this, enable Raspberry Pi I2C interfacing using Raspberry Pi’s Software Configuration:
sudo raspi-config
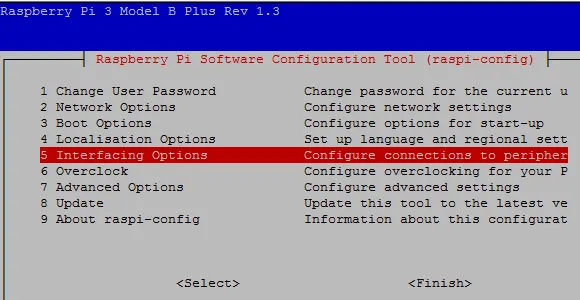
Now, click on ‘Interfacing Options.’
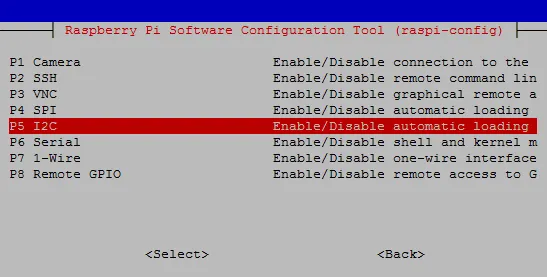
Then click on ‘I2C’ to enable it.
Connecting and Setting up temperature sensor
If you do not want to use the DHT11 or DHT22, you can skip this chapter.
I have already discussed the two sensors in detail here, so this is only the connection as a reminder (10kΩ resistance):
If you have never used the sensor before and the library is not yet installed, we need to install it first. Some packages are needed for that:
sudo apt-get update
sudo apt-get install build-essential python-dev python-openssl git
Now we install the library to read the DHT11/22 sensors:
git clone https://github.com/adafruit/Adafruit_Python_DHT.git && cd Adafruit_Python_DHT
sudo python setup.py install
If everything went through without errors, we can already proceed.
Using Raspberry pie and ThinkSpeak Library
In order to be able to use the service, it is possible to simply send the data via “POST” or retrieve via “GET”. Functions are available in just about any programming language and with a little bit of knowledge, data transfer should be fast. The answers are in principle in JSON.
If you do not have enough experience or just do not feel like writing it yourself, you can also use the ThingSpeak library. For this we install it simply by pip:
sudo pip install thingspeak
On the one hand, a Python library is created and, in addition, a terminal-application. You can also call thingspeak via the console (or from another C ++ / Java program).
So let’s start. Our little Python script should read the temperature and humidity of the DHT22 every 15 seconds and send it to our channel. In addition, the data should then be retrieved again (this is not necessary in applications that only send data, so it is just a demonstration example).
We will create a new file,
sudo nano thingspeak_example.py
|
1 2 3 4 5 6 7 8 9 10 11 12 13 14 15 16 17 18 19 20 21 22 23 24 25 26 27 28 29 30 |
import thingspeak import time import Adafruit_DHT channel_id = 206897 # PUT CHANNEL ID HERE write_key = '24GJQV17H7H4XGJ5' # PUT YOUR WRITE KEY HERE read_key = '9EZ7E0918UVVAGAY' # PUT YOUR READ KEY HERE pin = 4 sensor = Adafruit_DHT.DHT22 def measure(channel): try: humidity, temperature = Adafruit_DHT.read_retry(sensor, pin) # write response = channel.update({'field1': temperature, 'field2': humidity}) # read read = channel.get({}) print("Read:", read) except: print("connection failed") if __name__ == "__main__": channel = thingspeak.Channel(id=channel_id, write_key=write_key, api_key=read_key) while True: measure(channel) # free account has an api limit of 15sec time.sleep(15) |
which gets the following content (save and exit with CTRL + O, CTRL + X):
Of course, if you do not use the DHT22 sensor, the code needs to be adjusted a bit.You need to adjust lines 5 to 7 accordingly. Line 8 only needs to be changed if you are using a different GPIO for the sensor.
Get Data in web panel using API
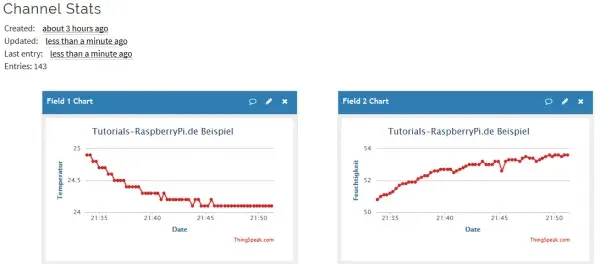
The data of the panel is displayed with a few seconds delay “quasi live”. You can customize the panels (appearance and data display) and even write your own ideas for the data. For these so-called apps, you just have to master a bit of HTML, CSS and Javascript. Alternatively, you can also download plugins from the Forum.
Settingup ThinkSpeak Account
Before we start, you need an account at ThingSpeak. Create an account here if you do not have one yet. Then, create a new channel at https://thingspeak.com/channels .
Here you give a name to the channel as well as which fields you want to use. In total, up to 8 fields can be used. The names given have no influence on the transmission of the data, as we only specify “field1”, “field2”, etc. All these assigned names are still changeable later.
After you have saved the channel below, you will automatically be redirected to the tab “Private View”. Here the assigned fields are displayed as a diagram. Further up you will find the “Channel ID“. We will need them soon.
Afterwards, we switch to the tab “API Keys”. The two values of “Write API Key” as well as “Read API Key” are equally needed so that we can write or retrieve data.
Code
import sys
import RPi.GPIO as GPIO
import os
import Adafruit_DHT
import urllib2
import smbus
import time
from ctypes import c_short
#Register Address
regCall = 0xAA
regMean = 0xF4
regMSB = 0xF6
regLSB = 0xF7
regPres = 0x34
regTemp = 0x2e
DEBUG = 1
sample = 2
deviceAdd =0x77
humi=""
temp=""
i2cbus = smbus.SMBus(1) # for Pi2 uses 1
DHTpin = 22
key="2TGQM466HIOVOUD5" # Enter your Write API key from ThingSpeak
GPIO.setmode(GPIO.BCM)
GPIO.setwarnings(False)
GPIO.setmode(GPIO.BCM)
def convert1(data, i): # signed 16-bit value
return c_short((data[i]<< 8) + data[i + 1]).value
def convert2(data, i): # unsigned 16-bit value
return (data[i]<< 8) + data[i+1]
def readBmp180(addr=deviceAdd):
value = i2cbus.read_i2c_block_data(addr, regCall, 22) # Read calibration data
# Convert byte data to word values
AC1 = convert1(value, 0)
AC2 = convert1(value, 2)
AC3 = convert1(value, 4)
AC4 = convert2(value, 6)
AC5 = convert2(value, 8)
AC6 = convert2(value, 10)
B1 = convert1(value, 12)
B2 = convert1(value, 14)
MB = convert1(value, 16)
MC = convert1(value, 18)
MD = convert1(value, 20)
# Read temperature
i2cbus.write_byte_data(addr, regMean, regTemp)
time.sleep(0.005)
(msb, lsb) = i2cbus.read_i2c_block_data(addr, regMSB, 2)
P2 = (msb << 8) + lsb
# Read pressure
i2cbus.write_byte_data(addr, regMean, regPres + (sample << 6))
time.sleep(0.05)
(msb, lsb, xsb) = i2cbus.read_i2c_block_data(addr, regMSB, 3)
P1 = ((msb << 16) + (lsb << 8) + xsb) >> (8 - sample)
# Refine temperature
X1 = ((P2 - AC6) * AC5) >> 15
X2 = (MC << 11) / (X1 + MD)
B5 = X1 + X2
temperature = (B5 + 8) >> 4
# Refine pressure
B6 = B5 - 4000
B62 = B6 * B6 >> 12
X1 = (B2 * B62) >> 11
X2 = AC2 * B6 >> 11
X3 = X1 + X2
B3 = (((AC1 * 4 + X3) << sample) + 2) >> 2
X1 = AC3 * B6 >> 13
X2 = (B1 * B62) >> 16
X3 = ((X1 + X2) + 2) >> 2
B4 = (AC4 * (X3 + 32768)) >> 15
B7 = (P1 - B3) * (50000 >> sample)
P = (B7 * 2) / B4
X1 = (P >> 8) * (P >> 8)
X1 = (X1 * 3038) >> 16
X2 = (-7357 * P) >> 16
pressure = P + ((X1 + X2 + 3791) >> 4)
return (str(pressure/100.0))
def readDHT():
humi, temp = Adafruit_DHT.read_retry(Adafruit_DHT.DHT11, DHTpin)
return (str(int(humi)), str(int(temp)))
# main() function
def main():
print 'System Ready...'
URL = 'https://api.thingspeak.com/update?api_key=%s' % key
print "Wait...."
while True:
(humi, temp)= readDHT()
(pressure) =readBmp180()
finalURL = URL +"&field1=%s&field2=%s"%(humi, temp)+"&field3=%s" %(pressure)
print finalURL
s=urllib2.urlopen(finalURL);
print humi+ " " + temp + " " + pressure
s.close()
time.sleep(10)
if __name__=="__main__":
main()