Project 1 (Mini Project on Vehicle Direction Detection
LIVE BATCH-07
Aim: To create a Simulink model for determining the vehicles direction based on the camera input.
Objectives:
- Development of MATLAB Simulink model as per requirement.
- Tag the requirements to the simulink model; tagging requirement 1 & requirement 2 to their corresponding subsystems is fine.
- MBD compliant changes, Data Dictionary creation & code generation is added advantage, and that is not scope of this project.
- If choosing code generation, Storage class for Input signals: ImportedExtern; Storage class for Output signal: Export to File; Storage class for local signals: localizable; Storage class for calibration signals: Const.
- Choose sample time for all signals as 0.01s
Theory:
Vehicle direction examination plays a vital role in several different application. various such application are Driver Assisatnce sysytem, Electronic Toll collection and Intelligent Parking system. Particularly in wrongdoing anticipation and mischance examination this feature cab be an added advantage. Also as to increase the security level for both the driver and the other vehicle running over the road detection of direction of vehicle is an upperhand to avoid any collision or fatality.
Identifying the direction of the vehicle is one of the important & diverse features in Autonomous driving & Advanced Driver Assistance Features. This particular sub-feature of identifying the direction of vehicle is basically identifying the direction the vehicle is taking based on the camera input.
Camera reads the road signs & stores into its memory with unique values for left turn, right turn & straight drive. Depending on the direction it is taking, final indication is given to the driver – as an indication if he is driving in the recommended direction or not.
Vehicle Direction Determination can also be coupled along - side features like GPS systems to identify whether the vehicle is reaching its destination in an optimized manner. This sub feature can also be used along with Lane Detection, Highway Warning, Ramp Entry / Exit in Wrong Way Detection etc.
For this project there were several steps taken which are as follows:-
- Developement of the Desired model
- Configuration Parameter Setting
- Linking of the Simulink Data Dictionary
- Signal resolving and Signal Propogation
- Model Advisor Report Generation
- C-code generation
DEVELOPEMENT OF THE DESIRED MODEL
The Simulink model for determining the vehicles direction and which will fulfill the above requirements are as follows:
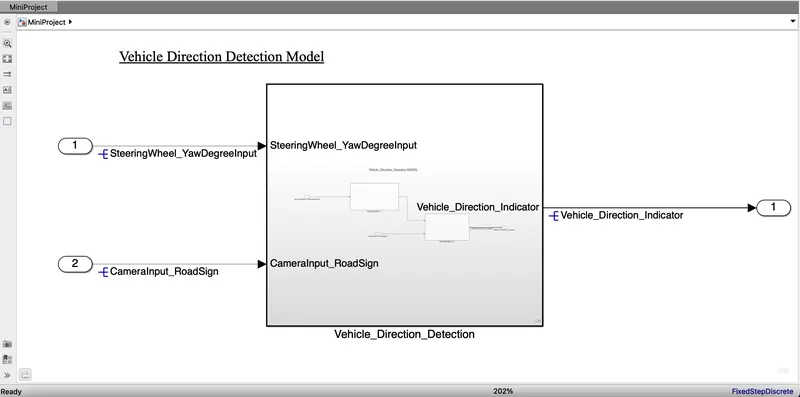
This model is craeted on the basis of the two requirements of the project and the subsystem for the above Model is as follows:
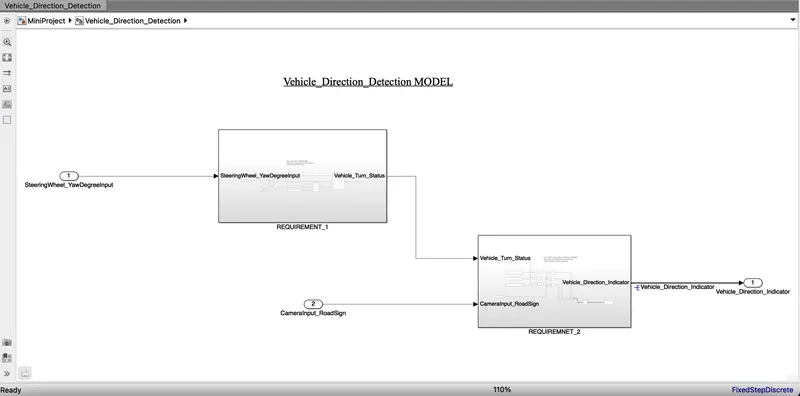
According to the Projects Question the requirements are as follow:
Requirement - 1:
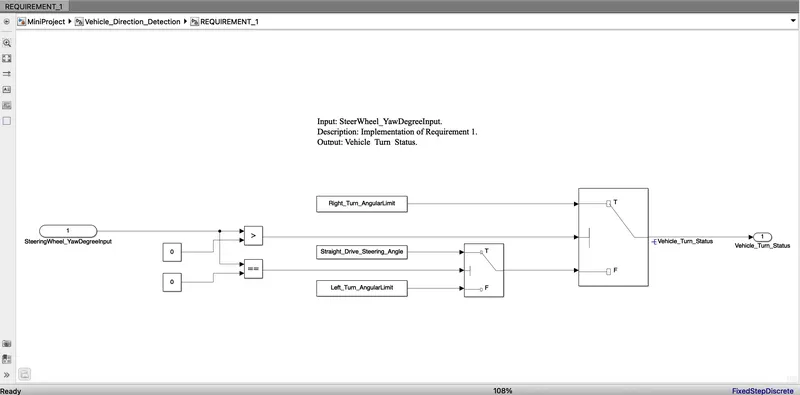
- Steering wheel input as yaw rate (Signal name: SteeringWheel_YawDegreeInput) is the input for this system.
- This is compared against 3 angular values, one each for left turn, right turn & straight drive (Calibration Values: Right_Turn_AngularLimit, Left_Turn_AngularLimit, Straight_Drive_Steering_Angle) to say which specific direction the steering wheel is turning towards.
- Use switch blocks to compare & develop this requirement. Keep this requirement in a subsystem & output of this requirement is a local signal (Signal Name: Vehicle_Turn_Status).
Keeping the above conditions the model for these requirement is being created and the subsystem taht has been createed is as follows:
Requirement – 2:
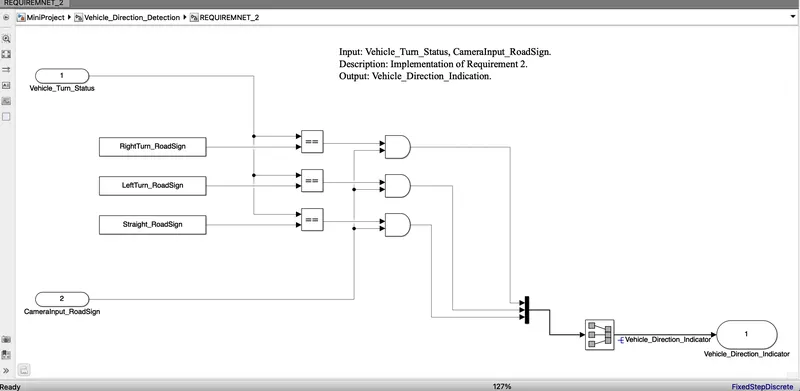
- Keep this requirement as a separate subsystem. Inputs to this requirement are local signal from requirement 1 (Signal Name: Vehicle_Turn_Status) & an input signal from camera (Signal Name: CameraInput_RoadSign), which confirms the occurrence of a road sign.
- Signal Vehicle_Turn_Status is compared against calibration values (Calibration Values: RightTurn_RoadSign, LeftTurn_RoadSign, Straight_RoadSign), if each of them is found equal, then each of the three corresponding output is compared against the camera input signal,
- Using a logical operator block, only one among them is finally given as output signal (Signal Name: Vehicle_Direction_Indicator).
The subsystem for the above requiement is as follows :
Once the model is being created now we need to set the Configuration Parameters Settings.
CONFIGURATION PARAMETER SETTINGS
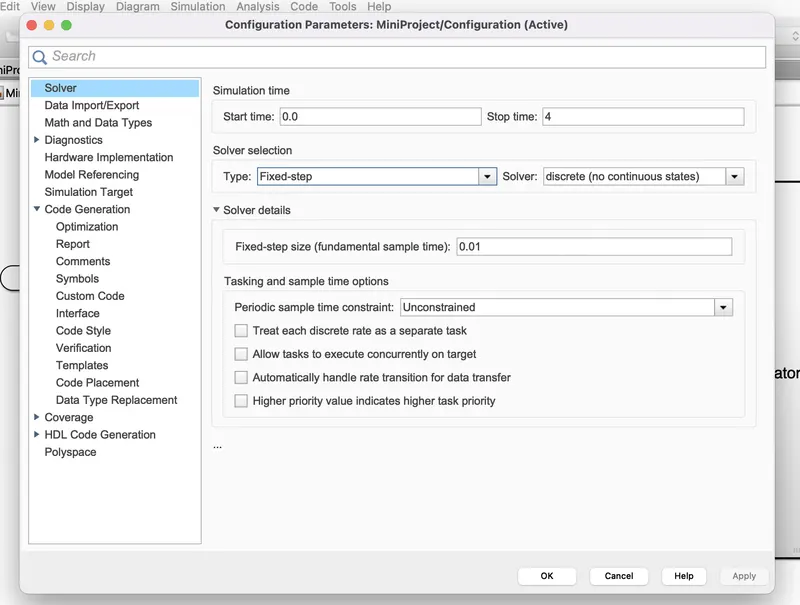
We have to set the Solver settingand Code generation settings. Under Solver setting, the solver type must be Fixed Step type and the Solver must be Discrete (no continuous state). And under the Code generation setting the Embedded coder must e selected and the sample time for all the signals must be set to 0.01.
LINKING OF THE SIMULINK DATA DICTIONARY
As teh signals given in the question are supposed to be used for the developemnet of this model, we need to add all the signals and constants in the SLDD in order to use that data appropriately and we can do it by just simply enetering the signals name, its dimentions, and data type and many more things as given in the question.
Signals & Calibration Data List:
|
Signal / Calibration Name |
Signal Type |
Data Type |
Dimension |
Min |
Max |
Initial Value |
Units |
|
SteeringWheel_YawDegreeInput |
Input |
Int16 |
1 |
-180 |
180 |
- |
Deg |
|
CameraInput_RoadSign |
Input |
Boolean |
1 |
0 |
1 |
- |
- |
|
Vehicle_Turn_Status |
Local |
Int16 |
1 |
-180 |
180 |
- |
Deg |
|
Right_Turn_AngularLimit |
Calibration |
Int16 |
[1 1] |
-180 |
180 |
30 |
Deg |
|
Left_Turn_AngularLimit |
Calibration |
Int16 |
[1 1] |
-180 |
180 |
-120 |
Deg |
|
Straight_Drive_Steering_Angle |
Calibration |
Int16 |
[1 1] |
-180 |
180 |
0 |
Deg |
|
RightTurn_RoadSign |
Calibration |
Int16 |
[1 1] |
-180 |
180 |
30 |
|
|
LeftTurn_RoadSign |
Calibration |
Int16 |
[1 1] |
-180 |
180 |
-120 |
|
|
Straight_RoadSign |
Calibration |
Int16 |
[1 1] |
-180 |
180 |
0 |
|
|
Vehicle_Direction_Indicator |
Output |
Boolean |
1 |
0 |
1 |
- |
- |
The following are steps in order to add the information to the SLDD
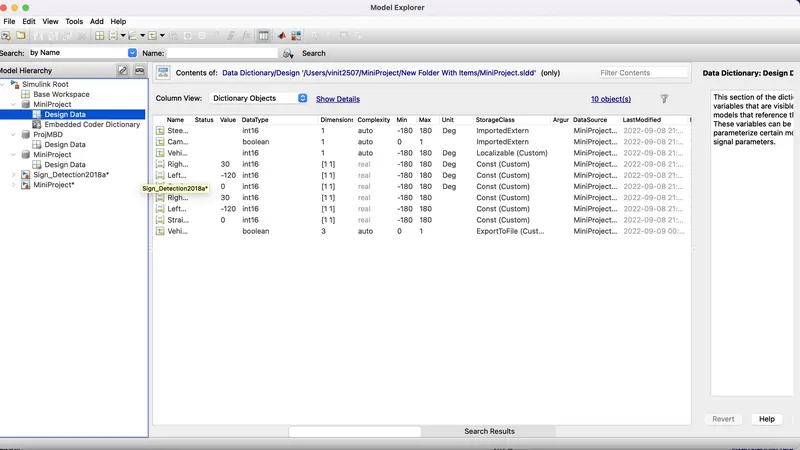
Firstly we need to click on the gear like option at the top of the window which says Model Explorer : By clicking on the model properties, a window will pop-up saying model properties. It will contain five parameters 1) Main 2) Callbacks 3) History 4) Description 5) Data.Under the Data we have need to select the Data Dictionary under taht New. Once on clicking New there pops-up a window for creating the New Data Duictionary. We need to save the file wherever we want. Once it is done, the simulink model will appear, in that at the Left Bottom of the screen, click on that , then it will take you to the Model Hierarchy.
Signal resolving and Signal Propogation
All the signals in the model must be resolved in order to get the appropriate output from the model. The steps for resolvinng the signasl are as follows:
Right click on the signal that has to be resolved -->Properties.
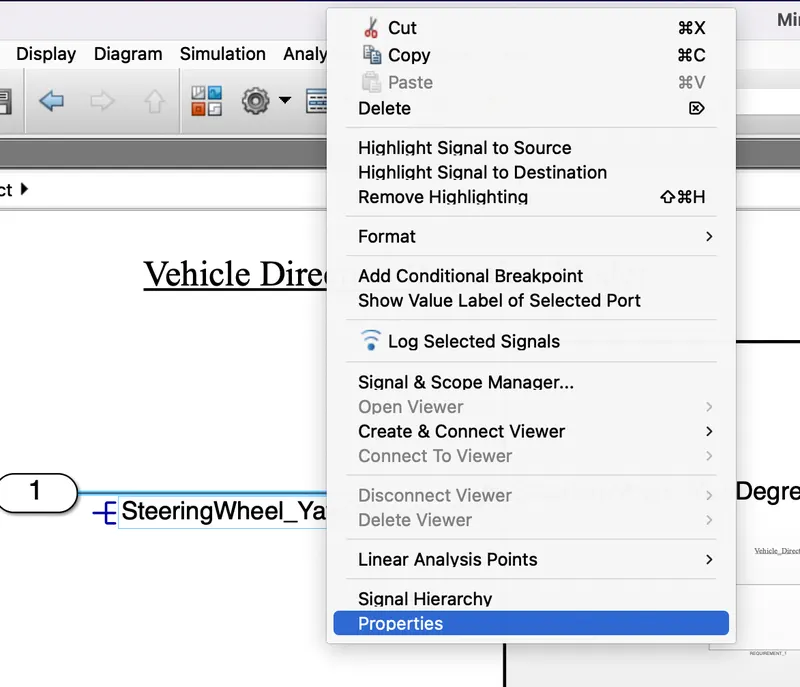
In properties --> Write the name of the signal and under that we need to check the option that says Signal name must resolve o Simulink signal object.
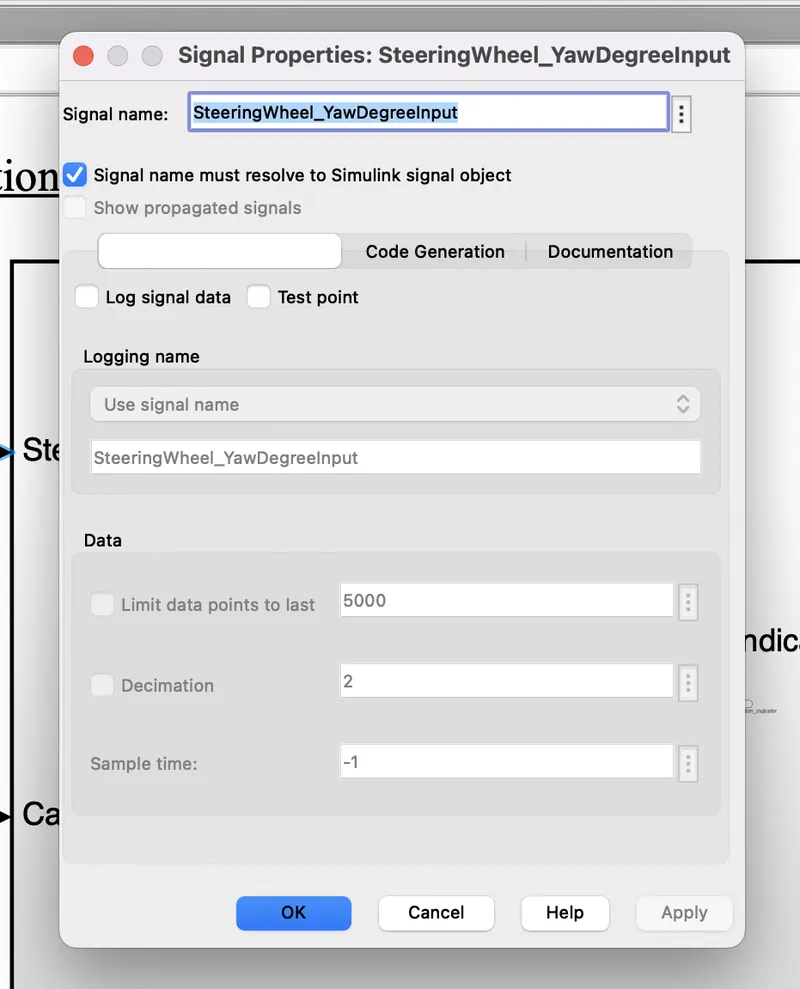
Once it is done then teh name of the signal appears on the signal along with the -E sign on it .
Model Advisor Report Generation
Now we will generate teh Model Advisor Report of this model in order to check if there are any Failed conditiosn or any errors are present in the model. It helps us to improve the efficiency of the model as from this report we can get the errors, and warnings that the model is having just by doing the Model Advidory Check. Later on we can fix teh errors that are present in the model.
The steps for generating the Model Advisor Report are as follows:
Firstly we need to click on the Analysis option that is present at the top of the Simulink model then under that Model Advidor will be present.
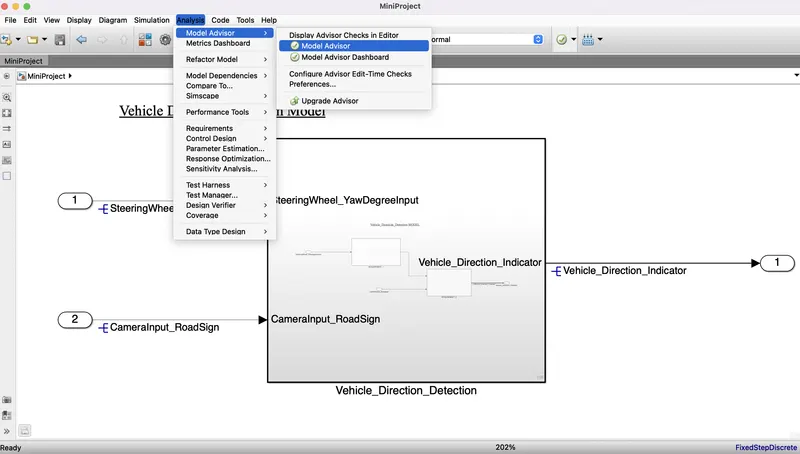
On clicking that it will take you to the Model Advisor window. In that we need to select the By Task option and under that we need to run the checks for only the Modeling Standards for MAAB.
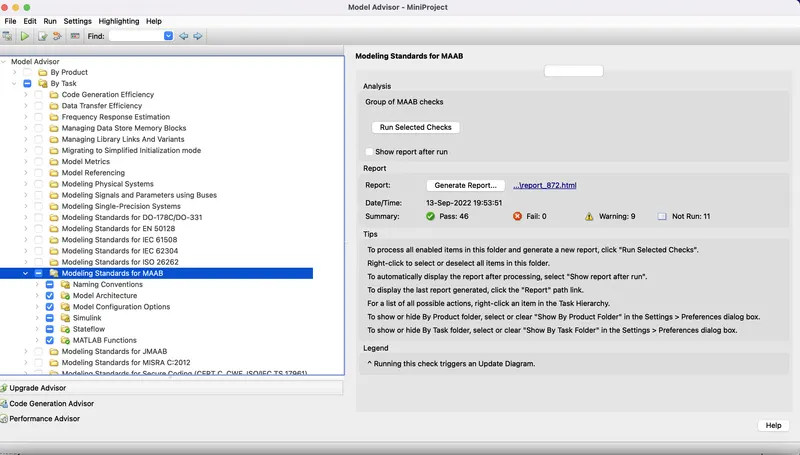
RESULT:
C-code generation
The code for this model is as follows:
//MINIPROJECTMBD

/*
 * File: MiniProject.c
 *
 * Code generated for Simulink model 'MiniProject'.
 *
 * Model version                  : 1.20
 * Simulink Coder version         : 8.14 (R2018a) 06-Feb-2018
 * C/C++ source code generated on : Tue Sep 13 15:15:04 2022
 *
 * Target selection: ert.tlc
 * Embedded hardware selection: Intel->x86-64 (Windows64)
 * Code generation objectives: Unspecified
 * Validation result: Not run
 */

#include "MiniProject.h"
#include "MiniProject_private.h"

/* Exported data definition */

/* Definition for custom storage class: ExportToFile */
boolean_T Vehicle_Direction_Indicator[3];

/* Const memory section */
/* Definition for custom storage class: Const */
const int16_T LeftTurn_RoadSign = -120;
const int16_T Left_Turn_AngularLimit = -120;
const int16_T RightTurn_RoadSign = 30;
const int16_T Right_Turn_AngularLimit = 30;
const int16_T Straight_Drive_Steering_Angle = 0;
const int16_T Straight_RoadSign = 0;

/* Real-time model */
RT_MODEL_MiniProject_T MiniProject_M_;
RT_MODEL_MiniProject_T *const MiniProject_M = &MiniProject_M_;

/* Model step function */
void MiniProject_step(void)
{
  /* local block i/o variables */
  int16_T Vehicle_Turn_Status;

  /* Outputs for Atomic SubSystem: '<Root>/Subsystem2' */
  /* Switch: '<S2>/Switch' incorporates:
   *  Constant: '<S2>/Constant'
   *  Constant: '<S2>/Constant1'
   *  Inport: '<Root>/ '
   *  RelationalOperator: '<S2>/Equal'
   *  RelationalOperator: '<S2>/GreaterThan'
   *  Switch: '<S2>/Switch1'
   */
  if (SteeringWheel_YawDegreeInput > 0) {
    Vehicle_Turn_Status = Right_Turn_AngularLimit;
  } else if (SteeringWheel_YawDegreeInput == 0) {
    /* Switch: '<S2>/Switch1' incorporates:
     *  Constant: '<S2>/Constant2'
     */
    Vehicle_Turn_Status = Straight_Drive_Steering_Angle;
  } else {
    Vehicle_Turn_Status = Left_Turn_AngularLimit;
  }

  /* End of Switch: '<S2>/Switch' */

  /* SignalConversion: '<S3>/Signal Conversion' incorporates:
   *  Constant: '<S3>/Constant'
   *  Constant: '<S3>/Constant1'
   *  Constant: '<S3>/Constant3'
   *  Inport: '<Root>/Input'
   *  Logic: '<S3>/AND'
   *  Logic: '<S3>/AND1'
   *  Logic: '<S3>/AND2'
   *  RelationalOperator: '<S3>/Equal'
   *  RelationalOperator: '<S3>/Equal1'
   *  RelationalOperator: '<S3>/Equal2'
   */
  Vehicle_Direction_Indicator[0] = ((Vehicle_Turn_Status == RightTurn_RoadSign) &&
    CameraInput_RoadSign);
  Vehicle_Direction_Indicator[1] = ((Vehicle_Turn_Status == LeftTurn_RoadSign) &&
    CameraInput_RoadSign);
  Vehicle_Direction_Indicator[2] = ((Vehicle_Turn_Status == Straight_RoadSign) &&
    CameraInput_RoadSign);

  /* End of Outputs for SubSystem: '<Root>/Subsystem2' */
}

/* Model initialize function */
void MiniProject_initialize(void)
{
  /* Registration code */

  /* initialize error status */
  rtmSetErrorStatus(MiniProject_M, (NULL));

  /* block I/O */

  /* custom signals */
  Vehicle_Direction_Indicator[0] = false;
  Vehicle_Direction_Indicator[1] = false;
  Vehicle_Direction_Indicator[2] = false;
}

/* Model terminate function */
void MiniProject_terminate(void)
{
  /* (no terminate code required) */
}

/*
 * File trailer for generated code.
 *
 * [EOF]
 */