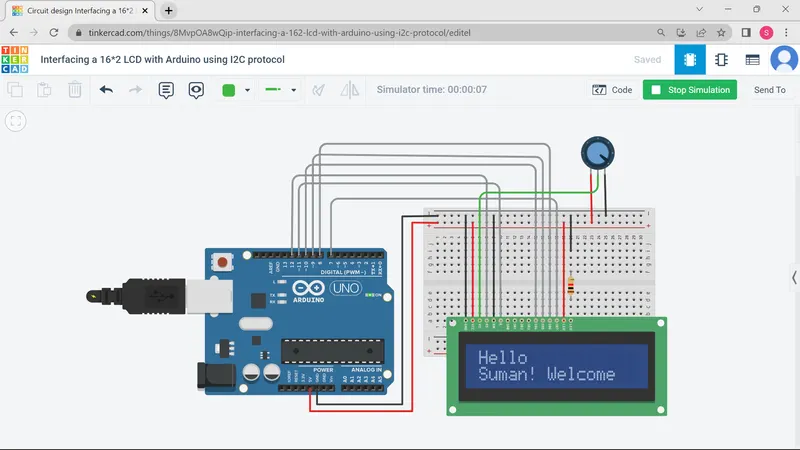
Project 1 - Interfacing a 16*2 LCD with Arduino using I2C protocol
Problem Statement............
Interfacing a 16*2 LCD with Arduino using I2C protocol
Solution
Aim
To interface a 16*2 LCD with Arduino using I2C protocol
Component Used/Required
| Name | Quantity | Component | ||
| U1 | 1 | LCD 16 x 2 | ||
| U2 | 1 | Arduino Uno R3 | ||
| Rpot1 | 1 | 10 kΩ Potentiometer | ||
| R1 | 1 | 1 kΩ Resistor | ||
Theory
What is the LCD 16*2?
The term LCD stands for liquid crystal display. It is one kind of electronic display module used in an extensive range of applications like various circuits & devices like mobile phones, calculators, computers, TV sets, etc. These displays are mainly preferred for multi-segment light-emitting diodes and seven segments. The main benefits of using this module are inexpensive; simply programmable, animations, and there are no limitations for displaying custom characters, special and even animations, etc.
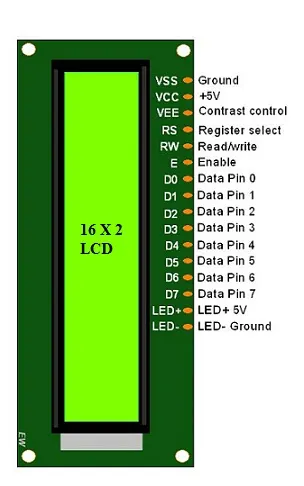
The 16×2 LCD pinout is shown below.
- Pin1 (Ground/Source Pin): This is a GND pin of display, used to connect the GND terminal of the microcontroller unit or power source.
- Pin2 (VCC/Source Pin): This is the voltage supply pin of the display, used to connect the supply pin of the power source.
- Pin3 (V0/VEE/Control Pin): This pin regulates the difference of the display, used to connect a changeable POT that can supply 0 to 5V.
- Pin4 (Register Select/Control Pin): This pin toggles among command or data register, used to connect a microcontroller unit pin and obtains either 0 or 1(0 = data mode, and 1 = command mode).
- Pin5 (Read/Write/Control Pin): This pin toggles the display among the read or writes operation, and it is connected to a microcontroller unit pin to get either 0 or 1 (0 = Write Operation, and 1 = Read Operation).
- Pin 6 (Enable/Control Pin): This pin should be held high to execute Read/Write process, and it is connected to the microcontroller unit & constantly held high.
- Pins 7-14 (Data Pins): These pins are used to send data to the display. These pins are connected in two-wire modes like 4-wire mode and 8-wire mode. In 4-wire mode, only four pins are connected to the microcontroller unit like 0 to 3, whereas in 8-wire mode, 8-pins are connected to microcontroller unit like 0 to 7.
- Pin15 (+ve pin of the LED): This pin is connected to +5V
- Pin 16 (-ve pin of the LED): This pin is connected to GND.
The features of this LCD mainly include the following.
- The operating voltage of this LCD is 4.7V-5.3V
- It includes two rows where each row can produce 16-characters.
- The utilization of current is 1mA with no backlight
- Every character can be built with a 5×8 pixel box
- The alphanumeric LCDs alphabets & numbers
- Is display can work on two modes like 4-bit & 8-bit
- These are obtainable in Blue & Green Backlight
- It displays a few custom generated characters
Arduino
Arduino is an open-source hardware and software company, project, and user community that designs and manufactures single-board microcontrollers and microcontroller kits for building digital devices.
Arduino board designs use a variety of microprocessors and controllers. The boards are equipped with sets of digital and analog input/output (I/O) pins that may be interfaced to various expansion boards or breadboards (for prototyping) and other circuits. The boards feature serial communications interfaces, including Universal Serial Bus (USB) on some models, which are also used for loading programs. The microcontrollers can be programmed using the C and C++ programming languages, using a standard API which is also known as the Arduino Programming Language, inspired by the Processing language and used with a modified version of the Processing IDE.
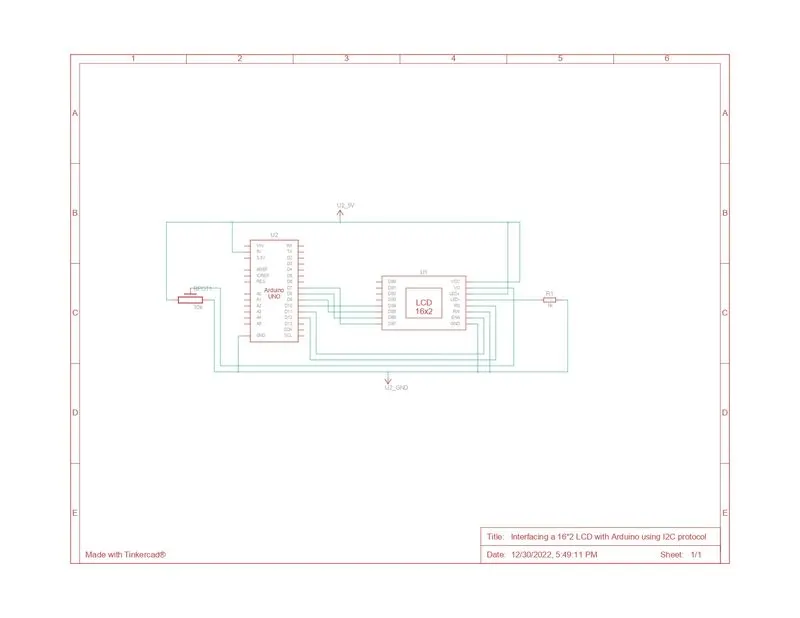
Circuit Diagram
Code
// C++ code
//
#include "LiquidCrystal.h" //Library for LCD display function
LiquidCrystal lcd(12,11,10,9,8,7); //Define LCD Module Pins (RS,EN,D4,D5,D6,D7)
void setup()
{
lcd.begin(16,2);
}
void loop()
{
lcd.setCursor(0,0); //Sets Cursor at line one of LCD
lcd.print("Hello "); //Prints >> Hello<< at LCD
lcd.setCursor(0,1); //Sets Cursor at line two of LCD
lcd.print("Suman! Welcome "); //Prints >>Suman! Welcome << at LCD
}
Output