Preparing Schedule & Cost Estimation for a building using REVIT
Challenge 8
Submitted by Kanala Rahul Reddy
1) Use the shortcut keys in Revit discussed in class to complete the following tasks and list them below
a. Using a 3D model create a section box
b. To create similar doors and windows in a floor plan layout
c. To reduce the thickness of lines visible in plan views
d. To apply override settings to a floor in the model section view
e. To increase the range of visibility in a plan view
f. To select the previously selected items
g. To add annotations to the model views
h. To bring the model elements inline
i. To rotate the model elements
j. To move an object to another location
k. To copy a model element
l. To mirror an element about an axis
m. To create an array of model elements
Short Cut Keys in Revit
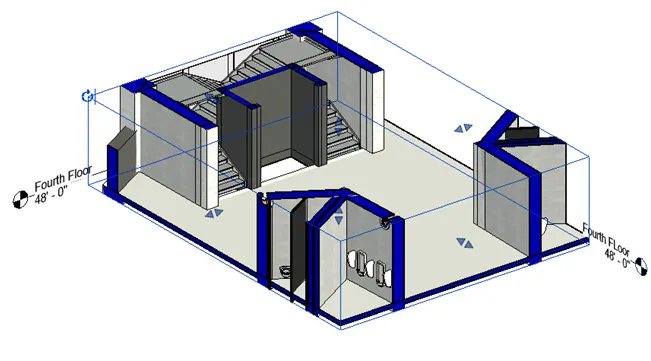
- BX (Section Box)
- Open Project 2 of Week 7
- Click on one of the staircases
- Press ‘Right click and click on ‘Select all instances visible in view’
- Press ‘BX’ to open section box around all stairs
- Adjust the box as per requirement
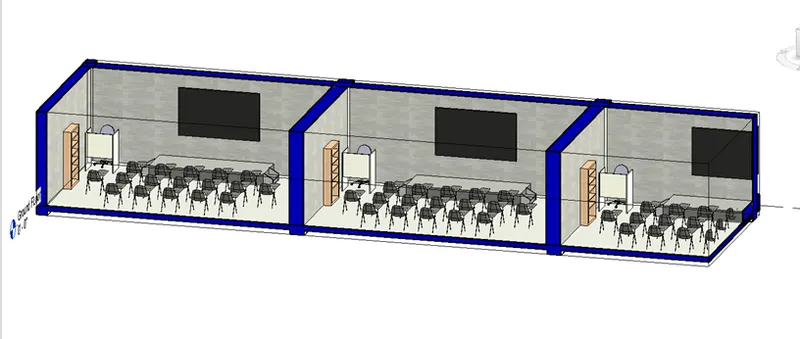
- CS (Create Similar)
Select one of the trees in front of the school building
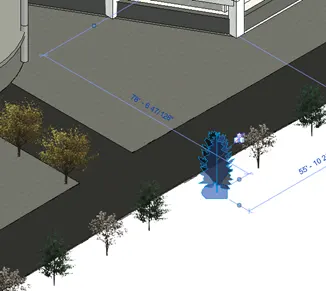
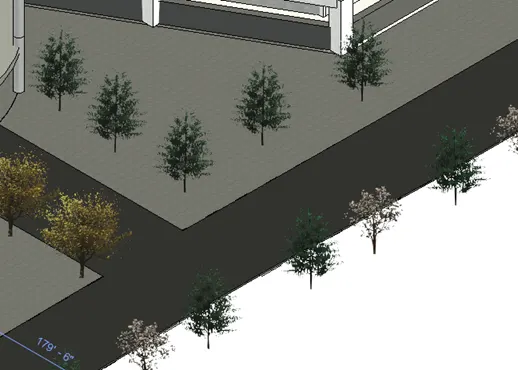
Click ‘CS’ to create similar tree sections
Place the tree where ever necessary
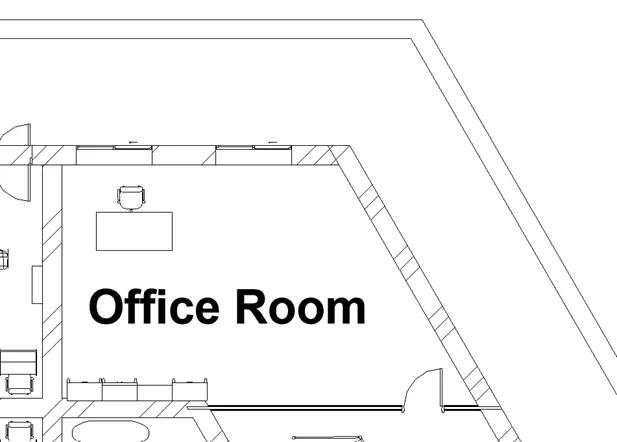
- TL (Thin Lines/Thick Lines)
Go to Ground Floor plan and zoom in on a part and view thick line/thin lines as follows
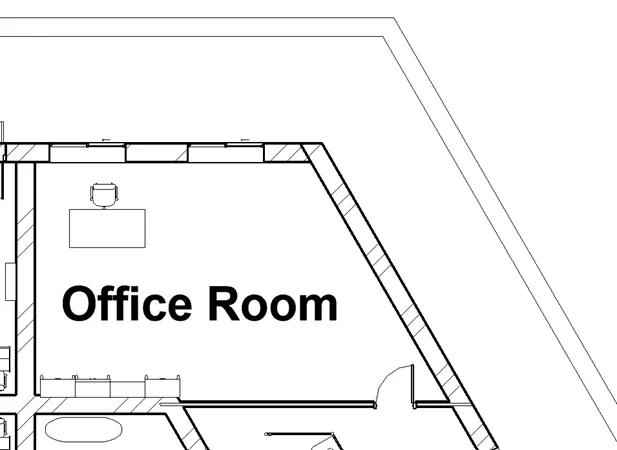
Type ‘TL’ to change the thickness of lines as below
Type ‘TL’ again to change back to Thick Lines
- VG (Visibility Graphics)
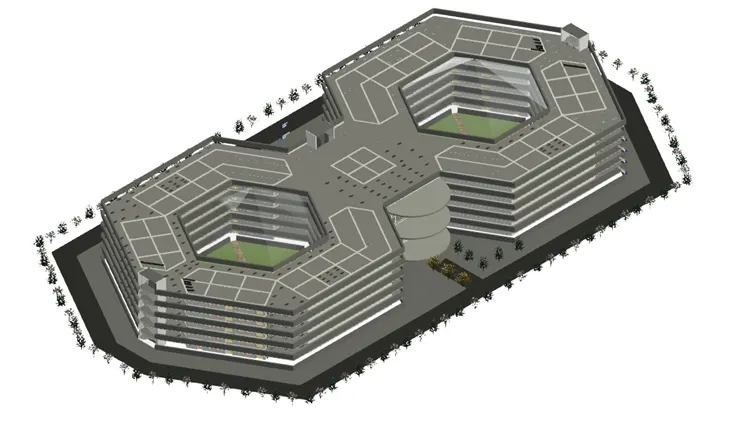
- Go to 3D view
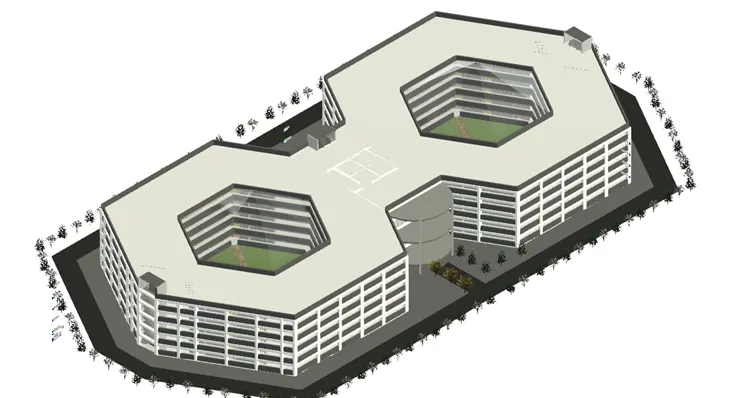
- Type ‘VG’ to open visibility graphics override tab
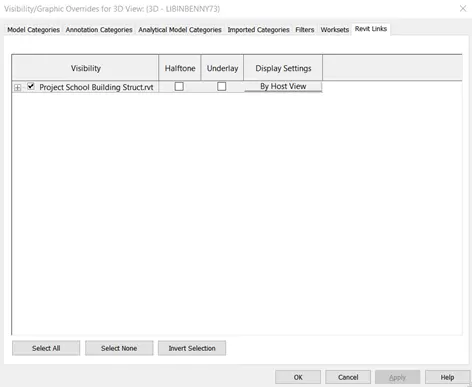
- Go to Revit Links and turn off the Imported Structural linked model as shown above
- Click on apply and press Ok
- VR (View Range)
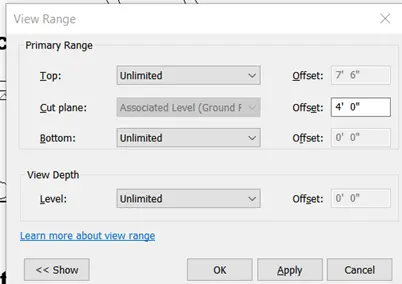
- Go to floor plan view and type ‘VR’
- Set parameters of the visibility
- Ctrl + ‘<’ (Reselect)
- If previously selected instances got unselected
- Press Ctrl + ‘<’ to reselect all the previous instances
- DI (Dimensions)
Type ‘DI’ to instantly draw dimensions to the model elements
- AL (Align)
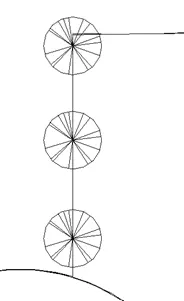
- To align to the required line type ‘AL’
- First, select the line/element to be aligned with
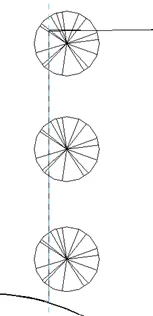
Then select the object to align it with the element
- RO (Rotate)
To rotate any object/ element along any axis
- MV (Move)
To move elements from an axis point
- CO (Copy)
To copy selected elements and paste accordingly
- MM/DM (Mirror)
- MM to mirror elements about an axis line
- DM to mirror elements about a drawn axis
- AR (Array)
To array an element n times with an offset distance
2) Using Revit and the project used from week 6 to 8 prepare a schedule for the following
a. Walls
b. Doors
c. Windows
d. Material – Concrete/Wood
Aim: To Create Schedules for different elements in Project 2 of Week 7
Introduction
A schedule is a tabular display of information, extracted from the properties of the elements in a project. A schedule can list every instance of the type of element you are scheduling, or it can collapse multiple instances onto a single row, based on the schedule's grouping criteria.
Procedure
Walls
- Go to View Tab and click on Schedules, Schedules/Quantities
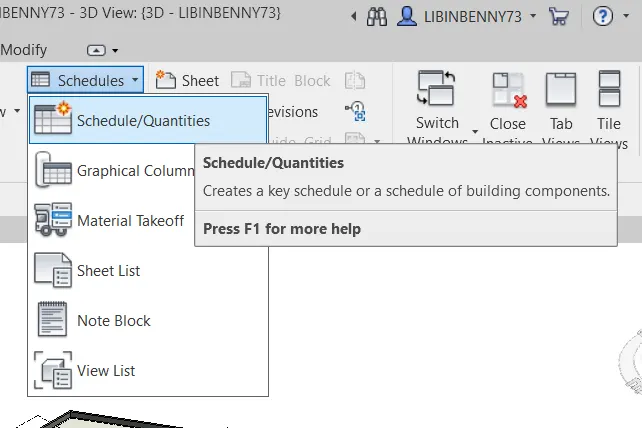
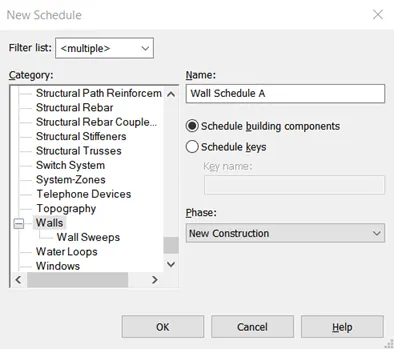
- Select walls in the popup tab
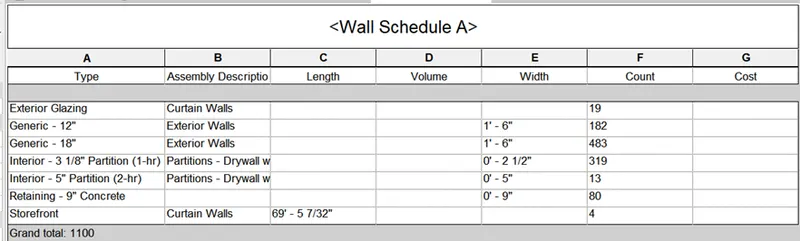
- Set the Name as Wall Schedule A
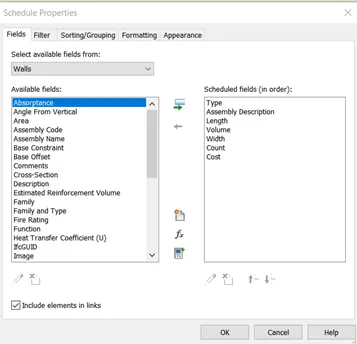
- Add Assembly description, count, cost, Type, Length, Width, volume to the list
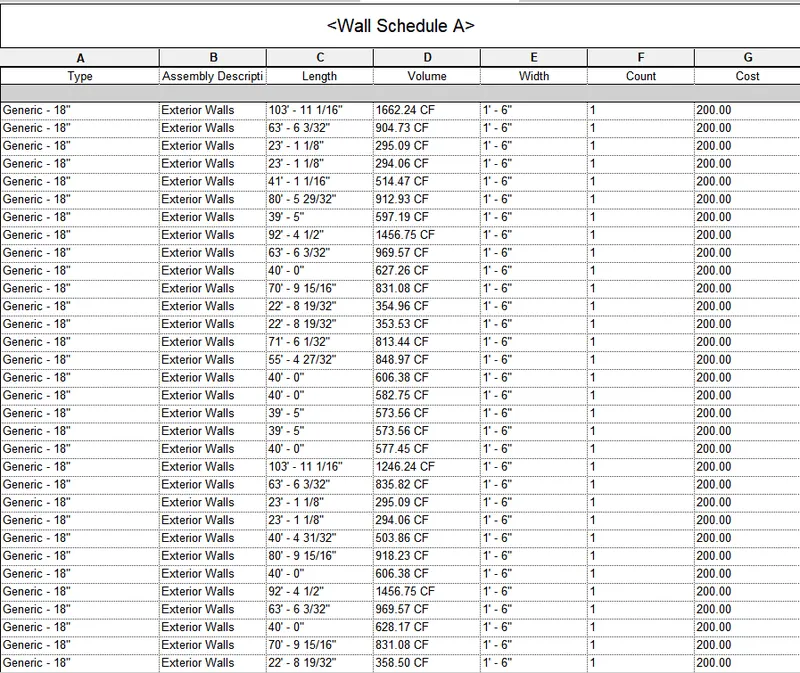
- Click ok to generate Schedule of Quantities
- Go to the Properties tab
- Click on Sorting/grouping
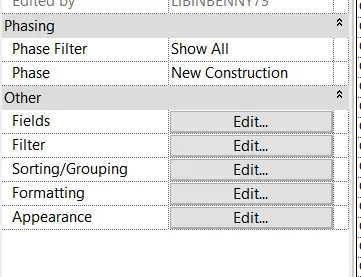
- Change sort by type
- Select Grand Totals and Deselect Itemize every instance
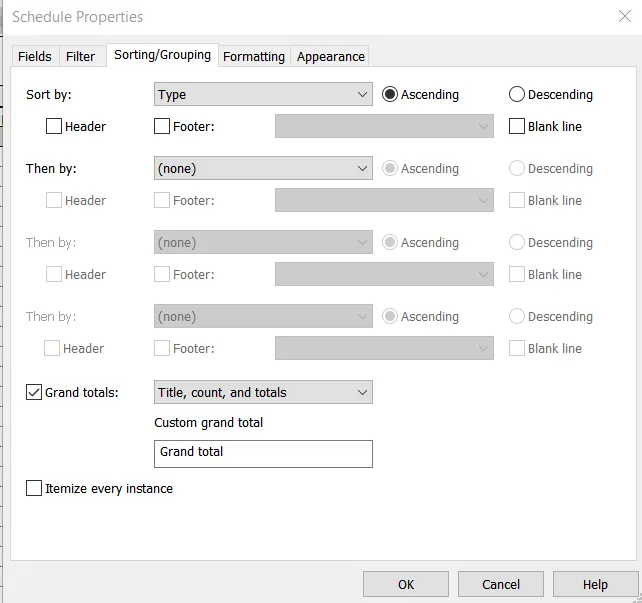
- Click Ok to sort by type
Doors
- Select Doors in the popup tab
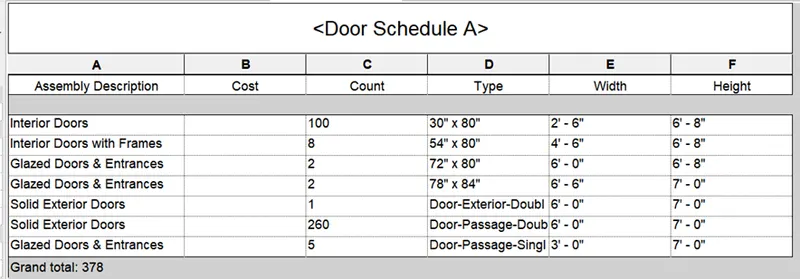
- Set the Name as Door Schedule A
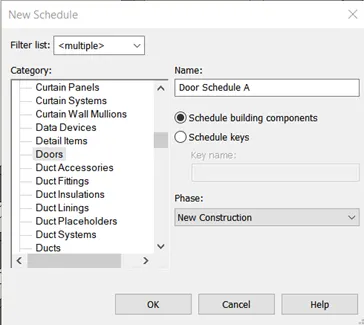
- Add Assembly description, count, cost, Type, Width, Height to the list
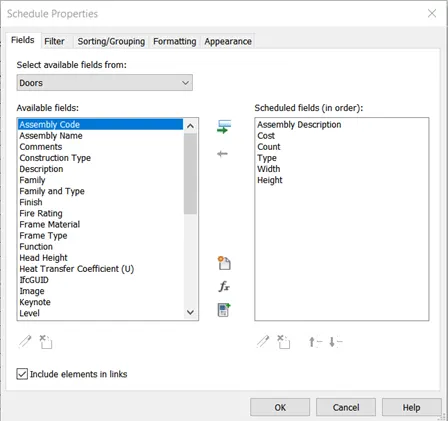
- Click ok to generate Schedule of Quantities
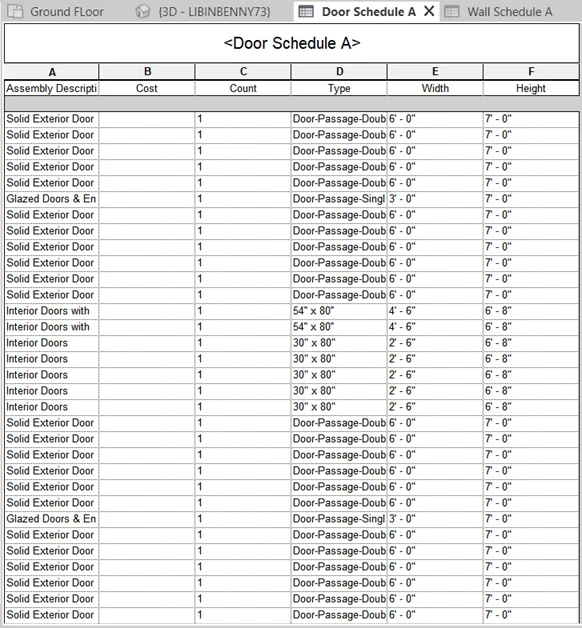
- Compute sorting accordingly
Windows
- Select Windows in the popup tab
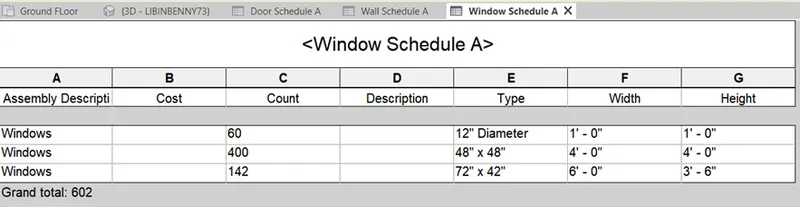
- Set the Name as Window Schedule A
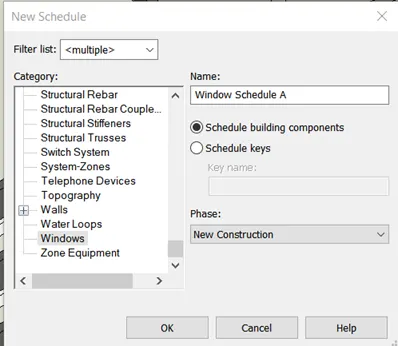
- Add Assembly description, count, cost, Description, Type, Width, Height to the list
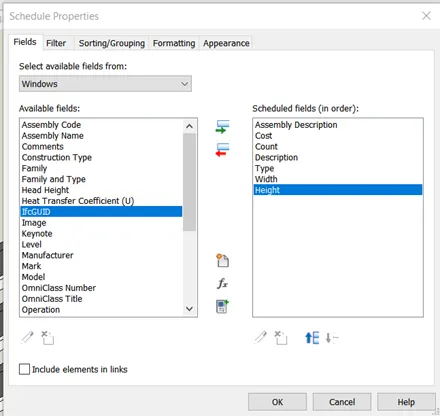
- Click ok to generate Schedule of Quantities
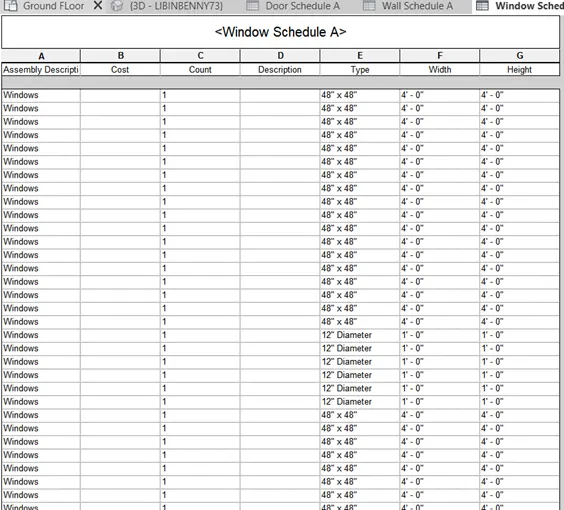
- Compute sorting accordingly
Material Take Off- Walls
- Go to View Tab and click on Schedules, Material take-off
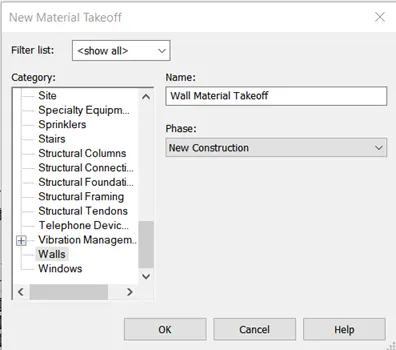
- Select Walls
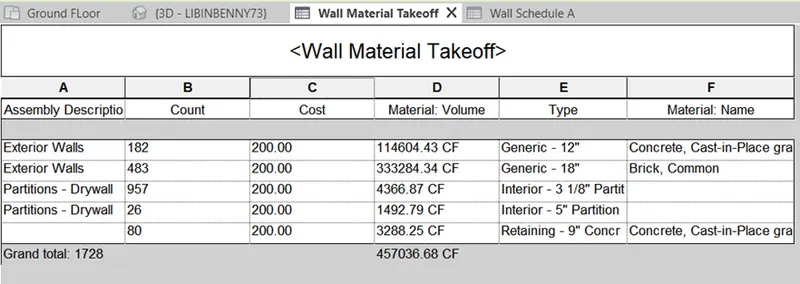
- Set name as Wall Material take-off
- Click Ok to open the Material take-off Properties tab
- Add fields Assembly Description, Count, Volume, Material Name, Material Volume, Cost
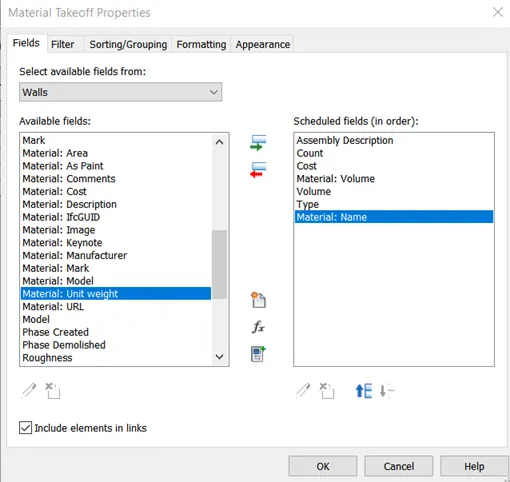
- Click on Include elements in Links
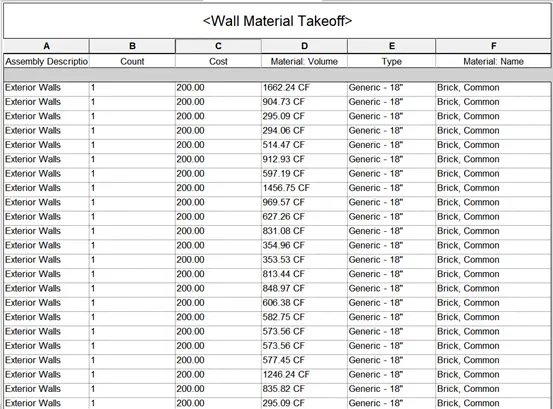
- Sort the data accordingly
Results:
The Schedules after sorting is as follows
Wall
Door
Window
Wall Material Takeoff
3) Using Revit Calculate the area and volume of each room in the model with appropriate room tags applied to each room. Prepare a schedule report for the area and volume of each room.
Aim: To create schedules and calculate the Area and volume of all the rooms
Introduction:
Revit can calculate the area and volume of rooms and display the information in schedules and tags. Room areas display on the Properties palette, in tags, and in schedules for rooms. Revit measures the perimeter of a room at a defined distance above the base level of the room.
Procedure:
Set all the room tags appropriately
- Go to View Tab and click on Schedules, Schedules/Quantities
- Select 'Rooms' in the popup tab
- Set the Name as Wall Schedule A
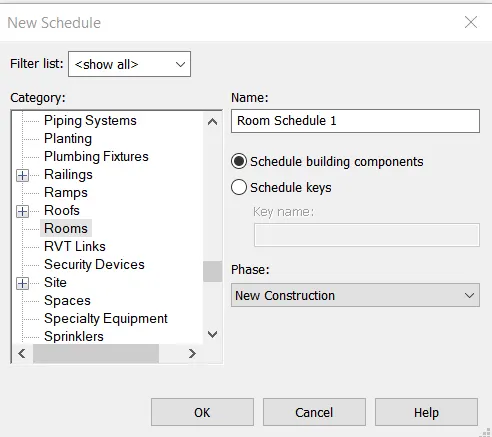
- Add Name, Unbound height, Area, volume to the list
- Click on include elements in links
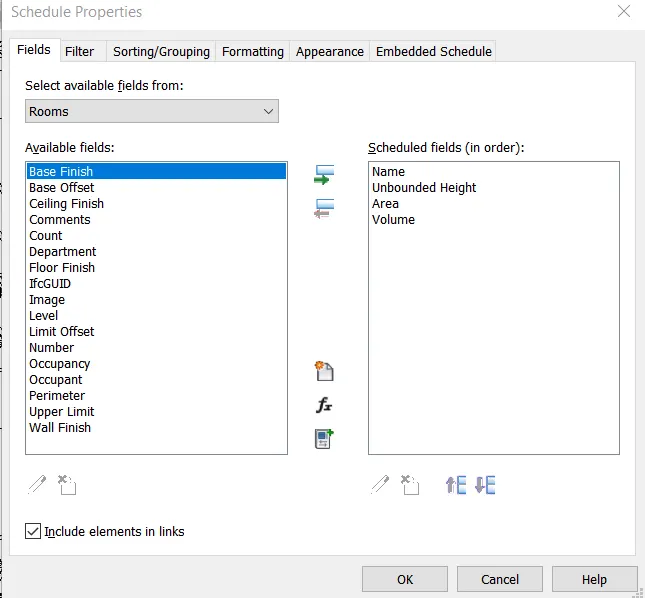
- Click ok to generate Schedule of Quantities
- Go to the Properties tab
- Click on Sorting/grouping
- Change sort by type
- Select Grand Totals and Deselect Itemize every instance
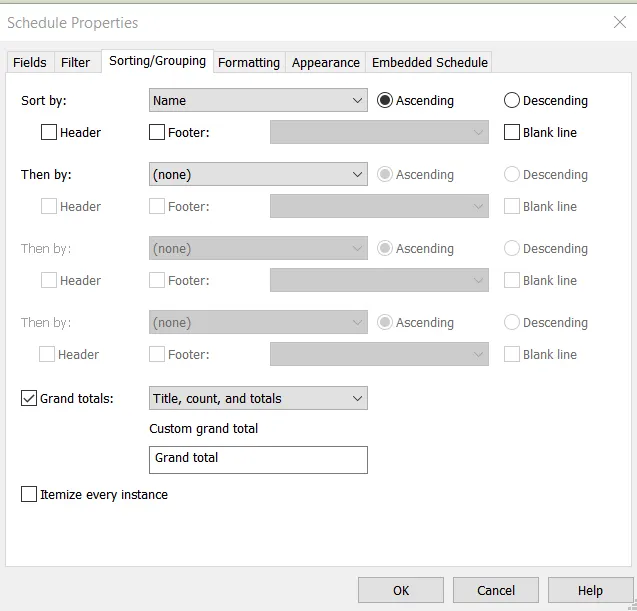
- Click Ok to sort by type
In Modify tab click on Calculated
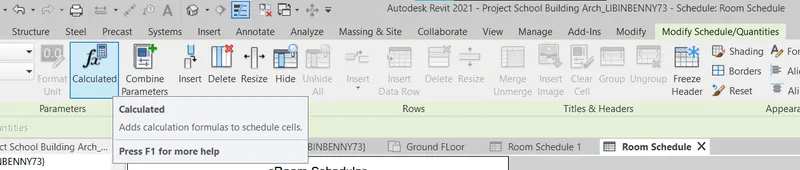
- Select one of the cells under the 'volume' column and click calculated
- Set name as Volume of room
- Set Formula as "Area*Unbound height" by clicking on the 3 dots on the side
- Click ok to show the calculated volumes as below
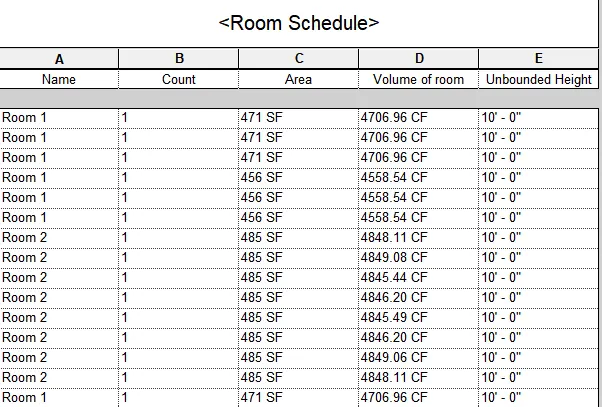
Result:
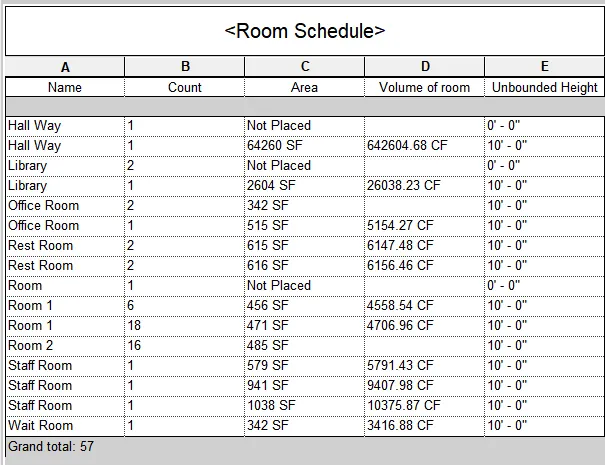
The Schedule for rooms
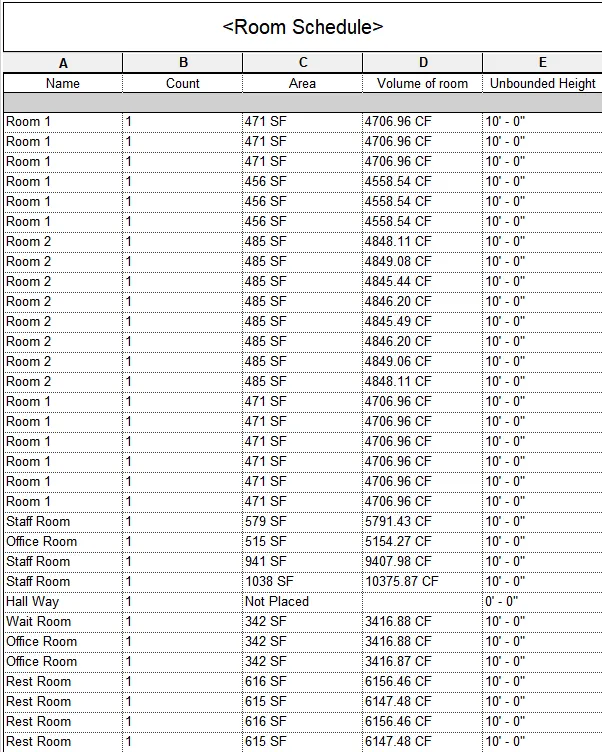
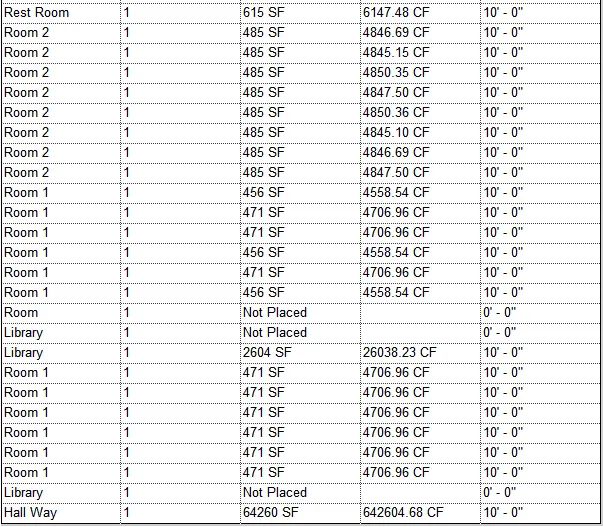
Sorted Schedule of Rooms
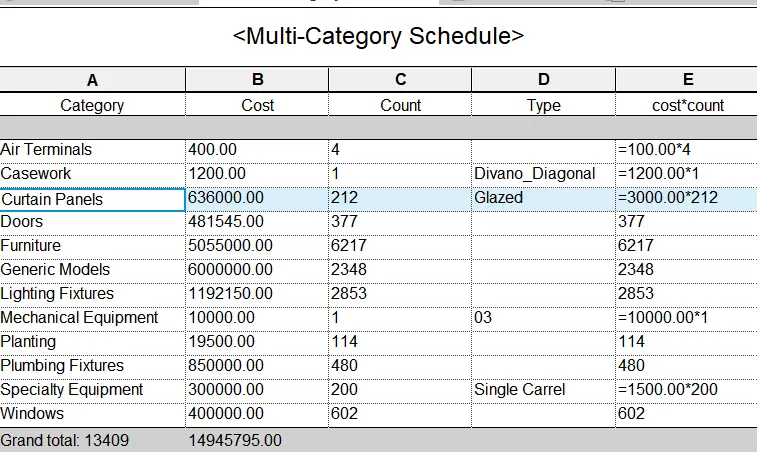
4) Using the same schedule using the unit cost rate for materials available on the internet, prepare the total cost of materials used in the project
a. Total Cost of Materials
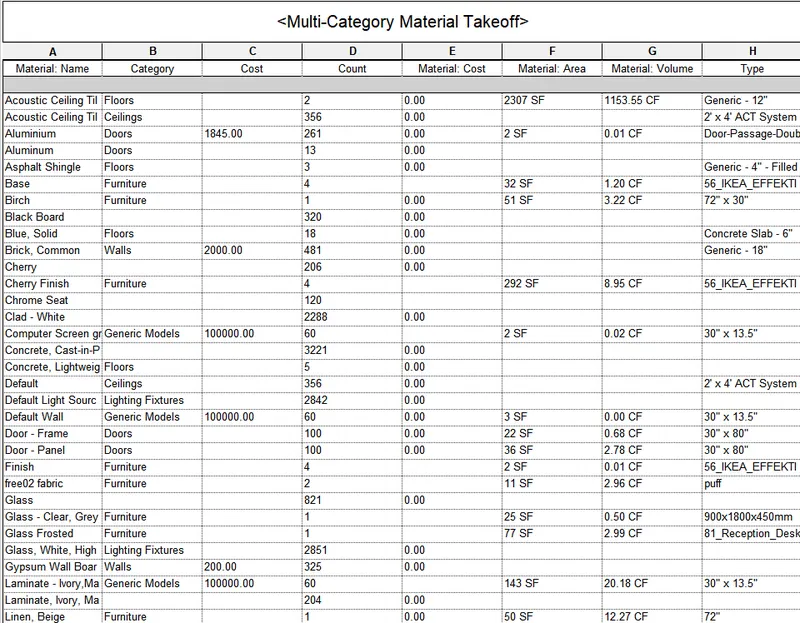
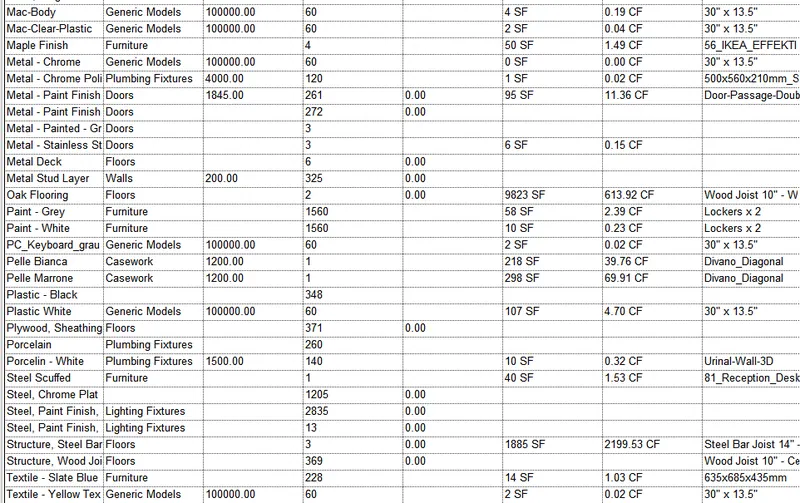
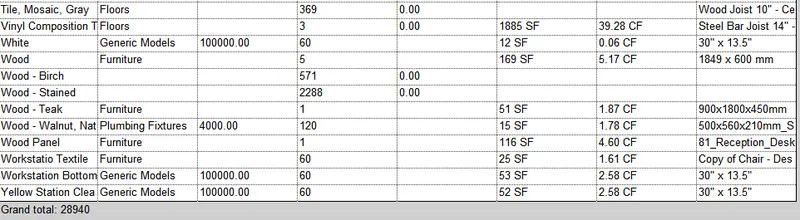
b. Individual Material Takeoff
- Go to View Tab and click on Schedules, Schedules/Quantities
- Select 'Multi- Category' in the popup tab
- Set the Name as Multi-Category Schedule A
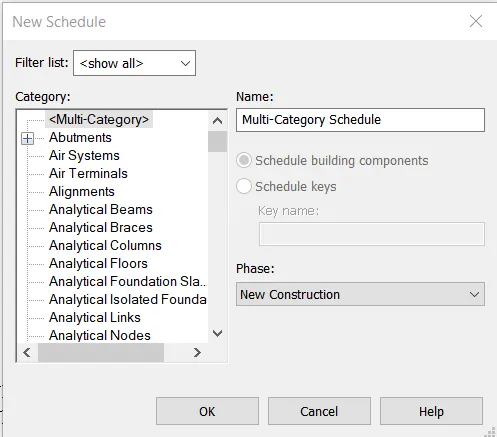
- Add Category, Cost, Count, Type to the list
- Click on include elements in links
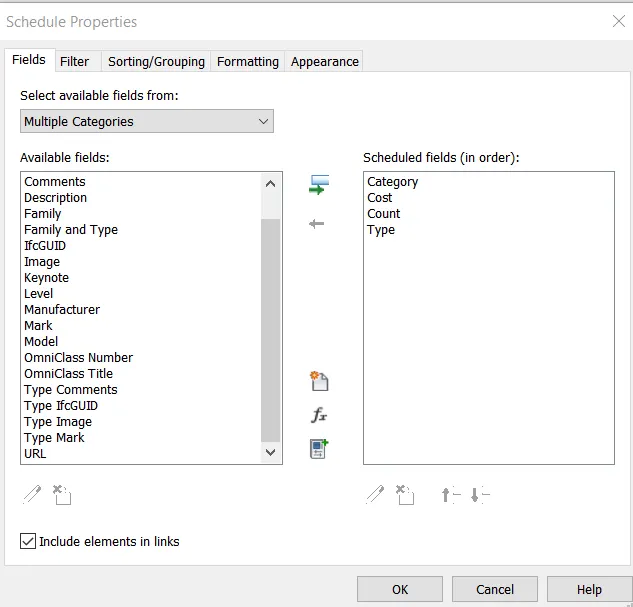
- Click ok to generate Schedule of Quantities
- Go to the Properties tab
- Click on Sorting/grouping
- Change sort by Category
- Select Grand Totals and Deselect Itemize every instance
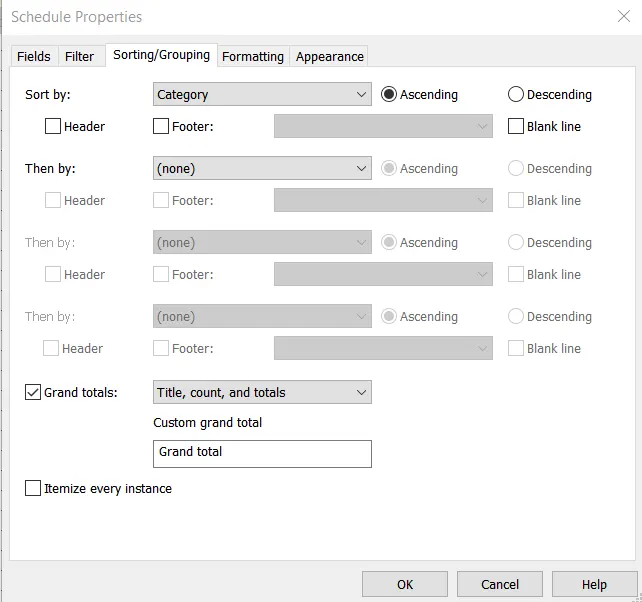
- Click Ok to sort by type
- Go to fields in the properties tab and add a new parameter
- Add cost*count
Individual Material Takeoff
- Go to View Tab and click on Schedules, Material take-off
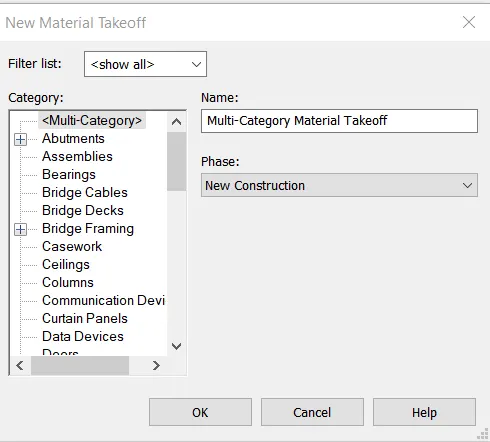
- Select 'Multi- Category' in the popup tab
- Set the Name as Multi-Category Material take-off
- Click Ok to open the Material take-off Properties tab
- Add fields Category, Count, Material Name, Material cost, Material Area, Material Volume, Cost
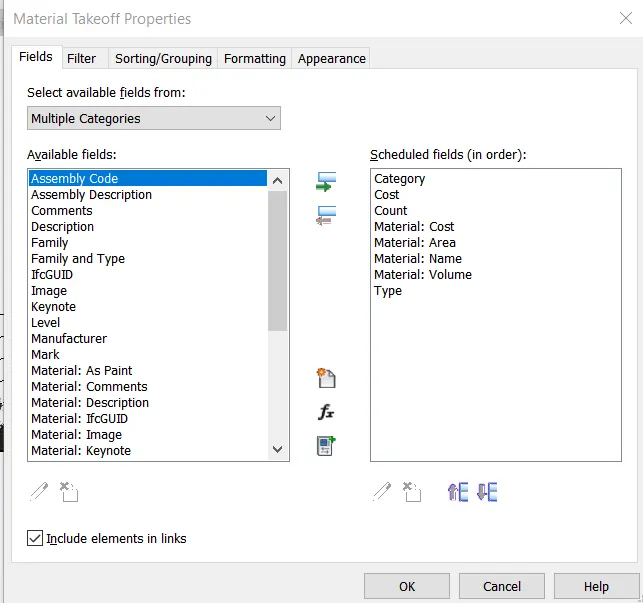
- Click Ok to open Individual Material take off
- Sort the data as per Material name
Result:
The Schedule cost for all elements is as follows for
Individual Material take Off
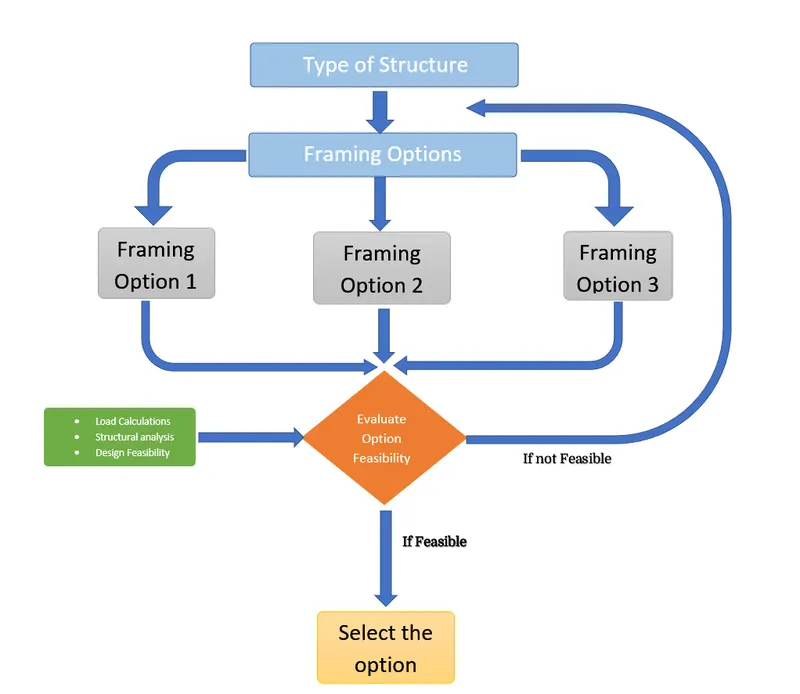
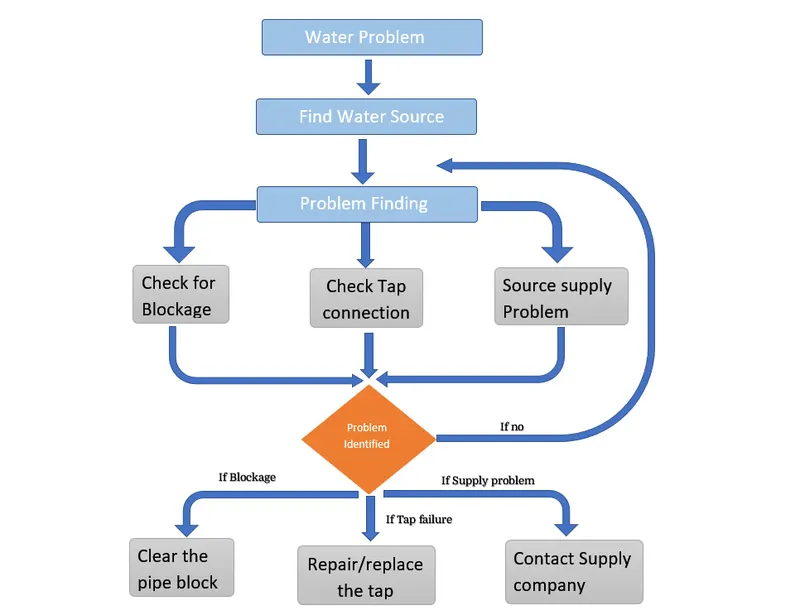
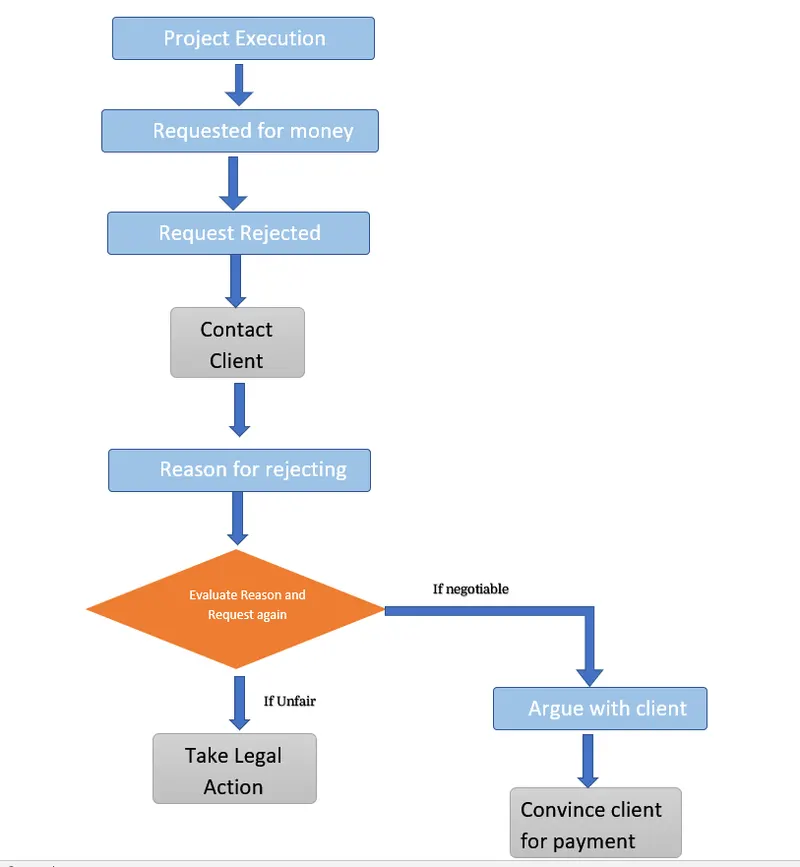
5) Using the concept of Visual Programming discussed in class, list a flowchart for the following scenario
a. How to decide framings for a structure using Dynamo?
b. If there is no water coming from the pipes
c. If the request for money from the client has been declined for the project
A. How to decide framings for a structure using Dynamo
B. If there is no water coming from the pipes
C. If the request for money from the client has been declined for the project
6) List the parameters associated with each model element
a. Wall
b. Floor
c. Door
d. Window
e. Table
f. Building
a. Wall:
- Type of wall
- Length
- Width
- Thickness
- Height
- Material
- cost
b. Floor:
- Type of floor
- Length
- Width
- Thickness
- Height
- Material
- cost
c. Door
- Type of Door
- Length
- width
- Area
- Height
- Lintel Heigh
- Height of sill Material
d. Windows
- Length
- Width
- Windows
- Area
- Height
- Lintel Height
- Height of sill
- Material
e. Table
- Type of table
- Purpose
- Height
- Length Width
f. Building
- Type of building
- Number of floors
- Foundation type
- Length
- Width
- Height
- Material used
- Loads of building
- Location of the building