Hood design-Week 2
Aim : To Design the hood of the Car
Objective :
- Design Outer Panel with the Hem.
- Develop the Inner Panel.
- Develop all the Necessary Reinforcements.
- Mirror and position the Hinge & Striker.
- Provide Mastic Data.
- Provide the required Emboss definition.
- Develop a detailed Report for the Mastic position and Embosses you have placed.
Explanation
What is an Hood ?
The hood (North American English) or bonnet (Commonwealth English excluding Canada) is the hinged cover over the engine of motor vehicles that allows access to the engine compartment, or trunk (boot in Commonwealth English) on rear-engine and some mid-engine vehicles) for maintenance and repair.
Types of Hood
1) Inlaid Hood or Built In Type : There is a gap between the hood and the car body as shown in the fig.1.1. Here the end point or the side reference line of the car lies on the fender , which uses more damge to the pedestrians and hence affecting their Euro-NCap ratings.
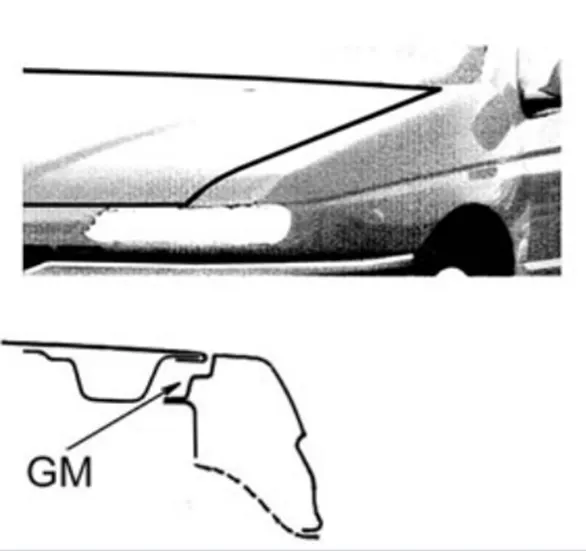
Fig.1.1.
2) Wrap Around Hood : These type tend to wrap around the car body as shown in the fig.1.2. Here the end point or the side reference line of the car lies on the Hood itself. This will reduce the head impact zone and hence can be able to achieve higher Euro NCap ratings. This is the most commonly used Hood type these days.
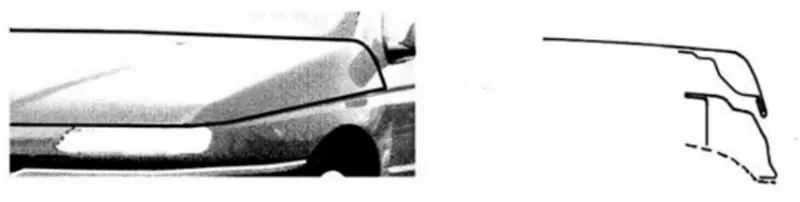
Fig.1.2.
Side Reference Line
The line from the ground at 45 degrees which is taken till the end point of the car. This is necessary to follow pedestrian Euro N-Cap assessment.
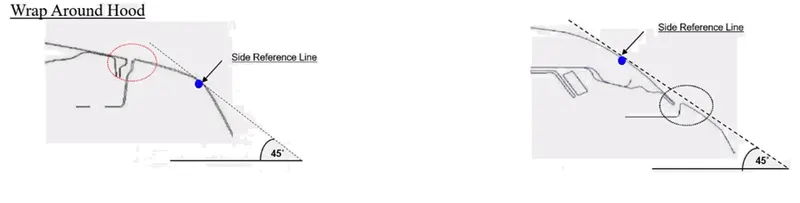
Fig.1.3. Fig.1.4.
The Side reference line on Inlaid Hood is shown in figure 1.3. & the Side refrence line for Wrap Around Hood is shown in fig.1.4.
Components of the Hood
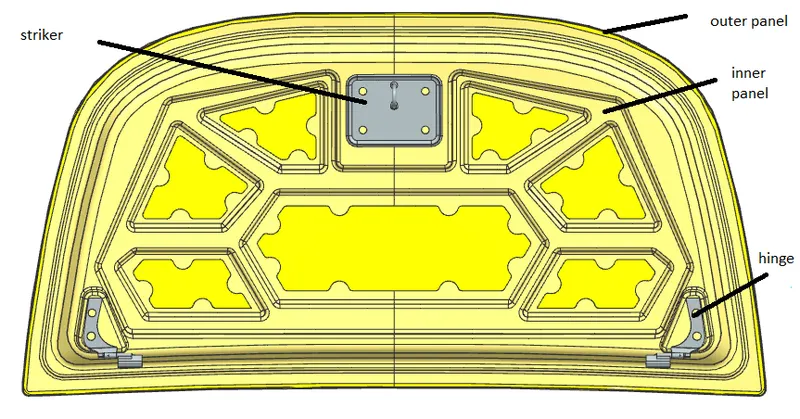
Fig.2.0
1) Reinforcements
In hood to accomodate Latch and striker and Hinges we have to remove some material which will result in loss of strength of the material locally. Hence to improve strength locally we provide these reinforcements. The reinforcements provided in the latch and striker area is called Latch and Striker Reinforcements & the reinforcements proided in the Hinge area is called Hinge Reinforcements
2) Stiffner pads
This is kind of Hard Sponge type between outer and inner panel to increase the strength and also during the motion of the hood there will be vibration. Hence to avoid vibration we use stiffner pads. This reduces the NVH (Noise, Vibration, Harness ) level in the car.
3) Mastic Seal
These are the hard rubber kind of materials which is placed in between the outer and inner panel which oozes out and helps in holding the outer and inner panel together. This is palced in the inner pannel in such a way that it covers the whole hood. These seals can improve strength locally of about 80 mm in dia.
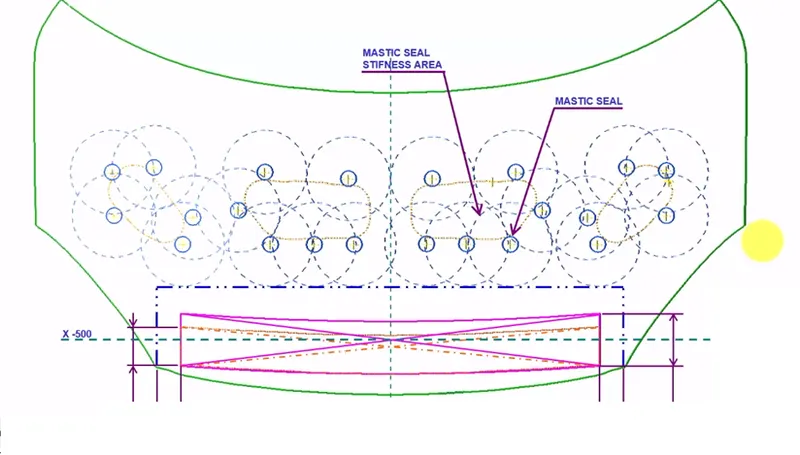
Fig.2.1.
4) Embosses
The implemet of embosses are very important on the inner hood since it plays a important role in saving human life during a crash from the front. The embosses are designed in Y & V direction so that during the crash the forces disspiates outwards or towards the hinge as shown in Fig.2.0. This will reduce the impact on the passengers in the front.
Adding embosses also adds aesthetic values , improves traction & also good heat dissipation throughout the surface.
5) Hinges
The Hinges enable us to open/close the hood as it is fixed and rotates at its axis.
6) Latch
There are two latches present in the car for hood opening. One is under the drivers seat which enable us to open the hood partially. The second latch is under the hood front which enables us to open the hood completely.
Materials used in Hood
1) Steel
2) Aluminium
3) CFRPs - carbon - fiber - reinforced plastics
Amid the raging debate on the suitability of aluminum as a replacement for steel in BiW, a major transformation has occurred in the form of the entire BiW being made up of carbon-fiber-reinforced plastics (CFRPs) in BMW’s i3 model, a fully electric car.
Design Considerations for Hood
Hood Head Zone for Lock Striker
The hood is designed to open at an angle based on the average height of the people in that region / country.
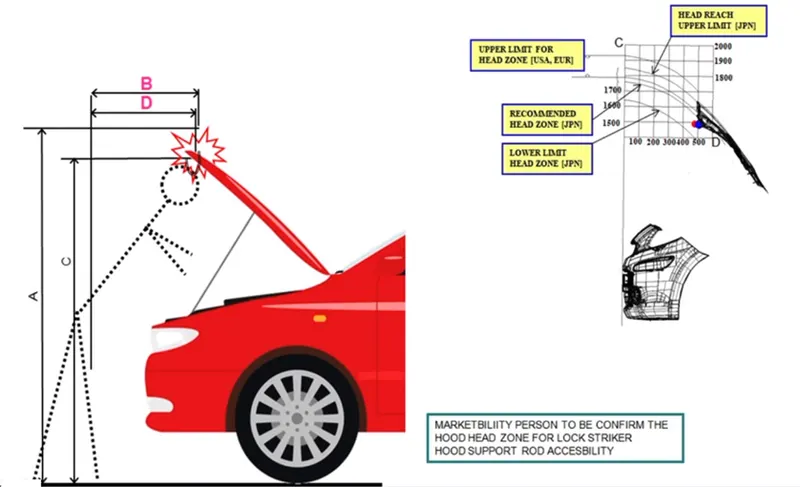
Fig.2.2.
Euro - NCap ( The European New Car Assessment Programme )
They are the team who analyse and give ratings on how safer is our car for the pedestrians based on the crash tests performed by them. If the car gets high Euro NCap ratings then the car is very much safer for the pedestrians and also becomes a very good selling point in the market.
To improve Euro N-Cap Ratings we can start removing materials inside the hood to make it more softer so that, the person when collides with the car will hit the empty area which will have less impact on him.
In some case small deformable brackets are given inside fender assembly to improve green zones shown in Fig.2.3. and eventually to achieve better ratings.
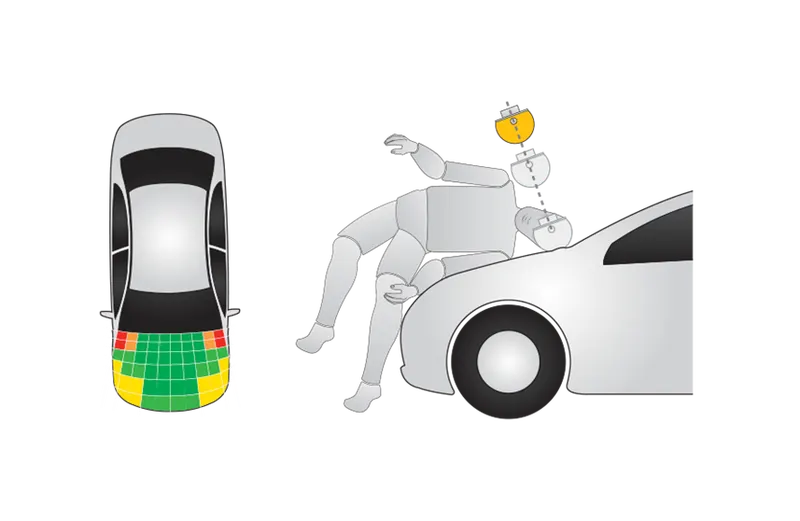
Fig.2.3.
HIC Criteria :
= or < 1000 (Rating : Green)
1000 ~ 1350 (Rating : Orange)
= or > 1350 (Rating : Red )
More the Green zones, Better will be the Ratings for the car.
Wrap Around Distance
It is the point from the ground to the end point of the hood.
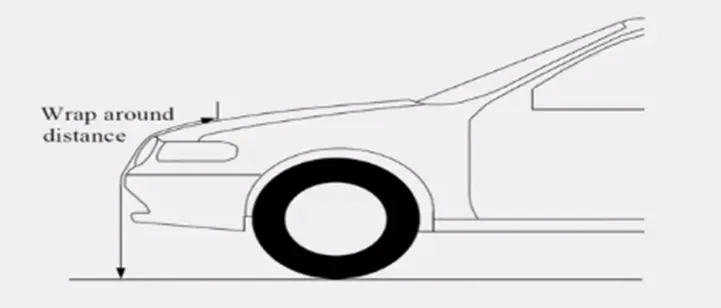
Fig.2.4.
The Side reference line should always fall more on the fender, so that the impact zone on the hood will be less as the wrap around distance is more . The safe zones for both child and Adult is shown in the Fig.2.5.
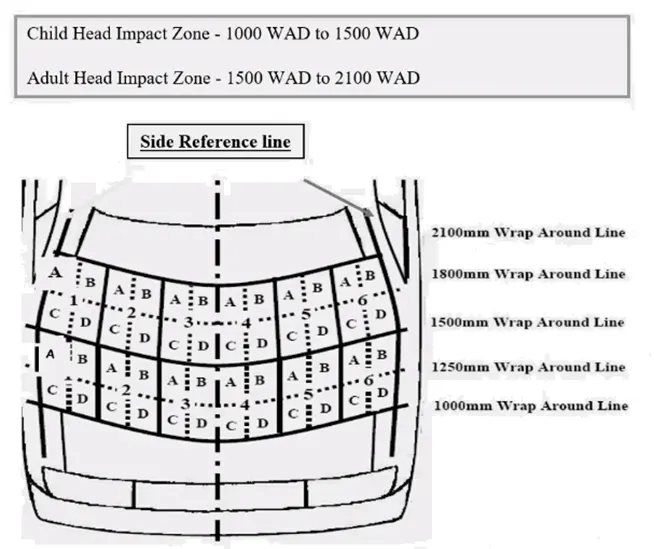
Fig.2.5.
The wrap around distance will never change. But, the imapct zones will only vary with the vary of length of the hood.
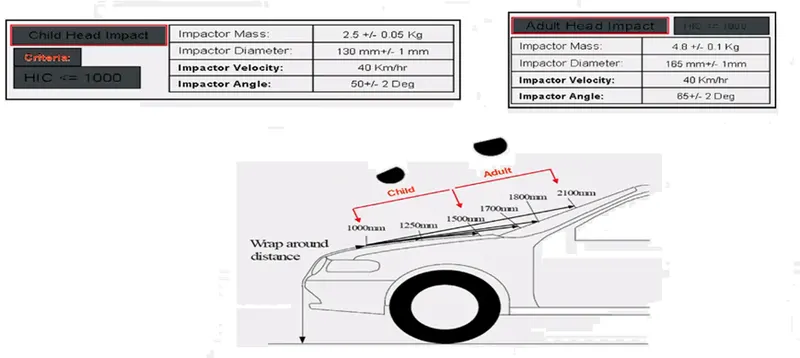
Fig.2.6.
Design of the Hood
1) Master Section
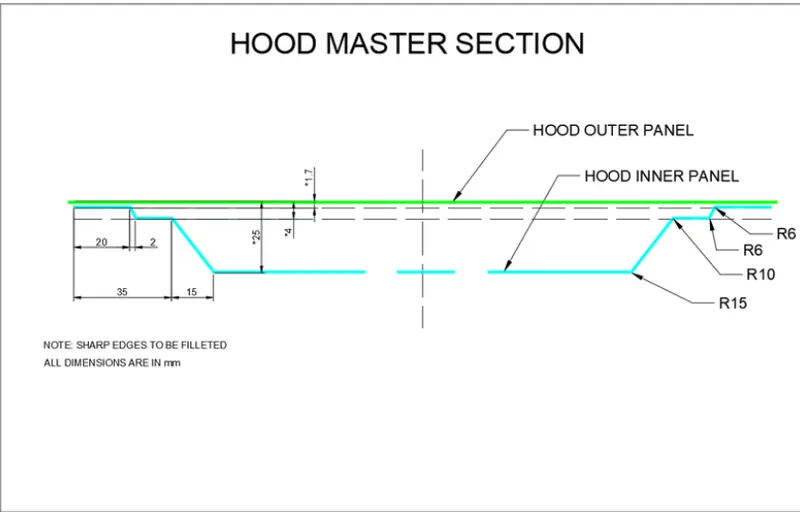
Fig.2.7.
The master Section shown in the fig.2.7. is the basic sketch which enables us to understand the various dimensions related to the hood. The master section denotes the following important features:
1) The gap between the hood outer and the inner panel is minimum of 2 mm
2) The distance from the hood outer to the hood innermost surface is 25 mm. Engine compartment is installed below this 25 mm surface. Hence the dimension is fixed.
3) The geometry is defined at almost 45 degree or angled outwards to enable tool to stamp and come out of the part.
2) Hemming
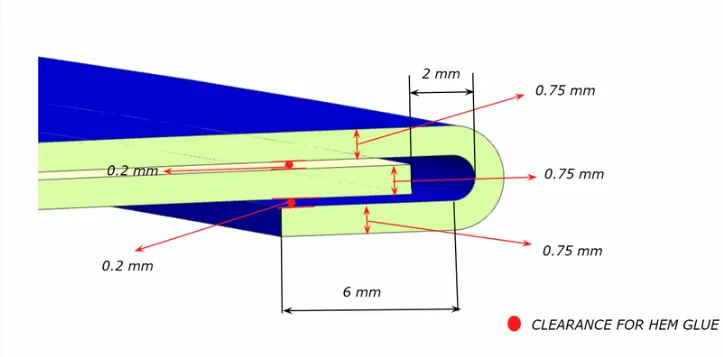
Fig.2.8.
The Hemming is a process where the hood outer is joined with the hood inner by adding extra material on the hood outer and made to wrap around the inner hood as shown in the Fig.2.8. This wrapping is done by running the ball rollers throughout the ends of the outer sheet.
The Hemming is done to avoid spot welds. After Hemming, Sealents are provided to achieve the water tightness.
3) Reliefs
These reliefs are provided on the surfaces to avoid Springback situations. The springback occurs when the rollers are made to roll on the surfaces to join the outer and inner hood , the hood surface at the corners tends to come back or spring back to its primary position due to lack of pressure of the rollers on the surface. Hence, when reliefs are provided then there is no need for the rollers to pass completely near the corners.
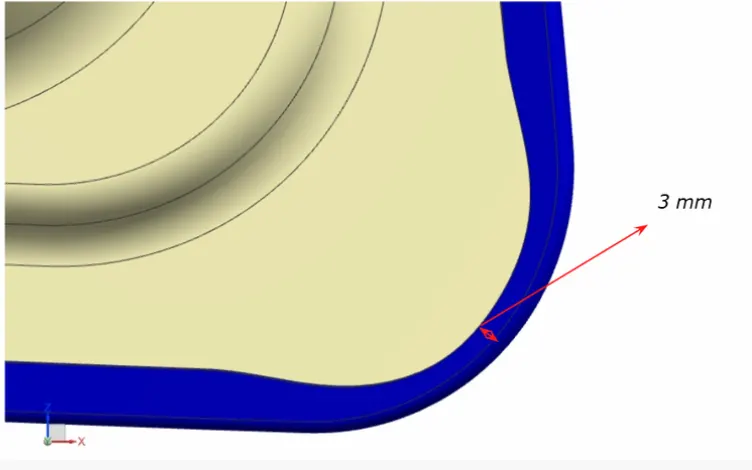
Fig.2.9.
4) Position of Striker
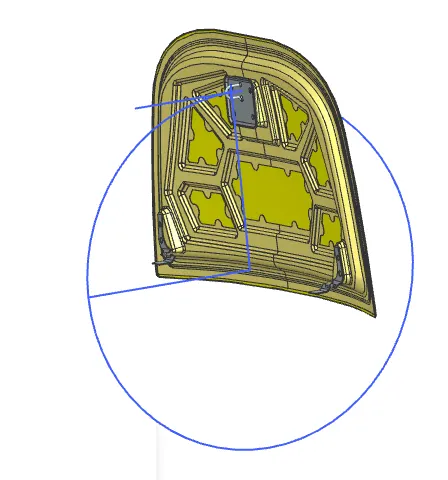
Fig.3.0.
For the proper opening & closing of the hood, the striker should be perpendicular to the trajectory of the hood. Firstly the hinge is positioned and an axis is drawn as shown in the fig.3.0. The Trajectory is derived from the hinge axis and the centre distance from the striker.
Conclusion
By considering all the design criterias Hood inner & outer panel is modelled