Hood design-Week 2
HOOD DESIGN
Objective:
To design outer panel of Hood with Hem and develop the Inner panel with all necessary reinforcements definition then positioning of Hinge, striker.
Theory:
The Hood or the Bonnet of a car is considered as the frontal BIW enclosure component. Bonnets are designed to reduce air resistance as the air flows around the car. The design of the bonnet is vital since it affects the aerodynamic flow around the car. Apart from this, bonnets are also designed to meet several other requirements. They serve a great deal of purpose in protecting the passengers inside the car and the pedestrians in the event of an accident. It also acts as the cover for the engine.
The hood or the Bonnet consists of the following parts.
- Hood outer panel
- Hood inner panel
- Latch and Striker reinforcement
- Hinge reinforcement
- Gas stay reinforcement
Requirements:
Hood Thickness and manufacturing considerations.
- Outer Panel Thickness = 0.75mm
- Inner Panel Thickness = 0.75mm
- Reinforcement Thickness = 1.5mm
- Minimum fillet radius = 3mm+Thickness (example: When thickness of inner panel is 0.75mm we need to maintain minimum fillet radius 3+0.75=3.75mm)
- No sharp corners inside the component
- No curvatures lesser than 5mm
- Small embosses should not exceed the maximum depth of 6mm (staying on the safe side)
- Mounting areas and welding areas need to be flat
- Provide appropriate corner relief on the area of curvature
Procedure:
1. Master section creation:
The master section is created based on the requirements received from the marketability team and the manufacturing requirements that we saw before. Below is the image of the master section used for the design.
2. Geometry and Emboss creation:
The geometry is created based on the master section that was provided above. After performing the initial stages of design, we will provide local embosses to strengthen the component. The component will be strengthened based on the master section. When a force impacts the hood from the front, it travels in an upward direction. The component is designed in such a way to divert the impact force direction away from the passengers, as shown in the image below:
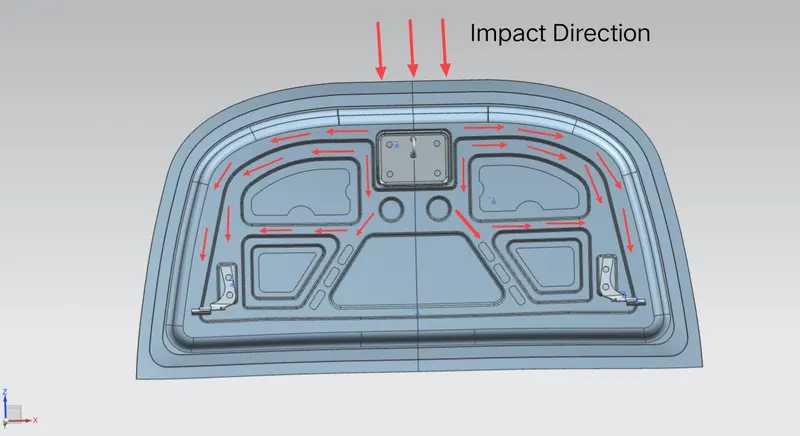
Embosses in the inner panel are made according to the diversion of the load path. The emboss depth is kept at a maximum of 5mm to be on the safer side so that the part can be manufactured without any problems.
3. Latch and Hinge reinforcements:
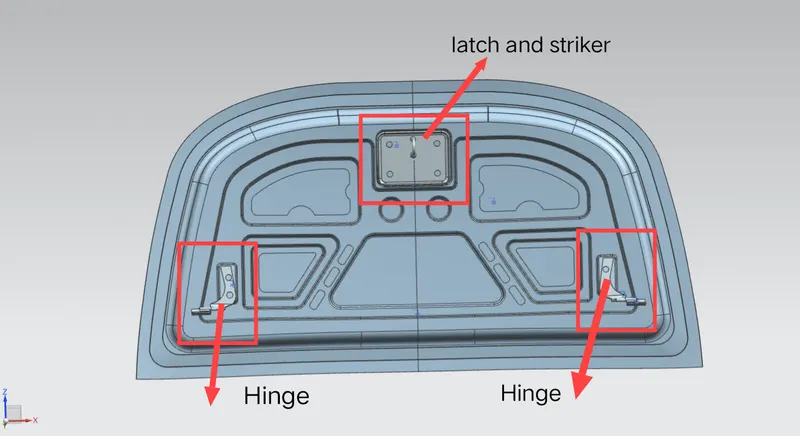
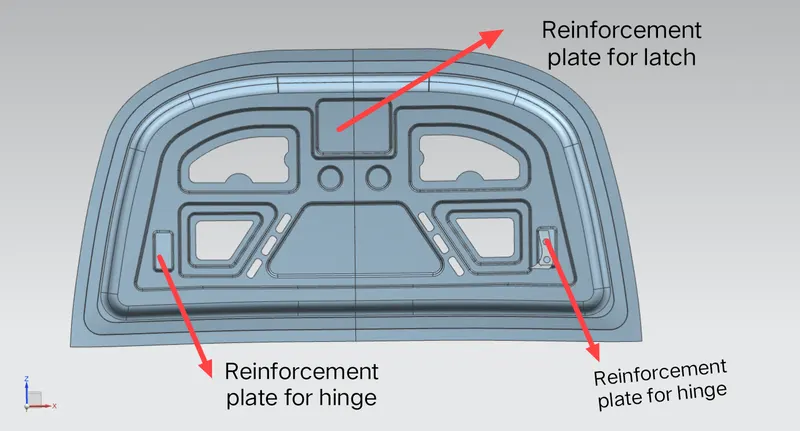
After designing the hood inner panel, we need to place the Latch and hinge as explained in functional requirements section, while the development of the inner panel, we also need to develop some additional reinforcements for strengthening the area where we are going to mount the Latch and Hinge parts. These re-enforcements are made from sheet metal of thickness 1.5mm.
See the below picture where the Latch, striker and Hinge are assembled for your reference
Reinforcement plates of Hinge and Latch are added on the backside of latch and hinge which can be seen in the below image, in this image outer panel is removed to show the reinforcement plates.
Conclusion:
I learned to design of Hood or Bonnet that satisfies the industry manufacturing, functional requirements and as well as Euro NCAP (New Car Assessment Program) standards which defines the automotive safety regulations. To develop Hood design I used cad software nx cad