Final Project: Design of an Electric Vehicle
BELONG TO LIVE SESSION BATCH EV 17
Design of an Electric vehicle
Create a MATLAB model of the electric car which uses lithium-ion battery and induction motor. Choose suitable blocks from Powertrain block set. Prepare a report about your model including the following:
Objectives:
- System-level configurations
- Model parameters
- Results
- ConclusION
ANSWER:
I see different types of Electric Vehicles! What are they?
You must have come across different types of electrics in the market. Some are fully electric while some are electric with ic engines. So what exact categories do they fall into? The electric vehicles are differentiated into three basic categories: Battery Electric Vehicles(BEV), Plug-in Hybrid Electric Vehicle(PHEV) and Hybrid Electric Vehicle(HEV). Let’s dive deeper into the world of types of electric vehicles.
-
Battery Electric Vehicle (BEV)
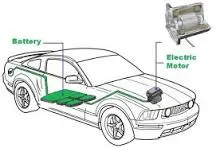
Components of an all-electric vehicle | credits: afdc.energy.gov These are the ones which you call a fully electric vehicle. This electric vehicle type does not contain any other source of actuation other than motors and batteries. There is zero-emission in these vehicles. The battery is charged through an external source of power such as DC fast charger or AC chargers.
On average, the BEVs take around 8 hours to get fully charged using an AC charger. This time can be reduced to 1 hour using a DC fast charger.
These electric vehicles have a range from 250kms to 500kms depending upon the battery capacity and the motor. Some of the 4-wheeler BEVs in India are Tata Nexon EV, Hyundai Kona Electric, Mahindra eKUV100, MG ZS EV and more. 2-wheeler BEVs in India include Ather 450, TVS iQube, Bajaj Chetak Electric and many other startups are planning to launch by the end of this year.
Have a look: Tata Nexon EV vs MG ZS EV vs Hyundai Kona Electric: Detailed Comparison -
Hybrid Electric Vehicle (HEV)
Hybrid Electric Vehicle | Types of electric vehicles | credits: afdc.energy.gov These type of electric vehicles are powered by both, fuel as well as electricity. The electricity is generated by the vehicle’s own braking system. The heat produced by the brakes is converted into electrical energy. This process of conversion is called Regenerative Braking.
The electric motor is used to start off the HEVs. Then the propulsion is taken care of by the IC engine. This ensures better fuel economy. The operation of the engine as well as the motor is controlled by the ECU. Some HEVs in India are Toyota Prius Hybrid, Honda Civic Hybrid and Toyota Camry Hybrid. Maruti Suzuki recently introduced its hybrid system in few models too. -
Plug-in Hybrid Electric Vehicle (PHEV)
PHEVs | types of electric vehicles These are types of hybrid electric vehicles which can recharge the batteries through regenerative braking or through the external source of power. The HEVs travel about 3-4kms before the engine is switched on, PHEVs can go up to 65kms before the engine provides the required assistance for the propulsion of the vehicle. PHEV options available in India are Mahindra e-Verito, BMW i8 and the Volvo XC90 T8.
This is all you need to know about the electric vehicle working, its types and components. Did we miss anything? Tell us in the comment section below.
Introduction
A new study related to Vehicle/Automobile engineering says that by coming 2025, there will be a major transformation in the automobile sector. Many automakers are working to change the vehicle technologies, the major area is to decrease the pollution and use electrification in the upcoming vehicles. The researchers and automakers are continuously working to reduce CO2 emissions.
New technology like high capacity lithium type battery will be a major energy source for the propulsion of electric vehicles.
At present, with the new technologies, some manufacturer has launched its products which are Tesla, Chevy Bolt EV and Nissan leaf which are fully electric battery-based car.
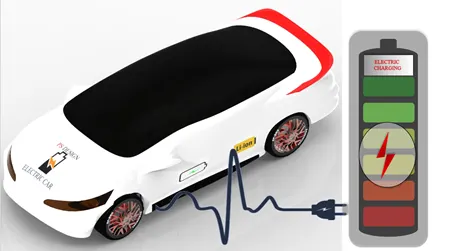
The power and performance of electric vehicles is depending upon the two machines i.e. a brushless DC motor (BLDC) or an induction motor. The DC (direct current) is replaced by DC brushless motors and Induction motors. Also, the lead-acid battery is replaced by lithium-ion batteries for EVs. Because the future of both the components induction or brushless DC motors depends upon their demands and uses.
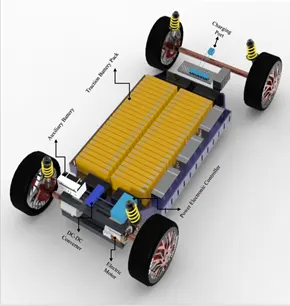
- Block Diagram
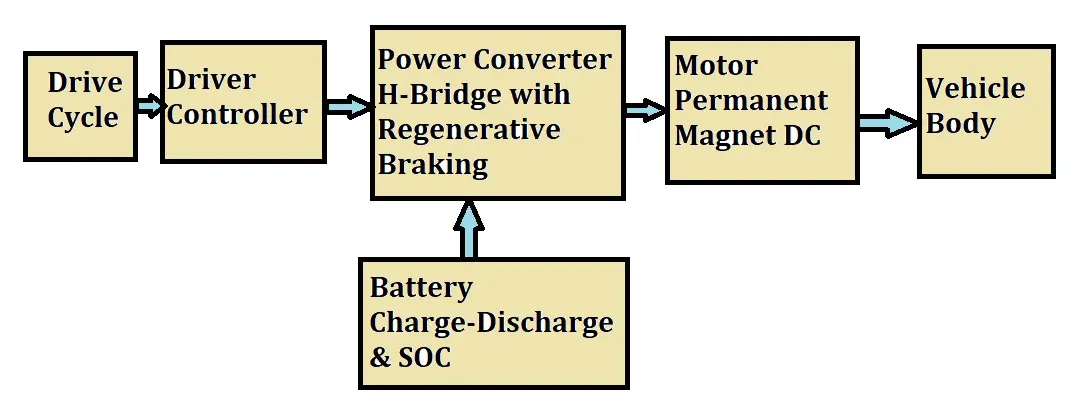
SIMULATION MODEL BASED ON BLOCK DIAGRAM :
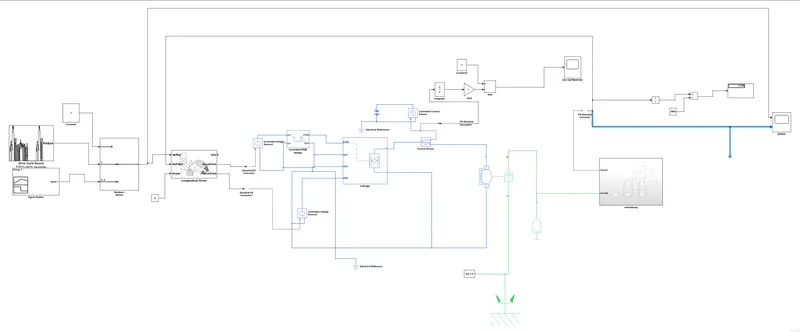
Pure Electric Powertrain:
Archittecture of Electric Vehicle
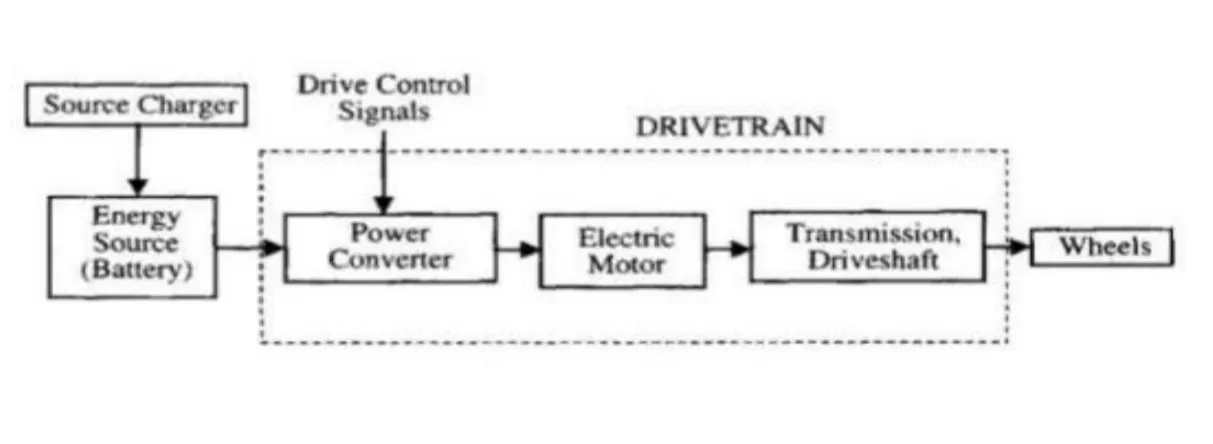
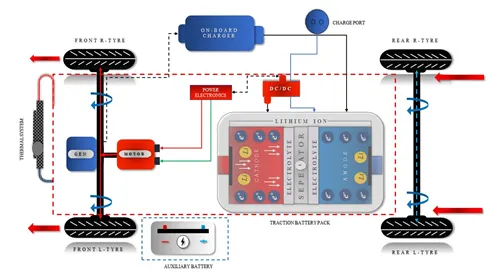
The most important components of electric vehicle areas:
- Auxiliary Battery: In an electric drive vehicle, the auxiliary battery provides electricity to power vehicle accessories.
- Traction Battery Pack: Traction battery pack is also known as Electric Vehicle Battery (EVB) which is used to store the electricity. Some examples of traction battery energy storage systems are as given:
- Lithium-Ion
- Nickel-Metal Hydride
- Lead-Acid
- Ultra-Capacitors
- DC/DC Converter: Basically, DC/DC converter is an electronic device which is used to converts higher-voltage DC power from the traction battery pack to the lower-voltage DC power. The converted power is used to run the vehicle accessories. It is also used to recharge the auxiliary battery.
- Electric Traction Motor: Another important component is electric traction motor and this device is used to provide motive power to the wheels.
- Onboard charger: Takes the incoming AC electricity supplied via the charge port and converts it to DC power for charging the traction battery. It monitors battery characteristics such as voltage, current, temperature, and state of charge while charging the pack.
- Power electronics controller: This unit manages the flow of electrical energy delivered by the traction battery, controlling the speed of the electric traction motor and the torque it produces.
- Charge port: The charge port allows the vehicle to connect to an external power supply in order to charge the traction battery pack.
- Thermal system (cooling): This system maintains a proper operating temperature range of the electric motor, power electronics, and other components.
How Does An Electric Vehicle Work?
An electric vehicle works on a basic principle of science: conversion of energy. Electrical energy is converted into mechanical energy. There is a motor used in the electrical system to carry on this duty of conversion. Motors can be of various types. The motor is to an electric vehicle what engine is to the IC vehicle. Let’s have a look at different types of motors used in EVs.
Types of Electric Motors
There are various types of motors that are used in electric vehicles nowadays:
-
DC Series Motor
It was a widely used motor back in the 1990s. This motor is capable of producing high initial torque. The easy speed control and sudden load increase bearing capacity make these motors a good choice. But the high maintenance due to the brushes and commutators is a major drawback in the DC series motor which are also known as Brushed DC Motors. These motors are still in use by the Indian railways.
-
Brushless DC Motor (BLDC)
BLDC used in Aether Scooters These motors are the technically advanced versions of DC series motors. They don’t use brushes and commutators. Instead, permanent magnets are used. BLDCs have high starting torque, high efficiency and low maintenance. BLDCs are widely used these days either as the hub motor or belt-driven.
-
Permanent Magnet Synchronous Motor (PMSM)
PMSM in Toyota Prius It is very similar in construction to the BLDCs. But the major difference is in the back emf. PMSM has a sinusoidal back emf whereas BLDC has trapezoidal one. They have a high power rating and can be used in high-performance applications such as sports cars, buses etc. For eg. Nissan Leaf uses a PMSM for propulsion.
-
Three Phase Induction Motor
Induction Motor in electric vehicles Unlike the DC motors, induction motors don’t have a high starting torque. It is cheap as compared to the other available options. But don’t go with the price. It still has very high efficiency and can withstand rugged environmental conditions. Tesla Model S uses this type of motor. Even Tata and TVS are planning to use induction motors in their electric vehicles. Indian Railways have also started using induction motors over DC motors.
MOTORS USED IN EV:
MATLAB Modelling of Electric Car
Vehicle Technical Specification
- Vehicle Weight (Kg): 1147
- Number of wheels per axle: 2
- Total Length: 4.127 m or 4,127 mm
- Total Height: 1.487 m or 1,487 mm
- Total Width: 1.746 m or 1,746 mm
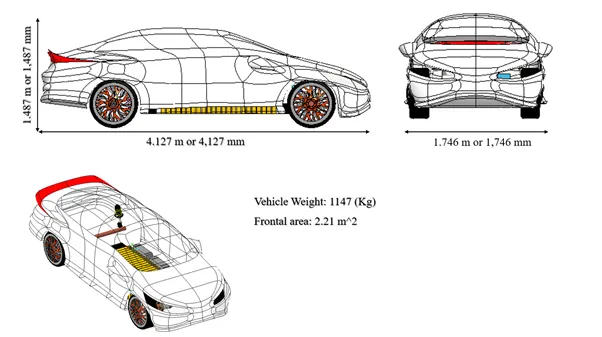
System Level Configuration
To model an EV in SIMULINK, we will need to model the aforementioned components separately and then have them work together. All the main components are available in the library of SIMULINK blocks and we will be adding each component and configuring its parameters to fit the requirements of the model. First, I have modelled the vehicle main body.
Vehicle Body
To model a vehicle's body, we need to first add the vehicle body block and this is shown below:
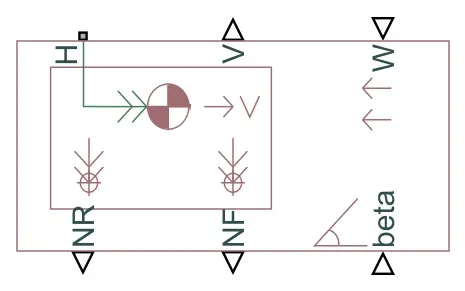
This block contains 6 ports which can be used to model the various aspects of the vehicle body. The ports are mentioned and elaborated below:
- H - This stands for 'Hub' and is used to connect the hubs of the wheels to the main body of the vehicle.
- V - This is a physical signal output port which stands for 'Velocity' and is used to output the speed/velocity at which the vehicle is moving at.
- W - This is a physical signal input port and allows us to model a 'headwind' acting on the vehicle by giving a speed for it.
- NR - This is a physical signal output port to model the rear wheel normal forces.
- NF - This is a physical signal output to model the front wheel normal forces.
- beta - This is a physical signal input port and allows us to model the vehicle on an inclination angle to create the effect of a hill climbing force.
If we double click the vehicle body block, we can see and modify its parameters and this is shown in the image below:
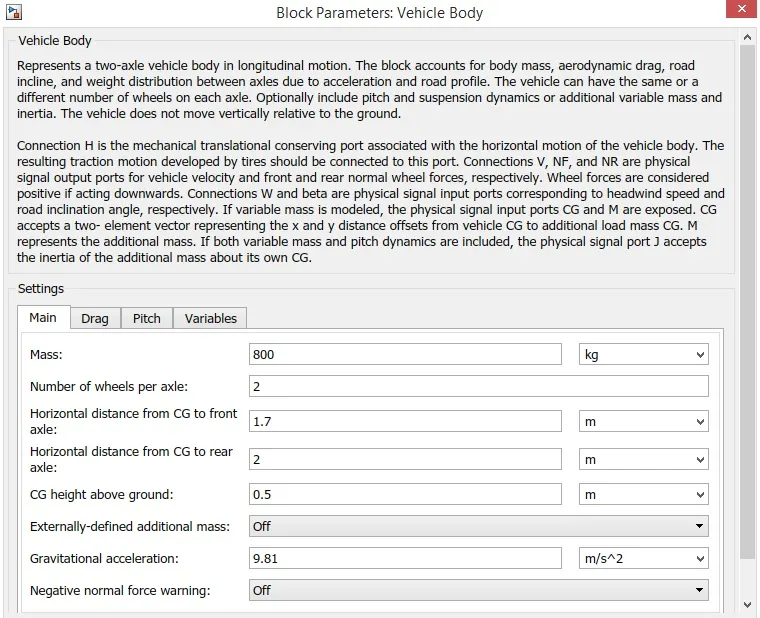
As you can see, we are able to modify various parameters of the vehicle body e.g. mass, number of wheels per axle, distance of the center of gravity to the front and rear axles. These are the main parameters and have been left with the default values assigned when the block was added to the workspace. The next tab shows the parameters for 'Drag' and this is shown below:
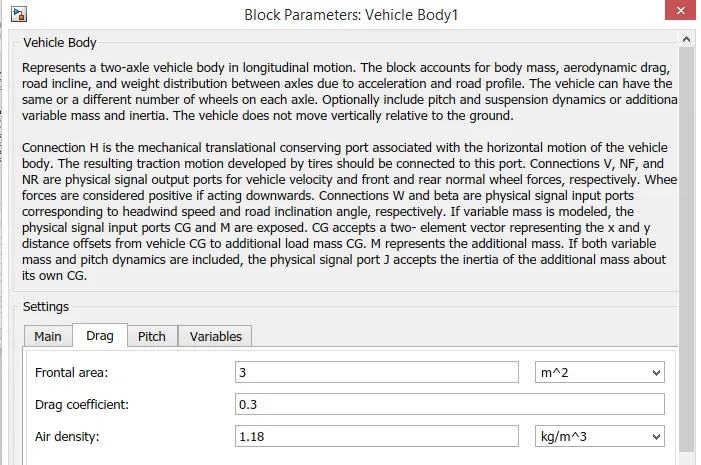
We can see from this image that the parameters of frontal area, drag coefficient and air density can be modified in order to effect the drag force acting on the vehicle. In my case, I have only changed the drag coefficient to 0.3 from the default value 0.4 in order for the model to resemble a typical sedan. Air density and frontal area are normal for this type of vehicle.
VEHICLE BODY SUBSYSTEM:
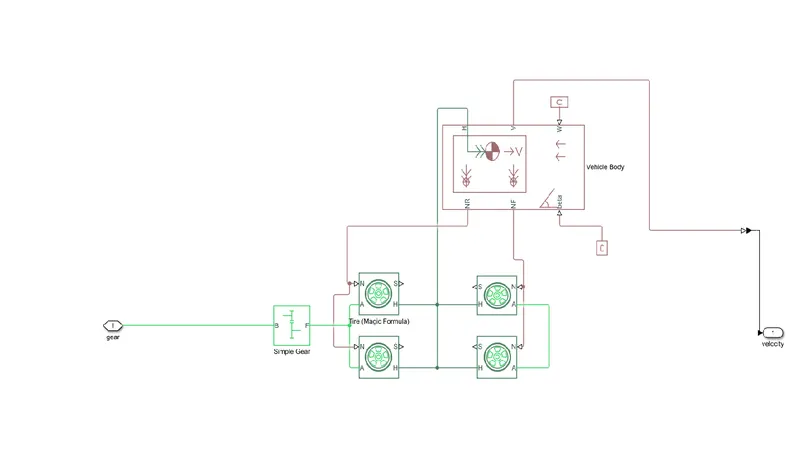
The above blocks are forming a subsystem which serves as a part for the whole vehicle. Four tires are connected, where the right two tires are the rear wheels and the remaining two are the front wheels . they are interconnected to the hub of the vehicle body block. and their respective axles are connected accordingly. We here have connected the rear axle with the gear as we want the model to be a rear wheel drive vehicle. Here the wind velocity port and hill-climbing angle ports are connected to physical constant blocks which is kept as zero.
Tire block parameters:
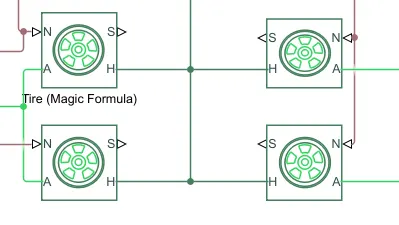
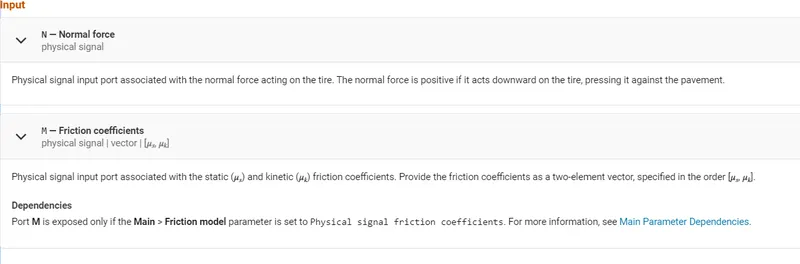
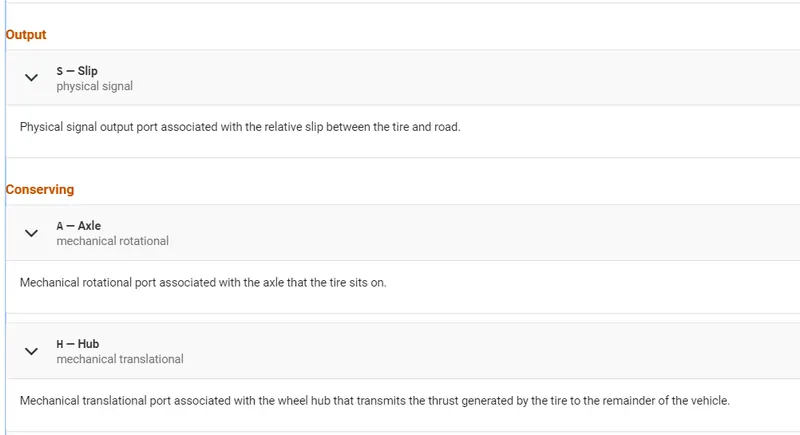
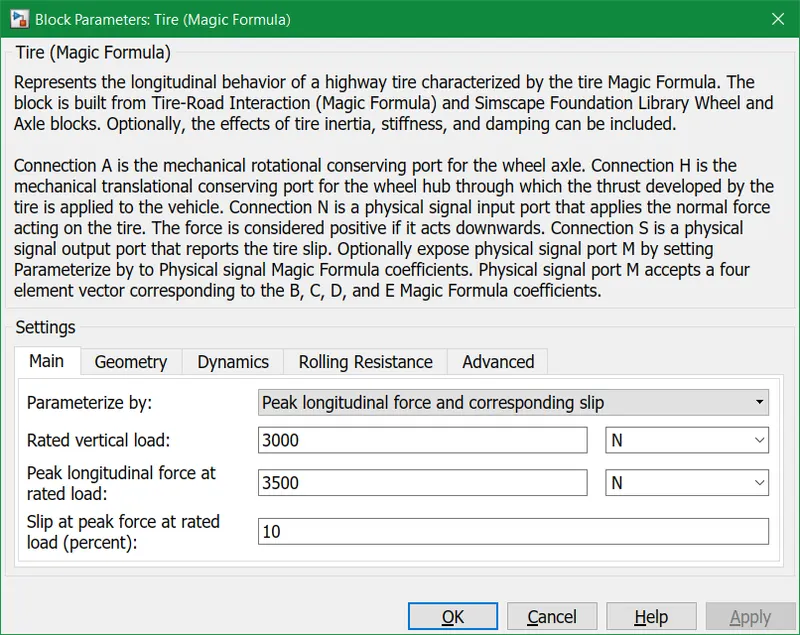
Here we can also change the geometry , dynamics, rolling resistance other characteristics if we want
Simple gear block parameters:
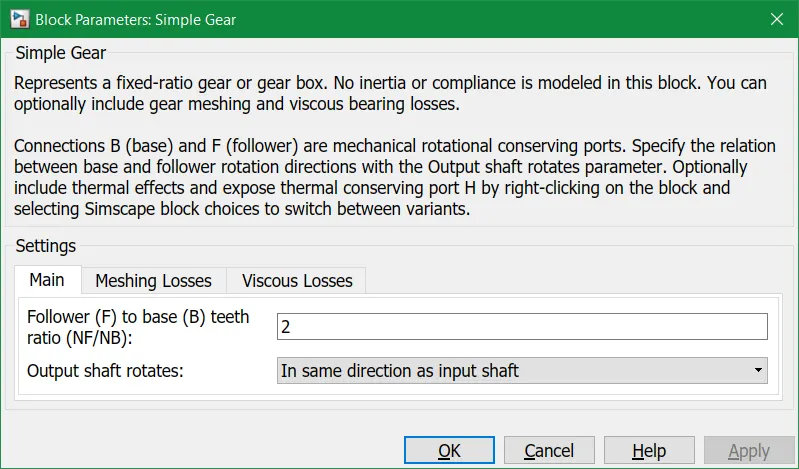
This block models a gear system with fixed gear ratio with no-inertia effects. However, we can modify the messing of the gear teeth, Here The follower to base teeth ratio has been set to 2 and the output shaft rotates in the same direction as the input shaft.
All these blocks are categorised into a single subsystem which we have names as vehicle body block, which takes the mechanical input from the motor and controller block into the gear and displays the velocity at which the vehicle body moves.
MOTOR AND CONTROLLER SUBSYSTEM:
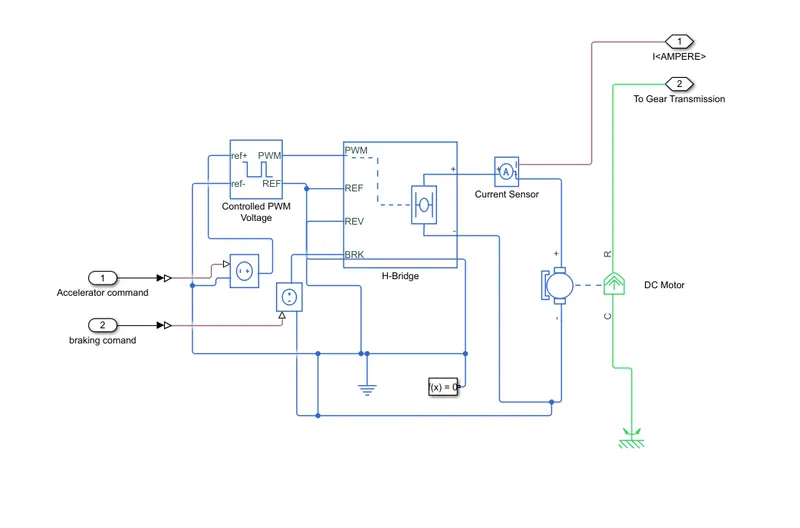
Components:
- DC Motor
- H-bridge
- Controlled PWM voltage
- Controlled voltage source
- Current sensor
DC-Motor-
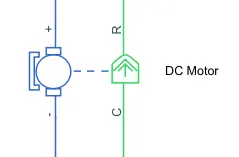
For the EV model, I have selected to use a DC motor block because DC motors are easy to model and have a very few parameters to run for a particular application. There are two sides of the block , the mechanical side is on the right and the electrical side is on the left. mechanical side has tow ports C and R, C stands for casing and is the stable part and R is the rotor which produces a torque. The electrical side has a positive and negetive side for the voltages to be applied. If positive voltage is applied to the motor block from the positive to the negetive terminal then a positive torque will act from C to R port. The directio of the torque can be cahnged by changing the sign of the back emf or the torque constant. Here i have connected the c port to the mechanical rotational reference because it will be stationary. The R port is connected to the gear in the vehicle body block.
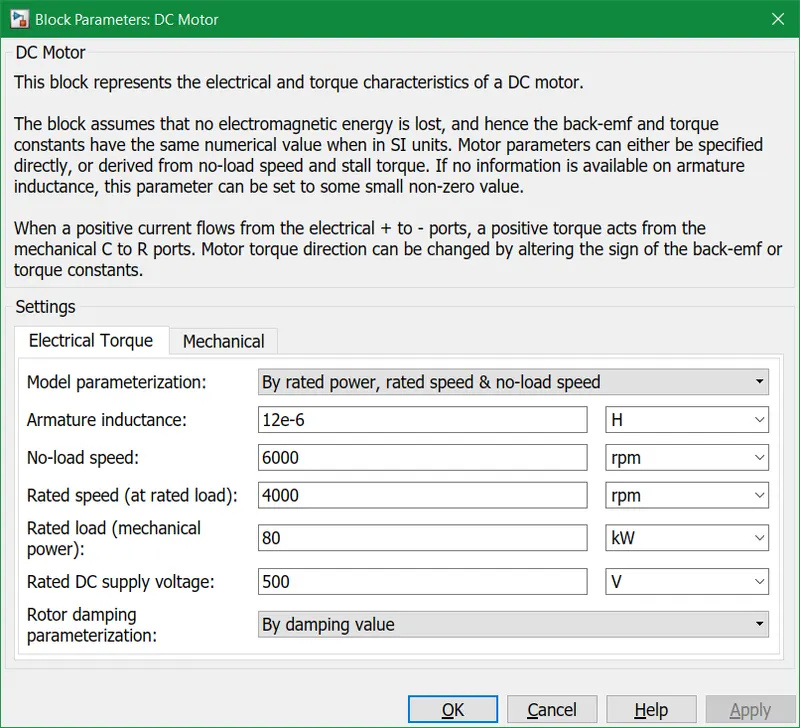 Here i have choosen to parameterize the block by rated power, rates speed and no-load speed. This lets us modify the parameterssuchas DC supply voltage, rated load. I have kept all values default except for the no-load speed, rated speed and rated load.
H-bridge Power Converter : here we are using power cconverter as voltage controller which is we are giving to dc motor .it cahnge the voltage applied to the motor which actually change the speed of the vehilcle .to controlled motor input so that we can controlled the voltage and spped of the motor
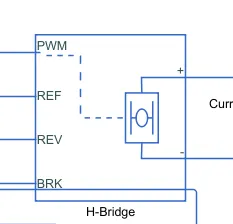
This is a power converter which is needed to provide power of the correct form and magnitude from one component to other. In case of EV,s a power converter is needed to provide a DC voltage from the battery of the EV to the DC motor, so that it can fuction properly at the required parameters.Here i have used an H-bridge motor drive as my power converter. The left side is for controlling the voltage signalsand the right side terminals to provide the controlled voltage to the DC motor the left side ports are:
- PWM- Pulse width modulation
- REF- Reference
- REV- Reverse
- BRL- Brake
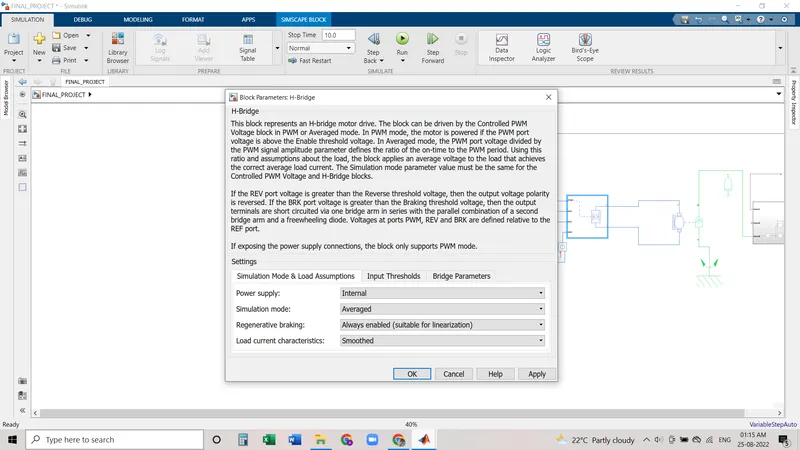
The simulation is kept in average mode beacuse PWM mode will take longer durations of simulation. In the section of bridge parameters the output voltage amplitude was modified to 400 volts according to the DC motor.
Controlled Pwm voltage :
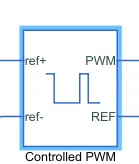
Next, i have used a 'controlled PWM voltage' to provide a controlled pulse width modulated voltage to the H-bridge block. The pulses of voltage created by this block are dependent on the duty cycle which is in that ratio of the time that the switch is ON to the time taken for one cycle. The duty cycle formula is given by:- Duty cycle= Ton/Ton +Toff= Ton /Tcyc. where Ton = On time,Tcyc=Time taken for one cycle.
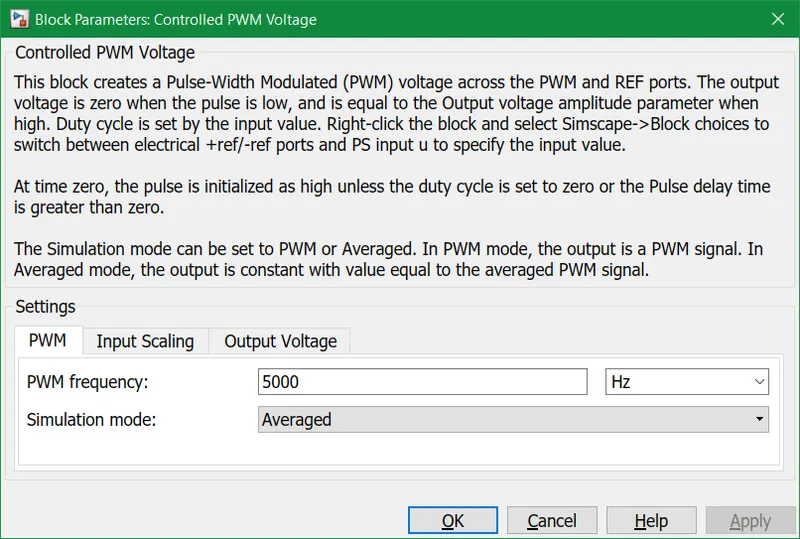
Here all the parameters are set to their default values. I have chosen the averaged simulation mode so that it will feed voltage pulses within quicker simulation times to the H-bridge. The remaining parameters of input scaling and output scaling are unchanged.
Controlled voltage source:
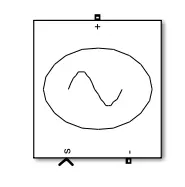
This block provides the necessary voltage that is powerfull enough to maintaion thr voltage at the output regardless of the current that passes through it.In this subsystem @ control voltage blocks ahve been used . One block is used for acceleration and other to provide the voltage for deacceleration.
Electrical reference block is used to create grounding effect for electrical circuits. In my model, we have used it in 2 parts . First to create an electrical ground between Controlled voltage source, controlled PWM voltage, H-bridge blocks. The second is for the battery system which will be modelled afterwards.
Solver configuration block is used to solve any necessary equations in a model. I Have used them in the connection to the REV port of the H-Bridge block.
Battery Subsystem:
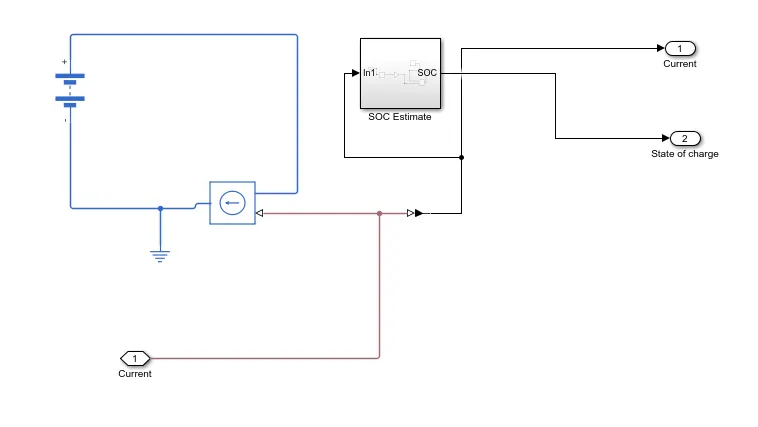
Battery: The battery will be the energy store of the EV and will contain the electrical energy in DC form and provide this energy to operate.
Nominal voltage has been set to 600 volts, internal resistance has been set to 0.2 ohms and an infinite charging capacity
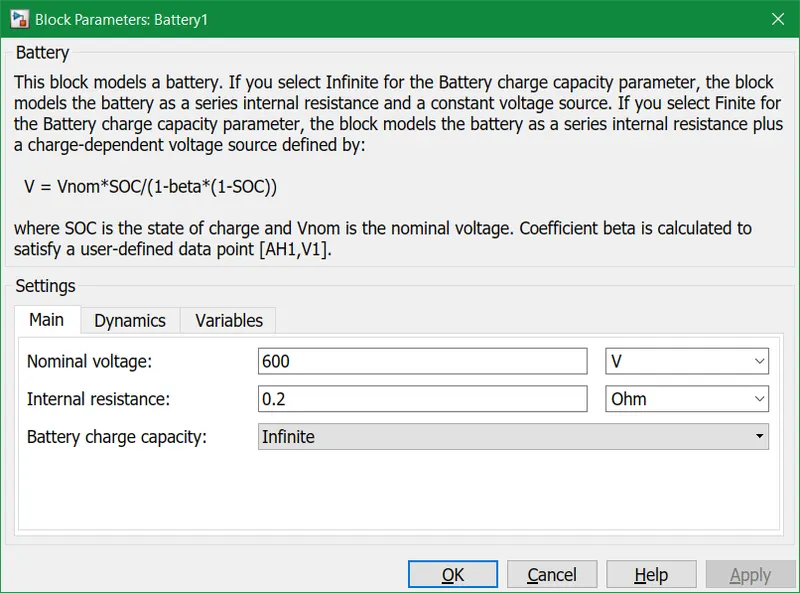
Nominal voltage is sufficient for supplying the voltage to DC-motor andH-bridge blocks.
Controlled current source:
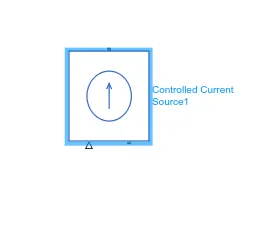
This block is a part in the battery sub-system. Similar to voltage source, this block produces an ideal current that is powerfull enough to maintain the specified current regardless of the voltage across it.
Current source:
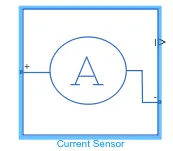
This current sensor block represents an ideal current sensor and is used to convert the current measured in an electrical circuit to a physical signal that is proportional to the current. It measures the current in the battery circuit and the DC motor. The positive and negetive terminals across which thecurrent sensor is inserted in to the circuit. The third port outputs the physical signal , In my model it sends the signal to te controlled current source.
SOC (state of charge) estimate subsystem:
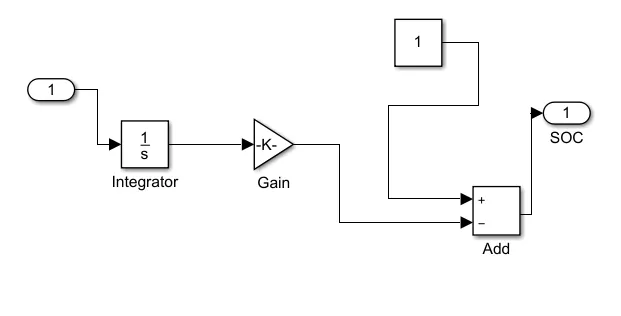
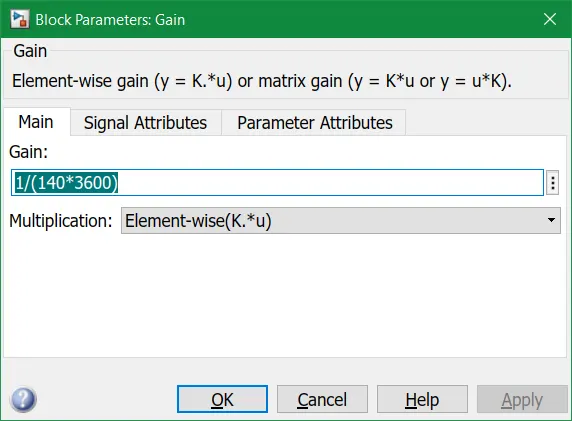
To measure the state of charge of the battery, a sub-system was created of various blocks. The first block is integrator block used to handle data transfer and integrate the value of the current signal with respect to time and next is the Gain block is used in order to multiplyer divide the signal coming from integrator block. This block will divide the current signal with the ampere ratingof battery which is 140(Ah)*3600(secs in hour) . Assuming the battery is always fully charged I have added the constant block with a value of 1 representing 100%.Next a sum block is used to perform addition and substraction operations athese blocks aremade into a subsystem called SOC estimate. A scope block is used at the junction of the PS-simulink converter block to plot the output signall of the current from the battery.
SOC Estimation :
For SOC estimation we use simple method called Coulomb Counting.
Coulomb counting is a technique used to track the State of Charge of a battery pack. It works by integrating the active flowing current (measured in amps) over time to derive the total sum of energy entering or leaving the battery pack. This produces a capacity that is typically measured in Amp-hours.
The SOC Estimate Block is connected with battery through Controlled Current Source block from which Integrator block counts all time period values of +,- values of current, the Gain considered at (1/50*3600) Ah capacity of battery, the sum block subtract the SOC from Initial set Constant block . This gives us the Battery SOC Estimate.
Block parameters of the gain block:
Speed measurement :
In order to measure tyhe speed. I have modified the scope block to have two input ports where one port takes the output velocity signal from the vehicle sub-system block and other port takes the output signall from the drive cycle to the reference velocity port on the longitudinal driver block. This has been done to compare the two speeds and check weather they overlap and achieve the same speed.
Distance measurement:
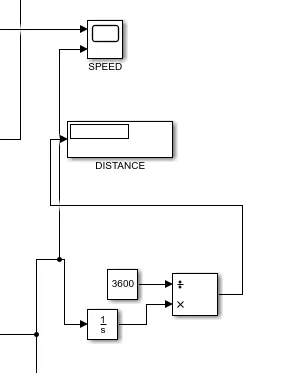
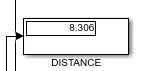
Mathematical blocks and scope block is used to measure the distance travelled by the vehicle. First we had to implement the integrator block to integrate the velocity siganal that is output from the velocity sub-system. Dividen block along with constant block having a value of 3600 is used to divide the integrated speed . This will give us the distance travelled in kilometers.
Longitudional driver and drive cycle:
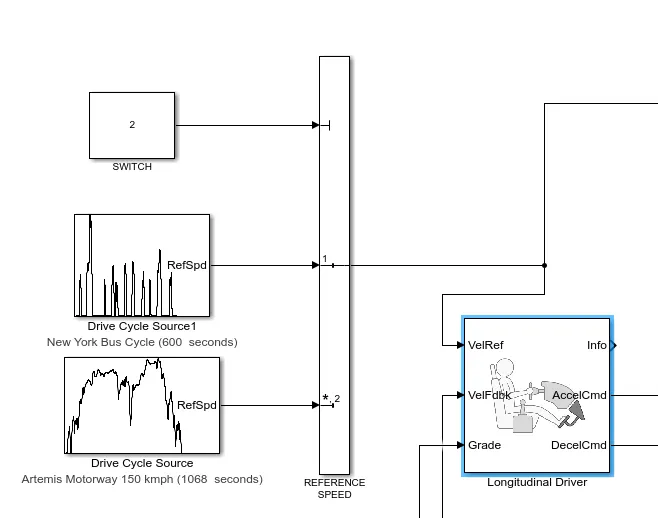
The longitudinal driver block is used for giving normalized acceleration and deacceleration commants to a controller based on two sets of data. The first data is the reference velocity and second data is the feedback velocity.The reference velocity data coming from drive cycle source and is compared to the feedback velocity data coming from the vehicle body. If the reference velocity is greater than the feedback velocity, an acceleration comand will be given as an output to the controlled voltage source. If the reference velocity is lesser than the feedback velocity, a deacceleration command is given as output to anpother controll voltage source. For the output acceleration and deacceleration commands i have used simulink-PS converter block. In this case the input signal; is velocity data and this is logic data which have to be converted to a voltage signal The ports in this block are:
- Velref- This stands for the reference velocity and it is the velocity data provided from a drive cycle source.
- Velfdbl- This stands for feedback velocity and it is coming from the vehicle's body velocity port
- Grade- This port provides a grade or inclination angle on which the vehicle is travelling in degrees.
- Info- This port is for the bus signals which consists of block calculations
- Accelcmd- This port provides the acceleration command to a controlled voltage source
- Deacclcmd- This port provides the deacceleration command to another voltage source.
Drive cycle:
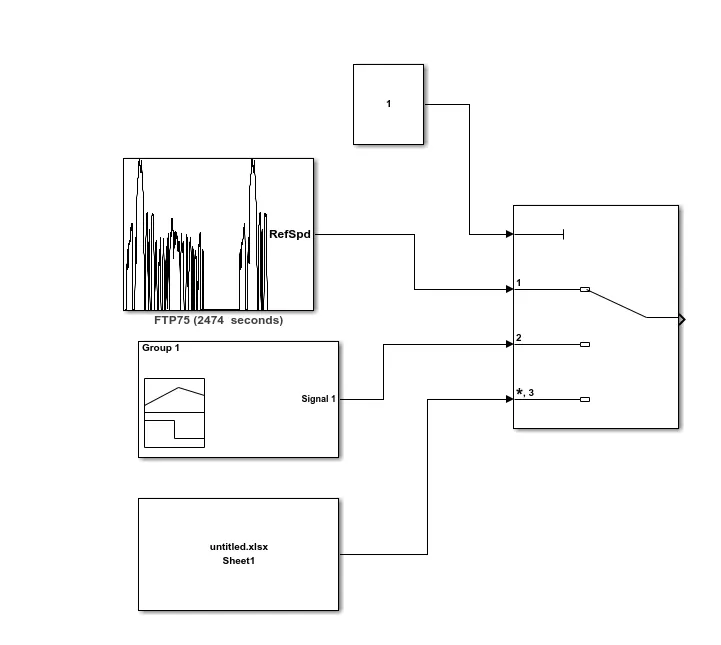
here we are using the three iputs with multiport switch through which we can decide which input we have to use .
at what speed we have to run the vehicle we have to give drive cycle input .
A drive cycle is a data set that contains velocity and time data for the purpose of modelling the motion of a vehicle. It is a plot of the vehicle velocity against the time and it is made to resembl typicall driving conditions that a consumer may experience themselves in. For example here i have used two types of drive cycle data one is the 'newyork bus cycle' and other is the 'artemis motorway of 150kmph'. Drive cycles are used by various testing procedures such as mileage, pollution tests, and acceleration and top speed tests.There are three ways of implementing a drive cycle. One method is to create your own drive cycle with spreedsheet or excelsheet. Another method isuse a signal builder and create siganls according to the user and the method that we used is to implement industry standard drive cycles which are previosly used to test parameters of the vehicle.
Block parameters:
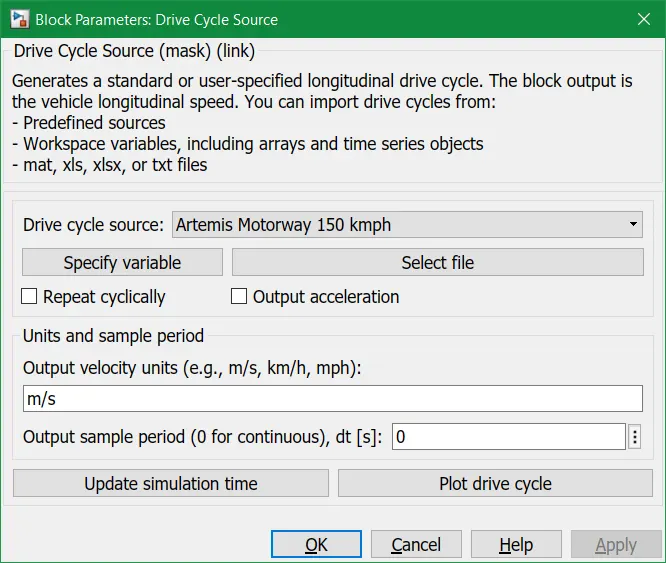
Artemis Motorway 150kmph Drive cycle graph is given as input to the vehicle model-->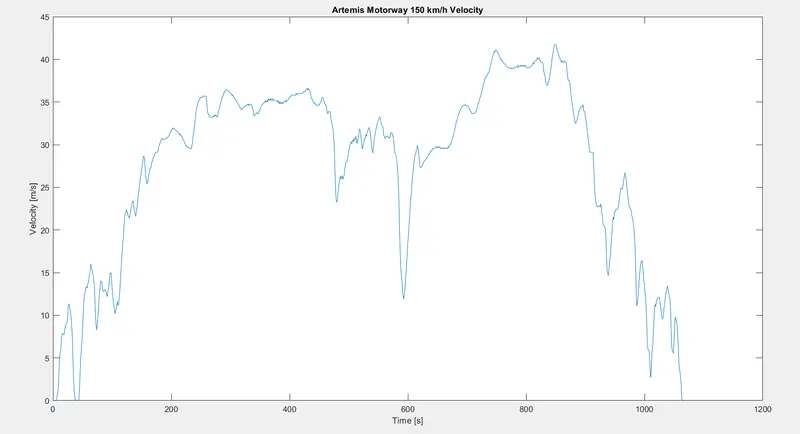
Results: I ran the above drive cycle for my EV model and took the outputs given from speed, surrent and SOC scopes. The distance travelled by the vehicle in the drive cycle is also measured using the display block. Before simulation the run time was updated according to the drive cycle time 1068secs.
Speed scope:
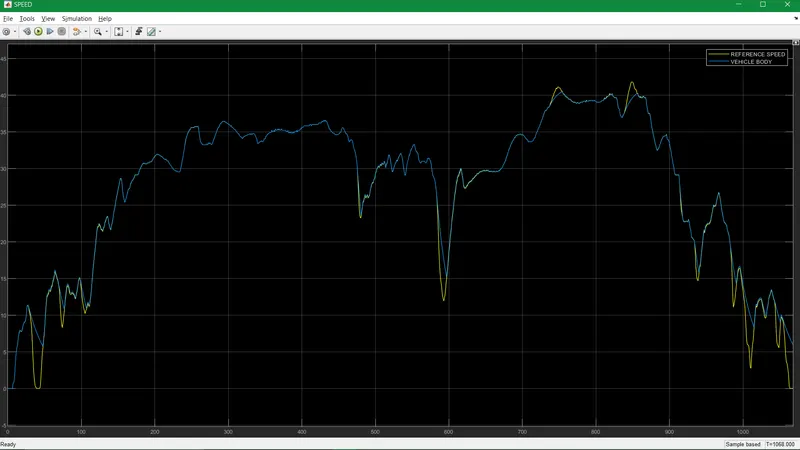
From this scope we can see two signals. The blue signal represents the vehicles body speed and the yellow signal is the Artemis drive cycle data . As we can see that the longitudinal driver successfully maintains the drive cycle data , process it and controls the vehicle's speed according to the reference speed. the graph overlaps eachother effectively during acceleration and deacceleration.
Current scope:
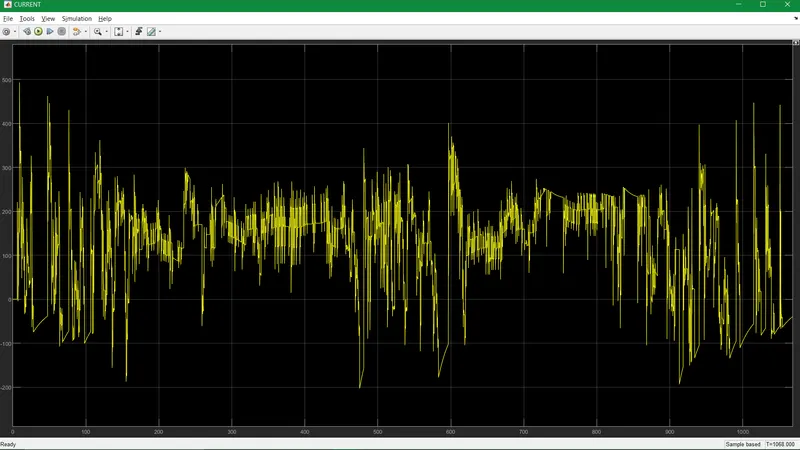
This scope shows how current flowing from the battery to the motor varies with the drive cycle.
SOC scope:
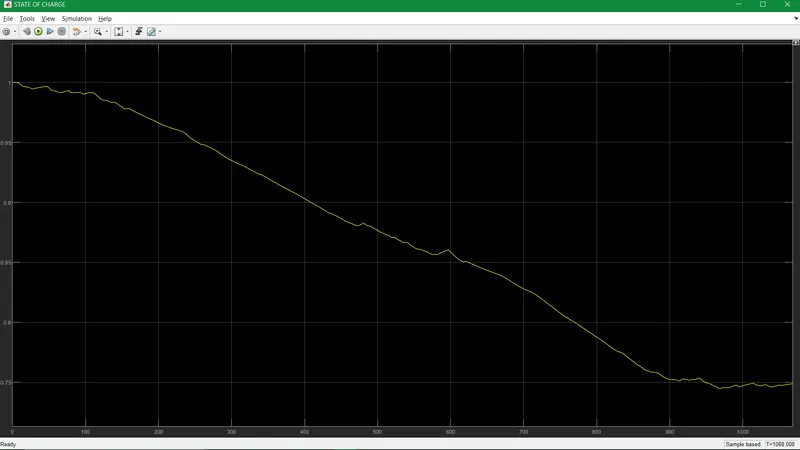
The SOC scope shows how the state of the battery varies over the drive cycle time, The battery was modelled to begin with an SOC pt 1 that is 100%. As the simulation starts the charge of the bettery gets decreased and when the vehicle is in braking mode the uplift in the grapf shows that regenerative braking is working to maintain the battery charge. Here we can see that after the whole simulation is over the State of charge percent lies at 75% after 1068 secs.
Distance travelled:
Results: I ran the above drive cycle for my EV model and took the outputs given from speed, surrent and SOC scopes. The distance travelled by the vehicle in the drive cycle is also measured using the display block. Before simulation the run time was updated according to the drive cycle time 1068secs.