Creation of geometries by Coordinate system methods using AutoCad
AIM:
To create the given geometries by coordinate system methods using AutoCAD.
INTRODUCTION:
The geometries given in the challenge should be created using AutoCAD after finding the missing coordinates. The procedure and result should be written after creating geometry.
P-1:
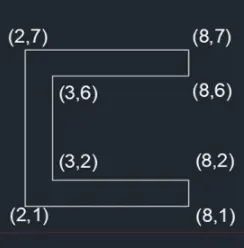
i)Absolute Coordinate System
Absolute Coordinate System is based on UCS origin (0.0) which is the intersection of x and y axes. The distances are measured from origin.
Procedure:
Step 1: Type shortcut L for line in command box and enter coordinates of (2.1). Press ENTER
Step 2: Tum on orthomode or F8 to draw straight line without any inclination.
Step 3: Type ZOOM in command box and press ENTER to view the line closely and Enter PAN in command box. Press ENTER to move the grid for the convenience of user
Step 4: Place the cursor horizontally rightwards and type next coordinates of (8.1) in command box Press ENTER
Step 5: Place the cursor vertically upwards and type the coordinates of (8.2). Press ENTER.
Step 6: Place the cursor horizontally leftwards and type next coordinates of (3.2). Press ENTER
Step 7: Place the cursor vertically upwards and type next coordinates of (3.6), Press ENTER.
Step 8: Place the cursor horizontally rightwards and type coordinates of (8.6), Press ENTER
Step 9: Place the cursor vertically upwards and enter coordinates of (8,7). Press ENTER. Step 11: Place the cursar horizontally leftwards and enter coordinates of (2,7). Press ENTER.
Step 10: Place the cursor vertically downwards and click the cursar on the first paint (2.1),
Step 11: Press ENTER or click on the command box CLOSE to exit from the geometry.
Step 12: Enter TEXT on command box. Click starting point on the grid and enter dimension of text as 0.5
Step 13: Enter all the required coordinates as mentioned in the diagram given in the result.
Step 14: Press ENTER after entering all the coordinates and click SAVE icon at the menu bar
Result:
ii) Relative Coordinate System
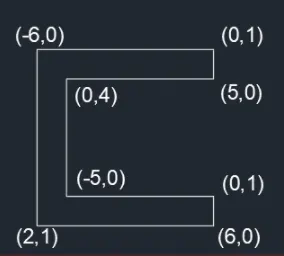
Relative Coordinate System is the system which origin is taken from the previous point.
Procedure:
Step 1: Type UNITS in command box. Select decimal with precision 0.0 and meters. Press OK.
Step 2: Type shortcut L for line in command box and enter coordinates of (2,1). Press ENTER.
Step 3: Turn on orthomode to draw straight line without any inclination.
Step 4: Type ZOOM in command box and press ENTER to view the line closely and Enter PAN in command box and press ENTER to move the grid D for the convenience of user.
Step 5: Place the cursor horizontally rightwards and type next coordinates of @6,0 in command box. Press ENTER.
Step 6: Place the cursor vertically upwards and type the coordinates of @0,1. Press ENTER.
Step 7: Place the cursor horizontally leftwards and type next coordinates of @-5.0. Press ENTER.
Step 8: Place the cursor vertically upwards and type next coordinates of @0.4. Press ENTER.
Step 9: Place the cursor horizontally rightwards and type coordinates of @5,0. Press ENTER. Step 10: Place the cursor vertically upwards and enter coordinates of @0,1. Press ENTER.
Step 11: Place the cursor horizontally leftwards and enter coordinates of @-6,0. Press ENTER.
Step 12: Place the cursor vertically downwards and click the cursor on the first point (2,1).
Step 13: Press ENTER or click on the command box CLOSE to exit from the geometry.
Step 14: Enter TEXT on command box. Click starting point on the grid and enter dimension of text as 0.5.
Step 15: Enter all the required coordinates as mentioned in the diagram given in the result.
Step 16: Press ENTER after entering all the coordinates and click SAVE icon at the menu bar.
Result:
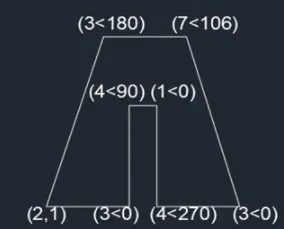
iii)Polar Coordinate System
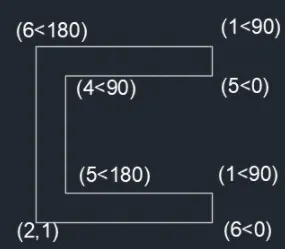
Polar Coordinate System is the system in which the distance and angle are measured from the origin.
Procedure:
Step 1: Type UNITS in command box. Select decimal with precision 0.0 and meters. Press OK.
Step 2: Type shortcut L for line in command box and enter coordinates of (2.1). Press ENTER.
Step 3: Turn on orthomode to draw straight line without any inclination.
Step 4: Type ZOOM in command box and press ENTER to view the line closely and Enter PAN in command box and press ENTER to move the grid for the convenience of user.
Step 5: Place the cursor horizontally rightwards and type next coordinates of @6-0 in command box. Press ENTER.
Step 6: Place the cursor vertically upwards and type the coordinates of @1-90. Press ENTER.
Step 7: Place the cursor horizontally leftwards and type next coordinates of @5-180. Press ENTER.
Step 8: Place the cursor vertically upwards and type next coordinates of @4-90. Press ENTER.
Step 9: Place the cursor horizontally rightwards and type coordinates of @5-0. Press ENTER.
Step 10: Place the cursor vertically upwards and enter coordinates of @1-90. Press ENTER
Step 11: Place the cursor horizontally leftwards and enter coordinates of 06-180, Press ENTER.
Step 12: Place the cursor vertically downwards and click the cursor on the first point (2.1).
Step 13: Press ENTER or click on the command box CLOSE to exit from the geometry.
Step 14: Enter TEXT on command box. Click starting point on the grid and enter dimension of text as 0.5.
Step 15: Enter all the required coordinates as mentioned in the diagram given in the result.
Step 16: Press ENTER after entering all the coordinates and click SAVE icon at the menu bar
Result:
P-2:
i) Absolute Coordinate System
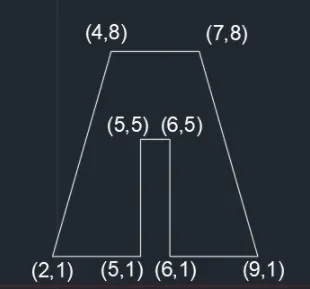
Absolute Coordinate System is based on UCS origin (0,0) which is the interaction of x and y axes. The distances are measured from origin.
Procedure:
Step 1: Type UNITS in command box. Select decimal with precision 0.0 and meters. Press OK.
Step 2: Type shortcut L for line in command box and enter coordinates of (2.1). Press ENTER.
Step 3: Turn on orthomode to draw straight line without any inclination.
Step 4: Type ZOOM in command box and press ENTER to view the line closely and Enter PAN in command box and press ENTER to move the grid for the convenience of user.
Step 5: Place the cursor horizontally rightwards and type next coordinates of (5.1) in command box. Press ENTER.
Step 6: Place the cursor vertically upwards and type the coordinates of (5,5). Press ENTER.
Step 7: Place the cursor horizontally rightwards and type next coordinates of (6.5). Press ENTER.
Step 8: Place the cursor vertically downwards and type next coordinates of (6.1). Press ENTER.
Step 9: Place the cursor horizontally rightwards and type coordinates of (9.1). Press ENTER.
Step 10: Turn off orthomode. Place the cursor upwards left side and enter coordinates of (7.8). Press ENTER.
Step 11: Turn on orthomode. Place the cursor horizontally leftwards and type next coordinates of (4,8). Press ENTER.
Step 12: Turn off orthomode. Place the cursor downwards left side and click on ordinates of (2,1). Press ENTER.
Step 13: Press ENTER or click on the command box CLOSE to exit from the geometry.
Step 14: Enter TEXT on command box. Click starting point on the grid and enter dimension of text as 0.5.
Step 15: Enter all the required coordinates as mentioned in the diagram given in the result.
Step 16: Press ENTER after entering all the coordinates and click SAVE icon at the menu bar.
Result:
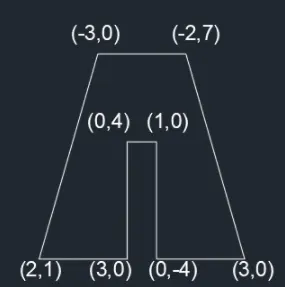
ii)Relative Coordinate System
Relative Coordinate System is the system in which origin is taken from the previous point.
Procedure:
Step 1: Type UNITS in command box. Select decimal with precision 0.0 and meters. Press OK.
Step 2: Type shortcut L for line in command box and enter coordinates of (2,1). Press ENTER.
Step 3: Turn on orthomode to draw straight line without any inclination.
Step 4: Type ZOOM in command box and press ENTER to view the line closely and Enter PAN in command box and press ENTER to move the grid for the convenience of user.
Step 5: Place the cursor horizontally rightwards and type next coordinates of @3.0 in command box. Press ENTER.
Step 6: Place the cursor vertically upwards and type the coordinates of @0,4. Press ENTER.
Step 7: Place the cursor horizontally rightwards and type next coordinates of @1.0. Press ENTER.
Step 8: Place the cursor vertically downwards and type next coordinates of @0.-4. Press ENTER.
Step 9: Place the cursor horizontally rightwards and type coordinates of @3,0. Press ENTER.
Step 10: Turn off orthomode. Place the cursor upwards left side and enter coordinates of @-2,7. Press ENTER.
Step 11: Turn on orthomode. Place the cursor horizontally leftwards and type next coordinates of @-3,0. Press ENTER.
Step 12: Turn off orthomode. Place the cursor downwards left side and click on (2,1). Press ENTER.
Step 13: Press ENTER or click on the command box CLOSE to exit from the geometry.
Step 14: Enter TEXT on command box. Click starting point on the grid and enter dimension of text as 0.5.
Step 15: Enter all the required coordinates as mentioned in the diagram given in the result.
Step 16: Press ENTER after entering all the coordinates and click SAVE icon at the menu bar.
Result:
ii)Relative Coordinate System
Relative Coordinate System is the system in which origin is taken from the previous point.
Procedure:
Step 1: Type UNITS in command box. Select decimal with precision 0.0 and meters. Press OK.
Step 2: Type shortcut L for line in command box and enter coordinates of (2,1). Press ENTER.
Step 3: Turn on orthomode to draw straight line without any inclination.
Step 4: Type ZOOM in command box and press ENTER to view the line closely and Enter PAN in command box and press ENTER to move the grid for the convenience of user.
Step 5: Place the cursor horizontally rightwards and type next coordinates of @3.0 in command box. Press ENTER.
Step 6: Place the cursor vertically upwards and type the coordinates of @0,4. Press ENTER.
Step 7: Place the cursor horizontally rightwards and type next coordinates of @1.0. Press ENTER.
Step 8: Place the cursor vertically downwards and type next coordinates of @0.-4. Press ENTER.
Step 9: Place the cursor horizontally rightwards and type coordinates of @3,0. Press ENTER.
Step 10: Turn off orthomode. Place the cursor upwards left side and enter coordinates of @-2,7. Press ENTER.
Step 11: Turn on orthomode. Place the cursor horizontally leftwards and type next coordinates of @-3,0. Press ENTER.
Step 12: Turn off orthomode. Place the cursor downwards left side and click on (2,1). Press ENTER.
Step 13: Press ENTER or click on the command box CLOSE to exit from the geometry.
Step 14: Enter TEXT on command box. Click starting point on the grid and enter dimension of text as 0.5.
Step 15: Enter all the required coordinates as mentioned in the diagram given in the result.
Step 16: Press ENTER after entering all the coordinates and click SAVE icon at the menu bar.
Result:
P-4:
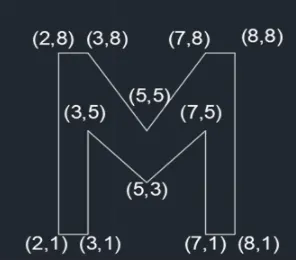
Absolute Coordinate System:
Absolute Coordinate System is based on UCS origin (0.0) which is the interaction of x and y axes. The distances are measured from origin
Procedure:
Step 1: Type UNITS in command box. Select decimal with precision 0.0 and meters. Press OK.
Step 2: Type shortcut L for line in command box and enter coordinates of (2.1). Press ENTER.
Step 3: Turn on orthomode to draw straight line without any inclination.
Step 4: Type ZOOM in command box and press ENTER to view the line closely and Enter PAN in command box and press ENTER to move the grid for the convenience of user.
Step 5: Place the cursor horizontally rightwards and type next coordinates of (3.1) in command box. Press ENTER.
Step 6: Place the cursor vertically upwards and type the coordinates of (3,5). Press ENTER.
Step 7: Turn off orthomode. Place the cursor downside rightwards and type next coordinates of (5,3). Press ENTER
Step 8: Place the cursar upwards night side and type next coordinates of (7,5). Press ENTER
Step 9: Turn on orthomode. Place the cursor vertically downwards and type coordinates of (7.1) Press ENTER.
Step 10: Place the cursor horizontally nightwards and type coordinates of (8.1). Press ENTER
Step 11: Place the cursor vertically upwards and enter coordinates of (8,8), Press ENTER
Step 12: Place the cursor horizontally leftwards and enter coordinates of (7.8). Press ENTER
Step 13: Turn off arthomode. Place the cursor downwards left side and enter coordinates of (5,5). Press ENTER.
Step 14: Place the cursor upwards left side and enter coordinates of (3.8) Press ENTER
Step 15: Turn on orthomode. Place the cursor horizontally leftwards and enter coordinates of (2.8). Press ENTER.
Step 16: Place the cursor vertically downwards and click the cursor on the first point (2.1) Press ENTER
Step 17: Press ENTER or click on the cornmand box CLOSE to exit from the geometry.
Step 18: Enter TEXT on command box. Click starting point on the grid and enter dimension of text as 0.5
Step 19: Enter all the required coordinates as mentioned in the diagram given in the result.
Step 20: Press ENTER after entering all the coordinates and click SAVE icon at the menu bar
Result:
P-5:
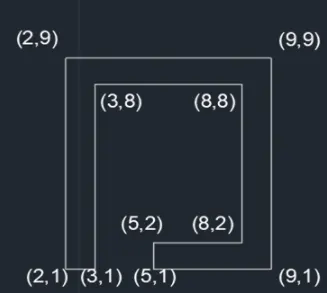
Absolute Coordinate System:
Absolute Coordinate System is based on UCS origin (0,0) which is the interaction of x and y axes. The distances are measured from origin.
Procedure:
Step 1: Type UNITS in command box. Select decimal with precision 0.0 and meters Press OK.
Step 2: Type shortcut L for line in command box and enter coordinates of (2.1). Press ENTER.
Step 3: Turn on orthomode to draw straight line without any inclination.
Step 4: Type ZOOM in command box and press ENTER to view the line closely and Enter PAN in command box and press ENTER to move the grid for the convenience of user.
Step 5: Place the cursor horizontally rightwards and type next coordinates of (3.1) in command box. Press ENTER.
Step 6: Place the cursor vertically upwards and type the coordinates of (3.8). Press ENTER.
Step 7: Place the cursor horizontally rightwards and type next coordinates of (8,8). Press ENTER Step 8: Place the cursor vertically downwards and type next coordinates of (8.2). Press ENTER.
Step 9: Place the cursor horizontally leftwards and type coordinates of (5.2). Press ENTER
Step 10: Place the cursor vertically downwards and type coordinates of (5.1). Press ENTER
Step 11: Place the cursor horizontally rightwards and enter coordinates of (9.1). Press ENTER
Step 12: Place the cursor vertically upwards and enter coordinates of (9.9). Press ENTER.
Step 13: Place the cursor horizontally leftwards and enter coordinates of (2.9). Press ENTER Result:
Step 14: Place the cursor vertically downwards and enter coordinates of (2.1).
Step 15: Press ENTER or click on the command box CLOSE to exit from the geometry.
Step 16: Enter TEXT on command box. Click starting point on the grid and enter dimension of text as 0.5
Step 17: Enter all the required coordinates as mentioned in the diagram given in the result.
Step 18: Press ENTER after entering all the coordinates and click SAVE icon at the menu bar.
Result:
P-7:
Absolute Coordinate System:
Absolute Coordinate System is based on UCS origin (0.0) which is the interaction of x and y axes. The distances are measured from origin.
Procedure:
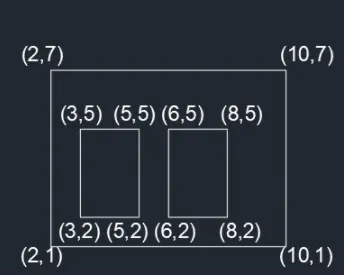
Step 1: Type UNITS in command box. Select decimal with precision 0.0 and meters. Press OK.
Step 2: Type shortcut L for line in command box and enter coordinates of (2,1). Press ENTER
Step 3: Turn on orthomode to draw straight line without any inclination.
Step 4: Type ZOOM in command box and press ENTER to view the line closely and Enter PAN in command box and press ENTER to move the grid for the convenience of user.
Step 5: Place the cursor horizontally rightwards and type next coordinates of (10.1) in command box Press ENTER.
Step 6: Place the cursor vertically upwards and type the coordinates of (10.7). Press ENTER
Step 7: Place the cursar horizontally leftwards and type next coordinates of (2,7). Press ENTER.
Step 8: Place the cursor vertically downwards and type next coordinates of (2.1). Press ENTER or click on the command box CLOSE to exit from the geometry.
Step 9: Type shortcut L for line in command box. Enter the coordinates of (3,2). Press ENTER.
Step 10: Place the cursor horizontally nightwards and type coordinates of (5,2). Press ENTER
Step 11: Place the cursor vertically upwards and enter coordinates of (5.5). Press ENTER
Step 12: Place the cursor horizontally leftwards and enter coordinates of (3,5), Press ENTER
Step 13: Place the cursor vertically downwards and enter coordinates of (3.2). Press ENTER or click on the command bax CLOSE to exit from the geometry.
Step 14: Type shortcut L for line in command box. Enter the coordinates of (6.2). Press ENTER.
Step 15: Place the cursor horizontally rightwards and type next coordinates of (8.2). Press ENTER
Step 16: Place the cursor vertically upwards and enter the coordinates of (8,5) Press ENTER
Step 17: Place the cursor horizontally leftwards and enter the coordinates of (6,5), Press ENTER
Step 18: Place the cursor vertically downwards and click on (6,2).
Step 19: Press ENTER or click on the command box CLOSE to exit from the geometry.
Step 20: Enter TEXT on command box. Click starting point on the grid and enter dimension of text as 0.5
Step 21: Enter all the required coordinates as mentioned in the diagram given in the result.
Step 22: Press ENTER after entering all the coordinates and click SAVE icon at the menu bar.
Result:
P-8:
Absolute Coordinate System:
Absolute Coordinate System is based on UCS origin (0,0) which is the interaction of x and y axes. The distances are measured from origin.
Procedure:
Step 1: Type UNITS in command box. Select decimal with precision 0.0 and meters. Press OK.
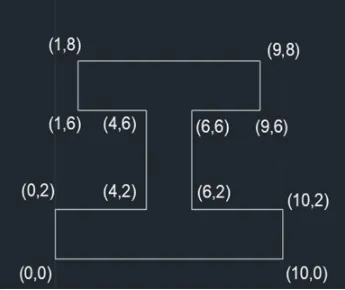
Step 2: Type shortcut L for line in command box and enter coordinates of (0,0). Press ENTER
Step 3: Turn on orthomode to draw straight line without any inclination.
Step 4: Type ZOOM in command box and press ENTER to view the line closely and Enter PAN in command box and press ENTER to move the grid for the convenience of user.
Step 5: Place the cursor horizontally rightwards and type next coordinates of (10,0) in command box. Press ENTER
Step 6: Place the cursor vertically upwards and type the coordinates of (10.2). Press ENTER.
Step 7: Place the cursor horizontally leftwards and type next coordinates of (6,2). Press ENTER
Step 8: Place the cursor vertically upwards and type next coordinates of (6,61. Press ENTER.
Step 9: Place the cursor horizontally rightwards and type coordinates of (9.6). Press ENTER.
Step 10: Place the cursor vertically upwards and type coordinates of (9.8). Press ENTER.
Step 11: Place the cursor horizontally leftwards and enter coordinates of (1,8) Press ENTER
Step 12: Place the cursor vertically downwards and enter coordinates of (1,6). Press ENTER
Step 13: Place the cursor horizontally rightwards and enter coordinates of (4.6). Press ENTER.
Step 14: Place the cursor vertically downwards and type next coordinates of (4.2). Press ENTER
Step 15: Place the cursor horizontally leftwards and enter the coordinates of (0.2). Press ENTER.
Step 16: Place the cursor vertically downwards and click coordinates of (0,0)
Step 17: Press ENTER or click on the command box CLOSE to exit from the geometry
Step 18: Enter TEXT on command box. Click starting point on the grid and enter dimension of text as 0.5
Step 19: Enter all the required coordinates as mentioned in the diagram given in the result.
Step 20: Press ENTER after entering all the coordinates and click SAVE icon at the menu bar
Result:
P-9:
Absolute Coordinate System:
Absolute Coordinate System is based on UCS origin (0,0) which is the interaction of x and y axes. The distances are measured from origin.
Procedure:
Step 1: Type UNITS in command box. Select decimal with precision 0.0 and meters. Press OK.
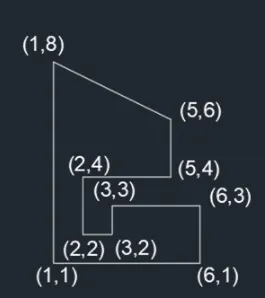
Step 2: Type shortcut L for line in command box and enter coordinates of (1,1). Press ENTER.
Step 3: Turn on orthomode to draw straight line without any inclination.
Step 4: Type ZOOM in command box and press ENTER to view the line closely and Enter PAN in command box and press ENTER to move the grid for the convenience of user.
Step 5: Place the cursor horizontally rightwards and type next coordinates of (6,1) in command box. Press ENTER.
Step 6: Place the cursor vertically upwards and type the coordinates of (6,3). Press ENTER.
Step 7: Place the cursor horizontally leftwards and type next coordinates of (3,3). Press ENTER.
Step 8: Place the cursor vertically downwards and type next coordinates of (3,2). Press ENTER:
Step 9: Place the cursor horizontally leftwards and type coordinates of (2.2). Press ENTER.
Step 10: Place the cursor vertically upwards and type coordinates of (2.4). Press ENTER
Step 11: Place the cursor horizontally rightwards and enter coordinates of (5.4), Press ENTER
Step 12: Place the cursor vertically upwards and enter coordinates of (5,6). Press ENTER.
Step 13: Turn off orthormode. Place the cursor upwards left side and enter coordinates of (1,8). Press ENTER.
Step 14: Turn on orthomode. Place the cursor vertically downwards and click on coordinates of (1.1).
Step 15: Press ENTER or click on the command box CLOSE to exit from the geometry.
Step 16: Enter TEXT on command box. Click starting point on the grid and enter dimension of text as 0.5.
Step 17: Enter all the required coordinates as mentioned in the diagram given in the result.
Step 18: Press ENTER after entering all the coordinates and click SAVE icon at the menu bar
Result:
P-10:
Absolute Coordinate System:
Absolute Coordinate System is based on UCS ongin (0,0) which is the interaction of x and y axes. The distances are measured from origin.
Procedure:
Step 1: Type UNITS in command box. Select decimal with precision 0.0 and meters. Press OK.
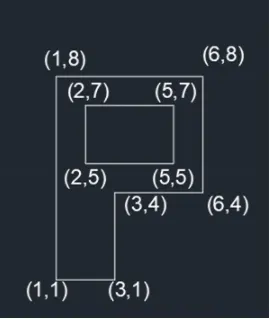
Step 2: Type shortcut L for line in command box and enter coordinates of (1,1). Press ENTER.
Step 3: Tum on orthomode to draw straight line without any inclination
Step 4: Type ZOOM in command box and press ENTER to view the line closely and Enter PAN in command box and press ENTER to move the grid for the convenience of user.
Step 5: Place the cursor horizontally nightwards and type next coordinates of (3,1) in command box. Press ENTER
Step 6: Place the cursor vertically upwards and type the coordinates of (3.4), Press ENTER
Step 7: Place the cursor horizontally rightwards and type next coordinates of (6,4), Press ENTER
Step 8: Place the cursor vertically upwards and type next coordinates of (6,8). Press ENTER
Step 9: Place the cursor horizontally leftwards and type coordinates of (1,8), Press ENTER
Step 10: Place the cursor vertically downwards and click on coordinates of (1.1).
Step 11: Press ENTER or click on the command box CLOSE to exit from the geometry
Step 12: Type shortcut L for line in command box and enter coordinates of (2,5). Press ENTER
Step 13: Place the cursor horizontally nightwards and enter coordinates of (5.5), Press ENTER
Step 14: Place the cursor vertically upwards and enter coordinates of (5.7), Press ENTER.
Step 15: Place the cursor horizontally leftwards and enter coordinates of (2,7), Press ENTER
Step 16: Place the cursor vertically downwards and enter coordinates of (2,5).
Step 17: Press ENTER or click on the command box CLOSE to exit from the geometry
Step 18: Enter TEXT on command box. Click starting point on the grid and enter dimension of text as 0.5.
Step 19: Enter all the required coordinates as mentioned in the diagram given in the result
Step 20: Press ENTER after entering all the coordinates and click SAVE icon at the menu bar
Result:
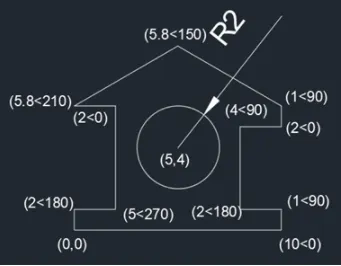
Profile-Wood:
Polar Coordinate System
Polar Coordinate System is the system in which the distance and angle are measured from the origin.
Procedure:
Step 1: Type UNITS in command box. Select decimal with precision 0.0 and meters. Press OK.
Step 2: Type shortcut L for line in command box and enter coordinates of (0,0). Press ENTER.
Step 3: Turn on orthomode to draw straight line without any inclination.
Step 4: Type ZOOM in command box and press ENTER to view the line closely and Enter PAN in command box and press ENTER to move the grid for the convenience of user.
Step 5: Place the cursor horizontally rightwards and type next coordinates of @10-0 in command box. Press ENTER.
Step 6: Place the cursor vertically upwards and type the coordinates of @1-90. Press ENTER.
Step 7: Place the cursor horizontally leftwards and type next coordinates of @2-180. Press ENTER.
Step 8: Place the cursor vertically upwards and type next coordinates of @4-90. Press ENTER.
Step 9: Place the cursor horizontally rightwards and type coordinates of @2<0. Press ENTER.
Step 10: Place the cursor vertically upwards and enter coordinates of @1-90. Press ENTER.
Step 11: Turn off orthomode. Place the cursor upwards left side and type next coordinates of @5.8-150. Press ENTER.
Step 12: Place the cursor downwards left side and enter coordinates of @5.8-210. Press ENTER.
Step 13: Turn on orthomode. Place the cursor horizontally rightwards and type next coordinates of @2-0. Press ENTER.
Step 14: Place the cursor vertically downwards and enter coordinates of @5-270. Press ENTER.
Step 15: Place the cursor horizontally leftwards and enter coordinates of @2<180. Press ENTER.
Step 16: Place the cursor vertically downwards and click on coordinates of (0,0).
Step 17: Press ENTER or click on the command box CLOSE to exit from the geometry.
Step 18: Click on CIRCLE icon on Draw tab and select Circle, Radius option.
Step 19: Enter (5,4) in command. Press ENTER.
Step 20: Enter DIMSTYLE in command box. Click modify and Go to Symbols and Arrows. Select Arrows as 0.5. Set current and Press OK.
Step 21: Enter DIMRAD in command box and Press ENTER.
Step 22: Enter 2 as radius and Click ENTER.
Step 23: Enter TEXT on command box. Click starting point on the grid and enter dimension of text as 0.5.
Step 24: Enter all the required coordinates as mentioned in the diagram given in the result
Step 25: Enter DIMSTYLE in command box. Click modify and Go to Symbols and Arrows. Select Arrows as 0.5. Set current and Press OK.
Step 26: Press ENTER after entering all the coordinates and click SAVE icon at the menu bar.
Result:
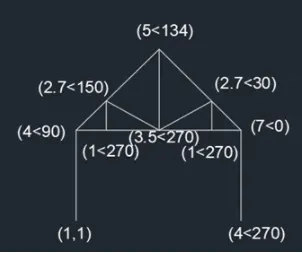
Queen Post Truss:
Polar Coordinate System
Polar Coordinate System is the system in which the distance and angle are measured from the origin.
Procedure:
Step 1: Type UNITS in command box. Select decimal with precision 0.0 and meters. Press OK.
Step 2: Type shortcut L for line in command box and enter coordinates of (1,1). Press ENTER
Step 3: Turn on orthomode to draw straight line without any inclination.
Step 4: Type ZOOM in command box and press ENTER to view the line closely and Enter PAN in command box and press ENTER to move the gnd for the convenience of user.
Step 5: Place the cursor vertically upwards and type next coordinates of @4-90 in command box. Press ENTER.
Step 6: Place the cursor horizontally rightwards and type the coordinates of @7-0. Press ENTER
Step 7: Place the cursor vertically downwards and type the coordinates of @4-270. Press ENTER.
Step 8: Click the cursor on @7-0 point. Turn off orthomode
Step 9: Type shortcut L for line in command box. Place the cursor upwards left side and type next coordinates of @5-134 Press ENTER
Step 10: Place the cursor downwards left side and click on next coordinates of @4-90. Press ENTER.
Step 11: Type shortcut L for line and turn on orthomode. Click on coordinates of @5-134 and place the cursor vertically downwards and type coordinates of @3.5-270. Press ENTER
Step 12: Turn off orthomode. Place the cursar upwards left side and enter coordinates of @2.7-150. Press ENTER
Step 13: Turn on orthomode. Place the cursor vertically downwards and type next coordinates of @1-270. Press ENTER.
Step 14: Type shortcut L for line and turn off orthomode, click on coordinates of @ 3.5<270 and enter coordinates of 27-30. Press ENTER
Step 15: Turn on orthomode. Place the cursor vertically downwards and type next coordinates of @1-270. Press ENTER
Step 16: Press ENTER or click on the command box CLOSE to exit from the geometry
Step 17: Enter TEXT on command box Click starting point on the grid and enter dimension of text as 0.5
Step 18: Enter all the required coordinates as mentioned in the diagram given in the result
Step 19: Press ENTER after entenng all the coordinates and click SAVE icon at the menu bar.
Result:
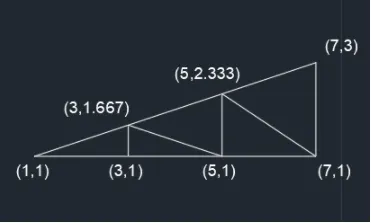
Mono Pitch:
Absolute Coordinate System
Absolute Coordinate System is based on UCS origin (0.0) which is the interaction of x and y axes. The distances are measured from origin.
Procedure:
Step 1: Type UNITS in command box. Select decimal with precision 0.0 and meters. Press OK.
Step 2: Type shortcut L for line in command box and enter coordinates of (1.1). Press ENTER
Step 3: Tum on orthomode to draw straight line without any inclination.
Step 4: Type ZOOM in command box and press ENTER to view the line closely and Enter PAN in command box and press ENTER to move the grid for the convenience of user.
Step 5: Place the cursor horizontally rightwards and type next coordinates of (7.1) in command box Press ENTER
Step 6: Place the cursor vertically upwards and type the coordinates of (7.3). Press ENTER
Step 7: Tum off orthomode. Click on coordinates of (1,1). Press ENTER or click on the command box CLOSE to exit from the geometry.
Step 8: Type shortcut L for line in command box. Tum on orthomode and type next coordinates of (3.1). Press ENTER.
Step 9: Place the cursor vertically upwards and type coordinates of (3,1.667). Press ENTER.
Step 10: Turn off orthomode. Place the cursor downwards right side and click on coordinates of (5,1). Press ENTER
Step 11: Turn on orthomode. Place the cursor vertically upwards and click on coordinates of (5.2.333). Press ENTER
Step 12: Turn off orthomode. Place the cursor downwards right side and click on coordinates of (7.1).
Step 13: Press ENTER or click on the command box CLOSE to exit from the geometry
Step 14: Enter TEXT on command box. Click starting point on the grid and enter dimension of text
Step 15: Enter all the required coordinates as mentioned in the diagram given in the result.
Step 16: Press ENTER after entering all the coordinates and click SAVE icon at the menu bar.
Result:
Result:
All the geomentries which are drawn using different coordinate system methods. It uses line tool and circle tool. The results are shown after each geometry.