Creation of geometries by Coordinate system methods using AutoCad
AIM
- To create the geometries from P1 to P2 using all the coordinates system methods and use the Line tool to create the geometries.
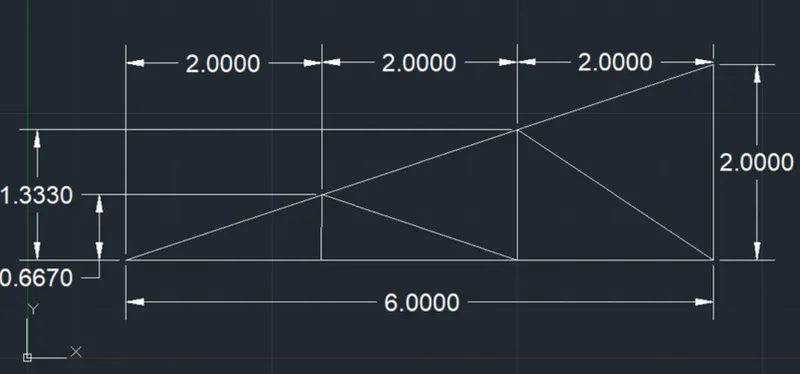
- Civil-related problems - Draw the profile and trusses using coordinate system methods. The dimensions are used for references
INTRODUCTION
- In AutoCAD, there are two coordinate system
- Cartesian
- Polar
- To these coordinate systems, Absolute and relative coordinate systems are applicable.
- Also coordinates in AutoCAD can be set, input the value of coordinates in the command line and enter coordinates using dynamic input.
- Types of the coordinate system
- Absolute coordinate system
- Relative coordinate system
- Relative rectangular coordinate system
- Relative polar coordinate system
- Direct distance entry
- COMMANDS USED
- Dimlinear command
- Line command
- Text command
- Circle command
- Ortho should be ON ( press f8 )
- O Snap should be ON( press f3 )
PROCEDURE
1 Absolute coordinate system
P1 DRAWING
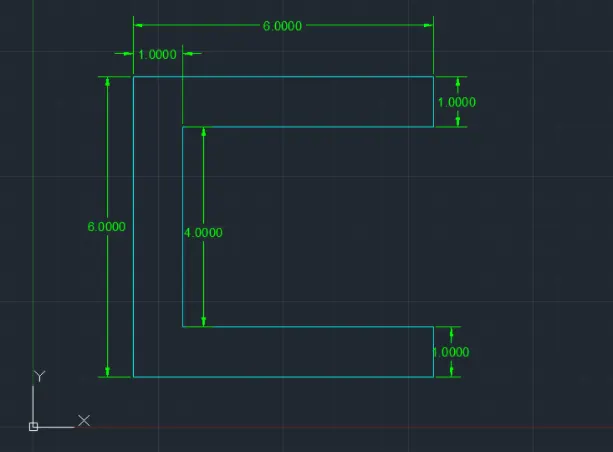
Step Procedure
- Enter Line command ( ctrl + L )
- Now type the coordinates (2,1)
- you will find the line point
- Now type the coordinates (2,6) in the Y direction
- type the coordinates (6,6) in the X direction
- type the coordinates (6,5) in the Y direction
- type the coordinates (3,5) in the X direction
- type the coordinates (3,2) in the Y direction
- type the coordinates (6,2) in the X direction
- type the coordinates (6,1) in the Y direction
- Now join the line to complete the diagram.
P2 DRAWING
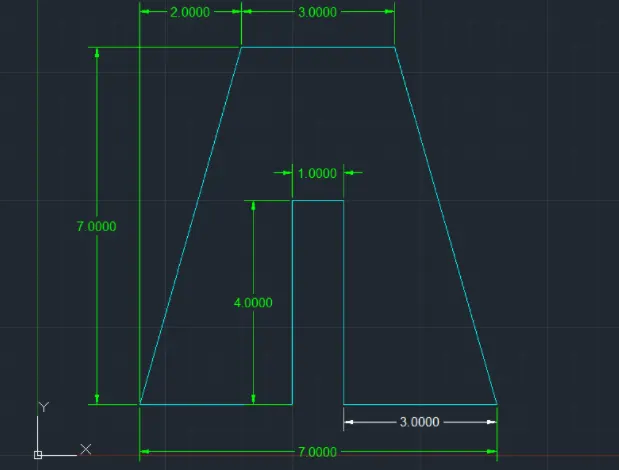
Step Procedure
- Enter Line command ( ctrl + L )
- Now type the coordinates (2,1)
- you will find the line point
- Now type the coordinates (5,1) in the X direction
- type the coordinates (5,6) in the Y direction
- type the coordinates (6,6) in the X direction
- type the coordinates (6,1) in the Y direction
- type the coordinates (9,1) in the X direction
- type the coordinates (7,8) in the Y direction
- type the coordinates (4,8) in the X direction
- type the coordinates (2,1) in the Y direction
2 Relative rectangular coordinate system
P1 DRAWING
Step Procedure
- Enter Line command ( ctrl + L )
- Now type the coordinates (2,1)
- you will find the line point
- Now type the coordinates (@6,0) in the Y direction
- type the coordinates (@0,1) in the X direction
- type the coordinates (@-5,0) in the Y direction
- type the coordinates (@0,4) in the X direction
- type the coordinates (@5,0 in the Y direction
- type the coordinates (@0,1) in the X direction
- type the coordinates (@-6,0) in the Y direction
Coordinates are (2,1) (@6,0) (@0,1) (@-5,0) (@0,4) (@5,0) (@0,1) (@-6,0)
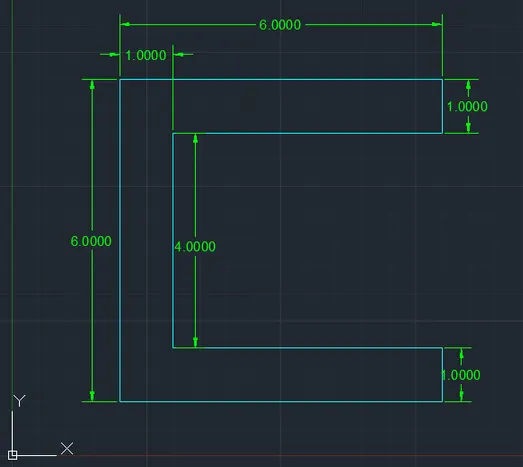
P2 DRAWING
Step Procedure
- Enter Line command ( ctrl + L )
- Now type the coordinates (2,1)
- you will find the line point
- Now type the coordinates (@3,0) in the X direction
- type the coordinates (@0,4) in the Y direction
- type the coordinates (@1,0) in the X direction
- type the coordinates (@0,-4) in the Y direction
- type the coordinates (@3,0) in the X direction
- type the coordinates (@-2,7) ) in the Y direction
- type the coordinates (@-3,0) in the X direction
- type the coordinates (@-2,-7) in the Y direction
Coordinates are (2,1) (@3,0) (@0,4) (@1,0) (@0,-4) (@3,0) (@-2,7) (@-3,0) (@-2,-7)
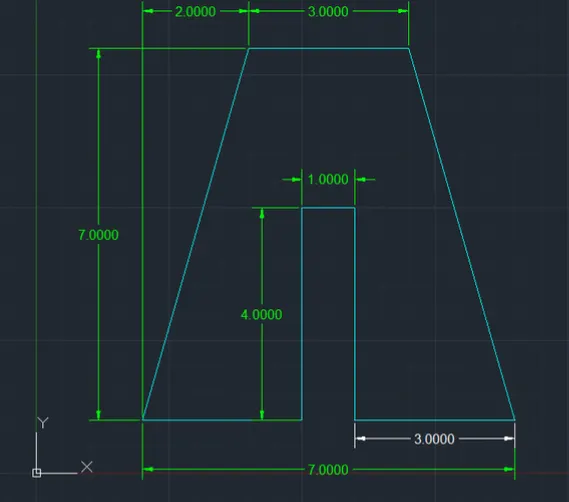
3 Relative polar coordinate system
P1 DRAWING
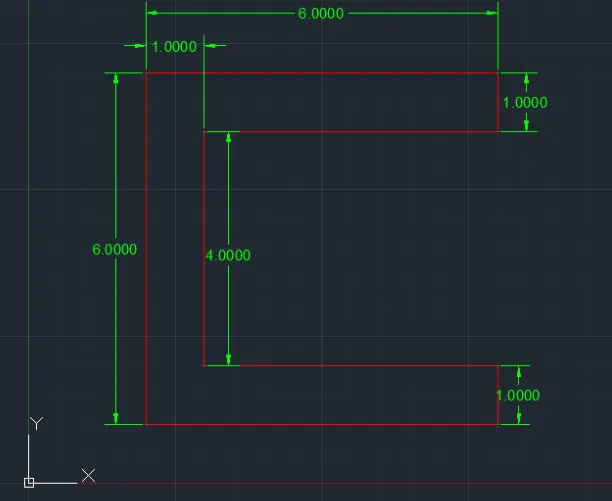
Step Procedure
- Enter Line command ( ctrl + L )
- Now type the coordinates (2,1)
- you will find the line point
- Now type the coordinates (@6<360) in the X direction
- type the coordinates (@1<90) in the Y direction
- type the coordinates (@-5<360) in the X direction
- type the coordinates (@4<90) in the Y direction
- type the coordinates (@5<360) in the X direction
- type the coordinates (@1<90) in the Y direction
- type the coordinates (@-6<360) in the X direction
- Now join the line
P2 DRAWING
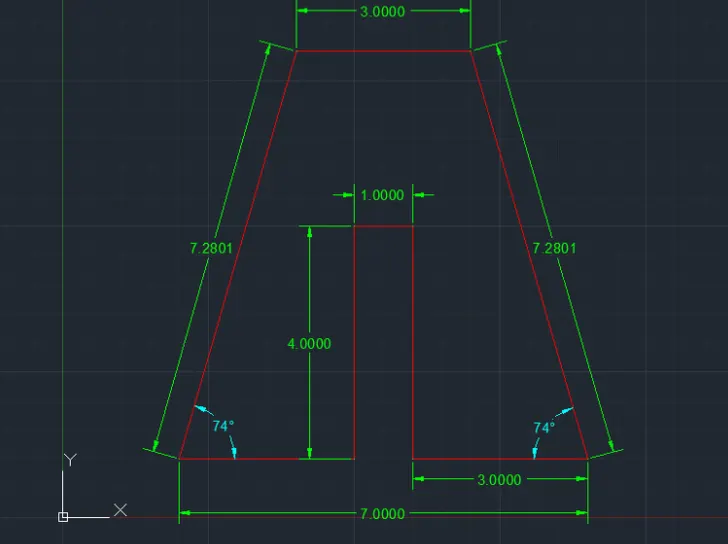
Step Procedure
- Enter Line command ( ctrl + L )
- Now type the coordinates (2,1)
- you will find the line point
- Now type the coordinates (@3<360) in the X direction
- type the coordinates (@4<90) in the Y direction
- type the coordinates (@1<360) in the X direction
- type the coordinates (@-4<90) in the Y direction
- type the coordinates (@3<360) in the X direction
- type the coordinates (@7<106) ) in the Y direction
- type the coordinates (@-3<360) in the X direction
- type the coordinates (@-7<74) in the Y direction
4 Direct distance entry
P1 DRAWING
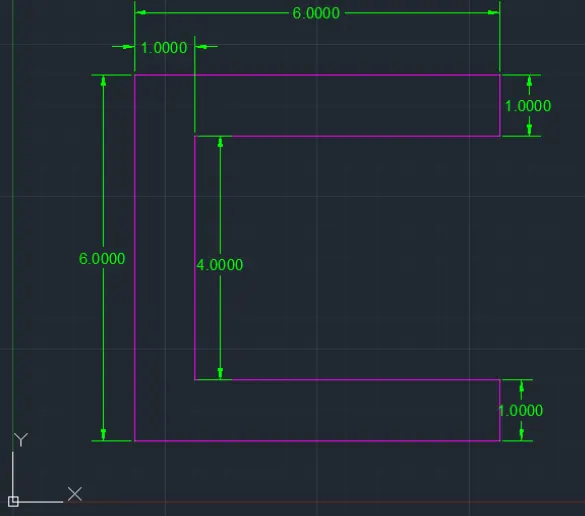
Step procedure
- Enter line command ( ctrl + L )
- Enter 6' and draw a line in the Y direction (upwards)
- Enter 6' and draw a line in the X direction (Right side)
- Enter 1' and draw a line in the Y direction (Downwards)
- Enter 5' and draw a line in the X direction (left side)
- Enter 4' and draw a line in the Y direction (Downwards)
- Enter 5' and draw a line in the X direction (Right side)
- Enter 1' and draw a line in the Y direction (Downwards)
- Now join the line
P2 DRAWING
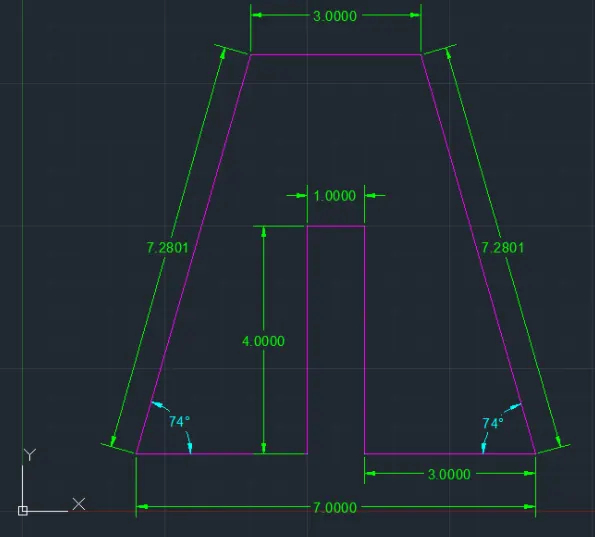
Step procedure
- Enter line command ( ctrl + L )
- Enter 3' and draw a line in the X direction (Right side)
- Enter 4' and draw a line in the Y direction (upwards)
- Enter 1' and draw a line in the X direction (left side)
- Enter 4' and draw a line in the Y direction (Downwards)
- Enter 3' and draw a line in the X direction (Right side)
- type the coordinates (@-2,7) ) in the Y direction
- Enter 3' and draw a line in the X direction (Right side)
- type the coordinates (@-2,-7) in the Y direction
P3 DRAWING
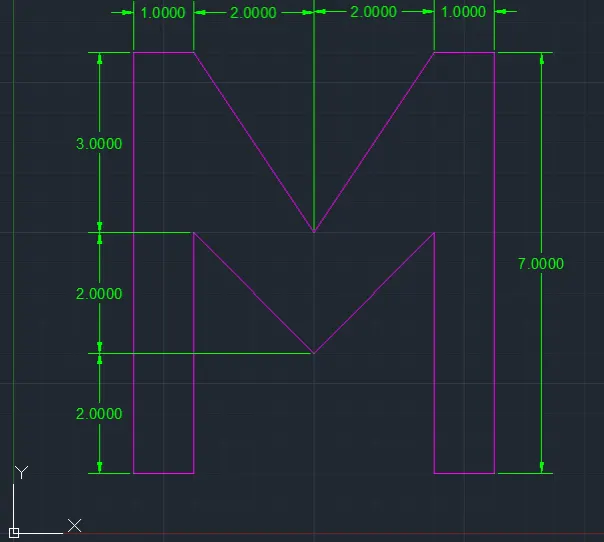
Step procedure
- Enter line command (ctrl+L)
- Enter 7' and draw a line in the Y direction
- Enter 1' and draw a line in the X direction
- Type @2'<120 and line enters
- Type @2'<60 and line enters
- Enter 1' and draw a line in the X-axis
- Enter 4' and draw a line in the Y-axis
- Type @-2'<60 and line enters
- Type @-2'<120 and line enters
- Enter 4' and draw a line in the Y-axis
- Enter 1' and draw a line in the X-axis
P4 DRAWING
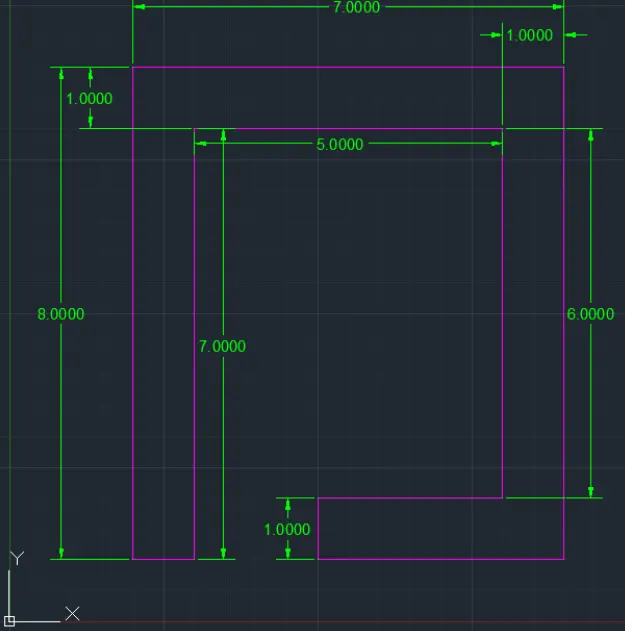
Step procedure
- Enter line command (ctrl+L)
- Draw a line 8' in the Y direction
- Draw a line 7' in the X direction
- Draw a line 8' in the Y direction
- Draw a line 4' in the X direction
- Draw a line 1' in the y-direction
- Draw a line 3' in the X direction
- Draw a line 6' in the Y direction
- Draw a line 5' in the X direction
- Draw a line 7' in the Y direction
- Draw a line 1' in the X direction
P5 DRAWING
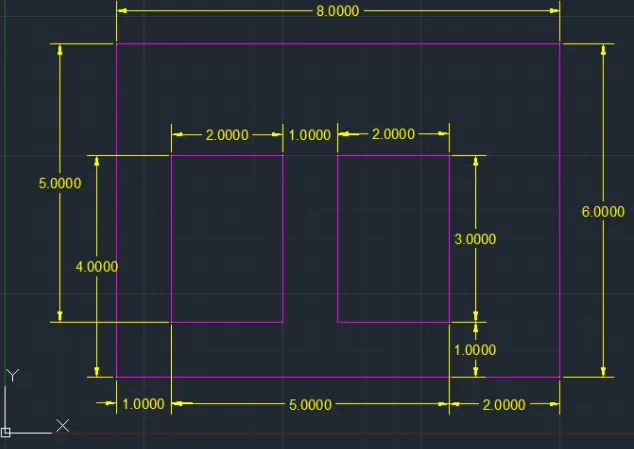
Step procedure
- Draw a rectangle of 8'*6' ( using rectangle command (rec + enter))
- using offset command draws a line inside the rectangle on 1' distance on the left side and upward direction
- now again use the offset command to draw another line of 2' from the right side and downward direction
- using offset command draws a line inside the rectangle on 2' distance on the left side
- using offset command draws a line inside the rectangle on 1' distance on the left side
- Now trim the unwanted lines
P6 DRAWING
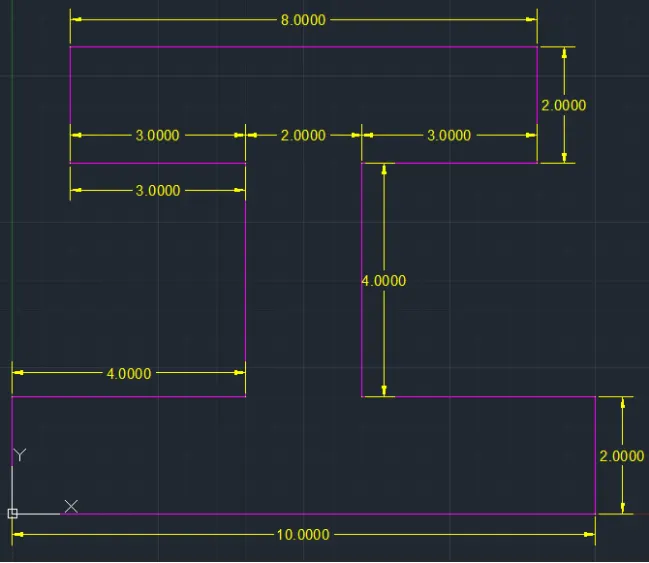
Step procedure
- Enter line command (ctrl+L)
- Draw a line 10' in the X direction (right side)
- Draw a line 2' in Y direction (upwards)
- Draw a line 4' in the X direction (left side)
- Draw a line 4' in Y direction (upwards)
- Draw a line 3' in the X direction (right side)
- Draw a line 2' in Y direction (upwards)
- Draw a line 8' in the X direction (left side)
- Draw a line 2' in Y direction (downwards)
- Draw a line 3' in the X direction (right side)
- Draw a line 4' in Y direction (downwards)
- Draw a line 4' in the X direction (left side)
- Draw a line 2' in Y direction (upwards)
P7 DRAWING
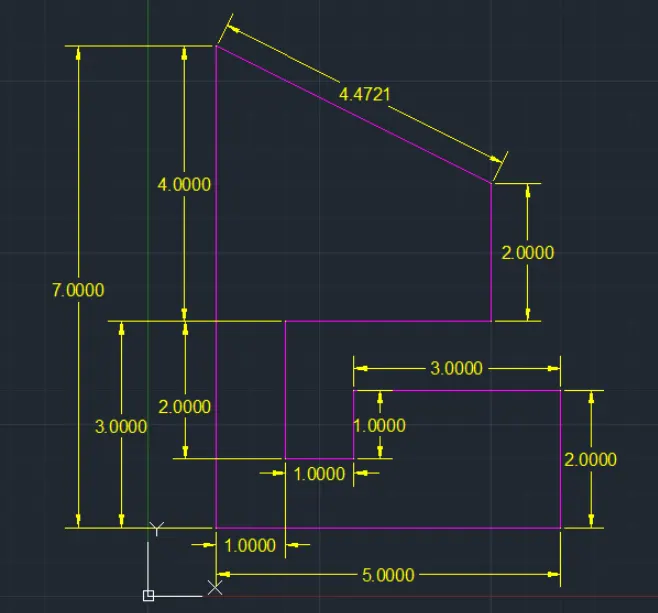
Step procedure
- Enter line command
- Draw a line of 7' in the downward direction
- Draw a line of 5' on the right side of the X direction
- Draw a line of 2' in the upward direction
- Draw a line of 3' in the left direction of the X-axis
- Draw a line of 1' in a downward direction
- Draw a line of 1' in the left side direction
- Draw a line of 2' in the upward direction
- Draw a line of 3' in the left direction of the X-axis
- Draw a line of 2' in the upward direction
- Now join the line
P8 DRAWING
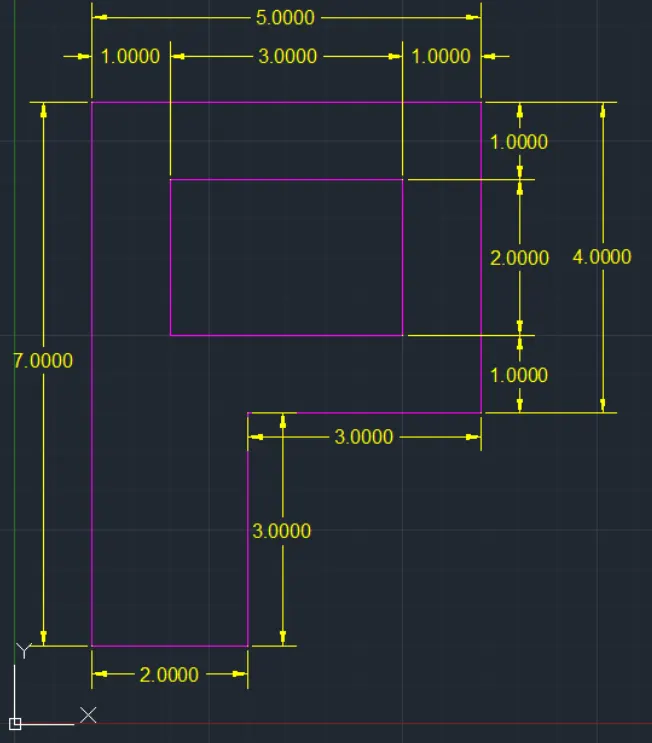
Step procedure
- Draw a rectangle of 3'*2'
- Now using the offset command draw another rectangle of 5'*4'
- Extend a line for 7' downwards from the outer side of the rectangle
- Now draw a line of 2' on the right side of the X direction
- Now join the line upwards
- Trim the unwanted lines
Civil Related Problems
Drawing the given profile and the trusses using the Absolute coordinate system method.
PROFILE WOOD
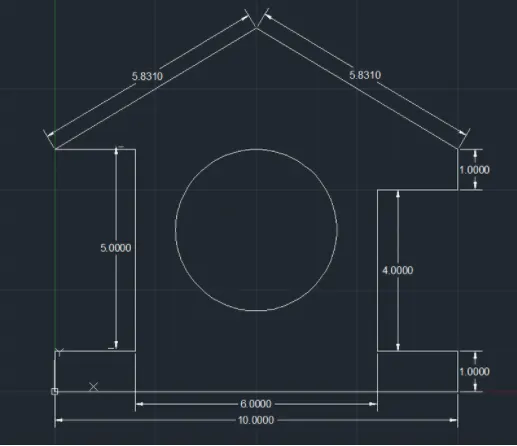
QUEEN POST TRUSS
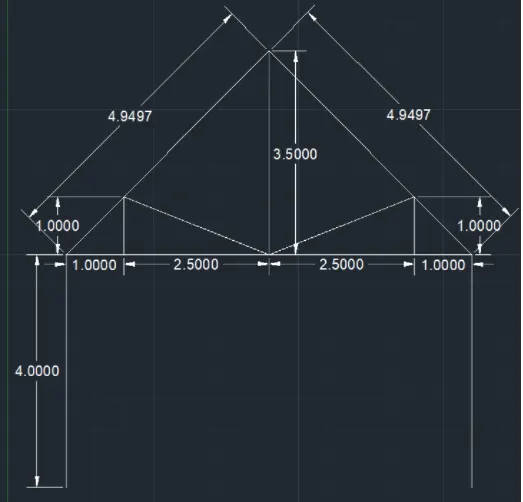
MONO PITCH
RESULT
- The geometries are mentioned in all the drawings. Missing dimensions are also written
- Using all the Coordinate systems all the drawings are drawn for P1 and P2 drawing
- The Profile and Trusses are drawn successfully using the Absolute Coordinate Method