Creating Kitchen layout, Hatching of Architectural elements and sectional view of an Industrial Building in AutoCad
PROBLEM NO 1 :
- AIM :
-
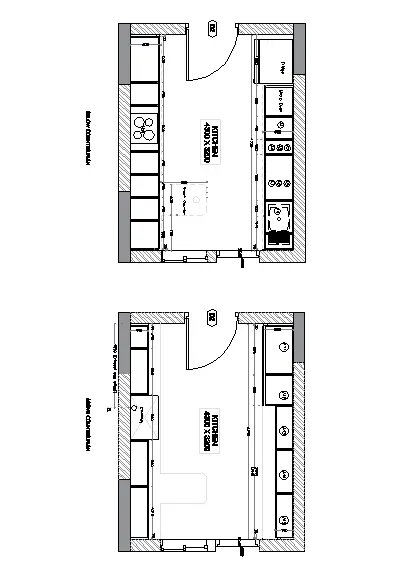
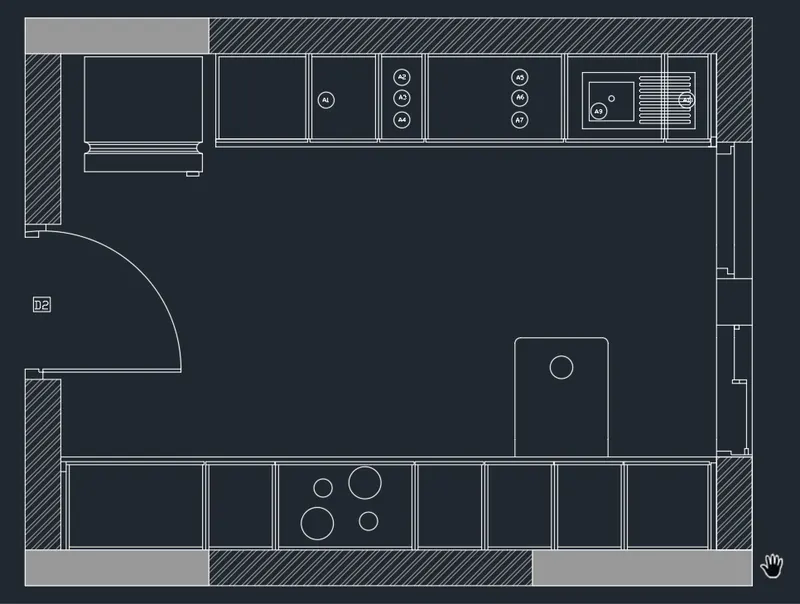
Create the layouts of the Kitchen and provide hatches pattern as shown. Also, use blocks wherever required. Provide appropriate dimensions in the plan. Assume the size of doors, appliances and others as per the standards.
- PROCEDURE :
- click on autocad application
- type the QNEW command
- select setting METRIC
- click on ADVANCED SETUP
- unit : DECIMAL precision 0
- angle : DECIMAL DEGREE
- angle measure : EAST
- then ,
- angle direction : COUNTER CLOCKWISE
- PRESS : NEXT
- set area :
- length : 100
- width : 100
- press : Finished
- command : UN (for units )
- set DECIMAL precision 00
- unit : mm
- press : enter
- command : Z (for zoom )
- type a for all
- press : ENTER
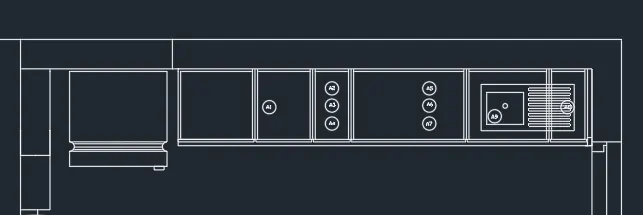
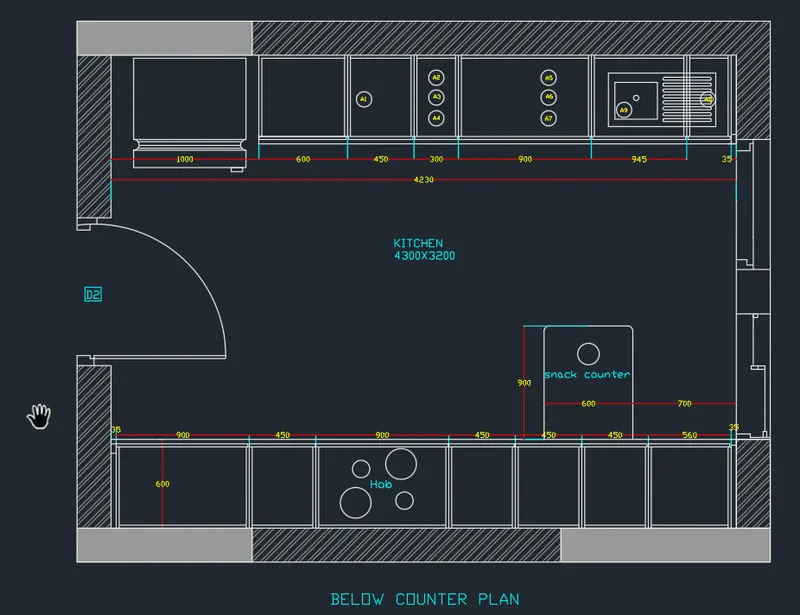
- BELOW THE COUNTER PLAN :
- command : XL
- mark the vertical and horizontal lines
- press : ENTER
- command ofset
- give the ofset distance 230
- both for vertical and horizontal
- command :o
- give the distance 35,900,450,900,450,450,450,560,35,230
- give the vertical ofset line the distance shown above
- command : ofset
- give the ofset distance 20 for each ofset lines
- command : ofset
- distance 600
- give it by refrance of horizontal lines
- command : TR (for triam )
- triam the extra lines
- press : ENTER
- command : ofset
- distance 3660 from refrance of horizontal lines
- then
- using ofset command mark internal ofset line at a distance of 230
- command : ofset
- mark vertically ofset line
- distance given below
- 50,1000,600,450,300,300,900,300,945,35,230
- press : enter
- command : ofset
- and mark vertical ofset line refrance of each vertical ofset lines at a distance of 20
- command : TR (for triam )
- triam the extra part
- press : enter
- command : c (FOR CIRCLE )
- mode 2 point circle
- draw a circle between two point
- command : REC (for rectangle )
- draw a hinged of door
- press enter
- command : L (for a line )
- draw a line
- command : TR (for triam )
- triam the extra part
- press : ENTER
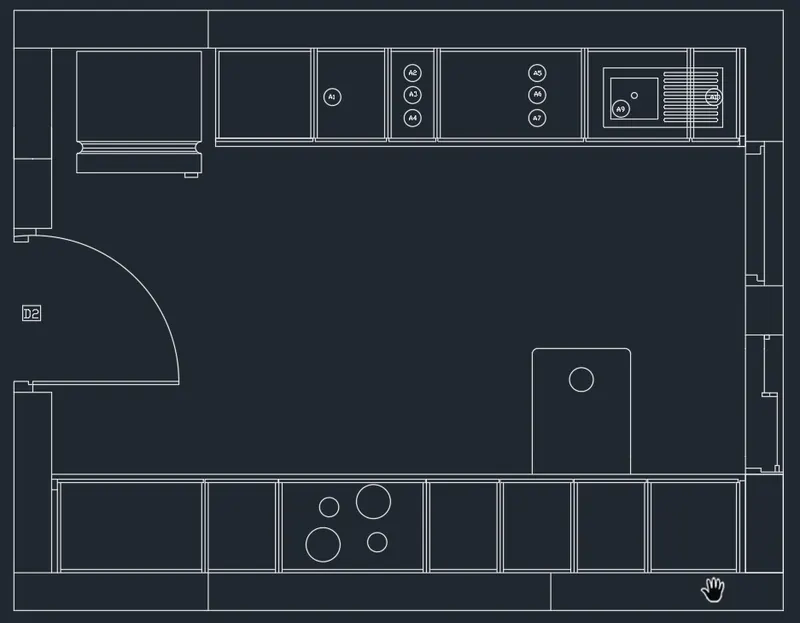
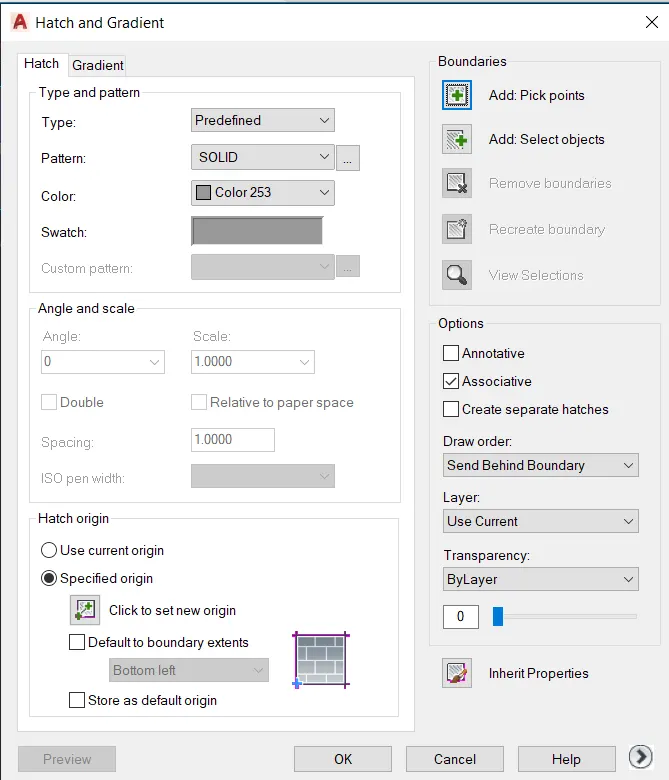
- give the hatch to the island
- press : enter
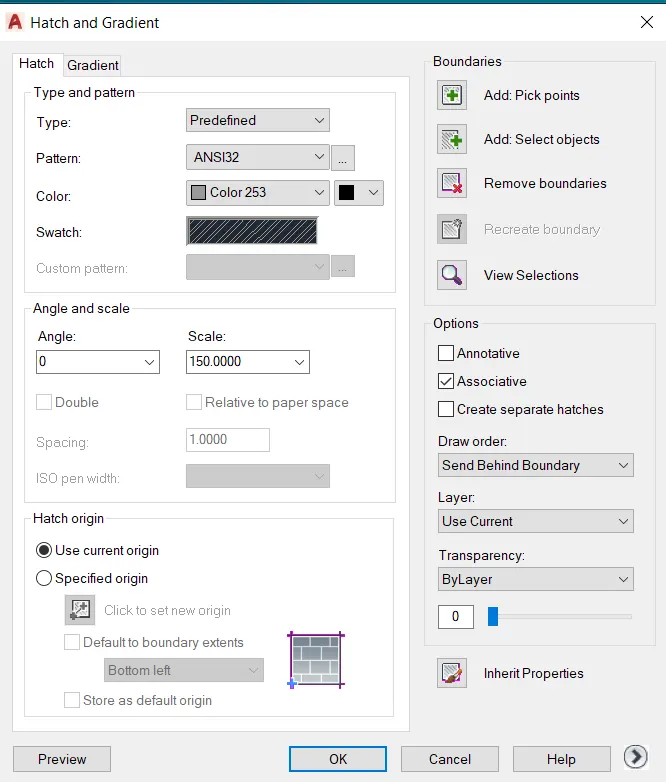
- command : H (for hatch )
- command :HATCH
- go to the hatch seeting
- click on predefined
- select the hatch patern ANSI32
- select the hatch colour is COLOUR 253
- click on PICK POINT
- command :DIMLIN (for dimension )
- give the dimension
- command : DIMCONTINUE
- and give the all dimension
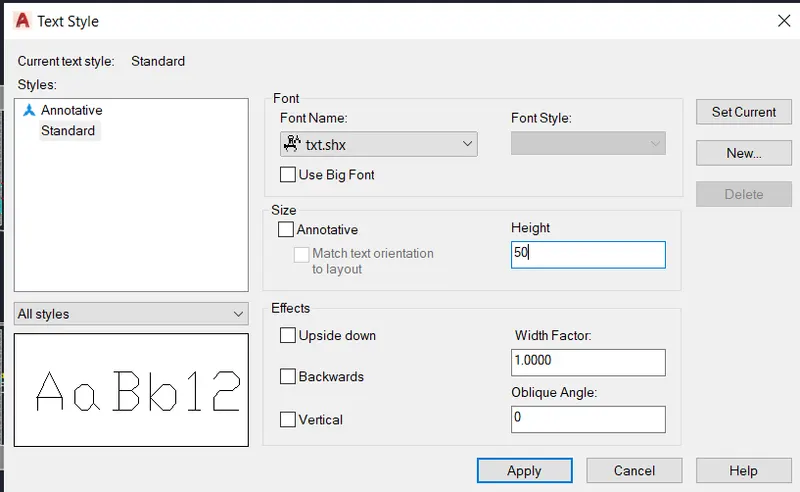
- command :TEXT STYLE
- select the font Txt.shx.
- give the height is 50
- set current
- press : ENTER
- command MTEXT (for text )
- write all the text
- press : enter
- select al, the dimesion
- give the dimension line colour is red
- and text colour is yellow
- press : enter
- again select all the text
- go to the BY LAYER
- select the layer colour is cyan
- press : enter
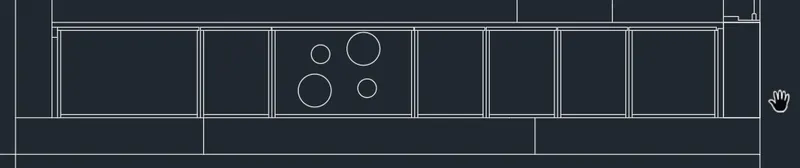
- 2. ABOVE THE COUNTER PLAN
- PROCEDURE :
- Command : XL
- mark vertical and horizontal line
- press : enter
- command ofset
- give the ofset distance 230
- again command ofset
- distance 4460 and then give the ofset distance 230
- press :enter
- command :TR (for triam )
- triam the extra lines
- command : ofset
- distance :230 mark this line by taing horizontal line as refrance
- command : ofset
- distance 3430 and then give 230 ofset line
- press : enter
- command : TR (for triam )
- triam the extra lines
- command :o (for ofset )
- distance 35,450,900, 900,900,1010,35
- mark vertical ofset line distance shown above
- command : ofset
- distanc 20 give the ofset line of each vertical ofset lines
- command : TR (for triam )
- triam the extra lines
- command : ofset
- distance 350 then 20 mark this lines by refrance of horizontal lines
- commqnd : circle
- take the center point of circle 1650 distance from left side
- as shown in fig

- command :o (FOR Ofset )
- distance 35 ,965,600,2595,35
- from upwad
- press enter
- command : O (for ofset )
- distance 20 for each ofset lines
- command :TR (for triam )
- triam the extra lines
- command : REC (for rectangle )
- draw the rectagle for hinged of door
- then ,
- command : C (for circle )
- select the 2 point circle mode
- draw the circle in between hinged of door
- command : TR (for triam )
- triam the extra lines
- in this way door is ready
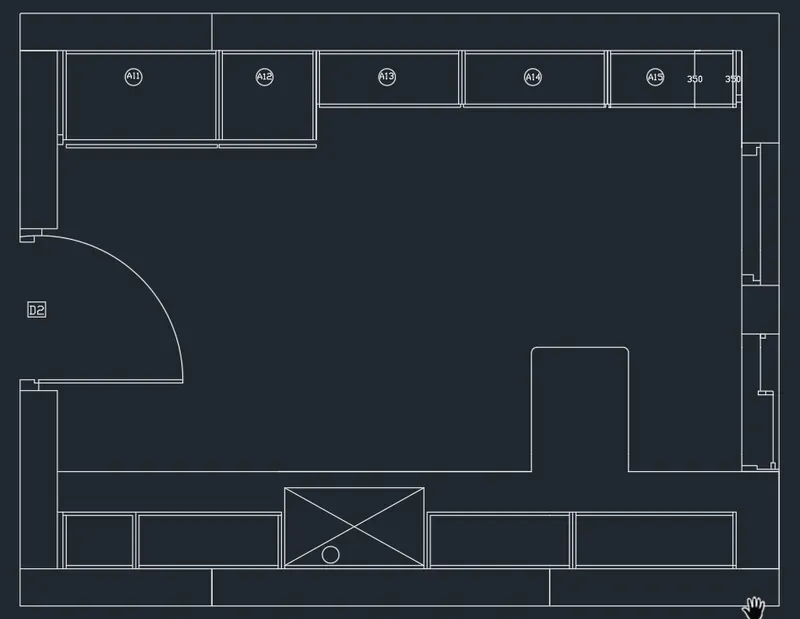
- command : H (for hatch )
- go to the hatch seating
- select the type is PREDIFINED
- select hatch patern SOLID
- select colour of hatch is COLOUR 253
- CLICK ON PICK POINT
-
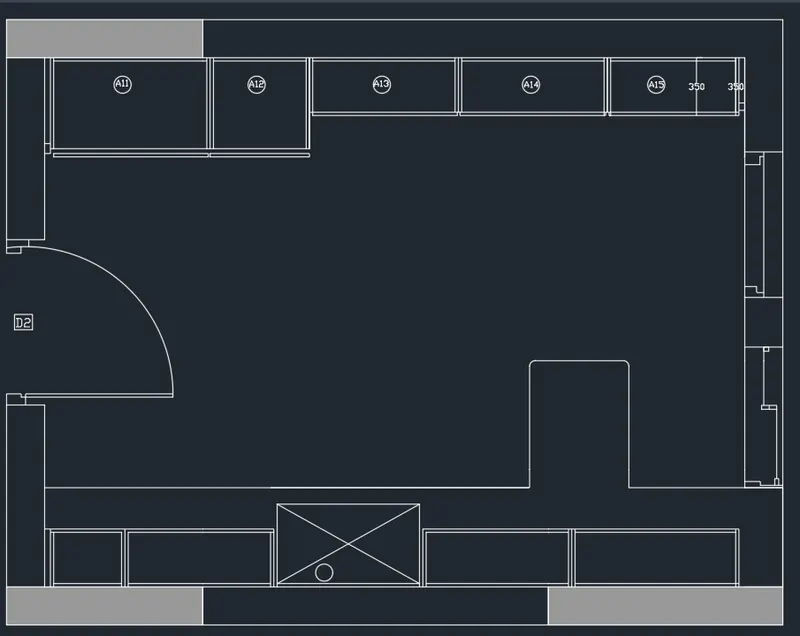
- command : H (for hatch )
- go to the hatch seating
- select the type is PREDIFINED
- select hatch patern ANSI32
- select colour of hatch is COLOUR 253
- CLICK ON PICK POINT
-
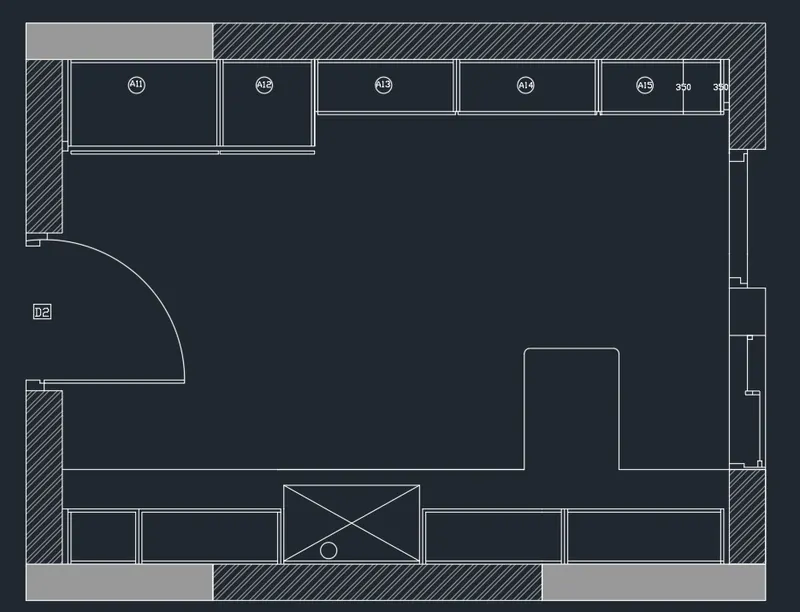
- Command :DIMLEN (for dimension )
- give the dimension
- command :DIMCONTINUE
- give the all dimension
- command : MTEXT for text
- write all the text over plan
- select all the dimension line
- go to the properties
- give the dimension line coloue as a red
- give the text colour yellow
- press : enter
- then,
- select all the text
- go to the ny layer
- select the colour of text as a cyan
- press : enter
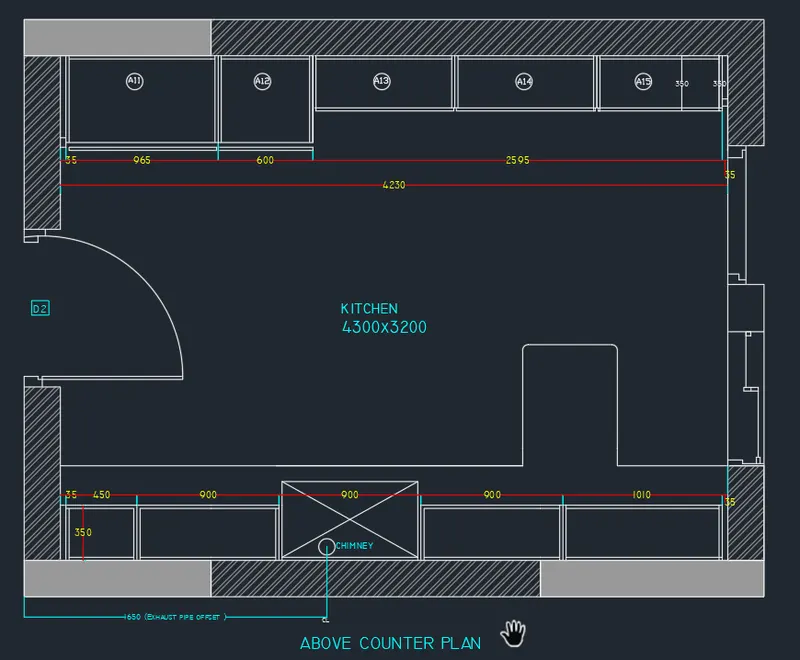
- RESULTS :
- COMMAND USED :
- START :QNEW
- UNITS : UN
- LIMET :LIMMAX
- ZOOM : Z
- COMMAND :XL
- OFSET : O
- TRIAM : TR
- HATCH :H
- TEXT :MTEXT
- DIMENSION : DIMLIN
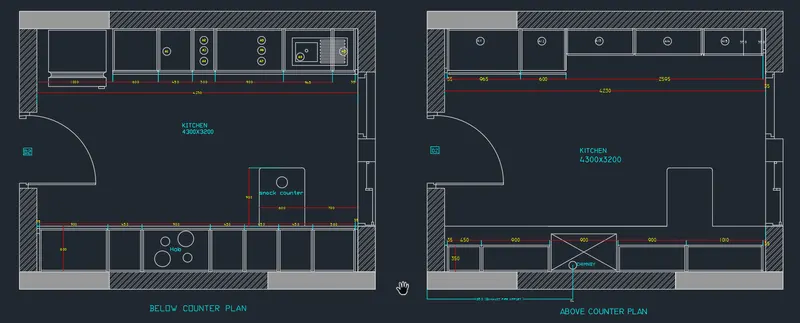
- PROBLEM NO 2:
- AIM
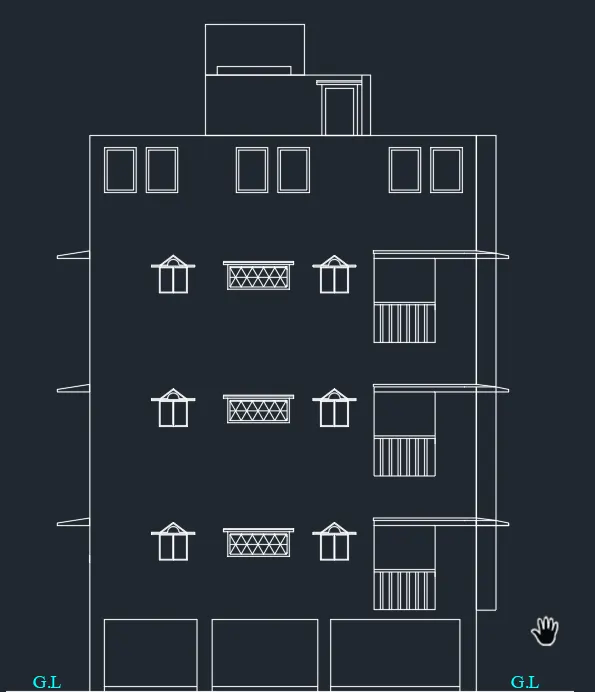
- Create the elevation of the plan created in the Challenges 7 and apply proper hatch in the walls, doors, windows, and other architectural elements. Refer to the dimensions in Plans and sections in Challenges 7.
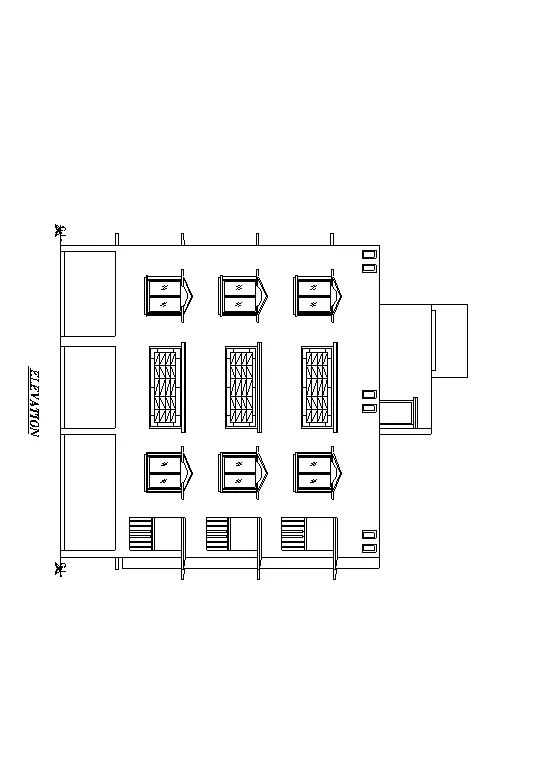
- PROCEDURE :
- click on autocad application
- stat the application
- type the QNEW command
- select the METRIC
- then click on wizard and ADVANCED SETTING
- Set unit : decimal presicion 0
- angle : decimal presicion 0
- then, angle measure : EAST and press NEXT
- angle direction : counterclockwise
- press : nest
- set area :
- length : 100
- width :100
- press : ENTER
- Command :UN (for units )
- set units decimal
- and mm
- press : ENTER
- COMMAND : Z (for oom )
- type A (for all )
- press : ENTER
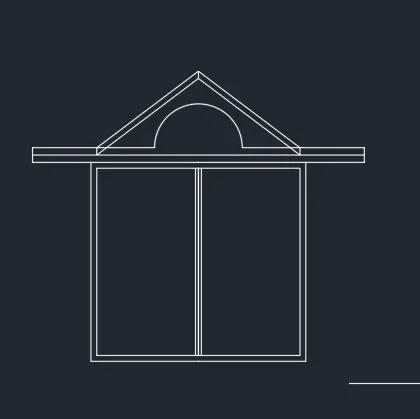
- command : REC (For rectangle )
- select start point
- click on DIMENSION
- length : 5
- width 10
- press : enter
- commnad :MI (for mirroe )
- select the object
- press :enter
- select the base poit
- and mirror it
- commnad : ofset
- give the ofset distence
- and give the ofset to the rectangle
- command : L (for line
- and draw the reamening part
- command : circle
- select two point mode
- draw the circle in between two point
- command : TR (for triam )
- triam the extra part
- Press : enter
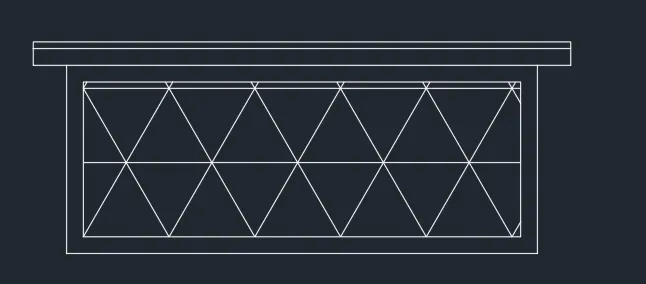
- command :REC (for rectangle )
- select the start point
- click on DIMENSION
- length :24
- width : 10
- press :ENETR
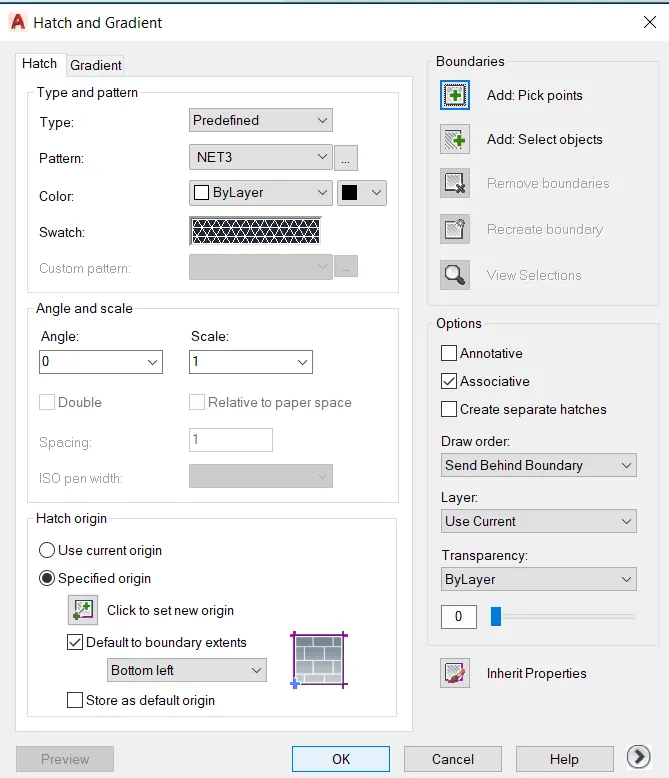
- commad : H (for hatch )
- select the predefined type
- select the hatch patern as shown below
- select the pick point
- also select the base point
- give the hatch
- press :ENTER
- Commad :M (for move )
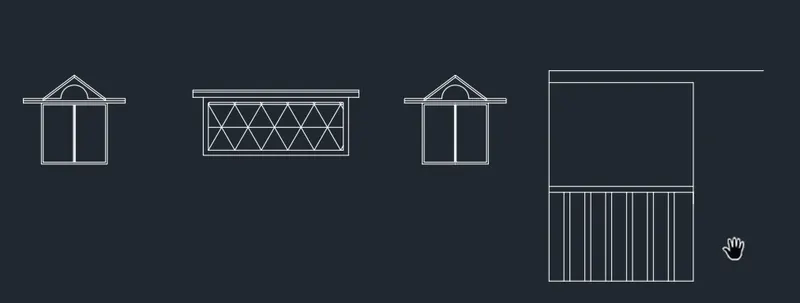
- move it and placed in proper way
- command :copy
- select the first object and copy and placed in where it requried
- command REC and commnd :L
- draw the porch
- press :ENTER
- Command :AR (for array )
- select the all object
- select the RECTANGLE mode
- and array it
- press :ENTER
- command : REC (for rectangle )
- and draw the rectangle
- command :x (explode )
- select object
- press :ENTER
- command :O (for ofset )
- give the ofset distance
- click on bottom horizontal line of large rectangle
- and give ofset
- command : L (for line )
- by using line command draw the reamenning part
- command :TR (for triam )
- triam the extra line
- press : enter
- now elevation is ready shown below
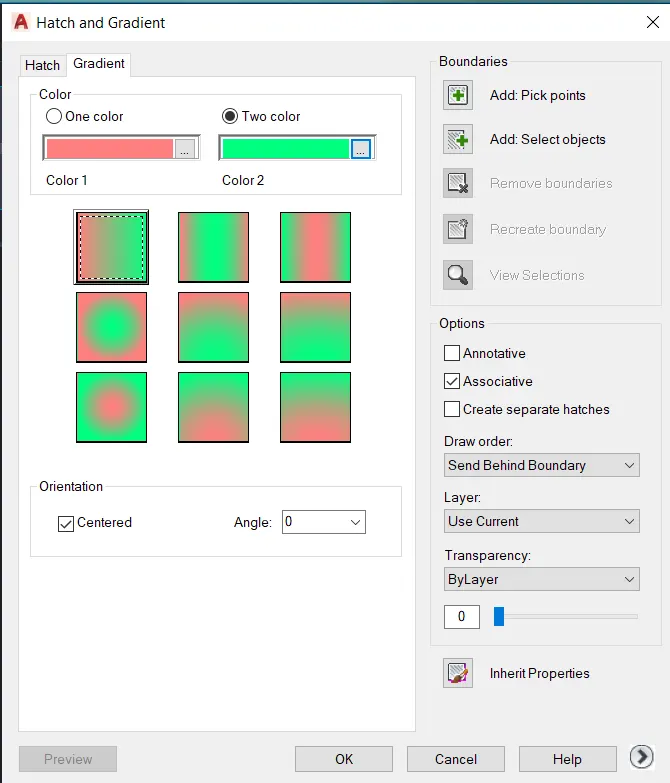
- command :H (for hatch )
- click on SEETING in command section
- click on GRIDENT
- SELECT the patern
- as shown below
- select the PICK UP POINT
- also select the base point
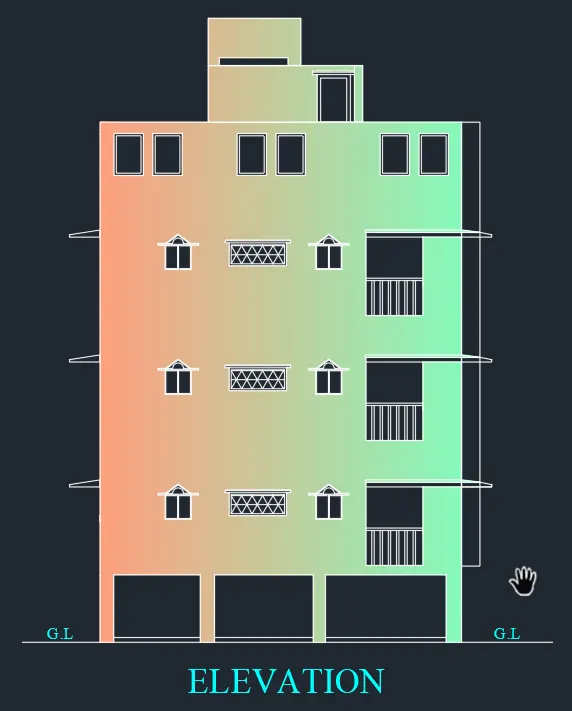
- hatch the object
- press : ENTER
- COMMAND MTEXT (FOR TEXT )
- selct the first point
- and write all text
- press enter
- RESULTS :
- COMMAND USED :
- START : QNEW
- UNITS : UN
- LIMETS : LIMMAX
- ZOOM : Z
- RECTANGLE : REC
- LINE :L
- TRIAM :TR
- OFSET : O
- HATCH : H
- TEXT : MTEXT
- PROBLEM NO : 3
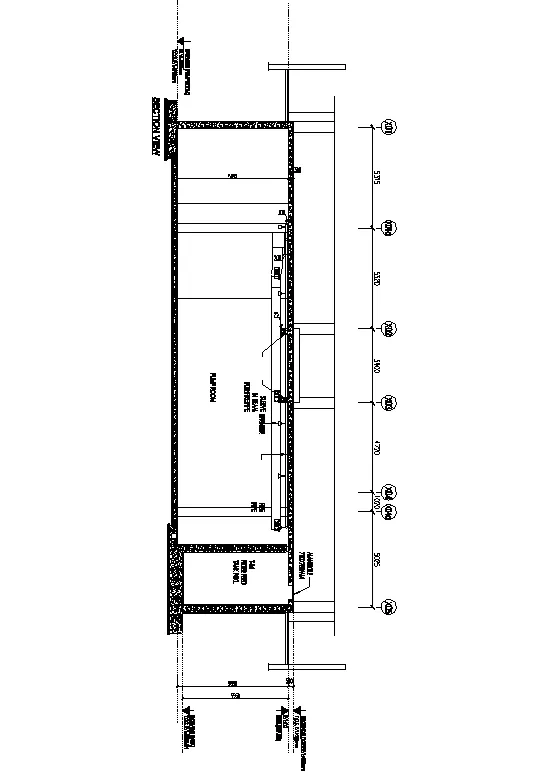
- AIM :
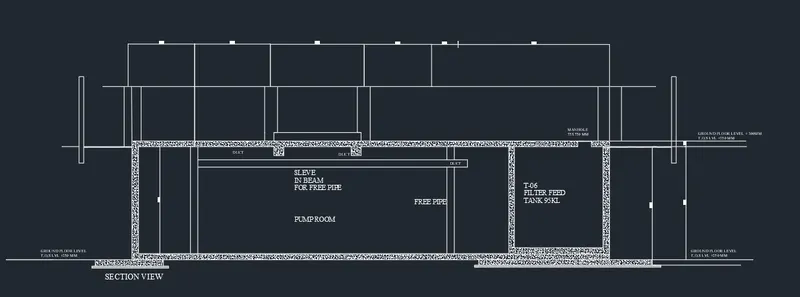
- create the section iew of an industrial building as shown in figure. provide appropriate and dimensions wherever requried . also, provide annotations to the drawing
- PROCEDURE :
- click on autocad application
- type QNEW in command section
- click on advance setup
- unit decimal precision 0
- angle decimal precision 0
- angle measure : EAST
- set angle direction counter clockwise
- press :NEXT
- Set the area
- length :100
- width :100
- press : OK
- command : UN (for units )
- give the units is decimal
- and mm
- press :ENTER
- command :Z (FOR zoom )
- type A in command section
- press :ENTER
- command : REC (for rectangle )
- select the start point
- click on DIMENSION
- length : 25300
- width : 5850
- press : enter
- command : O (for ofset )
- give the ofset distance 300
- press : enter
- command : X (for explode )
- select the object
- press : enter
- command :L (for line )
- by using line command draw the reamenning part
- press : enter
- command : MTEXT (for text )
- write the text over section plan
- press : enter
- then go to the ANOTATION tab
- click on multileader
- click on CONTENT
- selct the MTEXT option
- select 2 point for leader
- as shown in fig
- press : enter
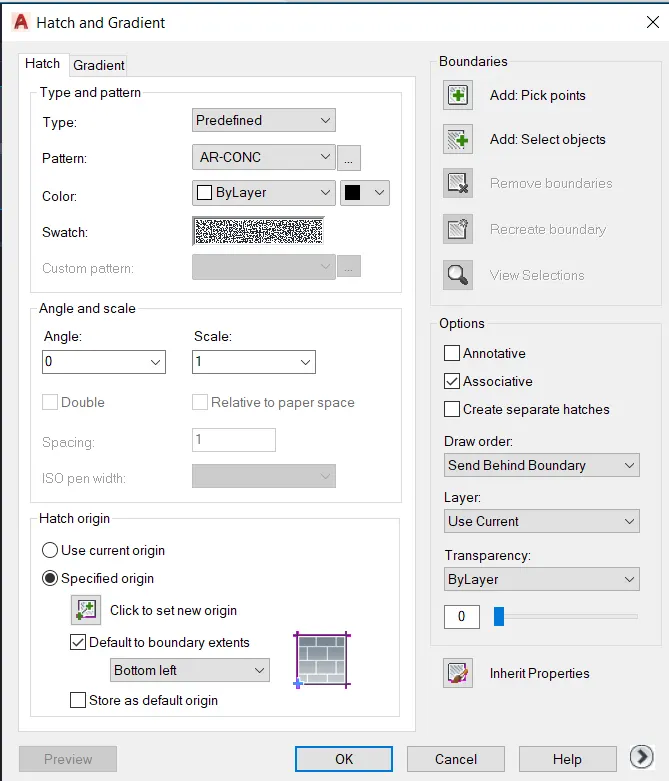
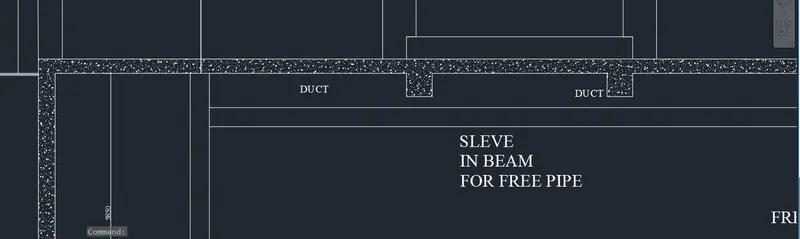
- command : H (for hatch )
- click on SEATING in commad section
- select the patern as shown in below
- select the pick point
- press : enter
- go to the object
- and give the hatch
- after theat press :enter
- COMMAND :DIMLIN (for dimension )
- give the dimension
- command : DIMCONTINUE
- And give the all dimension
- press :enter
- RESULTS :
- COMMAND USED :
- START :QNEW
- UNITS : UN
- LIMETS LMMAX
- ZOOM : Z
- RECTANGLE : REC
- LINE : L
- OFSET : O
- HATCH : H
- QLADER
- TEXT :MTEXT
- DIMENSION : DIMLIN ,DIMCONTINUE