Challenge

Creating Architectural and Structural model with 3D rendering using REVIT

  • Open a new file using the Structural Template.
  • After opening the Structural Template, navigate to the Architecture tab.
  • When creating a Residential Building (Group A), it's important to set up Grids and Levels.
  • In this project, there will be three levels in addition to the Foundation Level.
  • The levels include: Ground Floor Level, First Floor Level, Second Floor Level, and Foundation Level.
  • Each level will have a height of 3.2 meters.
  • The process for creating the Residential Building is as follows:
    1. Go to the Architecture tab.
    2. Select the Grid tool and create both vertical and horizontal grids as specified below.
    3. Type "UN" and set the units to your preferred measurement (the example uses meters).
    4. Set an offset of 3 meters for the grids.
    5. The grids will be placed with an offset of 3 meters.
    6. Go to the Foundation level in the Structure tab.
  • After creating the grids, proceed to create the footings.
  • Navigate to the Structure tab and select the Footings option.
  • Choose the footings and select all the grid lines; the footings will be automatically placed.
  • Next, create the columns.
  • Go to the Architecture tab, then to the Column tool.
  • Select the columns and choose the grid lines, then click the green checkmark in the ribbon.
  • The columns will be automatically placed.
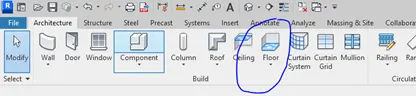
  • Next, create the floors.
  • Go to the Architecture tab, then to the Floor tool.
  • Click on the Floor option and select Architecture Floor.
  • Use the Line tool to select and create floors for each level.
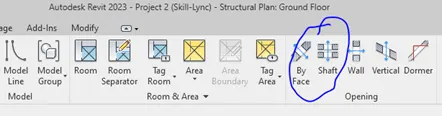
  • Next, create the shaft for the building.
  • Go to the Architecture tab and select the Shaft tool.
  • After selecting the shaft, go to the top floor and use the Line tool to create the shaft where the staircase or lift will be placed.
  • After creating the shaft, proceed to create the staircase.
  • Go to the Floor Plan and build the walls for rooms like the Living Room, Master Room, Toilet, etc.
  • While creating the walls, ensure you select the appropriate height for each floor.
  • Navigate to the Components section and add the WC, bathtubs, and other items for the toilets.
  • After building the walls, go to the Components section and add doors and windows for the bedrooms and living room for proper ventilation.
  • The project includes balconies, for which handrails need to be created.
  • A balcony is created for each floor. To create one, go to the Floor option, select the level, and use the Line tool to create the floor.
  • For creating railings on the extended balcony floors, go to the Railing tab, select it, and then add the railing to the extended floor.
  • Go to the View tab, and select the Sheets option.
  • Choose the A1 sheet size.
  • Go to the Elevation view, select the views for each direction, and drag them to the sheet.
  • Rename each sheet accordingly.
  • For the Architectural Plan, go to the View tab and select Sheets.
  • Choose the A1 sheet.
  • Select the floor plans for each level and drag them onto the sheet.
  • Rename each sheet accordingly.
  • For Section Views, go to the View tab and select Sheets.
  • Choose the A1 sheet.
  • Select the section views for each floor and drag them to the sheet.
  • Rename each sheet accordingly.
  • For the Rendered View, go to the View tab and select the Rendered option.
  • After selecting the Rendered tab, adjust the exposure and brightness settings for both interior and exterior views (e.g., sunlight, evening light).
  • Click Render to generate the rendered view.
  • The rendered view will be ready.
  • To save the rendered view as a PDF, press Ctrl + P.
  • In the window that appears, select "Microsoft Print to PDF" and click OK.
  • If needed, preview the document before printing.
  • Print the rendered view.
  • Your portfolio, next

    Ship work like this
    in your own course.

    Talk to a career counsellor

    Free 20-minute call. We'll map the right course to where you want to work.

    By submitting you agree to our Terms and Privacy Policy.