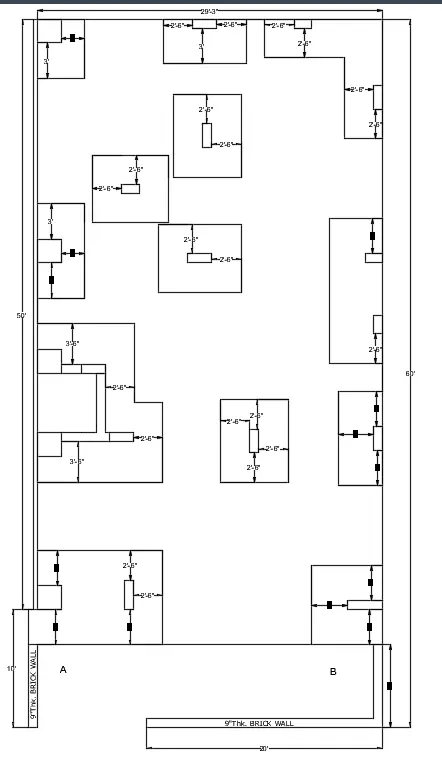
Creating a Wardrobe detailed drawing, Floor Plan, Kitchen Layout and Column Detail using AutoCad
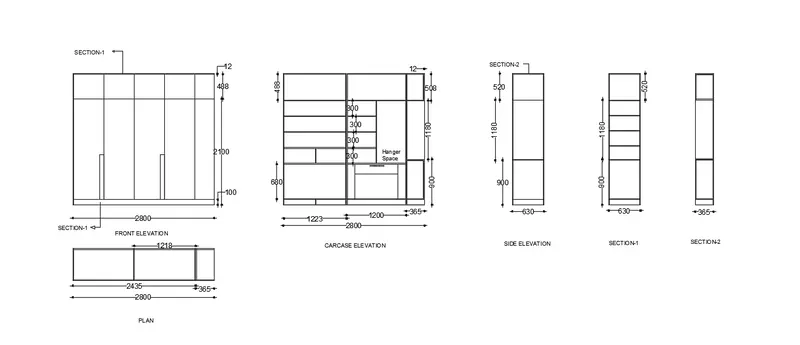
1. Aim: Draw the elevation and details of a wardrobe as shown in the Figure below
Introduction: Draw the elevation and details of a wardrobe as shown in the Figure below. After sketching, providing it the dimensions and text.
All dimensions are in mm.
- FRONT ELEVATION
Command: l
LINE
Specify first point:
Specify next point or [Undo]: 2800
Specify next point or [Undo]: 2600
Specify next point or [Close/Undo]: 2800
Specify next point or [Close/Undo]: 2600
Command: o
OFFSET
Specify offset distance or [Through/Erase/Layer] : 100
Command:
OFFSET
Specify offset distance or [Through/Erase/Layer] <100>: 2100
Command:
OFFSET
Specify offset distance or [Through/Erase/Layer] <2100>: 12
Command:
OFFSET
Specify offset distance or [Through/Erase/Layer] <12>: 488
Command:
OFFSET
Specify offset distance or [Through/Erase/Layer] <500>: 600
Command: _line
Specify first point:
Specify next point or [Undo]: 1000
Specify next point or [Undo]: 75
Command:
LINE
Specify first point:
Specify next point or [Undo]: 1000
Specify next point or [Undo]: 75
Command: tr
TRIM
Trim the unwanted lines
Command DT
DTEXT
Write the given text same as in the given Figure
Command DIM
Write all the specify dimensions
- CARCASE ELEVATION
Command: _line
Specify first point:
Specify next point or [Undo]: 2800
Specify next point or [Undo]: 2600
Specify next point or [Undo]: 2800
Specify next point or [Close/Undo]: 2600
Specify next point or [Close/Undo]: C
Command: o
OFFSET
Specify offset distance or [Through/Erase/Layer] <600>: 100
Command:
OFFSET
Specify offset distance or [Through/Erase/Layer] <100>: 12
OFFSET
Specify offset distance or [Through/Erase/Layer] <12>: 1223
Command:
OFFSET
Specify offset distance or [Through/Erase/Layer] <1223>: 1200
Command:
OFFSET
Specify offset distance or [Through/Erase/Layer] <1200>: 365
OFFSET
Specify offset distance or [Through/Erase/Layer] <14>:
Draws 7 lines vertically
Command: o
OFFSET
Specify offset distance or [Through/Erase/Layer] <50>: 508
Command:
OFFSET
Specify offset distance or [Through/Erase/Layer] <508>: 1260
Command: o
OFFSET
Specify offset distance or [Through/Erase/Layer] <14>: 300
Command: o
OFFSET
Specify offset distance or [Through/Erase/Layer] <14>: 600
On both left and right side
Command: o
OFFSET
Specify offset distance or [Through/Erase/Layer] <600>: 14
Command DT
DTEXT
Write the given text same as in the given Figure
Command DIM
Write all the specify dimensions
- SIDE ELEVATION
Command: _line
Specify first point:
Specify next point or [Undo]: 630
Specify next point or [Close/Undo]: 2600
Specify next point or [Close/Undo]: 630
Specify next point or [Close/Undo]: 2600
Specify next point or [Close/Undo]: Close
Command: o
OFFSET
Specify offset distance or [Through/Erase/Layer] <500>: 900
Command:
OFFSET
Specify offset distance or [Through/Erase/Layer] <900>: 1180
Command:
OFFSET
Specify offset distance or [Through/Erase/Layer] <1180>: 100
Command:
OFFSET
Specify offset distance or [Through/Erase/Layer] <100>: 15
Making baundry all sides
Command:
OFFSET
Specify offset distance or [Through/Erase/Layer] <15>: 20
Command: tr
TRIM
Trim the unwanted lines
Command DT
DTEXT
Write the given text same as in the given Figure
Command DIM
Write all the specify dimensions
- SECTION-1
Command: _line
Specify first point:
Specify next point or [Undo]: 630
Specify next point or [Close/Undo]: 2600
Specify next point or [Close/Undo]: 630
Specify next point or [Close/Undo]: 2600
Specify next point or [Close/Undo]: Close
Command: o
OFFSET
Specify offset distance or [Through/Erase/Layer] <20>: 100
Command:
OFFSET
Specify offset distance or [Through/Erase/Layer] <900>: 900
Command: o
OFFSET
Specify offset distance or [Through/Erase/Layer] <900>: 280
Command:
OFFSET
Specify offset distance or [Through/Erase/Layer] <280>: 300
Command:
OFFSET
Specify offset distance or [Through/Erase/Layer] <300>: 14
Command DT
DTEXT
Write the given text same as in the given Figure
Command DIM
Write all the specify dimensions
- SECTION- 2
Command: l
LINE
Specify first point:
Specify next point or [Undo]:
Specify next point or [Undo]: 365
Specify next point or [Close/Undo]: 2600
Specify next point or [Close/Undo]: 3652
Specify next point or [Close/Undo]: U
Specify next point or [Close/Undo]: 365
Specify next point or [Close/Undo]: 2600
Specify next point or [Close/Undo]: Close
Command: o
OFFSET
Specify offset distance or [Through/Erase/Layer] <14>: 100
Command:
OFFSET
Specify offset distance or [Through/Erase/Layer] <100>: 900
Command:
OFFSET
Specify offset distance or [Through/Erase/Layer] <900>: 1180
Command:
OFFSET
Specify offset distance or [Through/Erase/Layer] <1218>: 14
Command DT
DTEXT
Write the given text same as in the given Figure
Command DIM
Write all the specify dimensions
- PLAN
Command: l
LINE
Specify first point:
Specify next point or [Undo]: 630
Specify next point or [Close/Undo]: 2800
Specify next point or [Close/Undo]: 630
Specify next point or [Close/Undo]: 2800
Command: o
OFFSET
Specify offset distance or [Through/Erase/Layer] <5>: 365
Command:
OFFSET
Specify offset distance or [Through/Erase/Layer] <365>: 1218
Command:
OFFSET
Specify offset distance or [Through/Erase/Layer] <1218>: 14
Command DT
DTEXT
Write the given text same as in the given Figure
Command DIM
Write all the specify dimensions
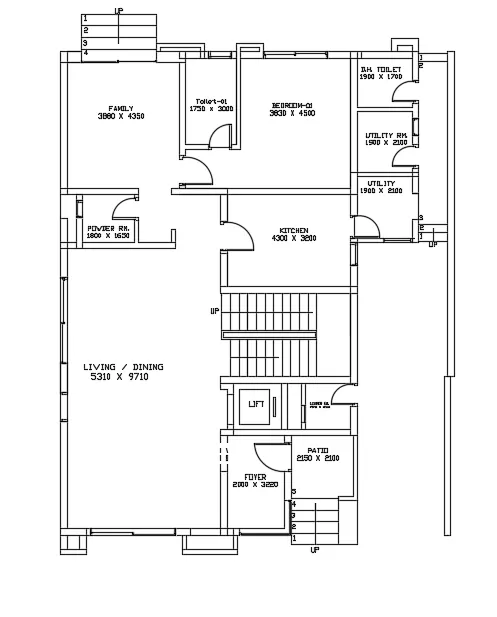
2. Aim: To Draw the floor plan as shown in the Figure.
Introduction:To draw the floor plan as shown in the Figure by using the proper drafting tools to sketch the plan.
Do not hatch or draw the furniture.
You need to draw the floor plan with the following:
All dimensions are in mm.
Given Dimensions
- Walls (Exterior and Interior)
Wall Thickness: Exterior Wall- 230mm, Interior Wall: 150 mm (Wherever Required)
- Doors and Windows: Assume the size of the doors and window.
2.1 Stairs: Tread-300mm, Riser-150mm
- Insert Text wherever required
- Insert the dimensions using proper dimension techniques
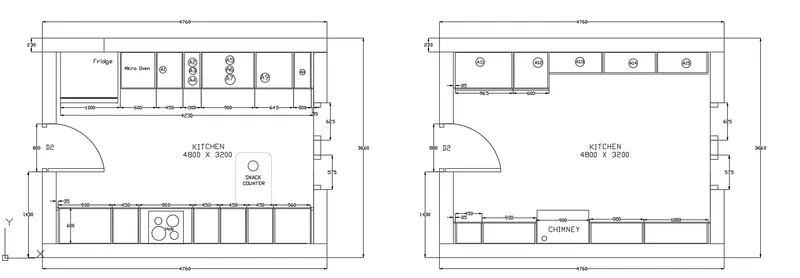
3.Aim: To Create the Kitchen Layout as shown in the Figure
Introduction: To create the Kitchen Layout as shown in the Figure and using proper dimension techniques to dimension the kitchen layout and inserting text wherever required. All dimensions are in mm.
To draw follow the steps below:
Ortho on (F8)
Draw a line of 4760
Draw an offset from the line ata offset distance of 3660
Close the line from both sides
Command OFFSET
Draw an offset from all the corner line at a offset distance of 230 to create a wall around
Command OFFSET
Draw an opening at centre of the left side of 800 to create a door
Command OFFSET
Drawing two openings for window at right side of 575
Command COPY
Copy whole figure using ortho mode at just side of the 1st kitchen plan to make same kitchen plan of same dimensions but in this the inner furniture is different
In 1st kitchen plan:
Draw an offset at a distance of 600
Command:
OFFSET
Specify offset distance or [Through/Erase/Layer] :900
Command:
OFFSET
Specify offset distance or [Through/Erase/Layer] : 450
Command:
OFFSET
Specify offset distance or [Through/Erase/Layer] :900
Command:
OFFSET
Specify offset distance or [Through/Erase/Layer] :450 (3 times)
Command:
OFFSET
Specify offset distance or [Through/Erase/Layer] :560
Command:
TRIM
Trim the unwanted lines
On the opposite side of plan
Command:
OFFSET
Specify offset distance or [Through/Erase/Layer] :850(To make fridge)
Command:
OFFSET
Specify offset distance or [Through/Erase/Layer] :600
Command:
OFFSET
Specify offset distance or [Through/Erase/Layer] :1000
Command:
OFFSET
Specify offset distance or [Through/Erase/Layer] :600
Command:
OFFSET
Specify offset distance or [Through/Erase/Layer] :450
Command:
OFFSET
Specify offset distance or [Through/Erase/Layer] :300
Command:
OFFSET
Specify offset distance or [Through/Erase/Layer] :645
Command:
OFFSET
Specify offset distance or [Through/Erase/Layer] :300
On both sides make an offset of 35 to provide the thickness of the cupboard
Command:
OFFSET
Specify offset distance or [Through/Erase/Layer] :35
Command:
TRIM
Trim the unwanted lines
Command DT
DTEXT
Write the suitable text as given in the figure
2nd kitchen plan
We have copied a same wall layout of kitchen just we have to create furnitures in it.
4. Aim: To sketch the column details as shown in Figure
Introduction: To sketch the column details as shown in Figure and inserting the dimensions and text in the figure
To sketch the column schedule follw these steps
Command: l
LINE
Specify first point:
Specify next point or [Undo]: 10
Specify next point or [Undo]: 7
Specify next point or [Close/Undo]: 10
Specify next point or [Close/Undo]: 7
Specify next point or [Close/Undo]: C
Command: l
LINE
Specify first point:
Specify next point or [Undo]: 6
Specify next point or [Undo]: 5.5
Specify next point or [Close/Undo]: 4
Command:
OFFSET
Specify offset distance or [Through/Erase/Layer] <1.5>: 1.5
Command:
OFFSET
Specify offset distance or [Through/Erase/Layer] <1.5>: 2
Command: l
LINE
Specify first point:
Specify next point or [Undo]: 6
Draw a rectangle of 3X3 units
Draw an offset at a distance of 0.10 inner side of rectangle
Command:
OFFSET
Specify offset distance or [Through/Erase/Layer] <1.5>: 0.7
To make the reinforcement inside the column
Command DT
DTEXT
Write the suitable text as given in the figure
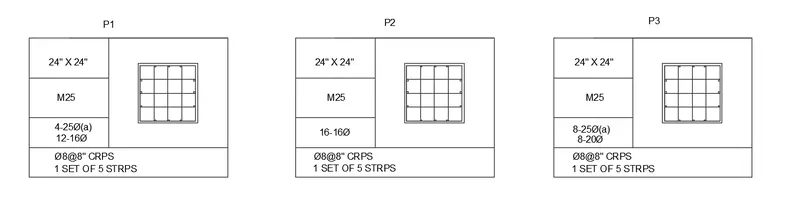
5. Aim: To draw the Raft Layout as shown in the Figure.
Introduction: To draw the Raft Layout as shown in the Figure and Assume the column size as per your knowledge. You can take the sizes as: 24”x24”, 9” x 24”, 9” x 18”, and 9’ x 24”.
Command: l
LINE
Specify first point:
Specify next point or [Undo]: 30'
Specify next point or [Undo]: 7'0.1"
Specify first point:
Specify next point or [Undo]: 7'0.1"
Command: o
OFFSET
Specify offset distance or [Through/Erase/Layer] <Through>: 9"
To create a wall of 9”
Command: L
LINE
Specify first point:
Specify next point or [Undo]: 3'
Specify next point or [Undo]: 9"
Specify next point or [Undo]: 2'
Specify next point or [Undo]: 2'
Specify next point or [Close/Undo]: 2'
Specify next point or [Close/Undo]: 2'
Specify next point or [Close/Undo]: 3'
Specify next point or [Close/Undo]: 10'7.5"
Specify next point or [Close/Undo]: 8'
Draw a refrence line of 5’4.5”
Command: _line
Specify first point:
Specify next point or [Undo]: 5'4.5"
Specify next point or [Undo]: 2'6"
Specify next point or [Undo]: 9"
Specify next point or [Undo]: 2'6"
Specify next point or [Close/Undo]:Close
Command: l
LINE
Specify first point:
Specify next point or [Undo]: 3'
Specify next point or [Undo]: 9"
Specify next point or [Close/Undo]: 3'
Specify next point or [Close/Undo]: 6'
Specify next point or [Close/Undo]: 6'9"
Specify next point or [Undo]: 3'
Specify next point or [Undo]: 9"
Specify next point or [Close/Undo]: 3'
Close
Rim the reference line of 5’4.5”.
Command: L
LINE
Specify first point:
Specify next point or [Undo]: 45'
Specify next point or [Undo]: 19'3"
Specify next point or [Undo]:8’3”
Specify next point or [Undo]: 6’9”
Specify next point or [Undo]: 2’4”
Specify next point or [Undo]: 6’9”
Specify next point or [Undo]: 10’3”
Draw all columns using line command same as the dimensions given in the figure and proper
locations
Command
DTEXT
Fill the text same as given in the figure
Command
DIMLINEAR
Justify the dimensions wherever required as same as given in the figure