Assignment 7-Side Pole Crash Simulation Challenge
AIM- side pole crash simulation of dodge neon BIW using RADIOSS solver and pre-proccessing using hypermesh/hypercrash.
OBJECTIVE-
to perform a crash analysis on the left side of dodge neon BIW, also known as a side crash. the analysis is to be carried out on the deformation and the forces created as a result of the crash neon side crash-BIW.
NEON SIDE CRASH- BIW.
1) check the unit system and either follow [ mg , mm , s] or [kg , mm , ms ].
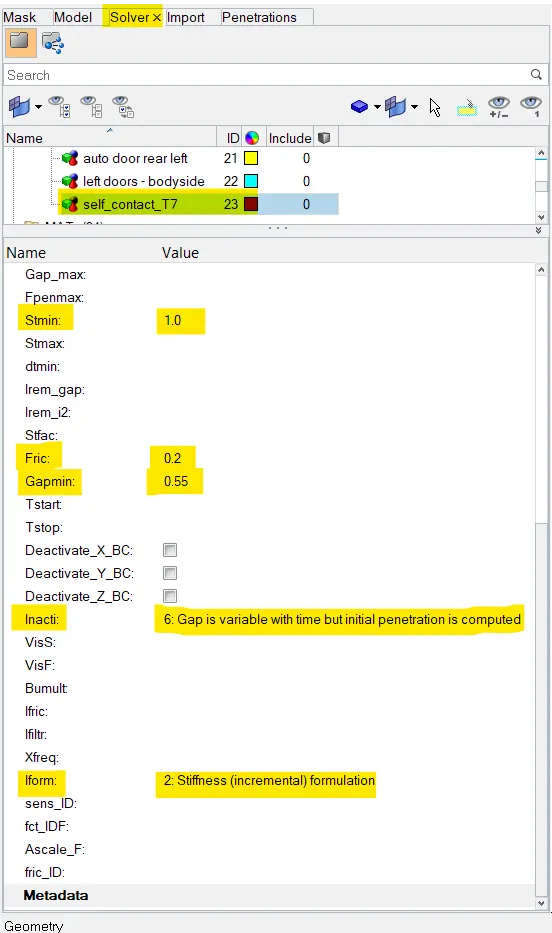
2) create an appropriate interface, friction 0.2 and recommended parameter.
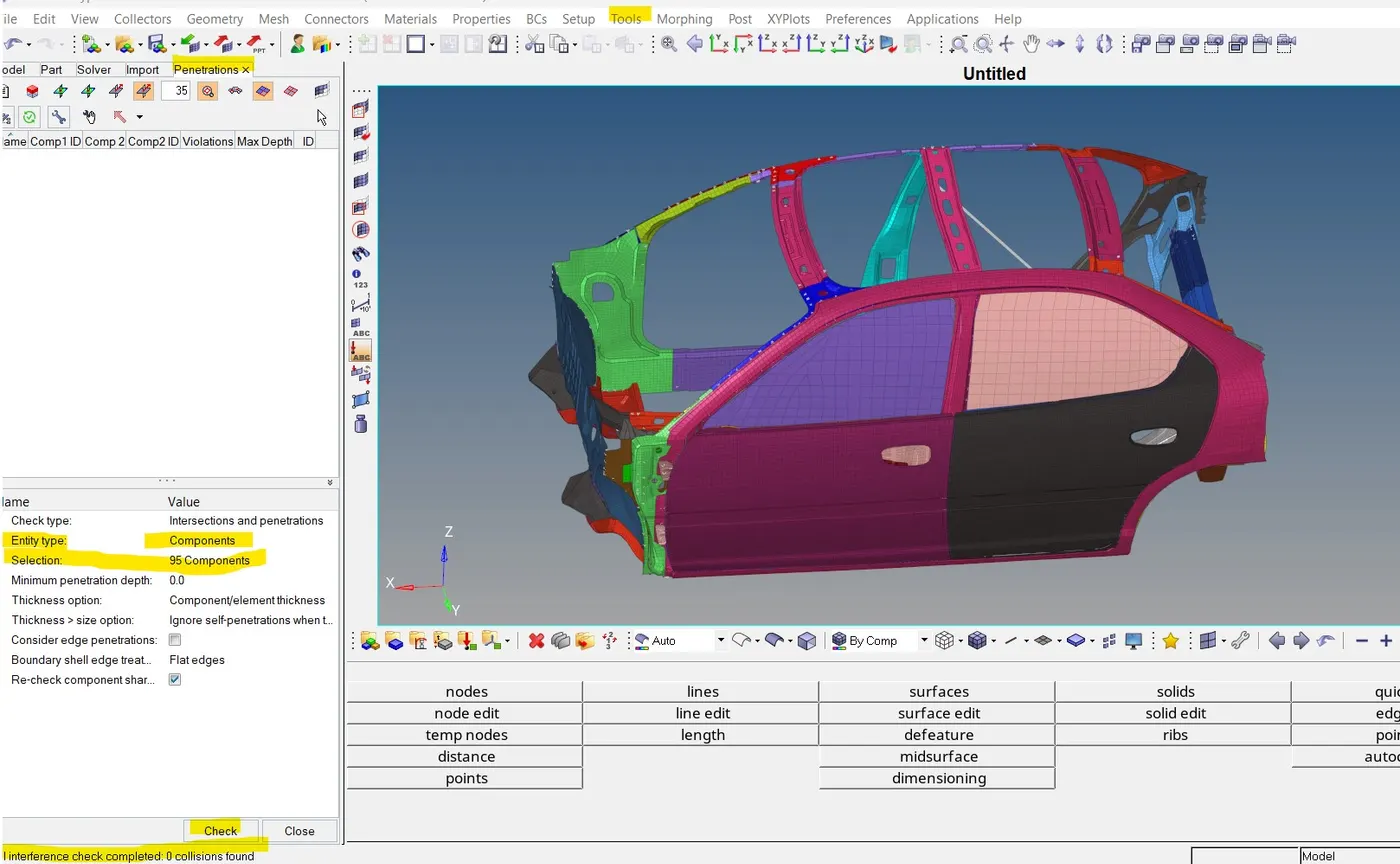
3) make sure of no penetration and intersection.
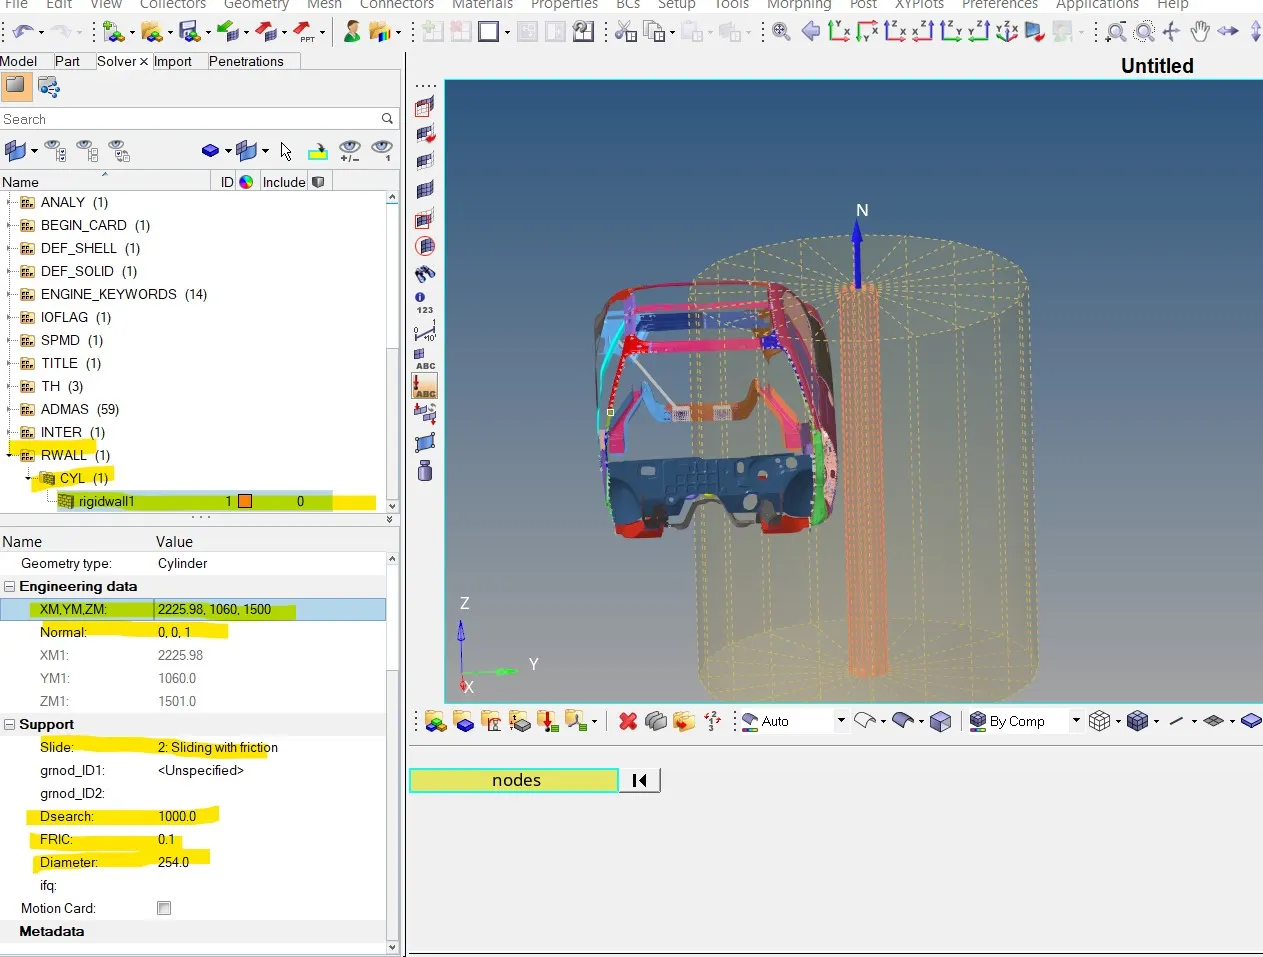
4) create a rigid wall with friction 0.1 as per the refrence model.
5) compare the model weight with the refrence model and use added masses to reach the target weight of 700kg while getting C.G about the required range.
6) initial velocity -20mph, as per the standards.
7) use model checker to ensure good quality.
8) timestep 0.5 to 0.1 microseconds.
9) run 80ms.
OUTPUT REQUESTS-
1) sectional force in the cross member.
2) instrusion at B pillar, hinge pillar, and fuel tank region. provide recommendation on what can help to reduce fuel tank instrusion.
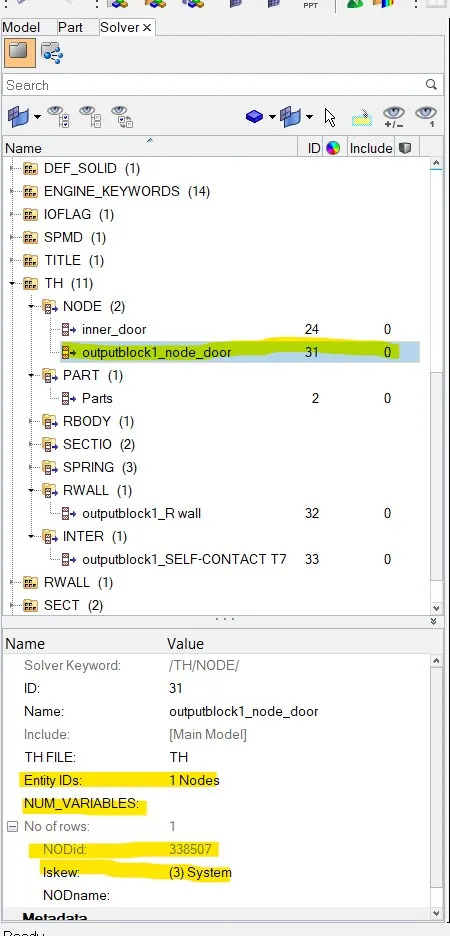
3) peak velocity of an inner node of the door.
PROCEDURE-
1) check for unit system.
2) import model in hypercrash.
3) check for penetration and intersection.
4) add masses to reach a target weight of 700kg.
5) export changes file and import in hypermesh.
6) create a self interface contact.
7) create a rigid wall.
8) add initial velocity to the model.
9) create cross section to find sectional forces on the cross members.
10) create a springs to check intrusion in different position.
11) assign property to spring.
12)create TH for section forces, intrusion springs, interface contacts.
13)create cards.
14) run model checker and correct errors if any.
15)run the analysis.
1) IMPORT THE MODEL-
i) first, we will import "0000.rad" starter file of the model which is named in neon_side_reduced_0000.rad in RADIOSS using import solver deck option.
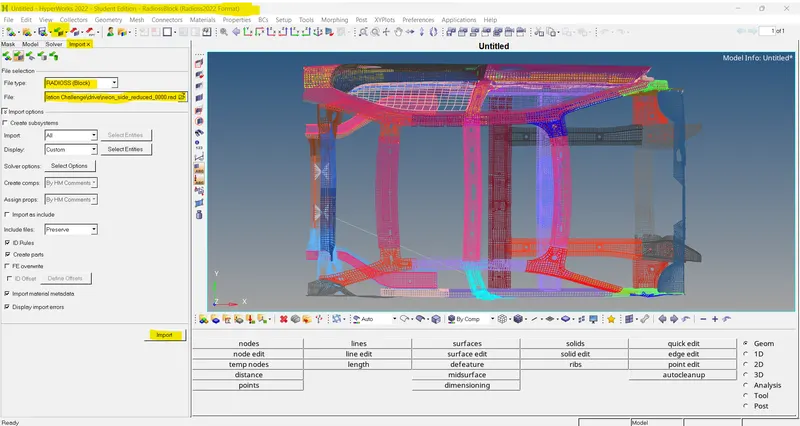
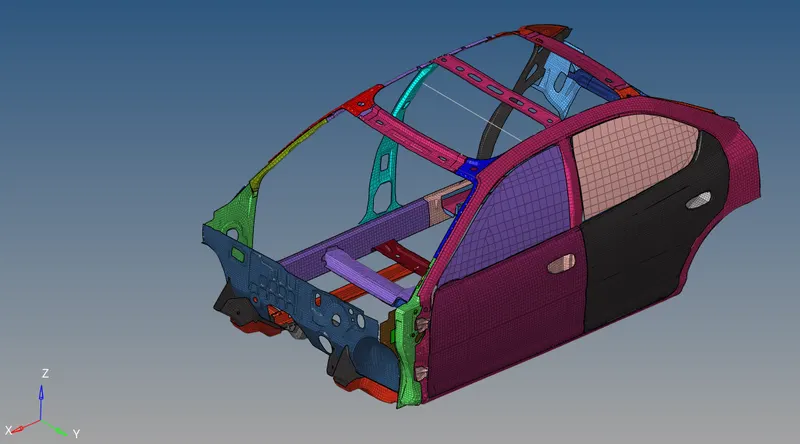
> reduced model for side crash analysis.
ii) CHECK FOR UNIT SYSTEM-
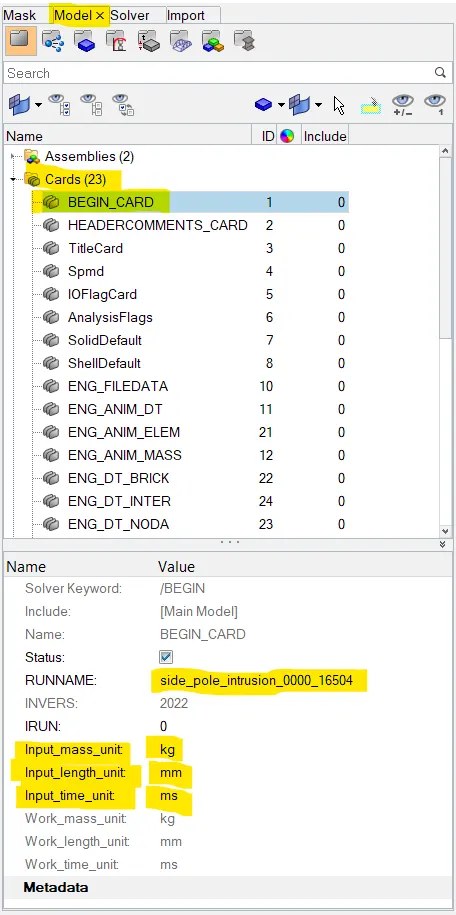
i)now in order to check the unit system of the model . we can go model browser , and in cards. check BEGIN_CARD are we can just open the neon_front_0000.rad in the notepad where we will be able to check the units.
ii)so, for this model, we have will see that the unit system followed is [kg mm ms].
iii) we will be using hypercrash and hypermesh to setup the model. some checks will be done in hypercrash and some in hypermesh. first, we will import the model into hypercrash.
2) CREATING THE APPROPRIATE INTERFACE, FRICTION 0.2, AND RECOMMENDED PARAMETERS-
in this case , the type 7 contact interface is defined, interface type 7 is a multi usage impact of interface modeling contact between a master surface and a group of slave nodes. it is also possible to consider heat transfer and heat friction.
all limitation are encountred with interface type 3, type4, and type5 are solved with this interface.
i) a node can be same time be slave and master node.
ii)each slave node can impact each master segment, expect if it connected to this segment.
iii)a node can impact more than one segment.
iv)a node can impact on the two sides, on edges and corner of each segment.
v)it is a fast search algorithm without limitations.
the main limitations of this interface are-
i) the time step is reduced in caseof high impact speed or contacts with a small gap.
1) delete existing contacts and create new contacts with recommended properties.
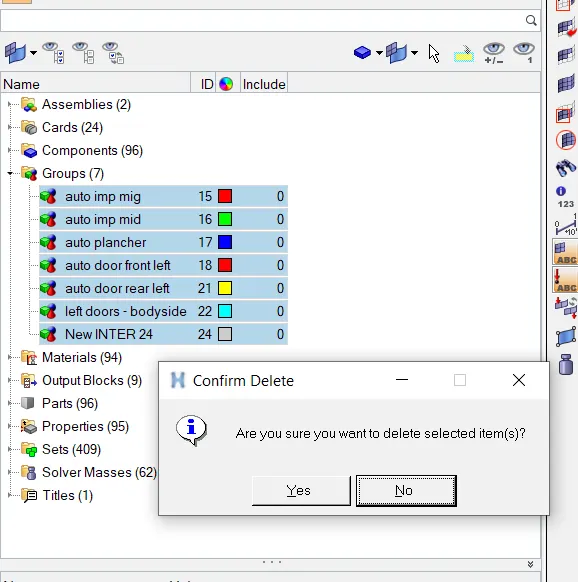
2)now create a new contact.
3)go to model browser > right click > create contact > rename as a self contact > select the all components >enter type 7. recommended properties.
4)for that, we just have to right-clicked where selecting the nodes are components there is one option called create/edit select and proceed with components.
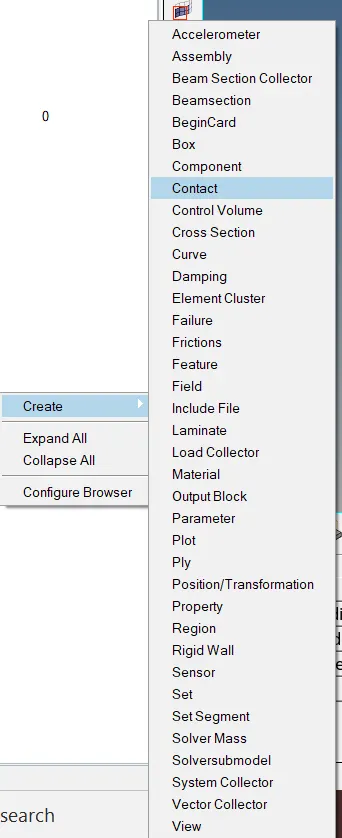
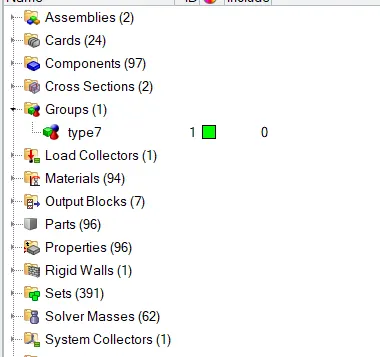
5) creating new self-contact.
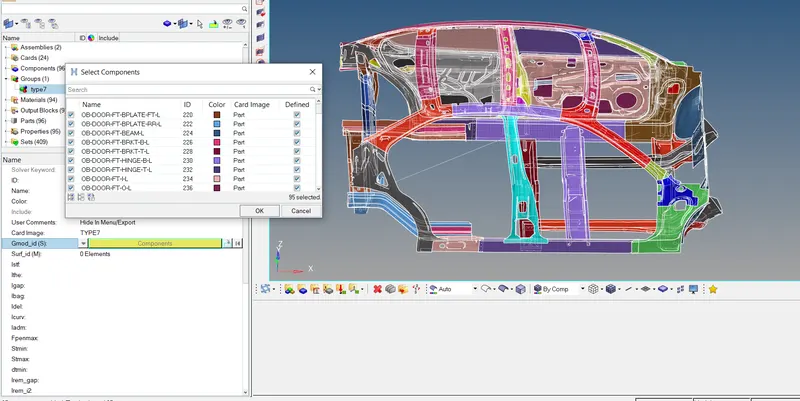
6)then after this step, we simply need to give in the select the all componet in the list.since we defining self-impact of model.
7) and then fill the recommended properties-
3)CHECK FOR PENETRATION AND INTERSECTION-
i) penetration is defined as the overlop of the material thickness of shell elements, while intersection is defined as elements that pass completely through one another. all models and especially impact model should be checked for penetration and intersection and depenetrated to ensure the integrity of the model. penetration adversly affect results and should be removed.
ii) to check penetration and intersection, go to quality > check all solver contact interface > select parts > click on check penetration.
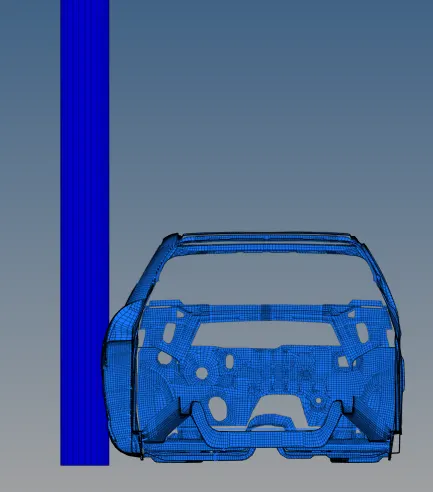
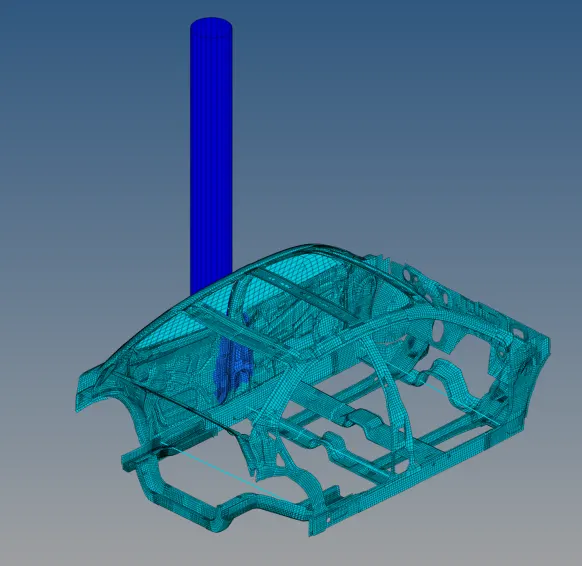
4) CREATE A RIGID POLE WITH A FRICTION 0.1 AS PER THE FMVSS 214 STANDARS.
I) CREATE RWALL CYLINDER-
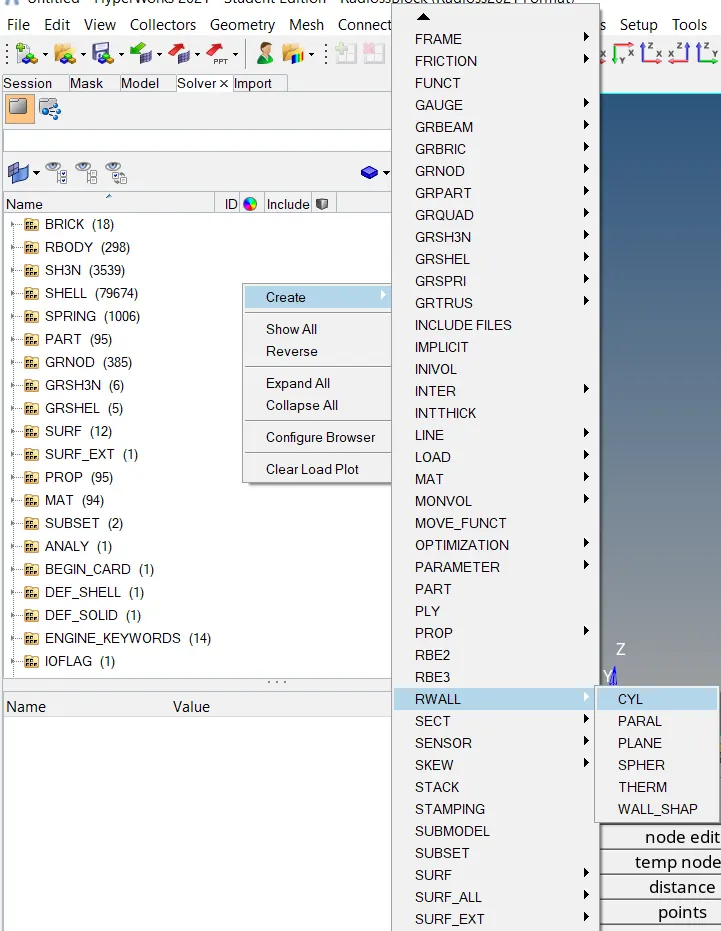
i) a rigid wall is nodal constraint applied to a set slave nodes in oreder to avoid the node penetration to the wall.if contact is detected , then the slave node and accleration and velocity are modified. mainly to constrain the movement of the moving body after impact , . we will be using a plane wall that extend infinity it is defined with two points.
ii) rigid wall entities provide a method for treating a contact between a rigid surface and nodal points of a deformable body. the radioss user profile a rigid cylinder is created in the model and solver browser.
iii) to create on RWALL cylinder,
iv)go to solver browser > create > RWALL > cylinder.
v) we need a refernce node to create on RWALL cylinder so, for that, we are creating a temp node in the mid of B-pillar.
vi)now translate this node to some distance with the reference of this translate node we have to create on R-wall cylinder with respect to that co-ordinates.
>properties of rigid wall-
5) COMPARE THE MODEL WEIGHT WITH THE FULL SCALE 300K NODES MODEL AND USE ADDED MASSES TO REACH A TARGET WEIGHT OF 700KG WHILE GETTING C.G ABOUT THE REQUIRED RANGE-
I) a vehicle center of gravity , or C.G The theoretical point where the sum of all the masses of each of its individual components effectively acts. in other words, from the physics prespective, a vehicle behaves as it entire weight resides at this one point. carrying weight up high, such as panoramic sunroof will raise a vehicle' c.g while placing heavy subsystem low in a vehicle, such as battery pack, will work to lower is better from handling standpoint , as it reduces weight transfer during cornering and braking, and it also reduces the propensity to roll over.
ADD MASSES>
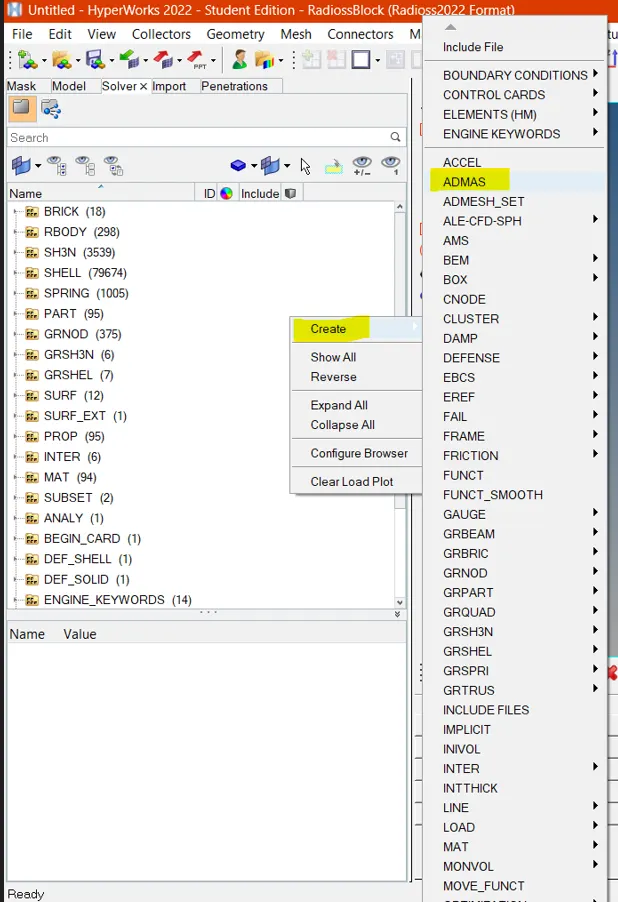
step 1-
ii) to add mass, ADMAS option is used to under in solver browser.
iii) go to create > ADMAS.
step 2-
i)adding mass to increase the overall weight of car.
ii) go to solver browser > admas >create > extra mass > give GRNODE ID > give mass value.
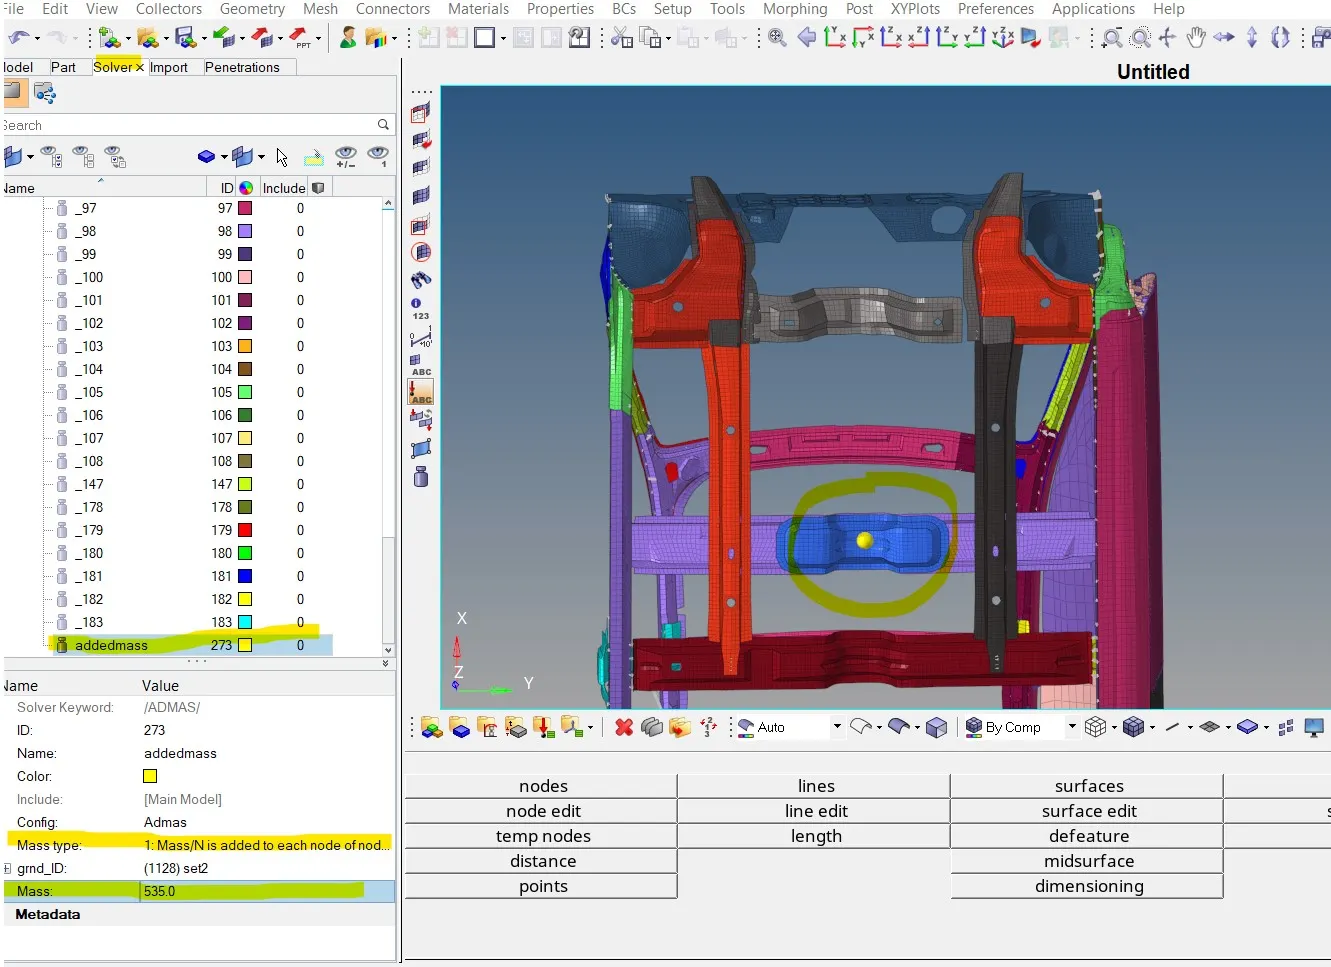
right click on grnd_id to create GRNODE, then the select node under entity id's and procced . select mass type as 1. mass/n is added to each node of node group . so i simply added mass 535kg to make the a 700kg target weight.
then, the mass and COG is checked in hypermesh . to view the COG position, a point is created with the obtained COG coordinates.
hence the mass is corrected to 700kg to represent a real life mass of a vehicle, and also then position of COG is now relocated to the desired position.
6) INITIAL VELOCITY - 20 MPH AS PER STANDARDS.
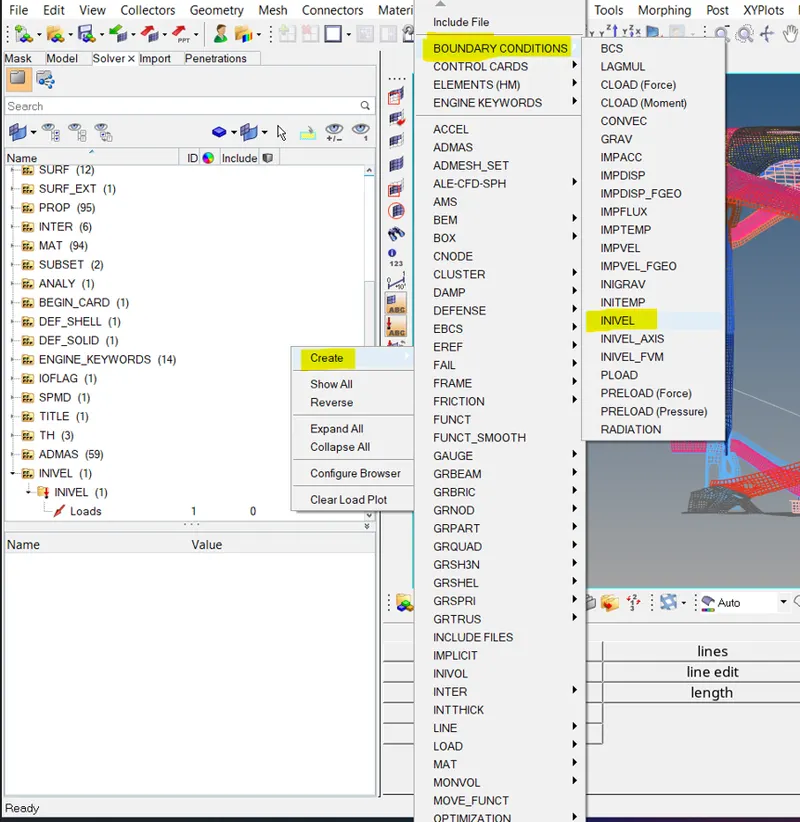
i)To define an initial velocity of 20mph(8,9408 mm/ms) under the solver browser.
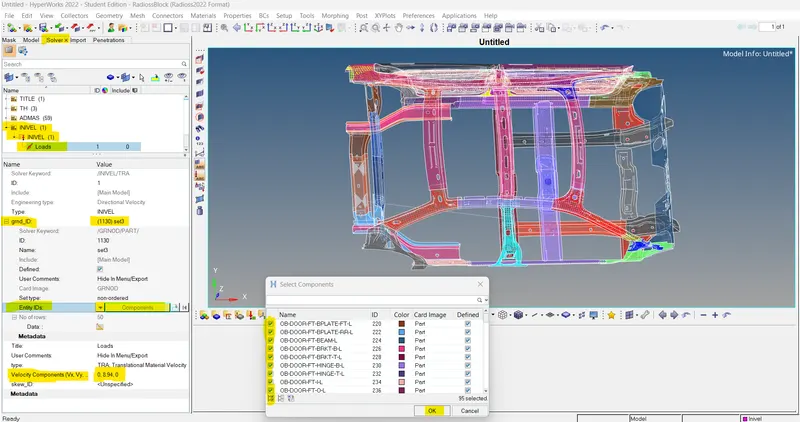
ii)the required velocity is 20mph but the units are in mm/ms , which would be 8.9408 mm/ms. and the vehicle is moving along the y-axis, so this value will be entred in [vy] v velocity.all other velocity values would be 0.
iii) go to create > boundary condition > INIVEL.
iv) right click on grnd_id to create GRNODE, then select nodes under entity id's and (all component) proceed.
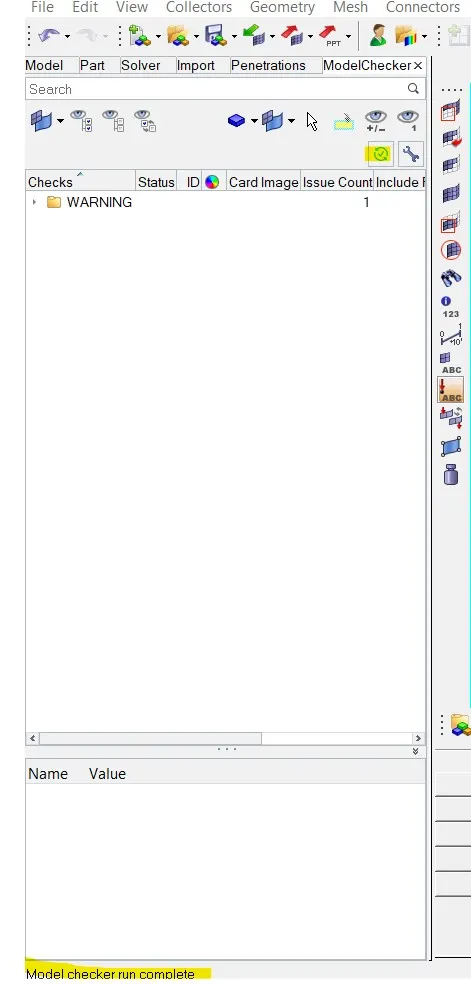
7) USE MODEL CHECKER TO ENSURE GOOD QUALITY-
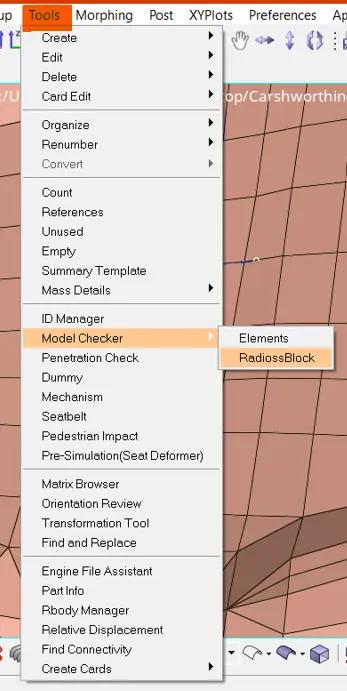
i) go to tool > model checker > radioss block > run > fix in any error.
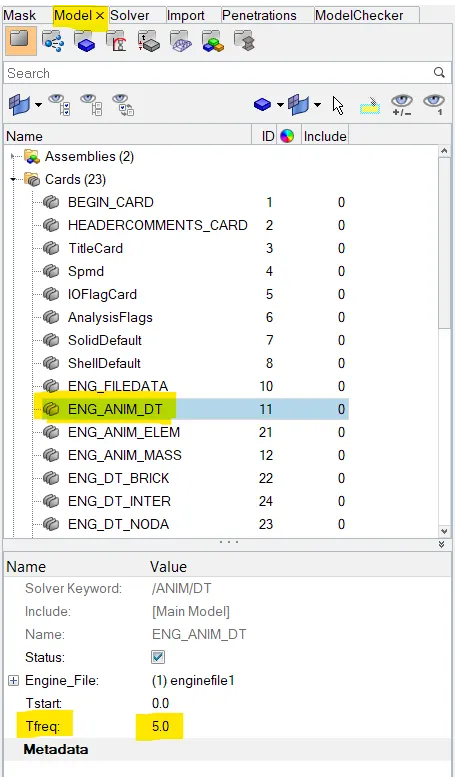
8) create a time step-0.5 to 0.1 microseconds-
i)case1 - go to model browser > cards > ENG_DT_ANIM > Tfreq=5.0.
ii)case2- go to model browser > cards > ENG_DT_NODA > Tmin=5.0/1000=0.0005 (Tscale=0.9)
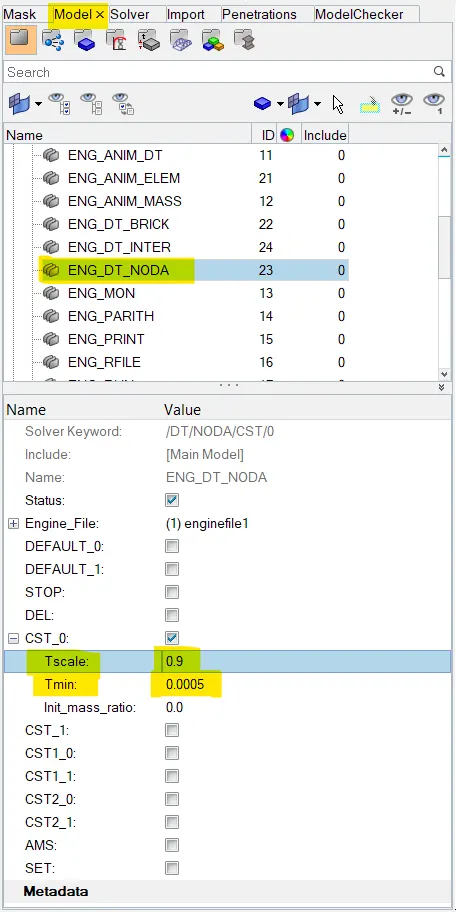
the convert time step value 0.5 microseconds to 0.5/1000=0.0005ms. and put in the Tmin.
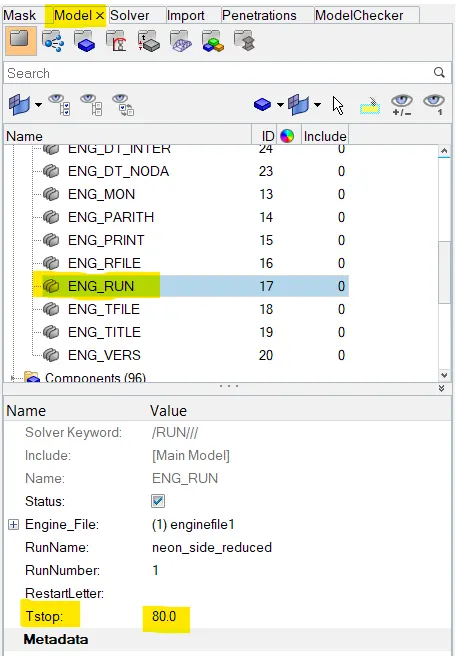
9) RUNNING 80MS-
go to model browser > cards > ENG_RUN > Tstop =80.0
OUTPUT REQUESTS-
1) SECTIONAL FORCE IN THE CROSS MEMBER-
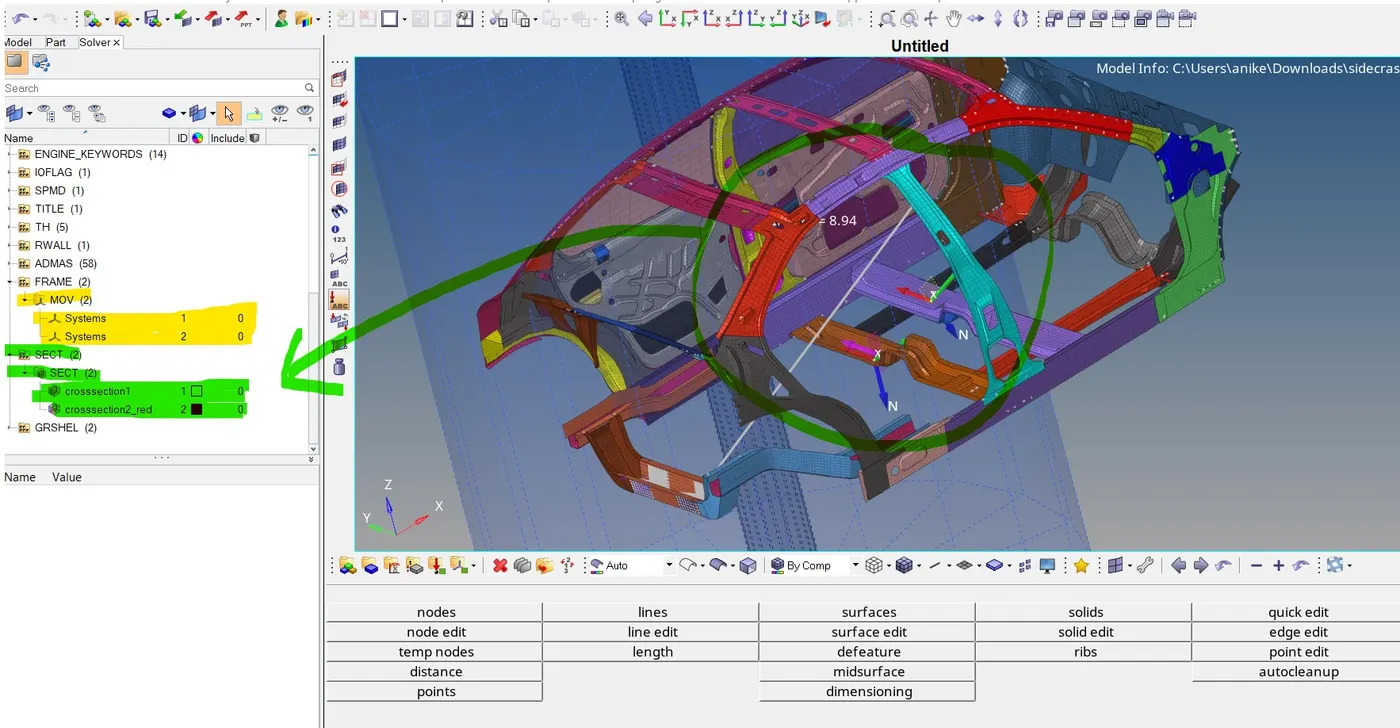
i) the result which we want on required cross-sectional parts will be calculated based on a frame of a reference. so before creating a cross-section , we will create moving frames on perticular nodes of part section. now we must create the moving frame which are also called as local axis. we must perfectly align our local axis to the global axis.
ii) now we can create a moving frame using these nodes. in the solver browser , we will right click and navigate to create > frame > mov. so here, we will create frame by node refrence and select the nodes for Z-axis and yz plane and then click on create.
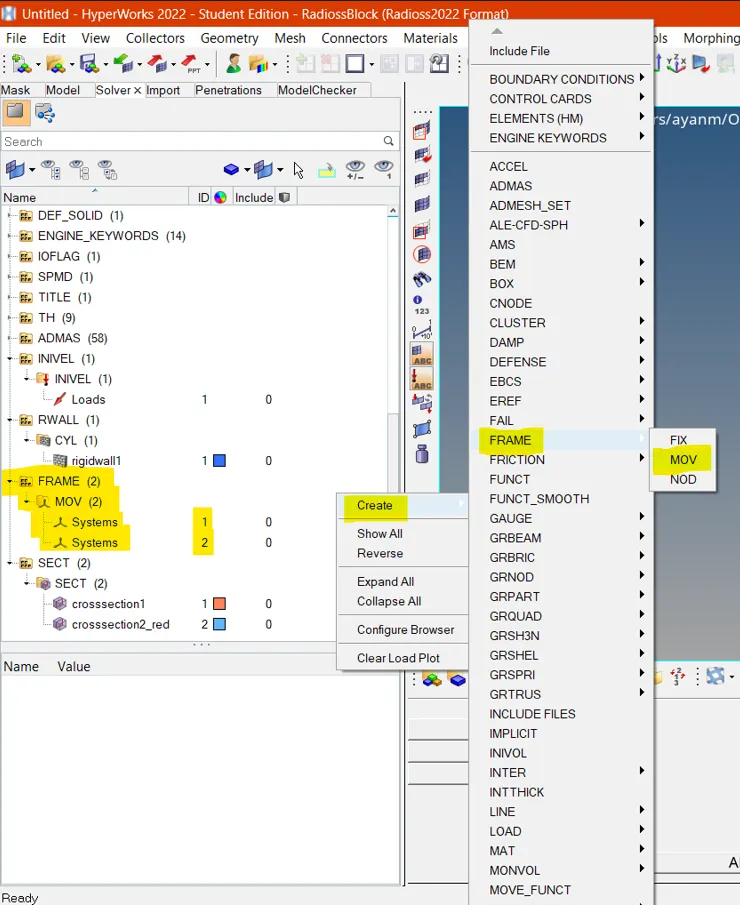
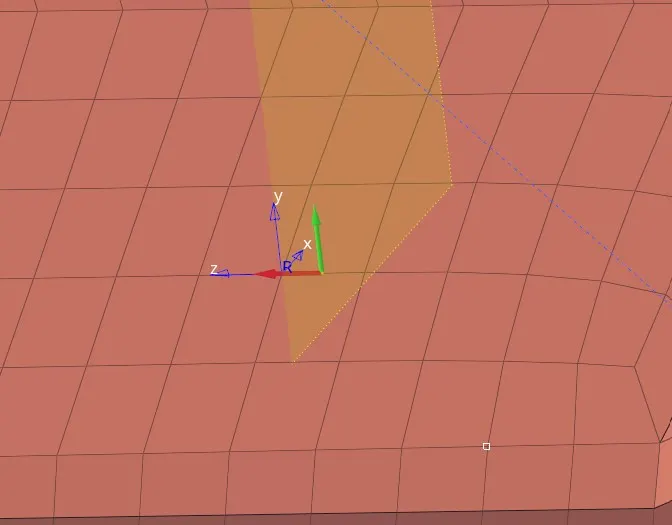
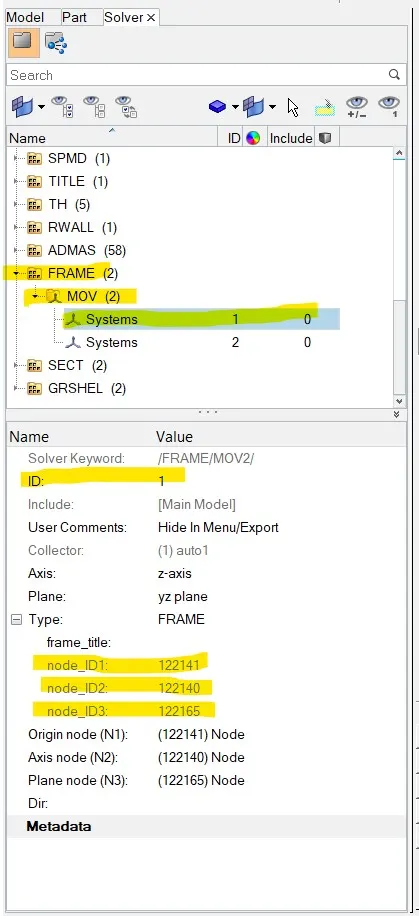
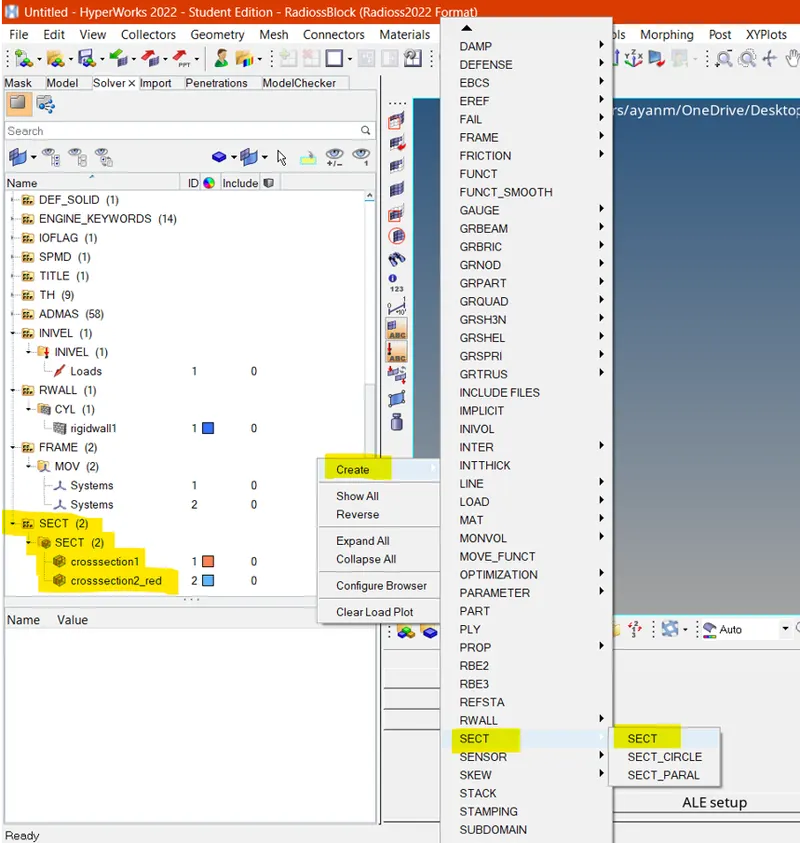
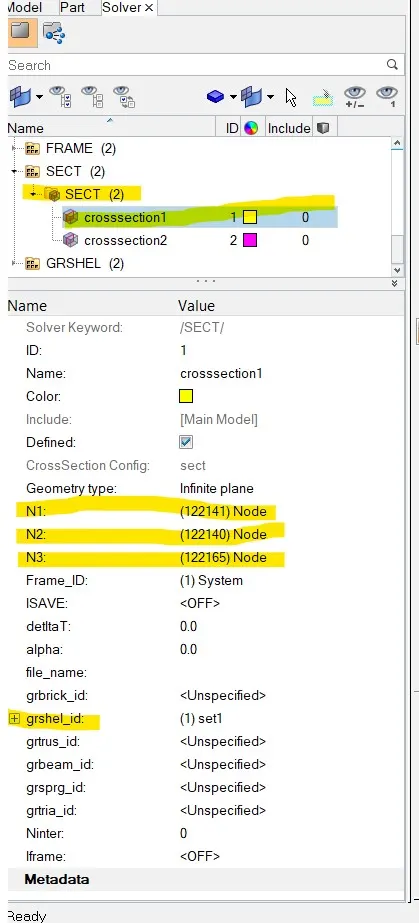
iii) thus, a moving frame will be created . now we will create a cross section for this frame . to create a cross section , we will right click the solver browser and navigate to create > sect > sect > .in the sectional panel , we will specify the frame _ID and node _ID 1/2/3 as N1,N2 AND N3. as moving frame we right click and create grshel_ID, then we will select the element where we want the cross-sectional results.
2) INTRUSION AT B PILLAR, HINGE PILLAR AND FUEL TANK REGION . PROVIDE RECOMMENDATIONS ON WHAT CAN HELP TO REDUCE FUEL TANK INTRUSION.
1)TO MEASURE INTRUSION-
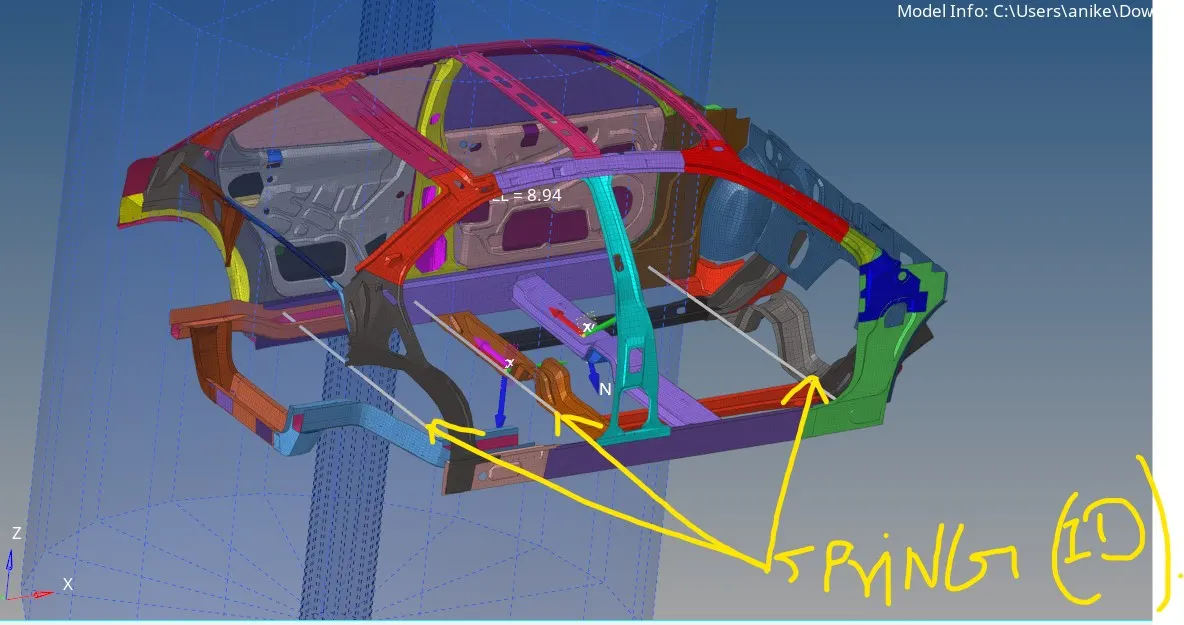
i) here we need to find the intrusion ar B-pillar, hinge pillar and fuel tank . so that find the results at the specified parts, we need to create a spring between the left and right of the B-pillar, hinge pillar, and fuel tank , for creating spring go to 1D> SPRINGS> SPRINGS2 and select 2 nodes as shown in the figure below.

> spring created as shown in the figure below-
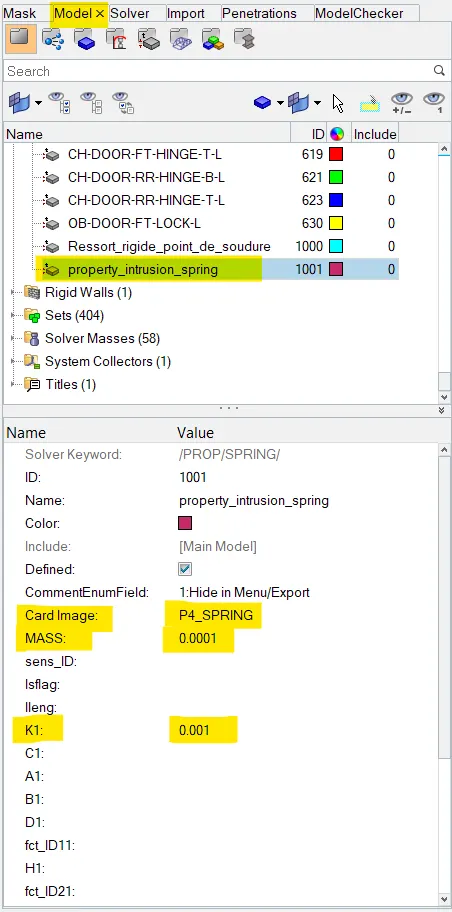
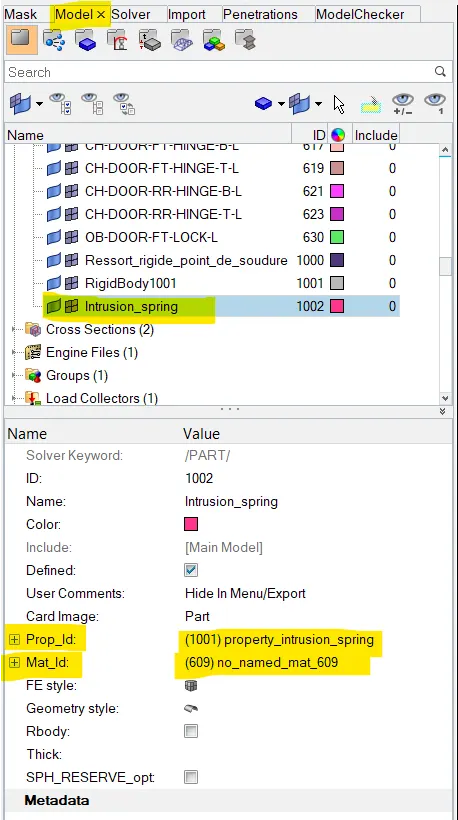
ii)now we have to create a property crad for spring and assign. it is to the spring element created.
iii)go to model browser > create > property > rename as intrusion springs.
iv) After creating a property , a new tab will open there we have to select CARD image as p4 spring and mass as 0.0001 and stiffness(k) as 0.001, and stiffness (k) as 0.001.
v) and then assigned the property and material ( here i select default one M2_PLAS_JHONS) card to the component card for intrusion spring.
3) PEAK VELOCITY OF AN INNER NODE OF THE DOOR-
1) peak velocity of an inner node of the door-
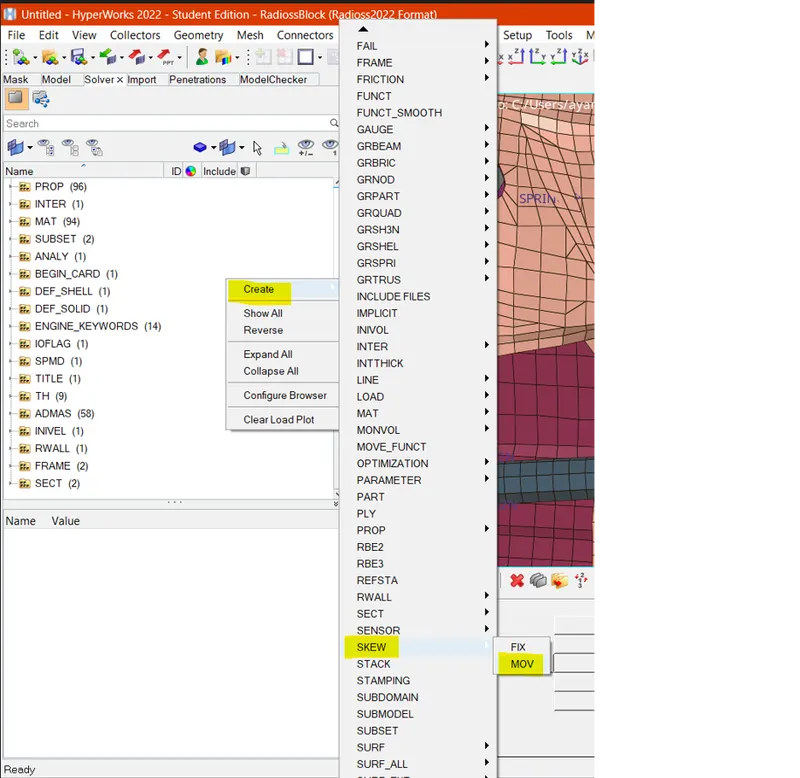
i)to find the peak velocity at the inner node of the door, we will create a moving frame at the node location by using right-clicking on solver browser > create > skew >mov.
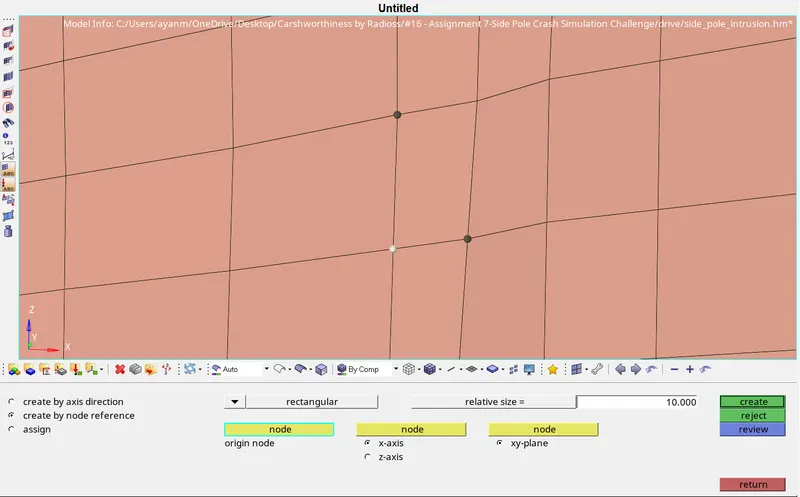
ii) select the required nodes as the origin node then select a node to define the x-axis and xy-plane. as shown in below fig.
MODEL CHECKER-
finally, before carrying out the RADIOSS analysis, an error check was run on the file through hyperworks. the model check tool can be accesed through.
tool> model checker > radiossblock > run from the upper toolbar ( fix any error are there manually )
RUNNING THE ANALYSIS IN RADIOSS-
in hypermesh, moving to analysis > radioss . we can click save as to save the file if it hasn't been saved yet.care must be taken to include _0000.rad in the file name since it's the satrter file after that we can check the connectors option and input -nt 4 in the option bar before clicking radioss this starts the radioss simulation.

ANALYSING THE OUTPUT FILE-
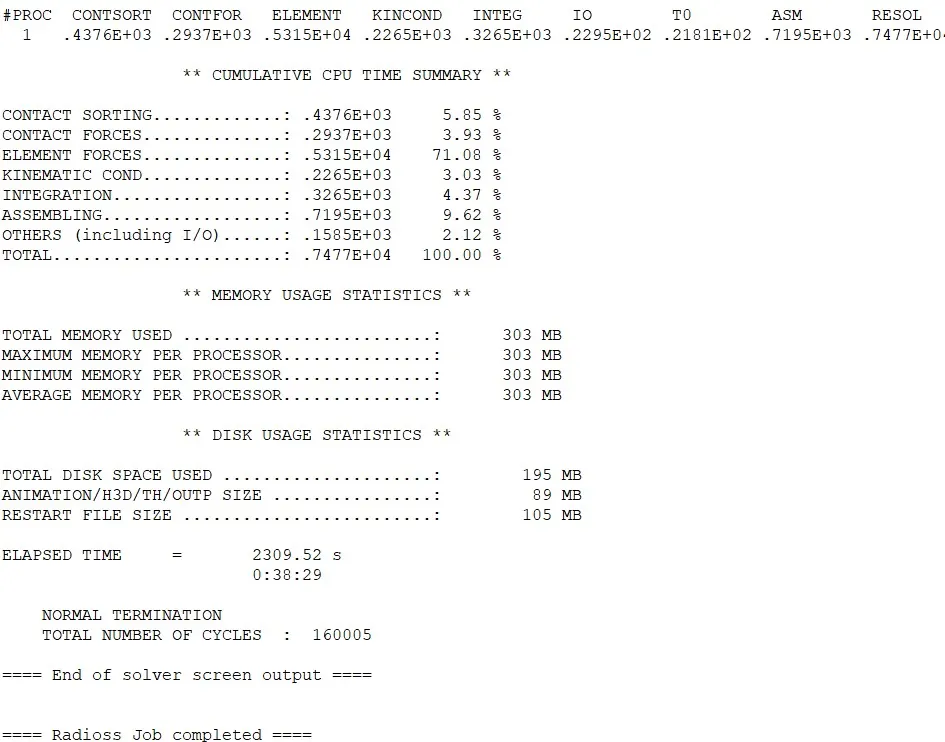
the next step is to carry out energy error and mass error check and this is done by analyzing the radioss engine output file , this can be accesed from the same directory as the starter and engine file and is denoted by the out extension the file in quetion contain _000.1 out and can be accesed using any text editor such as notepad.
we can analyze through altair compute console view after the simulationas we can see, the energy is -1.5% it is definately acceptable du to proximately to 0% error in addition to that the mass error is 0.3457E-05 to 0.4360-05 which is very less and acceptable.
SIMULATION ANIMAL-
i) to view the simulation, we can switch to hyperview through the client selector.
ii) or, in console solver view results we directly op[en hyperview.
in hyperview we will need to import the h3d varient of the file. after importing , we can then the select contour tool to switch to the von mises contour so we can analyze the stresses that form within the BIW in the simulation . this what is the simulation looks.
DISPLACEMENT CONTOUR PLOT-
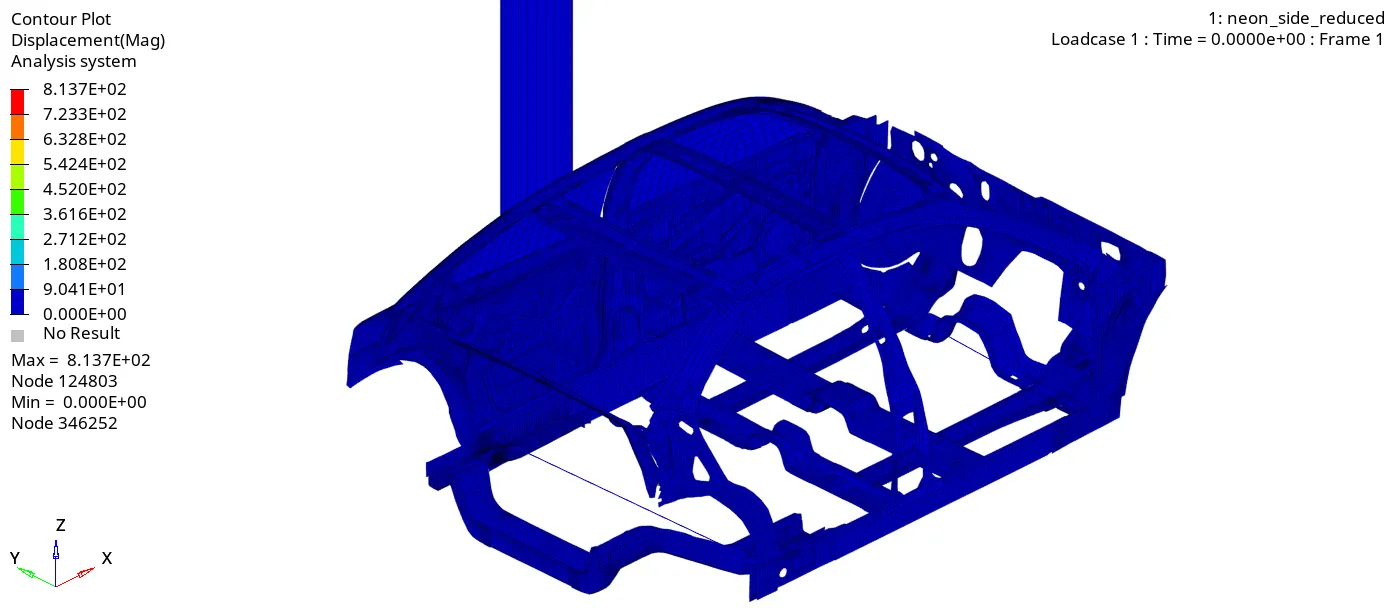
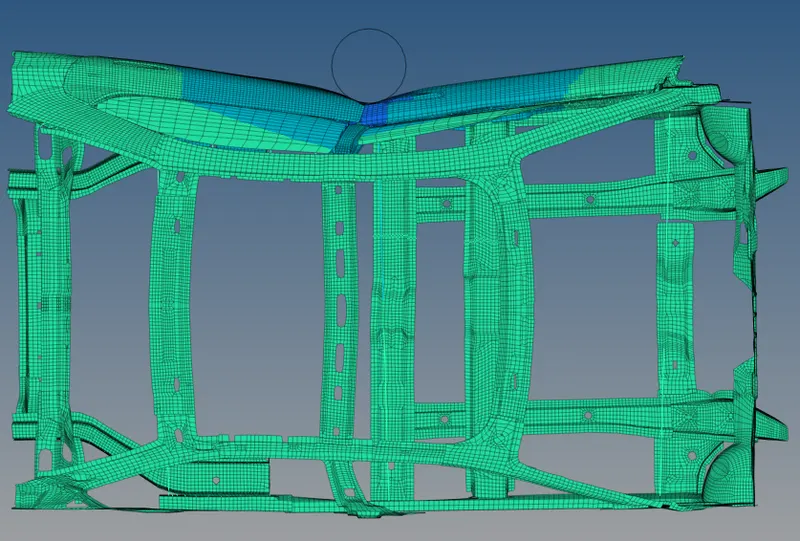
in the above crash simulation of the vehicle , we can see the vehicle BIW is impacting a pole. impact the frame of the vehicle deforms and the vehicle body gets contracted around the pole with left pillar-B as the pivot point . the C.G of the vehicle is in the same axis or direction of pole so we can see even deformation of the frame around the pole.
> VON MISES STRESS CONTOUR PLOT-
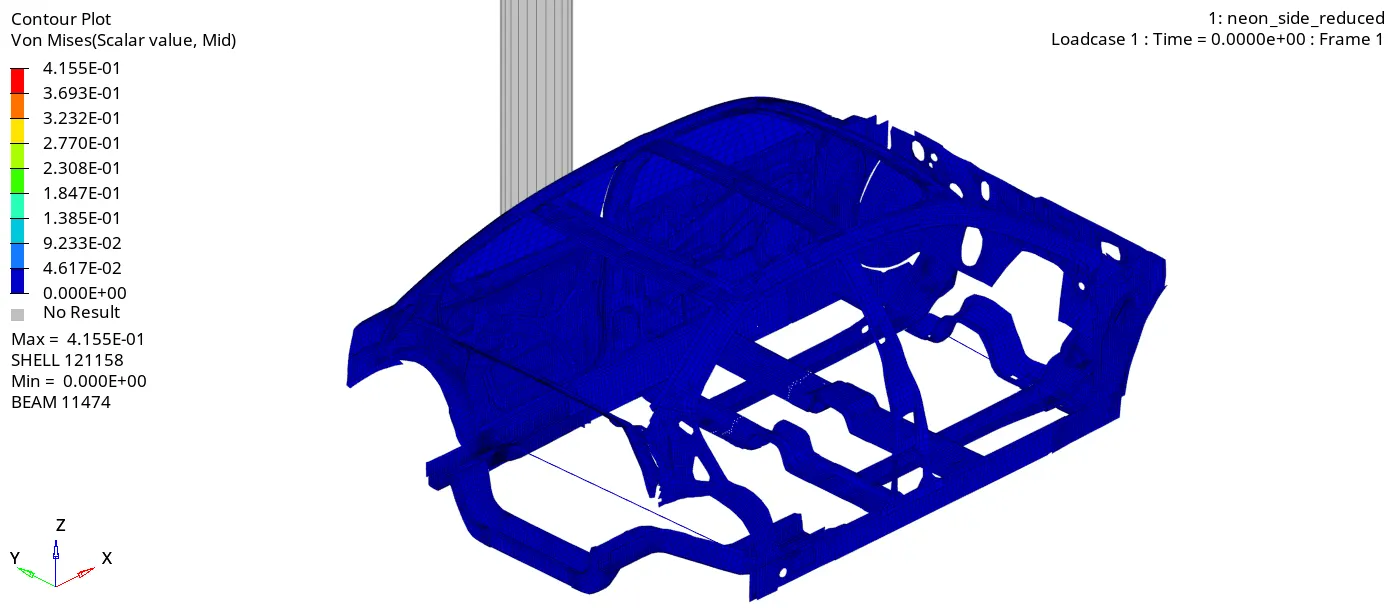
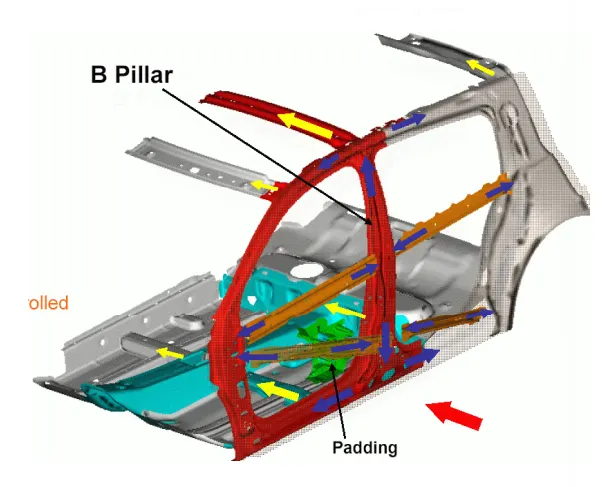
from the von mises stress plot, we can say that the stress dustribution is quite good in the vehicle after the crash. there are very few areas where we can see stress concentration. generally the stress is more in b-pillar and the cross member as b-pillar take the initial impact transfered to the cross member.
from the simulation we seen that initially, the car is hitting the R-wall cylinder with a velocity of 20 mph while the first impact is the B-pillar then the forces going to transfered to the left and and right and front direction in the roof rail and cross memberes in the bottom shown in fig. in each stage the transfer of force is going to reduce beacause energy absorbsed by the components.]\
GENERATINGNOUTPUT PLOTS-
i) after generating the simulation. we can them go ahead and generate the plots. using the same client selector we can switch to hypergraph 2D. in the hypergraph client, we need to import time history file TO1 file.
ii) on importing we can build the plots using different variables. we shall first look at general plots of energies and rigid wall forces generated in and by entire BIW respectively.]
global variable- energies-
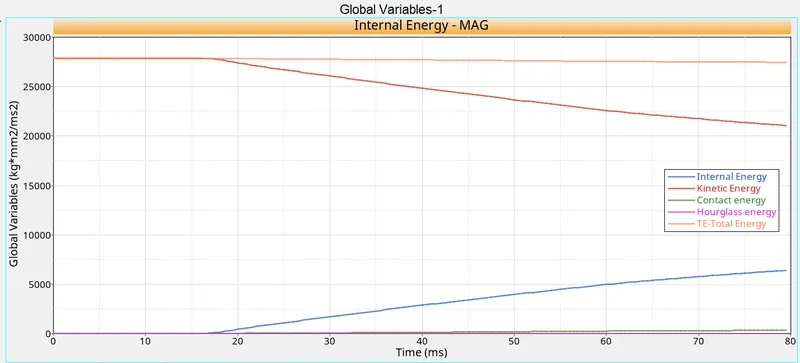
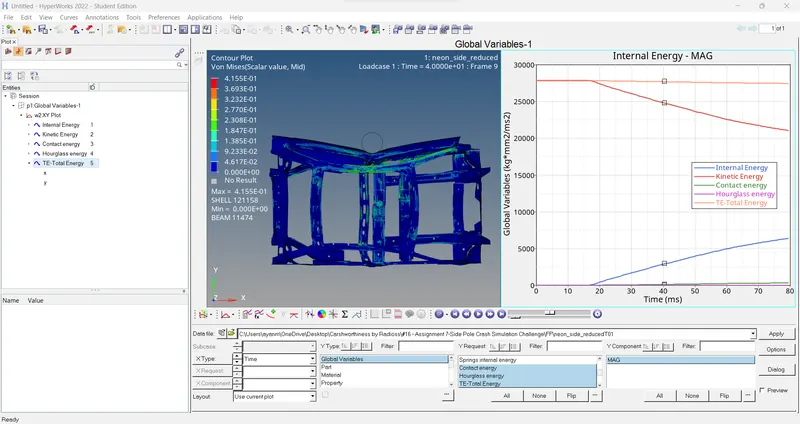
iii) the changes in kinetic and internal energies occure at the exact moment the BIW contacts the rigid cylindrical wall, understandibly, the BIW loses kinetic energy throughout the simulation du to the obivious decreases in velocity . at the same time it absorbs the forces and this results in as incease in internal energies and as a result, deformation also occure.
Contact energy graph-
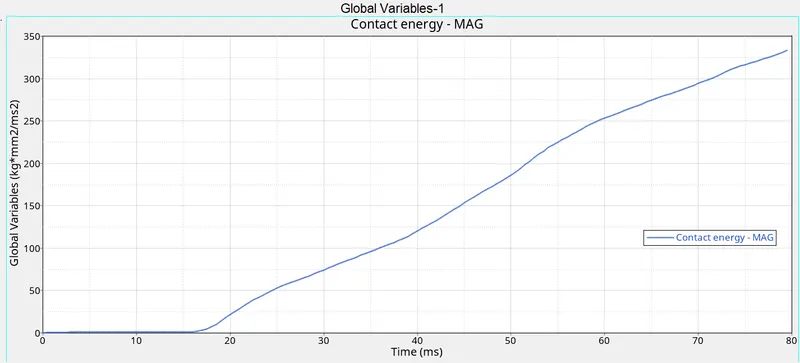
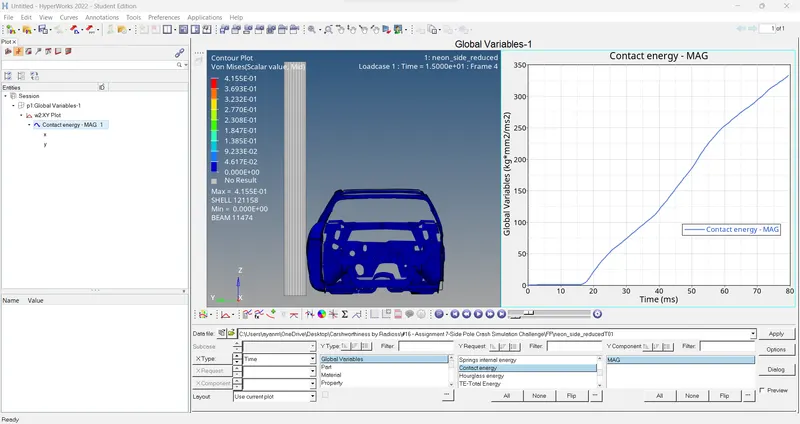
i)contact energy is a type of energy that is formed when one element meets the other or neighboring elements. the opposing force created by this elements forms the contact energy. in this case it takes off after 17ms, at this point the model starts deforming in such way that penetration of nodes occures when certain region of the model press on themselves buckled elements are forced into contact.
ii) the increase in contact energy affects the overall energy of this system, which is why there is decrease in total energy over the course of the simulation it is comparitevely negligible decraeses through . the magnitude of contact energy generated is much lower compared to that of energies in previous plot.
iii)from above graph, we see that the hourglass energy is almost negligible since we have used improved integrated element formulation(QEPH).
rigid wall forces-
take a look at the rigid wall forces genrated-
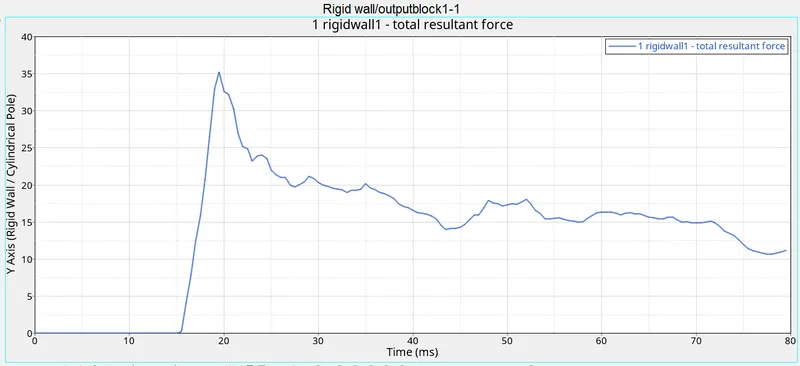
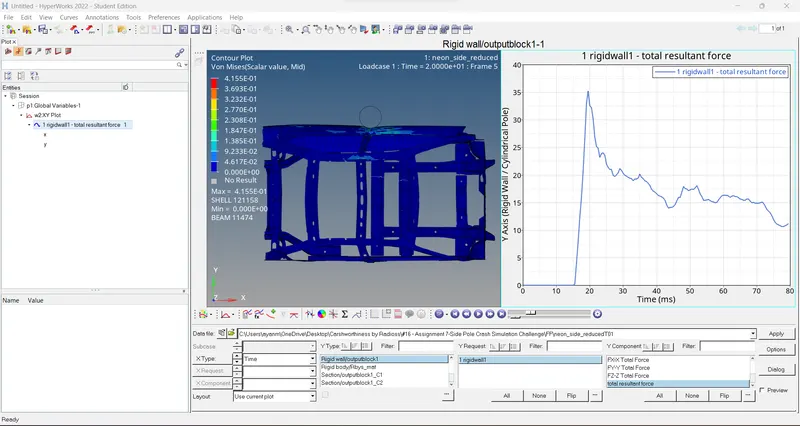
i)as it can be seen in the starting, the rigid wall force generated is zero till 15ms of simulation beacause of no contact, but 19.5 ms there is a peak rise in the wall forcses to the value of 35.27KN which is the point another first impact, the rigid wall forces decrases.
sectional force on cross-member-
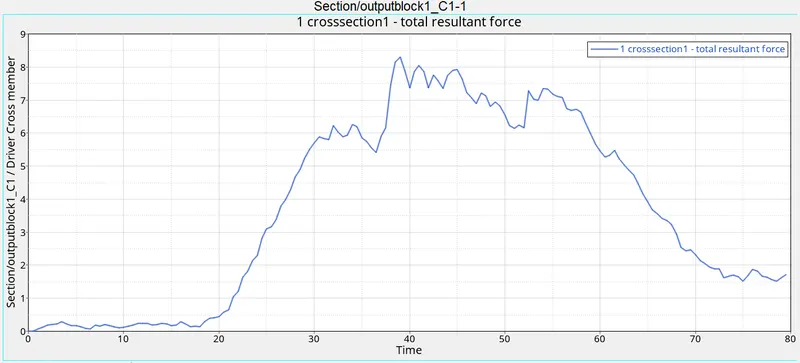
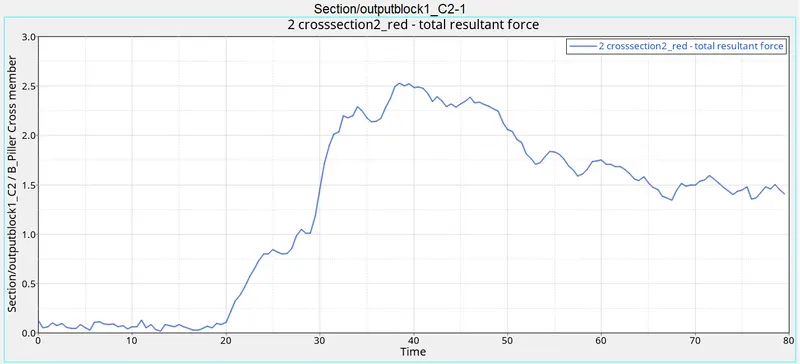
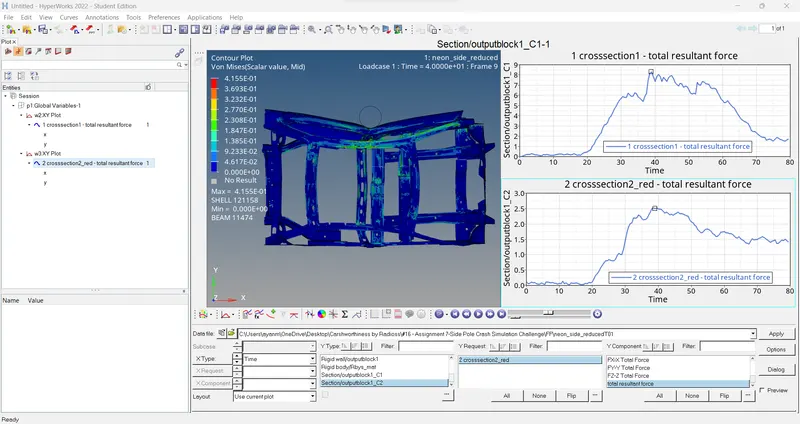
i) cross member are very crucical in the side impact analysis these components prevent the body to shrink or deform inward. when the car hits the rigidbody maximum amount of forces will pass support through the cross member of the base and roof . this component along with the door bar and support door outer,B Pillar and rocker are also involved in the majority the prevent deformation but the forces acting on every other component eventually pass from the cross member.
ii)the max sectional force at the B-pillar cross member (c2) is 2.5kn at 38.5 ms and for the driver seat cross member (c1) it is 8.29kn at 39ms.
peak velocity at inner door-
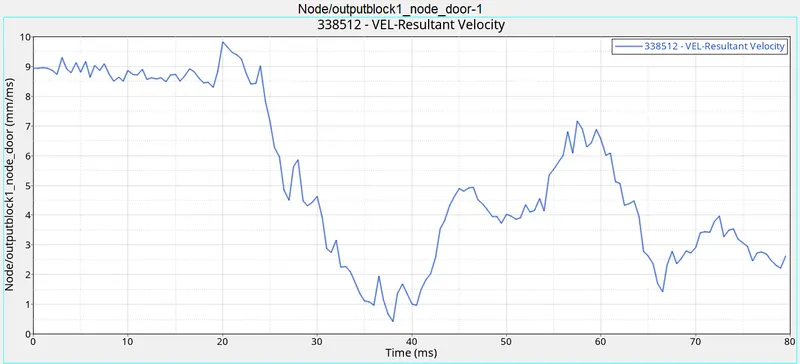
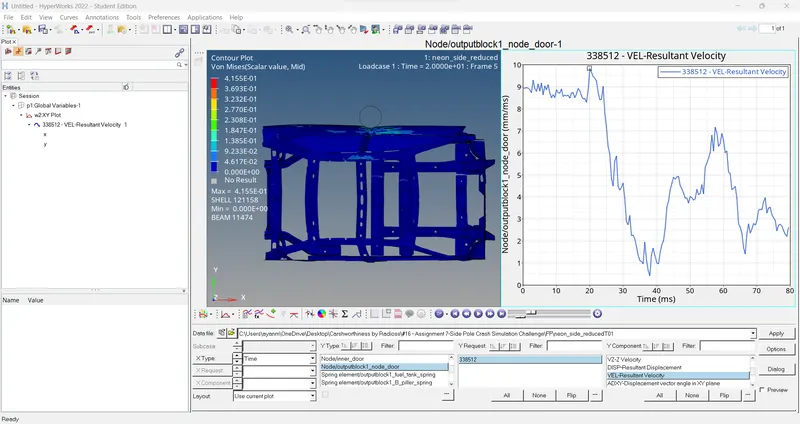
i) as we all know that when the car hits pole first impact will be the door and du to the deformation, the inner portion of the door might hit the passengers inside the car and lead to injueries hence it is important the peak velocity at the door region to be calculated.
ii) from the graph the peak velocity of the node on the door is 9.8mm/ms at 20ms. the velocity of the node is almost constant before hitting the rigid cylinder wall (pu to 16.5ms) after impact there is a steep drop when then a small rise probably du to folding deformation created as the crash progressed ( du to inertia) as time passes we can see the velocity hradually decreasing.
intrusion inside the car at B-pillar,hinge pillar and fuel tank-
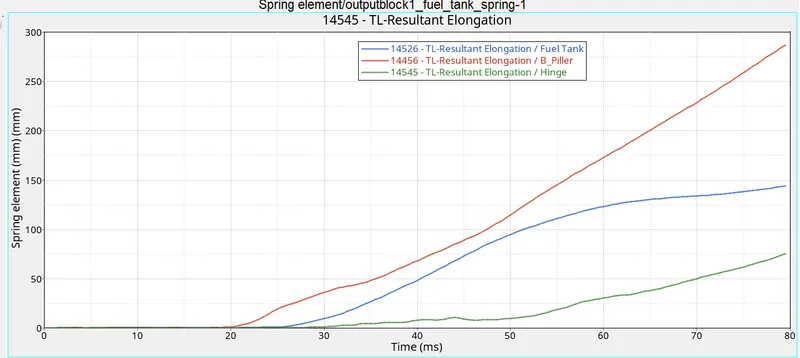
i) the intrusion and deformation of the component can harm the occupents and the inner part of the car like a fuel tank from the about plot it is obivious that intrusion near the hinge soring ( A-pillar ) is 75mm which is substatial and at the fuel tank it is around 144mm, at the B-pillar it is 287mm which may damage the cabin and passenger inside.
ii) the A-pillar spring received the least displacement than B-Pillar and fuel tank.admirably the B-pillar was able to absorb a lot of the impact of COG and the pole sides by side B-pillar.
CONCLUSION-
the overall objective of this project was to simulate a side pole crash and validate the results of the simulation obtained from the crash test. the simulation was performed using the radioss software package.
i)all the required graphical result are obtained and disscused.
ii) du to the limited number of nodes in the student version some of the BIW, engine blocks suspension system, etc are removed so result in not in real life condition.
ii)from all the result we can say that the cabin is mostly deformed which is not acceptable. we can prevent this by providing additional cross member at the top and bottom.
https://drive.google.com/file/d/11ETlzVW0v-MK4ZyEMFJID8ErPIFnHAaS/view?usp=sharing please accept the project2 side pole crash car simulation file.