Assignment 5-RADIOSS Interfaces & Study of Effect of Notches Challenge
AIM:
To create the mesh for bumper assembly, mesh size should be 6mm.
OBJECTIVE:
To mesh and simulate the given model with different cases in RADIOSS as per the requirement.
1.To run the crash tube model.
2.To change the Inacti = 6 and run.
3.To create the type 11 contact and run.
4.To remove the both notches and remove boundary condition on rigid body node then run.
5.To create a new notch in the middle, select the whole section and run.
6.To create a new notch with nodes only from opposing 2 faces and run.
PROCEDURE:
MODEL-1(MESHING OF BUMPER ASSEMBLY):
1.Import the model. Goto Filemenu > import > model > select the model file > Import.
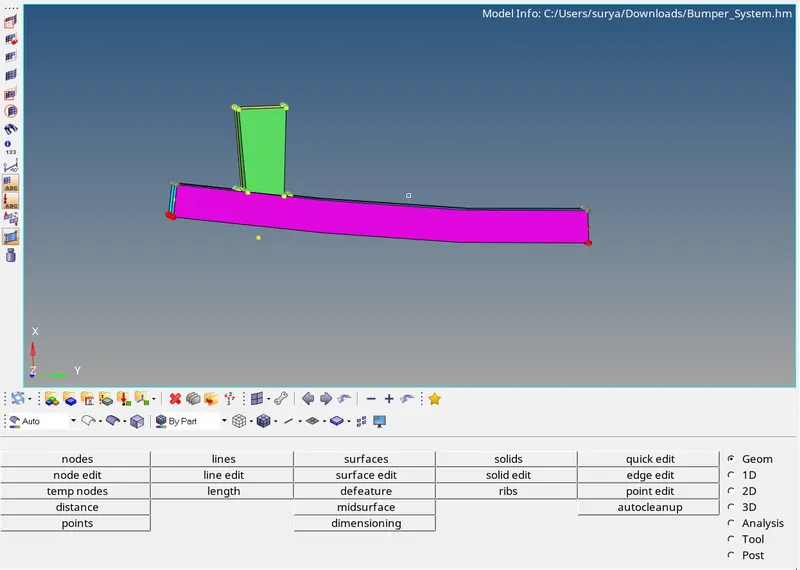
2.Assign the quality parameters. Click on the preferences in the Menu bar > Criteria menu setings > Enter Target Element Length as 6mm > Click ok.
3.To perform a mesh, Select Auto mesh option from the 2D panel > click the surface to mesh > Enter the element size as 6 > Click mesh.

4.The mesh is completed and the model is made sure that there are no tria elements in the model.
5.Now we have create a connection between the crash box and rear bumper. So go to connectors > seam and provide the necessary values.

6.We have to connect the crash box and rear bumper so as to give accurate result when we perform the analysis. There are different types of connections are avaliable apart from this we have choose seam weld which is used to connect the two different materials.
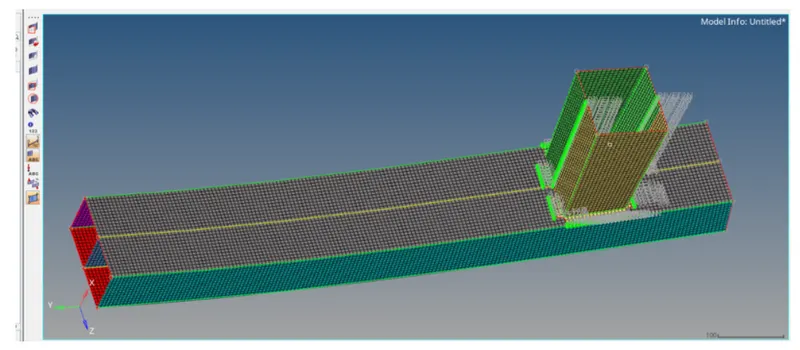
7.The meshing is done on the bumper and the crash boxes are connected to bumper using 1D connectors.
CASE-1:
1.To run the simulation as it is without any changes, Open Hypermesh with RADIOSS profile.
2.Import the file. File > Import > Solver Deck and import the file.
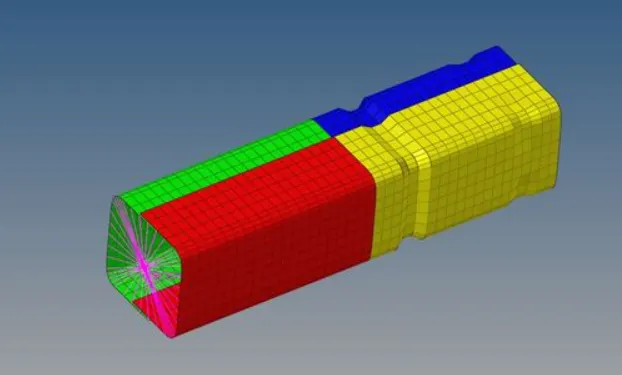
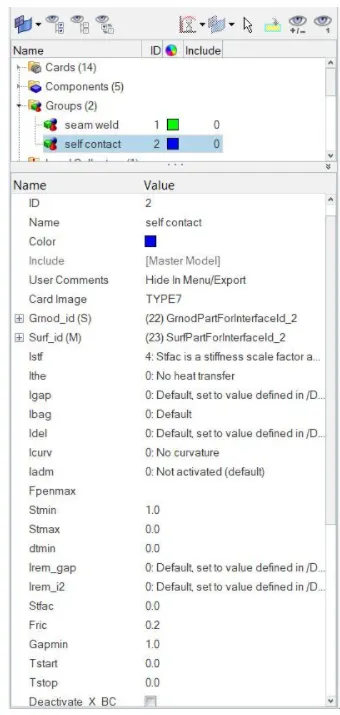
3.After importing we can check the defined interface in the model. Type 7 interface is used.
4.It is a general purpose interface which can simulate all types of impact between a set of nodes.
5.Type 7 interface is than it is non oriented and slace nodes can belong to the master surface enabling the self impact.
6.To run the simulation. Goto Analysis > RADIOSS > Select the loaction to save the file > Check include in collectors box. In option tab type -nt 4.
7.Having a notch in the crush tube affects way the model deforms.. After hitting the rigid wall the crush tube deforms in the area of notch first and then deforms further.
8.Open Hyperview to view animation and contour plots from h3d file. The simulation file is attached in the given section named case-1.
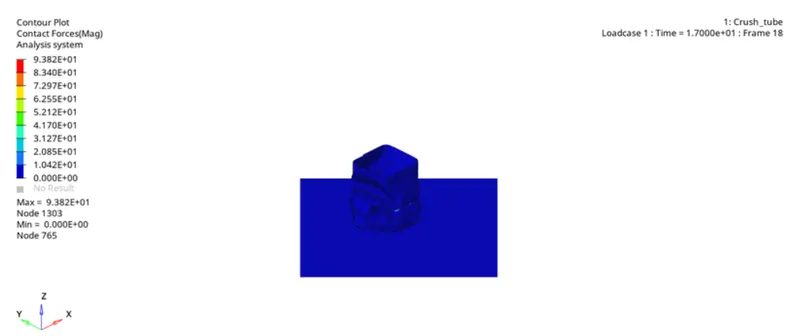
9.Check the output file and check energy error and mass error.
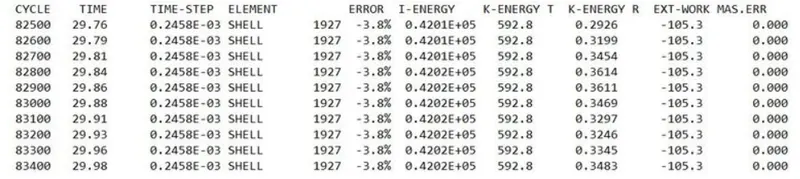
10.Here the energy error is -3.8% and mass error is 0% which is less than -15% to 2% and also 1% respectively.
11.We can accept the results and plot the graphs using hyper graph.
12.Open hypergraph 2D for observing the energy plot data from ta01 file.
GRAPHS:
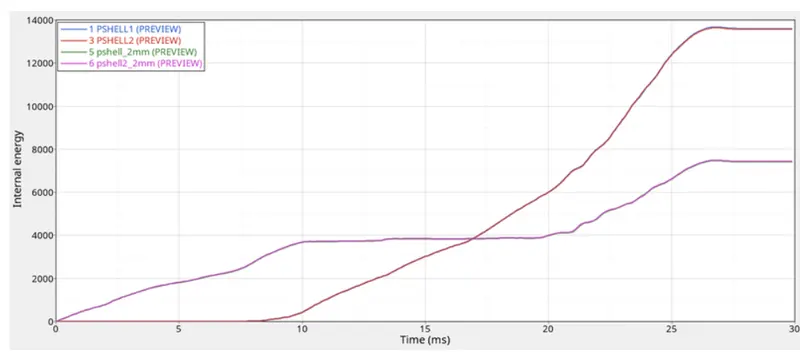
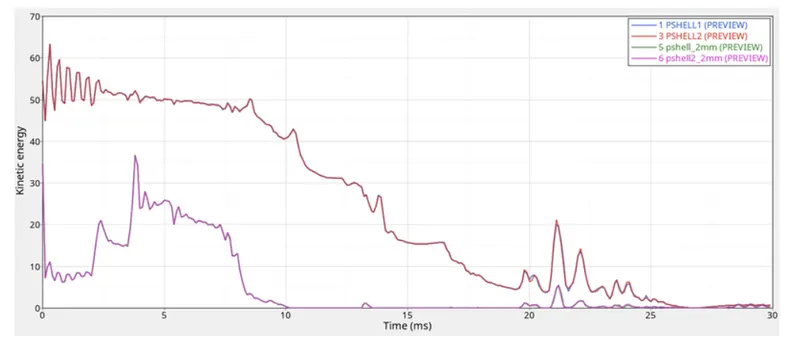
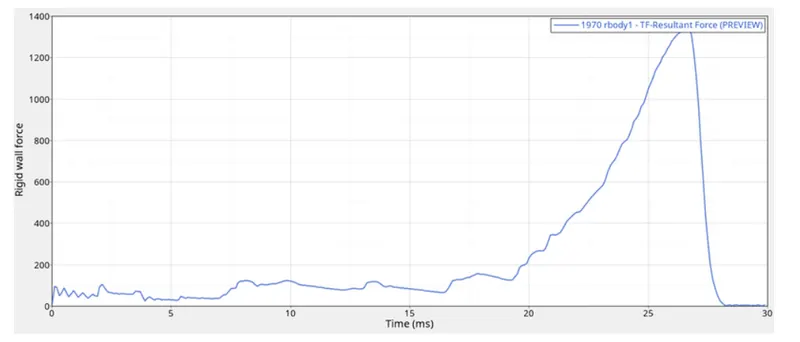
13.For this simulation, the max von mises stress is created as 69.53N/mm^2 and the max contact force is created as 82 N.
14.The time history for all the components are created in order to study the deformation and energy variation in each component with respect to time.
15.The internal energy for the p_shell_2 components is increasing at the begining because it is attached to the rigid wall and deform smoothly at notch area where as the stiffness is less at this parts.
16.The internal energy for the p_shell_3componenets is 0 for 10ms and linearly increasing to deform and the stiffness is high for this parts because of flat surface area.
17.The kinetic energy for the p_shell_2 components in varying at the beginning for 10ms and maintained as constant which means no more deformation occurs.
18.The kinetic energy for the p_shell_3 components is continuosly varying over the time 25ms means deformation takes place at a velocity of 13.3 m/s.
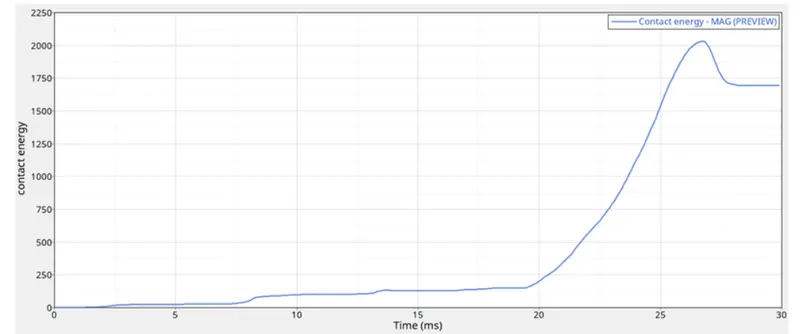
19.The contact energy is varying at a very small amount at the beginning and there is a sudden peal formed because there is large amount of energy developed at the end of deformation.
20.The over all elements are vecame compressed which will developed large force on the rigid wall around 1400N and energy created is 2KJ.
CASE-2:
1.The model is imported and run the simulation with recommended properties whereas we have to change Inacti = 6 as per given statement.
2.The type 7 contact interface is used with recommended property.
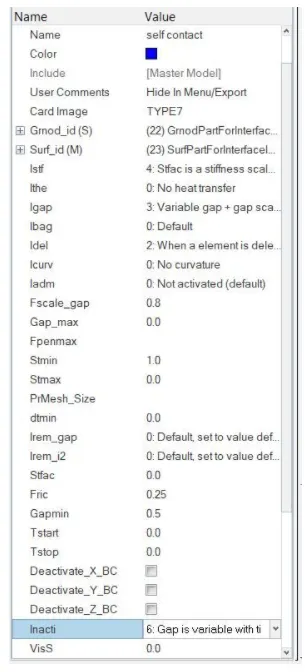
3.After changing the parameters run the simulation.
4.To run the simulation. Goto Analysis > RADIOSS > Select the loaction to save the file > Check include in collectors box. In option tab type -nt 4.
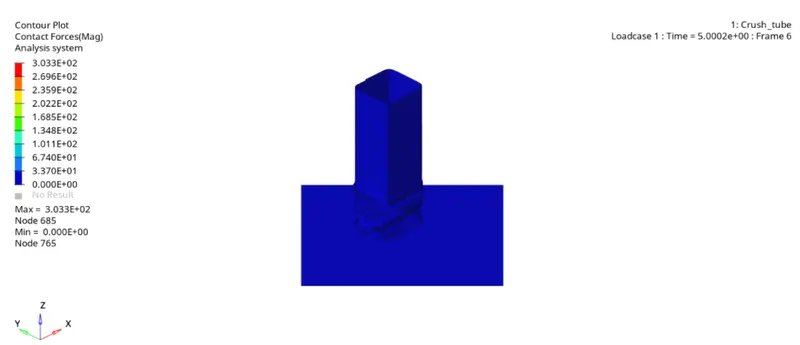
5.Plot the graphs using hyper graph.
GRAPHS:
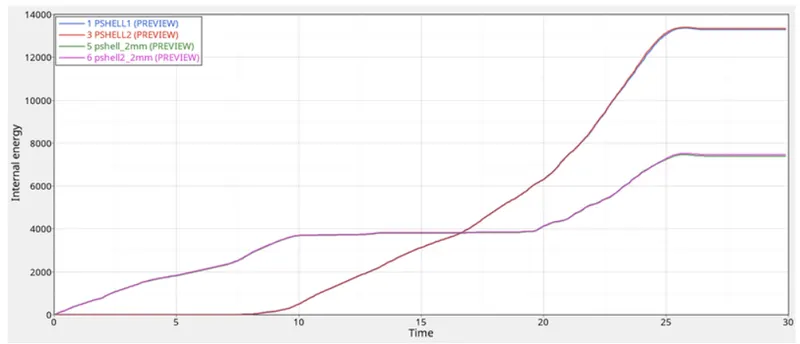
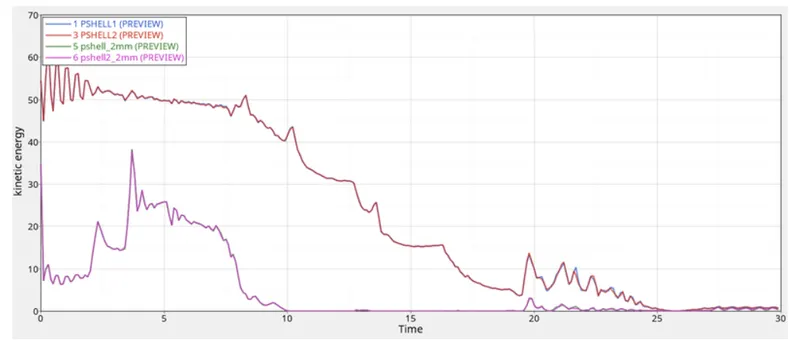
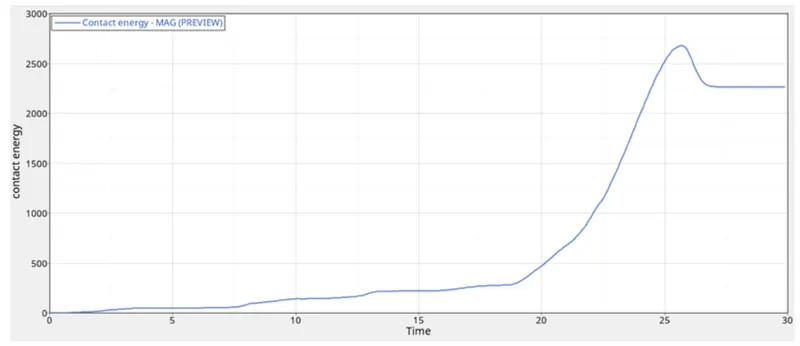
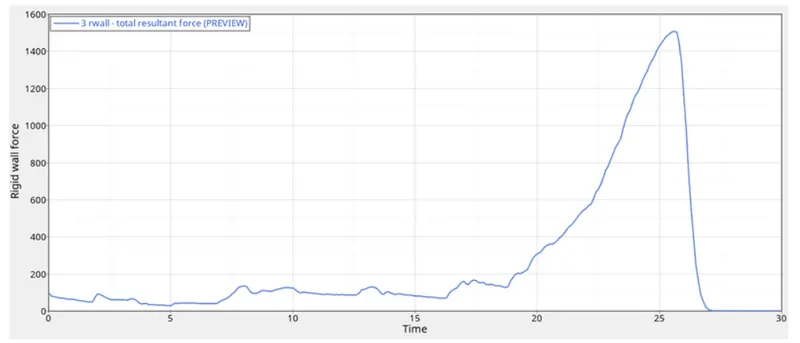
6.The max von mises stress is create as 69.53N/mm^2 and max contact force is created as 3N where as the time history for all the compoenents are created in order to study the deformation and energy variation in each componenet with repect to time.
7.The internal energy for the p_shell_2.0 components is increasing at the beginning because it is attached to the rigid wall and deform smoothly from the notch area where as the stiffness is less at this part.
8.The internal energy for the components is 0 for 10ms and linearly increasing to deform at a velocity 13.3m/s and the stiffness is high for this part because of flat surface area.
9.The kinetic energy for the p_shell_2.0 components is varying at the beginning for 10ms and maintained constant which meanse no more deformation occurs.
10.Because of notch area presents over the components it deforms very quickly. The kinetic energy for the p_shell_3.0 components is continuously varying over the time 25ms means deformation takes place at a velocity of 13.3m/s.
11.The contact energy is varying at a very small amount at the beginning and there is a sudden peak formed because there is large amount of energy developed at the end of deformation.
12.The overall elements are becoming overlapped or compressed which will develop large force on the rigid wall around 1500N and energy created as 2.6KJ.
CASE-3:
1.Import the model is imported and run the simulation with recommended properties where as we wants to change card image as Type 11 contact as per the requirement.
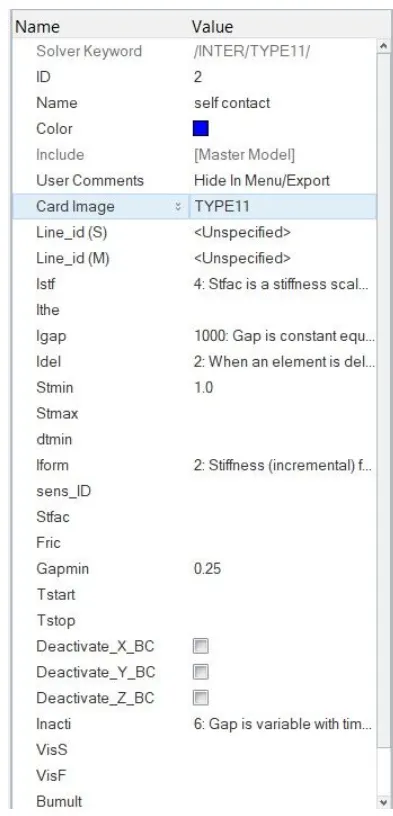
2.The type 11 takes into the account of the connections made by thee edges of the slave segment to the edges to master segment and hence improves thee accuracy of the reactive forces calculations.
3.To run the simulation. Goto Analysis > RADIOSS > Select the loaction to save the file > Check include in collectors box. In option tab type -nt 4.
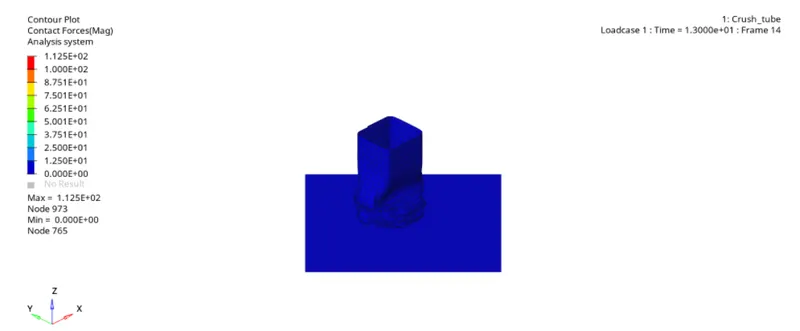
4.The simulation is done.
5.Plot the graphs using hyper graph.
GRAPHS:
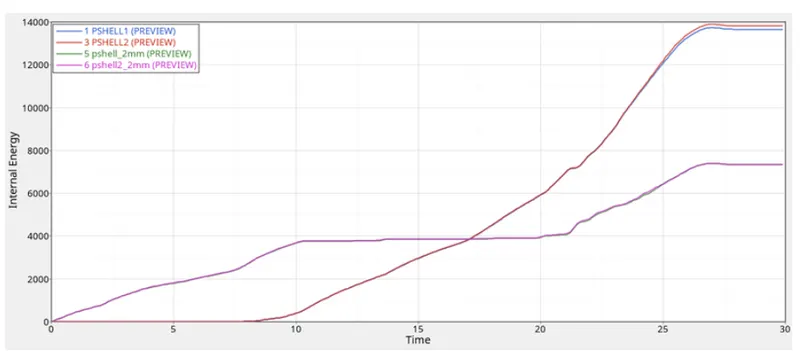
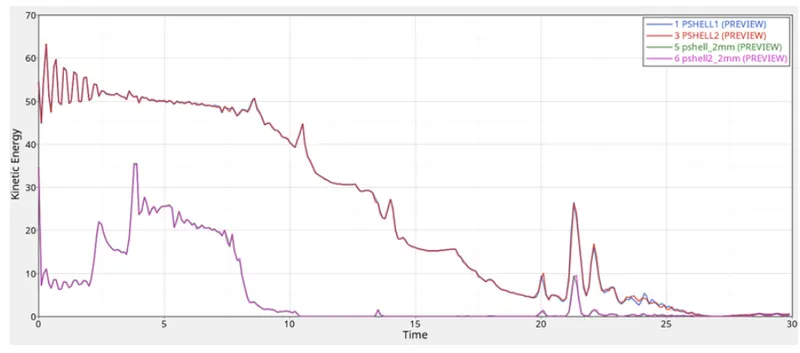
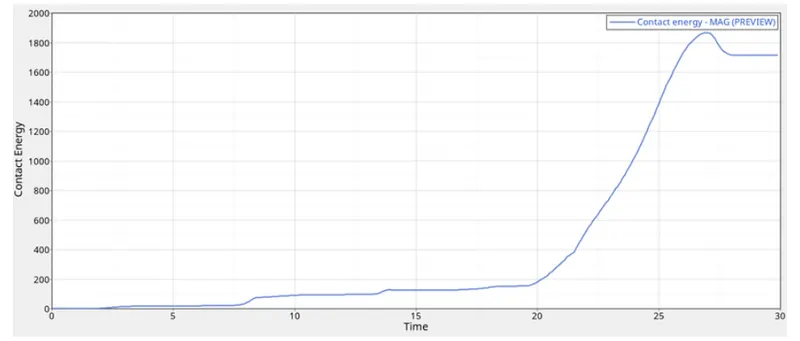
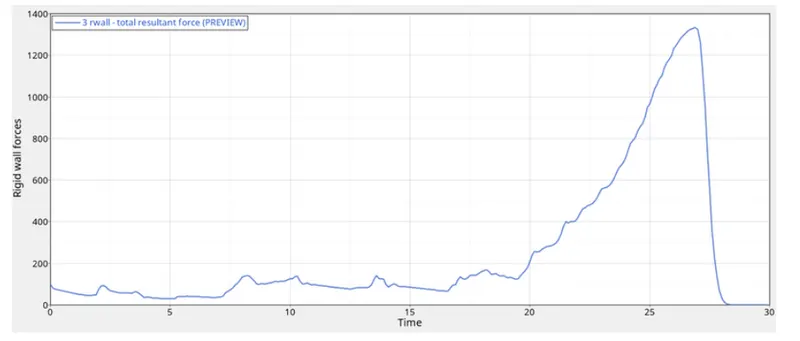
6.The max contact force is created as 112.5N where as the time history for all the components are created in order to study the deformation and energy variation in each component with respect to time.
7.The internal energy for the 2mm shell components is increasing at the beginning because it is attached to the rigid wall and deform smoothly from the notch area where as the stiffness is less at this part.
8.The internal energy for the 3mm shell components is 0 for 10ms and linearly increasing to deform at a velocity 13.3m/s and the stiffness is high for this part because of flat surface area.
9.The end of this compoenets defines the rigidity with a translational degree of freedom.
10.The kinetic energy for the 2mm shell components is varying at the beginning for 10ms and maintained constant which meanse no more deformation occurs.
11.Because of notch area presents over the components it deforms very quickly. The kinetic energy for the 3shell components is continuously varying over the time 25ms means deformation takes place at a velocity of 13.3m/s.
12.The contact energy is varying at a very small amount at the beginning and there is a sudden peak formed because there is large amount of energy developed at the end of deformation.
13.The overall elements are becoming overlapped or compressed which will develop large force on the rigid wall around 1300N and energy created as 1.9KJ.
CASE-4:
1.In this case the notch need to be deleted and make into a plane mesh.
2.To delete the Notch goto Tools panel and select Delete > Select the elements to be delete > Click on delete entity.
3.The notch elements are deleted.
4.To create a plane surface. goto 2D panel select Ruled > Select the First Node list > Select the Second Node list > Create. The mesh is created gice the element length as 6 > click Recalculate > Click mesh.
5.The mesh is created properly.
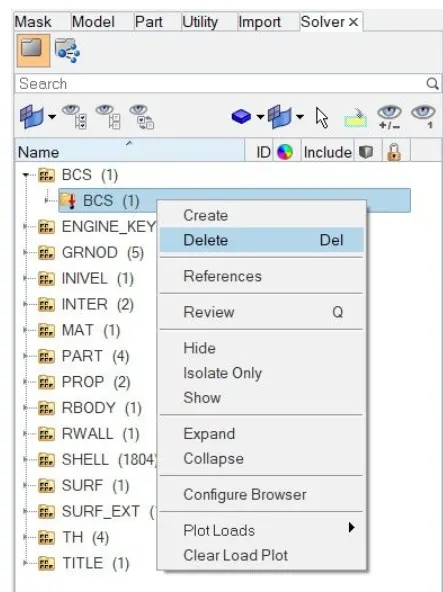
6.Now to delete the Boundary conditions, goto View > Browse > Hypermesh > Solver. The solver deck will be opened. Delete the BCS entity in the solver deck.
7.To run the simulation. Goto Analysis > RADIOSS > Select the loaction to save the file > Check include in collectors box. In option tab type -nt 4.
8.Plot the graph using Hypergraph.
GRAPHS:
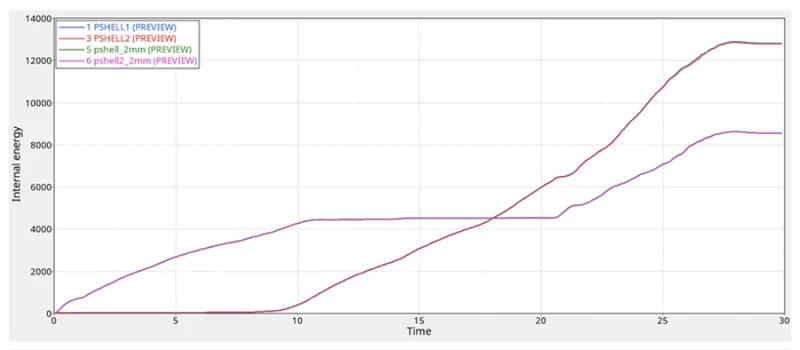
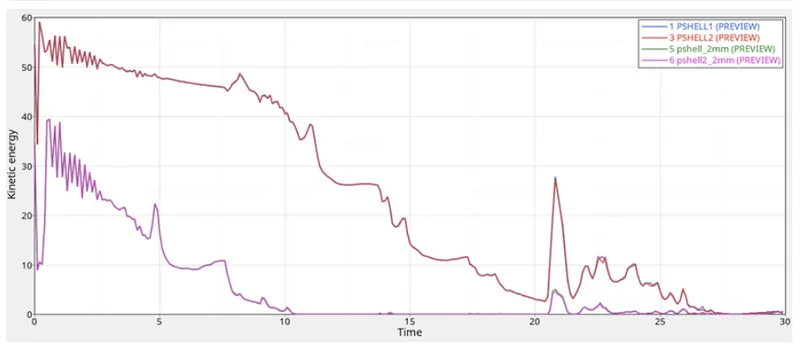
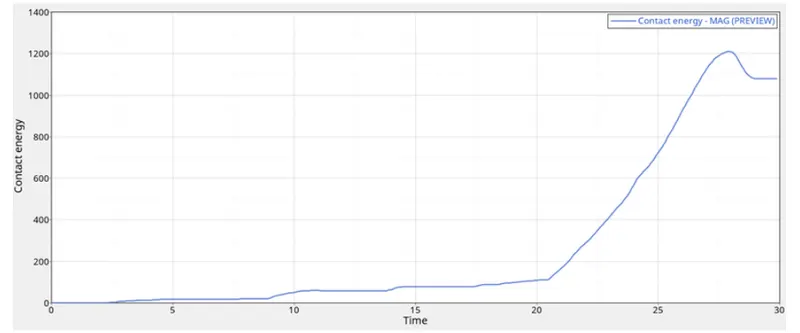
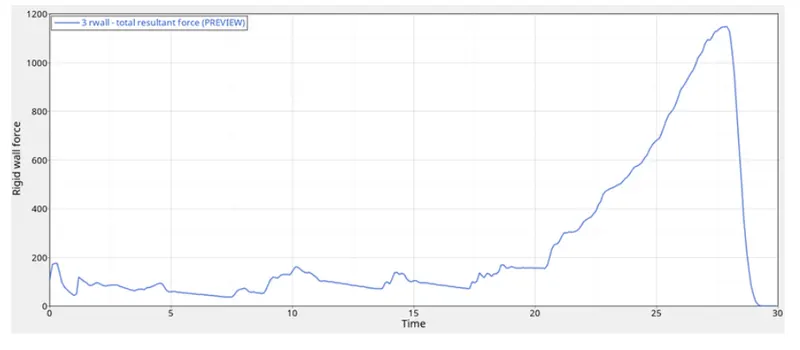
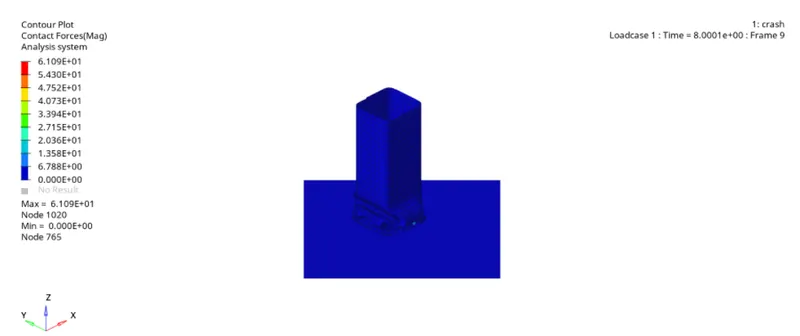
9.The max contact force is created as 61.09N where as the time history for all the components are created in order to study the deformation and energy variation in each component with respect to time.
10.The internal energy for the p_shell_2.0 components is increasing at the beginning because it is attached to the rigid wall and deform smoothly from the notch area where as the stiffness is less at this part.
11.The internal energy for the p_shell_3.0 components is 0 for 10ms and linearly increasing to deform at a velocity 13.3m/s and the stiffness is high for this part because of flat surface area. The total energy for all the 4 components are varying individually with absence of boundary conditions.
12.The kinetic energy for the p_shell_2.0 components is varying at the beginning for 10ms and maintained constant which meanse no more deformation occurs.
13.Because of notch area presents over the components it deforms very quickly. The kinetic energy for the p_shell_3.0 components is continuously varying over the time 25ms means deformation takes place at a velocity of 13.3m/s.
14.The contact energy is varying at a very small amount at the beginning and there is a sudden peak formed because there is large amount of energy developed at the end of deformation.
15.The overall elements are becoming overlapped or compressed which will develop large force on the rigid wall around 1200N and energy created as 1.3KJ.
CASE-5:
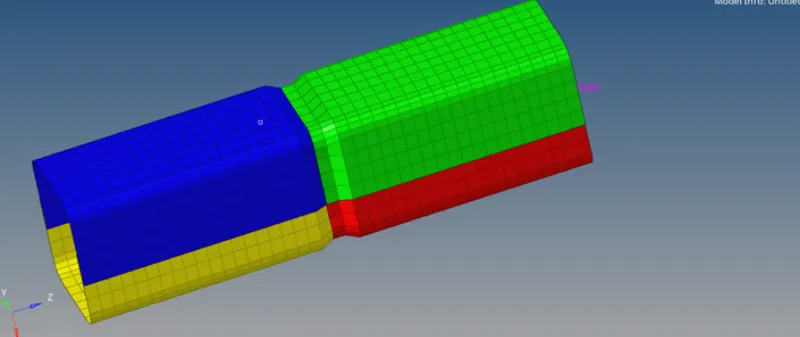
1.The model is imported and run the simulation with recommended properties where there is Notch presented on the middle surface and also the boundary condiditon are removed.
2.The notch is created with the magnitued of 3mm. The type 11 conract interface is used.
3.To run the simulation. Goto Analysis > RADIOSS > Select the loaction to save the file > Check include in collectors box. In option tab type -nt 4.
4.Plot the graph using Hypergraph.
GRAPHS:
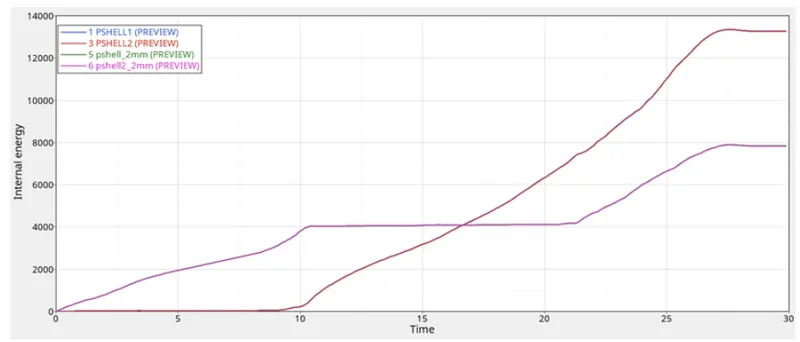
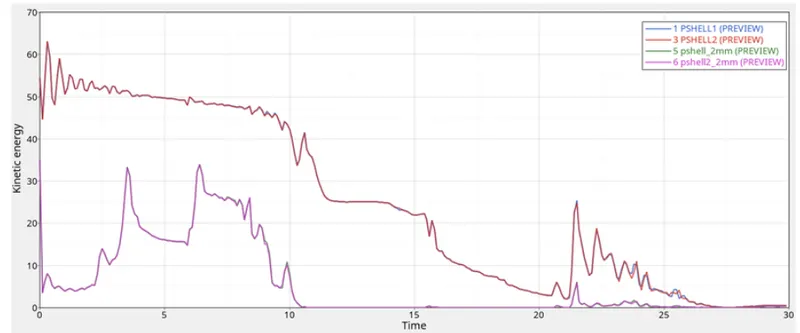
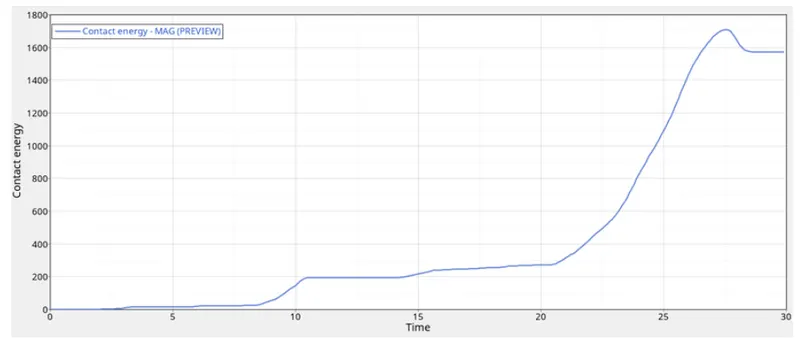
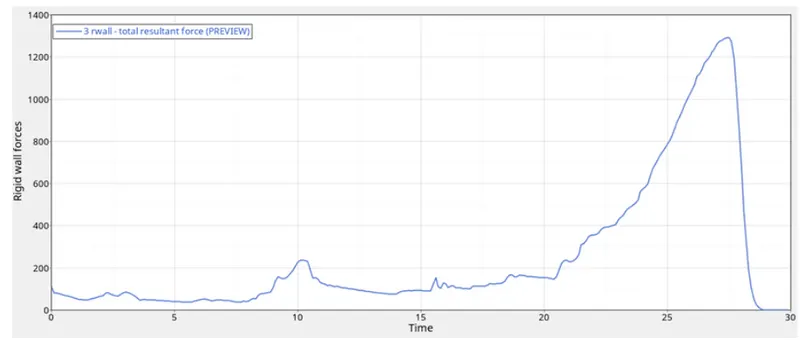
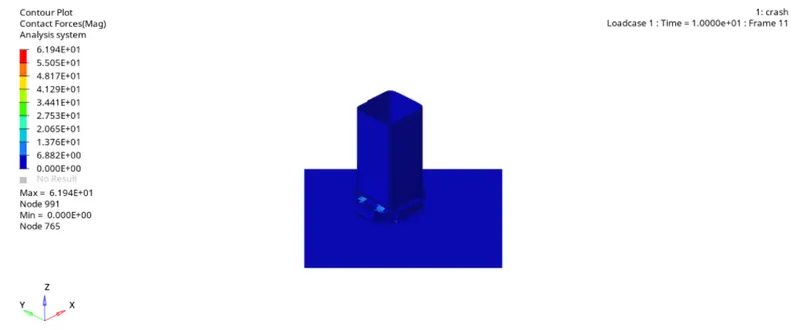
5.The max contact force is created as 61.94N where as the time history for all the components are created in order to study the deformation and energy variation in each component with respect to time.
6.The internal energy for the p_shell_2.0 components is increasing at the beginning because it is attached to the rigid wall and deform smoothly from the notch area where as the stiffness is less at this part.
7.The internal energy for the p_shell_3.0 components is 0 for 10ms and linearly increasing to deform at a velocity 13.3m/s and the stiffness is high for this part because of flat surface area. The total energy for all the 4 components are varying individually with absence of boundary conditions.
8.The kinetic energy for the p_shell_2.0 components is varying at the beginning for 10ms and maintained constant which meanse no more deformation occurs.
9.Because of notch area presents over the components it deforms very quickly. The kinetic energy for the p_shell_3.0 components is continuously varying over the time 25ms means deformation takes place at a velocity of 13.3m/s.
10.The contact energy is varying at a very small amount at the beginning and there is a sudden peak formed because there is large amount of energy developed at the end of deformation.
11.The overall elements are becoming overlapped or compressed which will develop large force on the rigid wall around 1300N and energy created as 1.7KJ.
CASE-6:
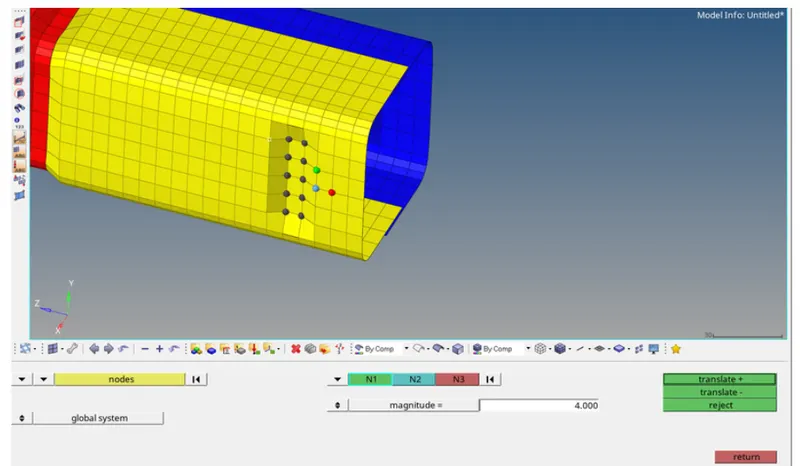
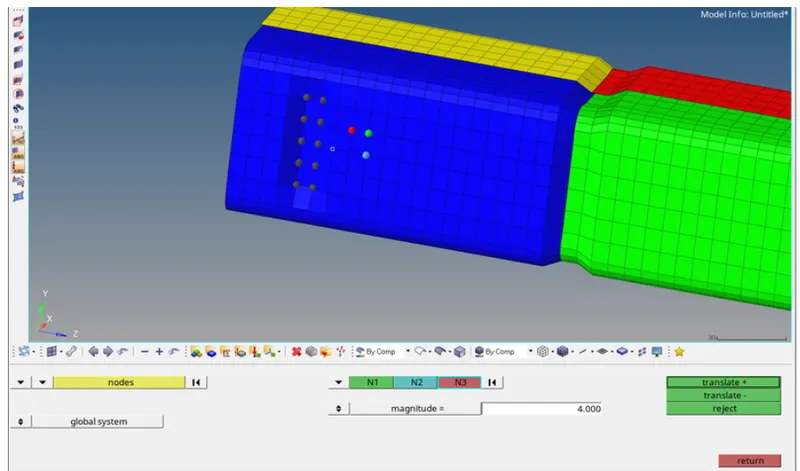
1.In this case, a notch should be created at the same place in the opposite direction.
2.To create a notch translate option is used.
3.Goto tools > Translate > Select nodes to translate > Select the orientation of the elements > Assign the magnitude as 5.
4.To run the simulation. Goto Analysis > RADIOSS > Select the loaction to save the file > Check include in collectors box. In option tab type -nt 4.
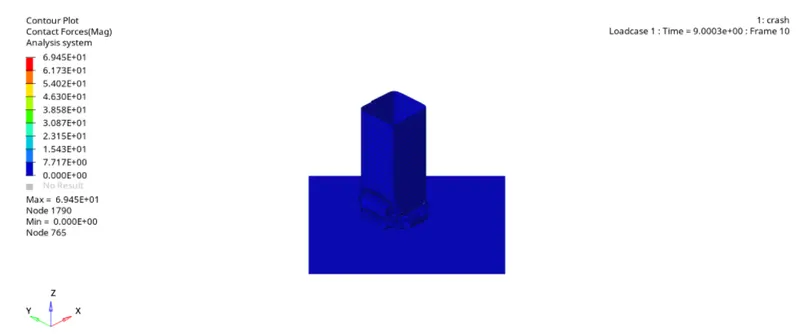
5.Plot the graph using Hypergraph.
GRAPHS:
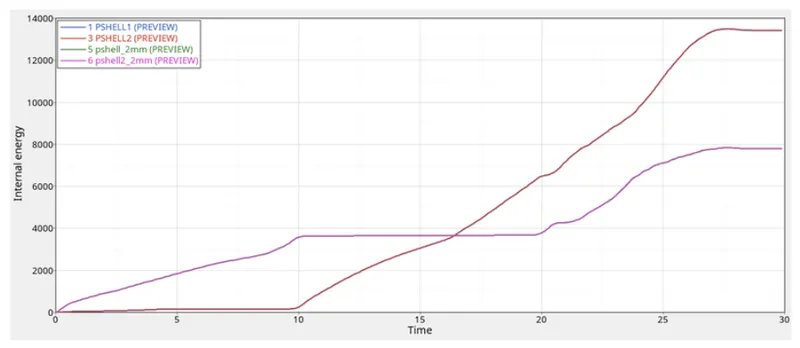
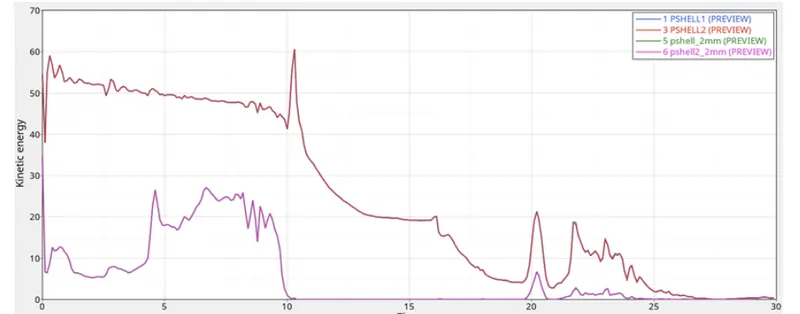
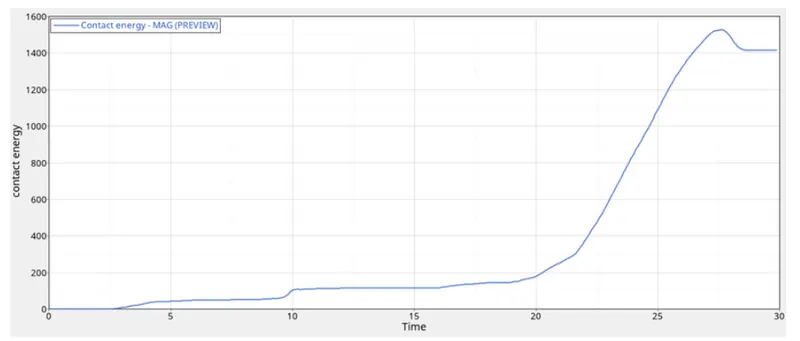
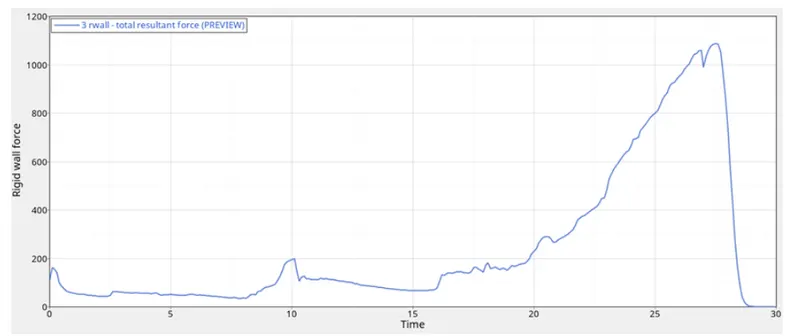
6.The max contact force is created as 69.45N where as the time history for all the components are created in order to study the deformation and energy variation in each component with respect to time.
7.The internal energy for the 2mm shell components is increasing at the beginning because it is attached to the rigid wall and deform smoothly from the notch on the middle opposite 2 surfacce whereas stiffness is less.
8.The internal energy for the 3mm components is 0 for 10ms and linearly increasing to deform at a velocity 13.3m/s and the stiffness is high for this part because of flat surface area. The total energy for all the 4 components are varying individually with absence of boundary conditions. The total energy for all the 4 components is varying individually with absence of boundary conditions.
9.The kinetic energy for the 2mm shell components is varying at the beginning for 10ms and maintained constant which meanse no more deformation occurs.
10.Because of notch area presents over the components it deforms very quickly. The kinetic energy for the 3mm shell components is continuously varying over the time 25ms means deformation takes place at a velocity of 13.3m/s.
11.The contact energy is varying at a very small amount at the beginning and there is a sudden peak formed because there is large amount of energy developed at the end of deformation.
12.The overall elements are becoming overlapped or compressed which will develop large force on the rigid wall around 1100N and energy created as 1.5KJ.
COMPARISION:
| Case No | Particulars | Energy Error(%) | Mass Error(%) | Max.Contact Force(N) | Max.Rigid wall Force(N) | Max.Contact Energy(KJ) | Reason |
| Case 1 | Running model as it is. | -3.8 | 0 | 69.53 | 1400 | 2 |
Node to Surface contact type 7. |
| Case 2 | Change Inacti = 6. | -4.8 | 0 | 69.53 | 1500 | 2.6 |
No Initial Penetrations found. |
| Case 3 | Type 11 Interface | -3.9 | 0 | 112.5 | 1300 | 1.9 | Type 11 Edge to Edge contact. |
| Case 4 | Removing notches and BC's | -2.5 | 0 | 61.09 | 1200 | 1.3 | No boundary condition, Flat surface. |
| Case 5 | Creating new notch to middle | -3.6 | 0 | 61.94 | 1300 | 1.3 | Ability to absorb increased due to middle notch. |
| Case 6 | Creating notch only on opposite side | -3.2 | 0 | 69.45 | 1100 | 1.5 | Due to Opposite notches. |
1.The change in the internal energy is due to the notch. With the removal of the notch the internal energy decreases and hence reduces the energy error as well.
2.The notch areas have high stresses and deform. In the plane surface where the notches are removed the stress levels are low. Since, we can state that by removing the notch helps to reduce the stress acting in the body.
3.The 3mm shell is requires higher internal energy it means ability to absorb force is higher in shell with 3mm thickness compared to shell with 2mm thickness. More thickness of shell has more internal energy the component.
OBSERVATION:
1.It is observed that in case 4 where the notch is removed, the stress induced in the crush tube is the least compared to other cases. The crush tube with notches undergo stress concentration and these areas are the first to undergo deformation.
2.The deformations are predictable in case of notched components. No initial penetraion is observed in case-1 where Inacti = 0.
3.If initial penetraion existed, it could have been indicated by the graph of contact energy which could have picked up at the start itself before any impact. Energy error for all cases is between -3.8% to 2.5% which is acceptable.
RESULT:
Thus the bumper model have been meshed and welded seam with the element size of 6mm and ready for further solving and post processing.
Thus all the cases of crush tube have been simulated and results are comparred using various energies plot.