Week - 8 - Morphing
AIM:
To perform morphing operations are given cad models.
PROCEDURE:
STEP 1: IMPORTING
Opening ANSA and importing the cad file
STEP 2: ORIENT
If any orient is improper then it should be corrected by selecting TOPO – FACES – ORIENT – AUTO – GREY OUTSIDE
STEP 3: CHECKS
Performing geometry checks by TOOLS – CHECKS – GEOMETRY – EXECUTE
STEP 4: MORPHING
- The entities which are needs to be morphed are first isolated from the geometry by INOT option.
- Selecting morph options from TOP PANEL – MORPH DECK – BOXES –NEW
- Dragging the selection box to the isolated entities and middle click.
- In the NEW MORPH dialog box, MIN volume is to be selected, and from clicking the ALIGN option – 2 NODE – selecting 2 nodes from the box , our required alignment could be done.
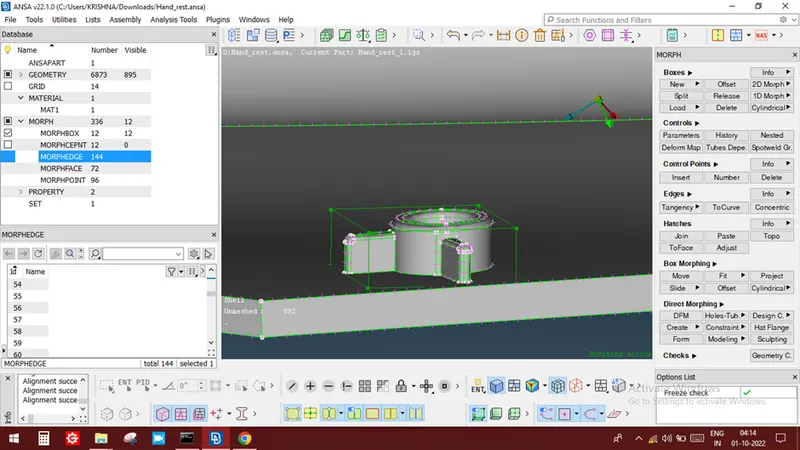
- Then in MORPH DECK – BOX MORPH – MOVE option is selected which is used to change the size the entity.
- By clicking such options, CONTROL POINT MOVEMENT dialog box opens.
- In that dialog box ENTITY mode is clicked and necessary entities are selected from the screen – MIDDLE CLICK.
- Then ALIGN option is chosen and the box entity is chosen for increasing the height – MIDDLE CLICK.
- A WARNING dialog box opens, in that GEO CHECK option – NEXT – FINISH.
- Next, the rectangular box entity is selected from the morph box – MIDDLE CLICK.
- OFFSET value needs to be entered in the specified place – MIDDLE CLICK – OK
- After doing such steps the entities will get morphed according to the specified offset value.
LEARNING OUTCOMES:
By doing this challenge, I come to know about what is morphing and its steps and procedures involved in it.
CONCLUSIONS:
Thus for the given two cad model morphing operations were performed and studied.