Spotwelds Modelling Using LS-Dyna
AIM:- Spotweld Analysis using the beam and hexa element.
Objective:-
1) model spot welds for the given assembly of parts and run a crash test.
2) model Spotweld using beam elements and solid elements separately.
3) Compare the axial and shear force among beam and solid elements
Spotweld
Spot welding (also known as resistance spot welding) is a resistance welding process. This welding process is used primarily for welding two or more metal sheets together by applying pressure and heat from an electric current to the weld area.
Spot Welding involves using heat produced by resistance to an electrical current to join materials together. The current heats the materials to a point where they become malleable. The use of strong pressure bonds them together.
Spot welding is only suitable for a small selection of base materials. Low carbon steel is the most suitable material for spot welding. This is because it is more resistant to electricity and has a lower thermal conductivity than the copper electrodes used to create the required electrical current.
High carbon steels and aluminum alloys can form brittle welds that don’t last with the spot welding process. Pure aluminum can qualify for spot welding but requires higher current levels. This is because it has a lower resistance to electricity than low carbon steel.
Procedure
# Spotweld modeling with beam elements.
1) Assigned material and section to the parts/two plates already present in the .k file.
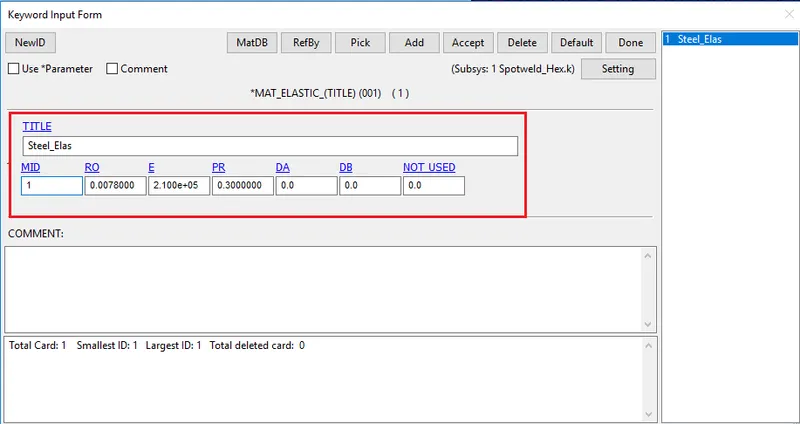
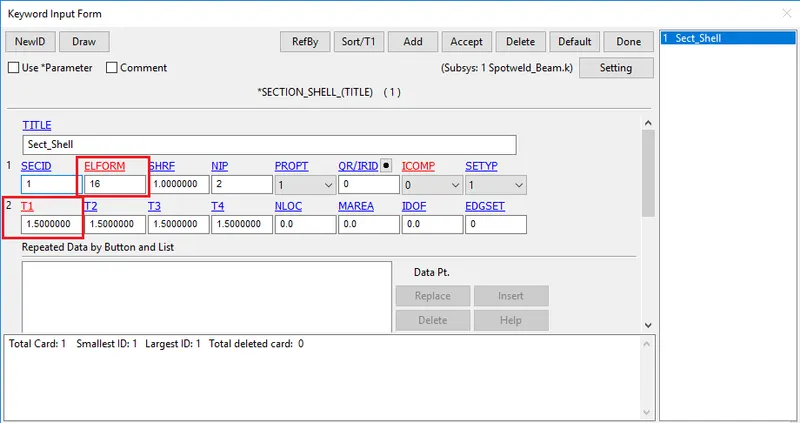
2)Elastic material MAT-001 with steel property has been assigned to the part with 1.5mm thickness in section-shell (element formulation-16)
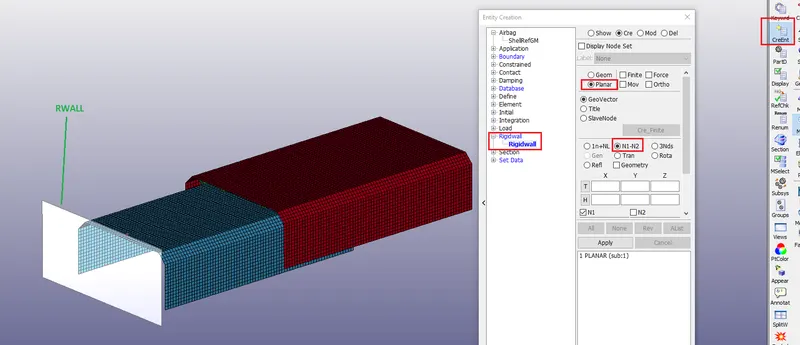
3) Created a rigid wall for the crash of the plates.
4) Procedure for creating spot weld as beam element,
Mesh----ElemGen----Beam----
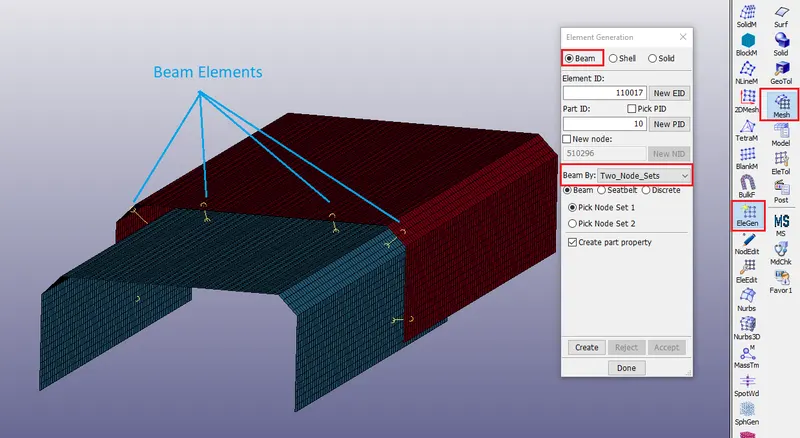
created a total of 6 Beam elements. All elements created their own PID by default. So to make it as one first created Dummy PID. Used Element Tools ---- Move or Copy to move the Beam elements in a single PID.
5) assign its material and section to the Beam element.
Section---beam---thickness-2--
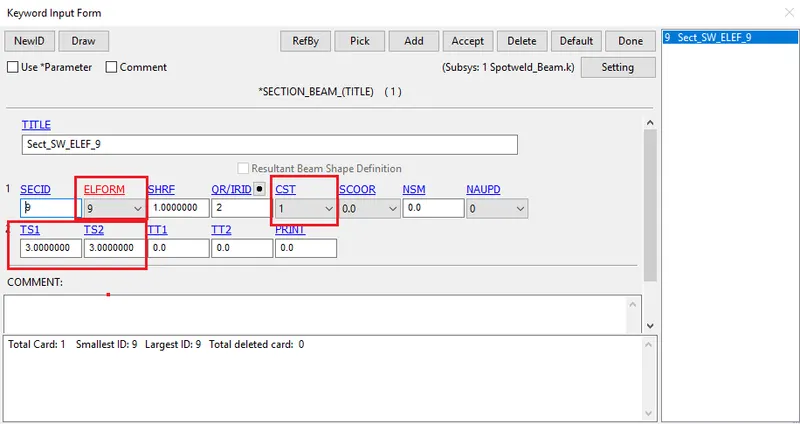
Element formulation of 9 is recommended for Spot weld representation of Beam element. CST (Cross-section Type ) is needed to define as 1 (Tabular) otherwise solver will throw an error of coordinate system during Solving.
Material for beam element spot weld,
MAT----SPOTWELD_100--
We need to define some property,
RO----E----PR----SIGY----EFAIL-----NRR-----NRS----NRT
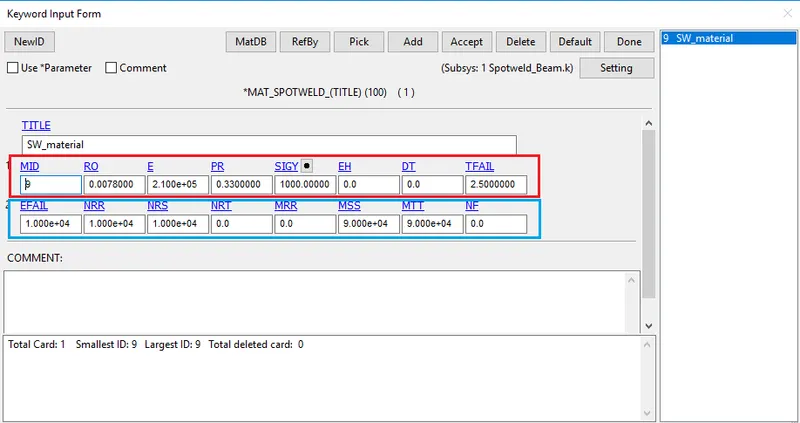
Set the Time Failure (TFAIL) to half of the simulation Time i.e. 2.5ms. This will lead to failing the weld based on the time interval define. Set the max value for all the other parameters.
6) assigned the section and material to the Weld PID.
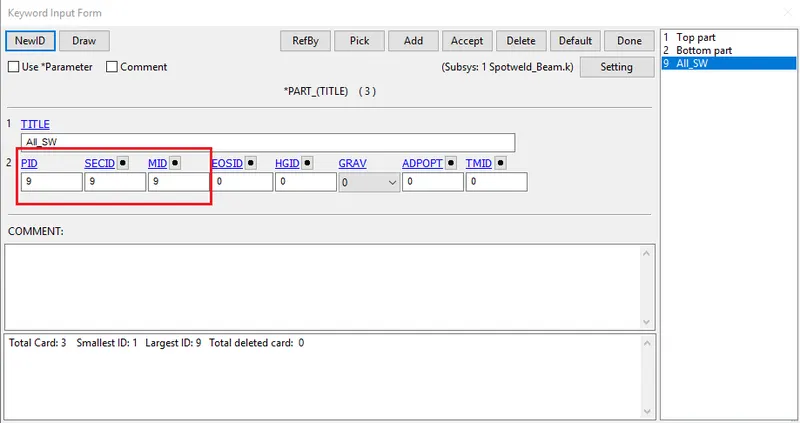
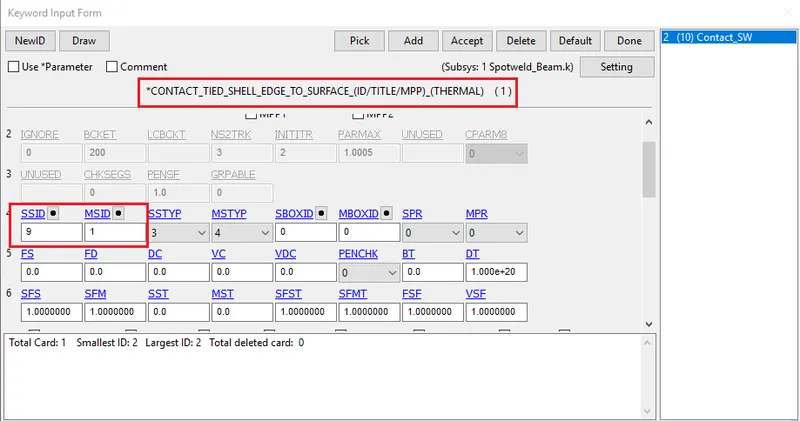
7) Contact needs to be assigned in between plates and the beam weld element, In order to make contact assign between these components we have to create a set, here we have created a part set from creating an entity.
Two types of Contacts deployed over the Problem
a) Tied Shell Edge To Surface Contact:- This is defined contact between the Weld and their respective parts. The parts that would be welded consider as Master and the Weld representing Elements considered as Slave.
b) Automatic Single Surface Contact:- This is defined as contact between parts or the parts that may collide with their own surface after impact. In short, it will represent the Self-Contact. No need to Defined Master for Self-Contact Representation only Slave Set is enough.
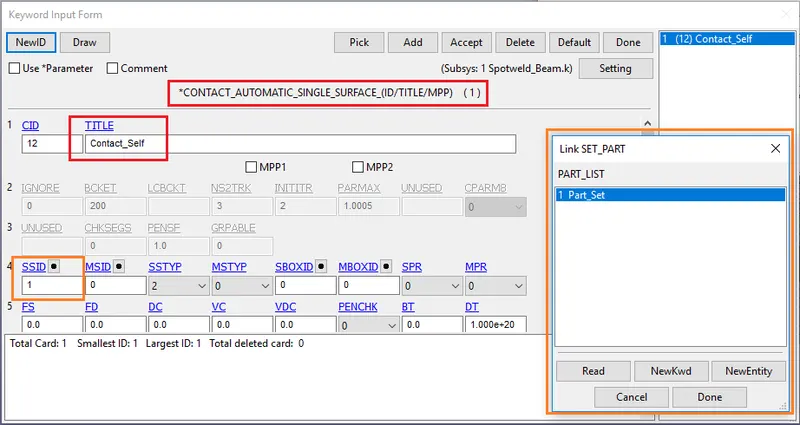
8) Control card has been assigned to give a termination time for simulation, termination point as 5ms and dt 0.1 ms taken for this simulation.
9) Database card assigned for output request.
# Procedure-2, For solid weld elements-
All the procedures are the same, with changes in the solid element creation. Only have to crate the Hexa elements instead of Beam.
EleTol----ElemEdit----Create--
After creating the solid element assigned all the things that we did in beam spot weld. assigned sections and materials for this solid element.
Here for material, we used the same material as a beam spot weld, but for section, we have chosen a solid section with 1 element formulation.
Note- Criteria for Weld failure--
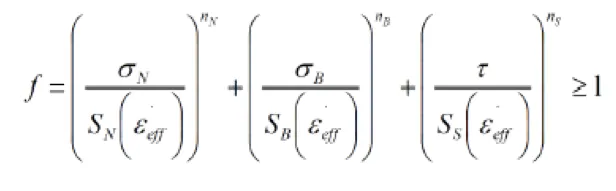
Formula used for for define failure criteria,
The failure criteria state that if the Summation of all the forces is more than one then the respective weld will Fail on that value. Whereas In this setup we are failing Weld at Time Failure and not considering the forces values for the result evaluation.
Result Evaluation
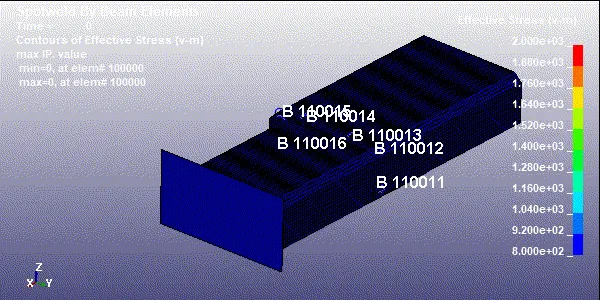
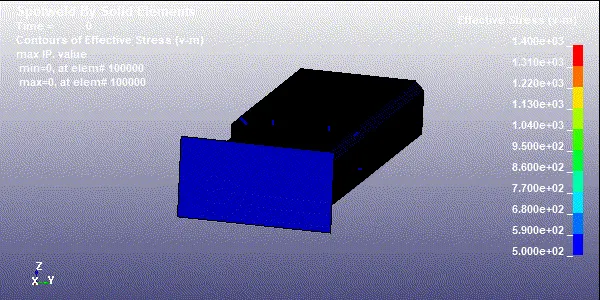
Animation
Plots
Equilibrium Check
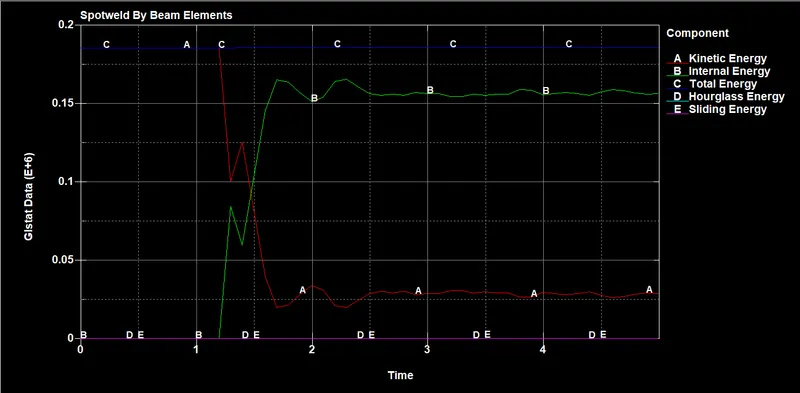
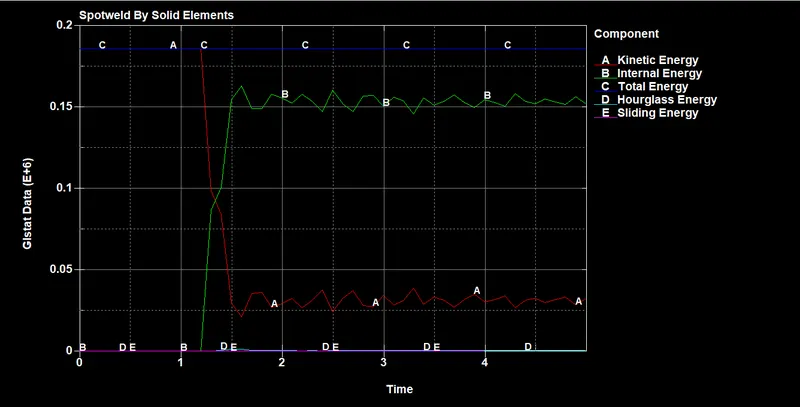
As we can see that in the above plots both the System are in Equilibrium. Total Energy remains Constant.
Axial Force over the Spot Weld
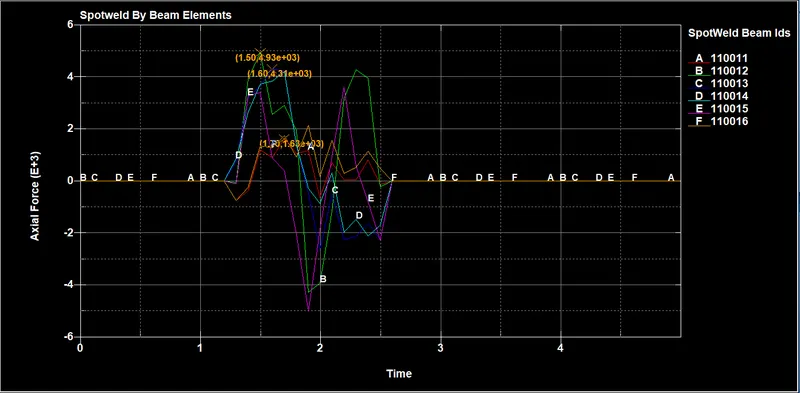
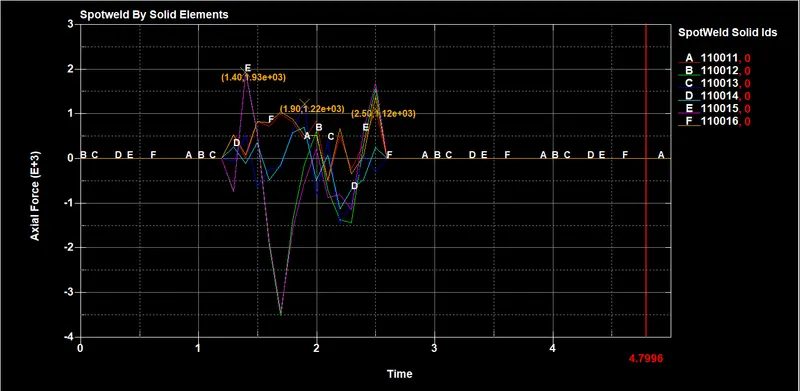
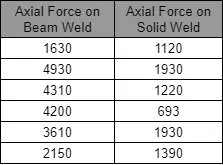
As we can see from the spot weld Axial force results in the above image the force variation in both the weld result is significant. The Axial forces generated in the Case of Beam welds are much higher as compare to Solid Welds.
Shear Force Over the Spot Weld
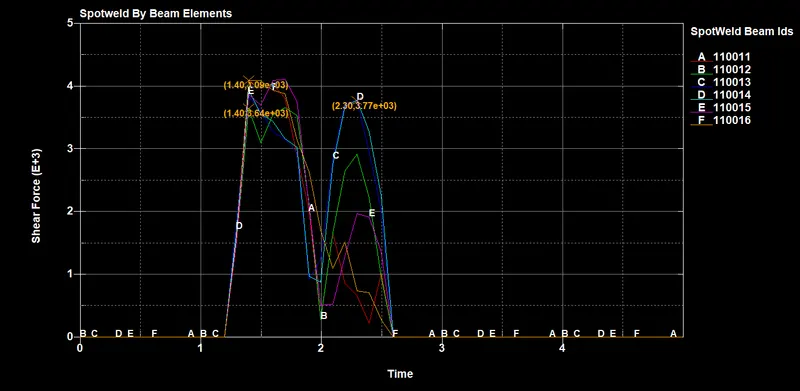
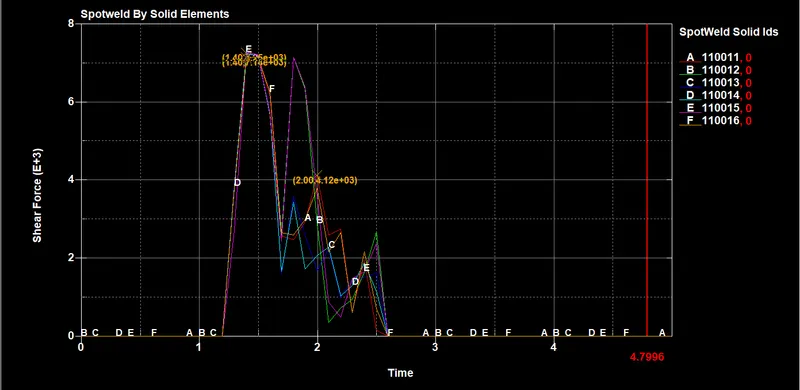
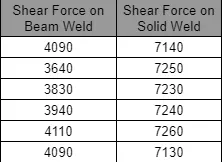
Shear forces generated over the Solid weld elements are much higher than the Beam Elements.
Resultant Force
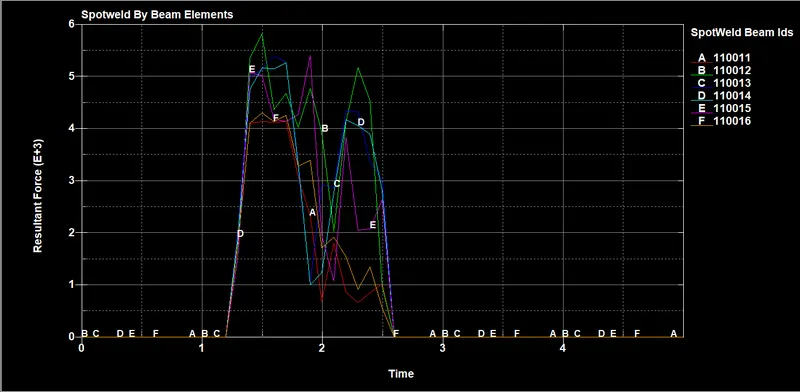
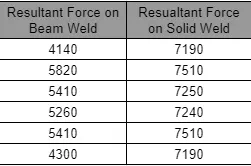
The resultant forces are also larger in the case of Solid weld element cases.
Conclusion:
1) The Axial force in the case of Beam is Higher.
2) The Shear force in the Solid element weld is higher. This is due to the higher stiffness of the Hexa element. The larger area is in contact when we used solid element as there is an element (face) to element contact whereas the beam elements are connected by Nodes.
3) There is no Hourglass energy generated. Also, the System is in Equilibrium.
4) Solid elements give a good representation of the actual weld