Week 2 Challenge
WEEK 2 CHALLENGE
INTRODUCTION:
STAAD is a popular structural analysis application known for analysis, diverse applications of use, interoperability, and time-saving capabilities. STAAD helps structural engineers perform 3D structural analysis and design for both steel and concrete structures.
A physical model created in the structural design software can be transformed into an analytical model for structural analysis. Many design code standards are incorporated into STAAD to make sure that the structural design complies with local regulations.
1.
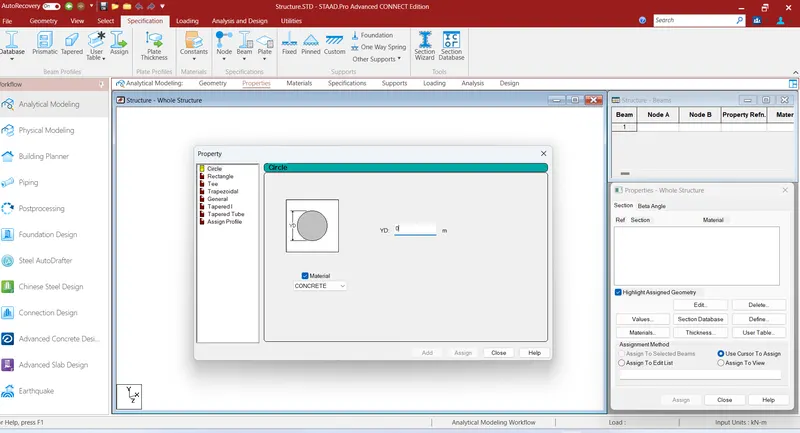
1. How will you assign Circular section to column?
Ans: For assigning a circular section to column, we have to go to properties then select the define property option and give the radius of circle and assign to the column.
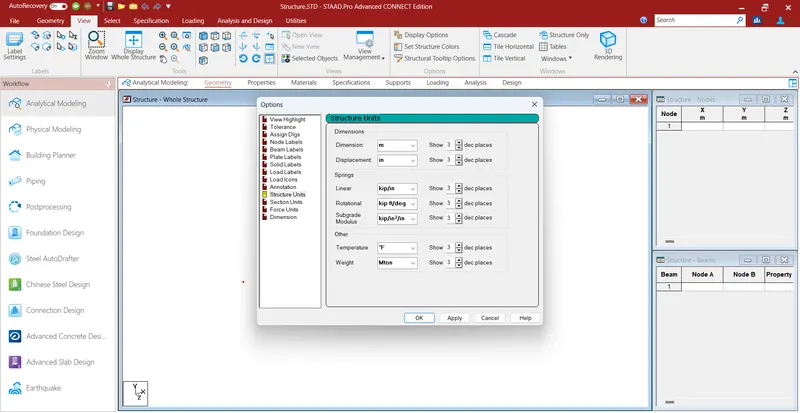
2. How will you assign Unit system to a .std model file?
Ans: While creating a model go to unit system and assign the units.
Go to view menu and select display options and click on units.
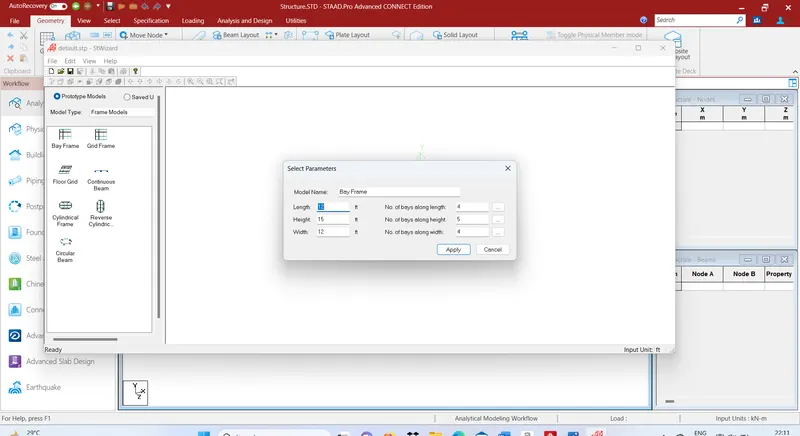
3. What are the parameters to be specified while using “Bay Frame” option?
Ans: The following parameters are specified while using Bay Frame option:
a) Length
b) Height
c) Width
d) No. of bays along length
e) No. of bays along Height
f) No. of bays along Width
4. Name few codal standards incorporated in STAAD Pro software.
Ans: In STAAD Pro codal standards are incorporated for Concrete, Steel and Aluminium IS456, IS13920, Euro code, ACI, BS codes, American codes.
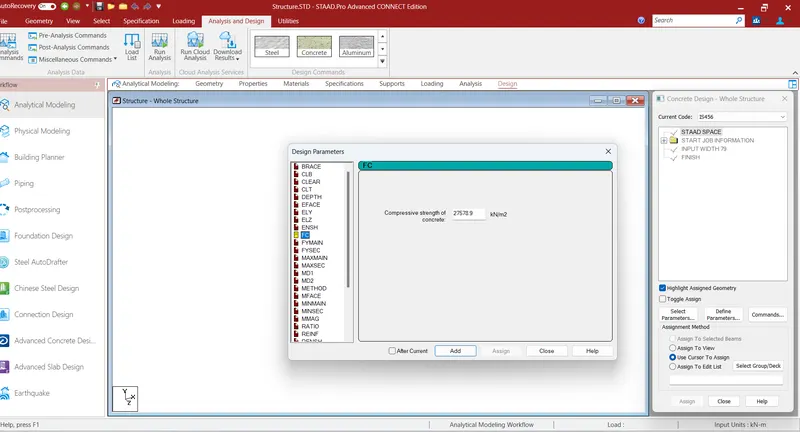
5. How will you specify the design compressive strength for a RCC section?
Ans: In design select materials as concrete and select the code and then go to define parameters then selcect the Fc and specify the value.
2.
1. State the “Input” steps involved in RCC design.
Ans: The following are the steps inovlved in RCC design INPUT
a) Geometry - So the geometry panel mainly deals with the initial part of the modelling in the STAAD Pro software. In the geometry panel we can draw the entire building using the geometry panel. The whole building is drawn within the geometry input as per the Architectural layout that we have received .
b) Properties - So in the Properties panel we assign the various properties to the model like beams, columns, plates etc using this property panel.
c) Materials - we assign different materials to the model using the material panel.
d) Specifications - In the specification panel we assigned the designations that to be followed while analysing.
e) Supports - In this panel we assign the base supports and the boundary conditions. All the things that are related to the loadings that we are going to assign in the model are done in this loading panel.
f) Loading - We load the different supports into the model
g) Analysis - In the analysis panel, the computational analysis is executed. After doing the above steps we need to analyse the building for the safety of the building and this analysation of the building is to be done in the analyse panel.
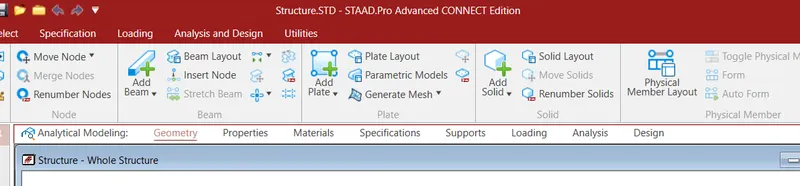
h) Design - And the final step in modelling in STAAD Pro software is the Design. So after doing the analysis, the building sections are designed and the detailed reinforcement design according to the designing that we have done so far is extracted through design input.
2. Explain the difference between Fixed and Enforced support condition in STAADPro.
Ans:
When the FIXED or FIXED BUT type of support is specified, for those degrees of freedom which are to be treated as fully restrained, STAAD assumes the displacements to be known quantities whose value is zero. Hence, those degrees of freedom are not considered for the stiffness matrix, and their value is not calculated. (For the FIXED BUT support type, if any degrees of freedom are assigned a spring using the KFX thru KMZ terms, those are treated as unknowns and their displacements are calculated).
When the ENFORCED or ENFORCED BUT type of support is specified, for those degrees of freedom which are to be treated as restrained, STAAD assigns a spring with a very high spring stiffness - translational stiff springs for translational restraints, and rotational stiff springs for rotational restraints. Those degrees of freedom which are free to displace are assigned springs of zero stiffness. Hence, for all the 6 degrees of freedom at such supports, the displacements are calculated. The ones which have a stiff spring will end up having a negligible displacement, and those with zero-stiffness-springs will have a displacement based on the structure geometry, properties and loading.
3.
1. Explain the steps involved in analysis of a model using STAAD Pro sequentially.
Ans:
Once you have completed the input file, the following procedure is used to perform an analysis and optional design.
The STAAD analysis engine performs analysis and design sequentially with a single click. In order to carry out the design, these design parameters must be specified along with geometry, properties, etc. in the input file. Also, we can change the design code used for design and code check before performing the analysis and design.
The Analytical Modeling and Physical Modeling of the STAAD.Pro user interface are used to prepare the structural input data which is then passed to the STAAD analysis engine for general purpose structural analysis and design
Select the Run Analysis tool in the Analysis group on the Analysis and Design ribbon tab.
The STAAD Analysis and Design dialog opens.
During the analysis (and design, if specified), an output file is generated. This file may contain selected input data items, results and error messages. Optional print specifications can be used to include additional information in the output file.
Select an option for what action occurs when the dialog is closed:
Open the output file - go to the post-processing mode - remain in the analytical modeling mode and Click Done.
To review the output file is this option was not selected in the STAAD Analysis and Design dialog, either:
Select the STAAD Output tool in the Utilities group on the Utilities ribbon tab. Select the View STAAD Output File tool on the Quick Start toolbar.
2. Explain the two ways in which a structural framework/model can be created in STAAD Pro software.
Ans: The two ways a strcutural framework/ model can be created in STAAD.Pro software are by uisng the following methods
Node by Node method: The first way to model a building by adopting node-by-node method. In this method we assign the nodes as per the architectural drawings that are placed manually by placing the co-ordinates. We can assign the nodes to our building by using the geometry panel. And these nodes can be transitionally repeated based on the building dimensions and the levels.
Structural wizard method: The second method is structure wizard method to model a building. This method is an automated method as compared to the node-by-node method. We can create truss, frame and other structures just by using this method.
3. Elaborate the different support conditions in STAAD Pro.
Ans: The different support conditions in STAAD PRO are:
FIXED SUPPORT - Fixed supports are restrained in all six degrees of freedom (TX, TY, TZ, RX, RY, and RZ)
PINNED SUPPORT - Pinned supports are restrained against translation (TX, TY, and TZ) but free to rotate (i.e., released in RX, RY, and RZ)
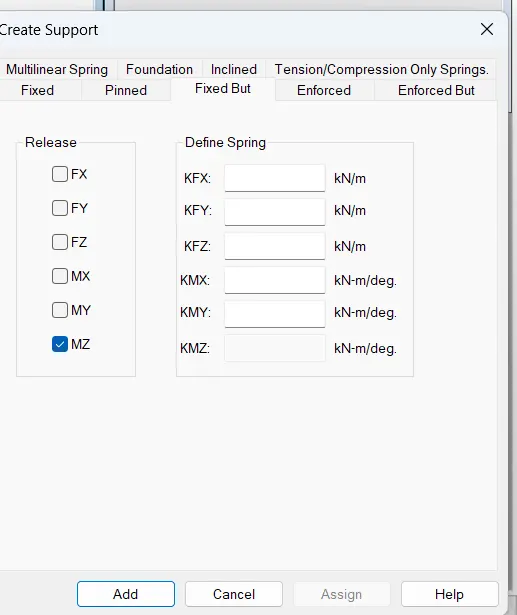
FIXED BUT SUPPORT - The Fixed But support condition is used to allow the user to define which degrees of freedom of a node are free and which are fixed.
ENFORCED SUPPORT/ENFORCED BUT SUPPORT - When the ENFORCED or ENFORCED BUT type of support is specified, for those degrees of freedom which are to be treated as restrained, STAAD assigns a spring with a very high spring stiffness - translational stiff springs for translational restraints, and rotational stiff springs for rotational restraints.
INCLINED SUPPORT - Fixed joints (supports) are assumed to be vertical or horizontal (parallel to one of the global axes). There are cases, however, when the support is inclined, e.g., when the foundation of a structure rests on a sloped surface rather than on a flat surface.
TENSION/COMPRESSION ONLY SPRINGS SUPPORT AND MULTILINEAR SPRING SUPPORT.
4. How will you extract the stress distribution for a staircase slab?
Ans:
The stress distribution for a staircase slab can be extracted by using the below procedure:
- Create the nodes of a staircase using the geometry panel option.
- After creating the nodes assign the plate element as the Slab property. And then define load cases and calculate the area load that is acting on the staircase slab.
- After this apply the load cases and the load combinations to the plate element as the area load.
- And then create a mess on the plate element.
- And after creating the mesh on the plate element go for the analysis of the model successfully, go to the Post-Processing mode option which can be present on the left side of the screen.
- After clicking on the option post-processing mode, click on the plate result option.
- After clicking the option there will be a drop-down list, in that list there will be another option called stress distribution result just click on that option.
- Under the option stress type choose the appropriate stress type accordingly.
- And then click on OK option.
- After clicking on the OK button, the STAAD Pro software will show the stress distribution result.
- And we can see the distribution result in the form of different colour zones which shows the maximum and the minimum stress values.
- Different colours shows the different results of minimum and the maximum stress distribution among the staircase.
5. Explain the different ways to view SFD & BMD in STAAD Pro.
Ans: To view the SFD and BMD in the software,
- Create the model using the nodes method in the geometry panel.
- After creating the nodes, go to the Properties panel and assign the properties to the model.
- And after that give the specification to the model according to the architectural layout.
- Assign the support conditions, after assigning the support condition to the model do the analysis.
- After completing the analysis successfully, now go to the post-processing mode.
- Then there will be another dialogue box, in that dialogue box there will be an option called beam result just click on that option.
- After clicking the option a tool pallete will appear on the screen.
- Here we can see different values such as Shear force or the Bending moments.
- So in order to see the shear force diagram, click on the Fy option and if we want to see the bending moment diagram then click on the option Mz.
Practical
AIM:
1. To analyze the following structural elements and validate the results
A. Simply Supported Beam
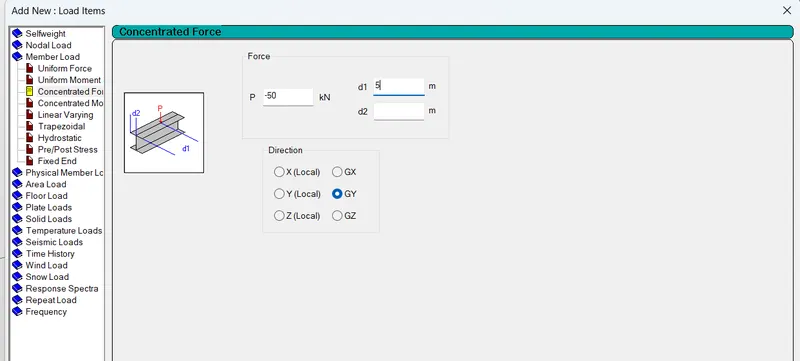
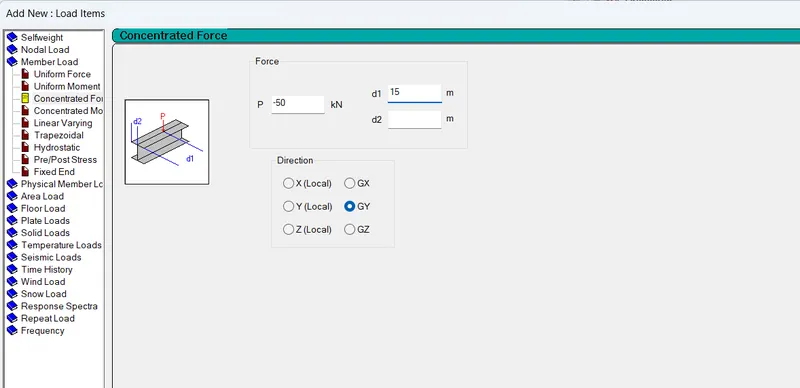
a. A Simply supported beam with two point loads symmetrically placed
b. Span L = 20m
c. Load P = 50kN each
d. Both P located at 5m from each support
PROCEDURE:
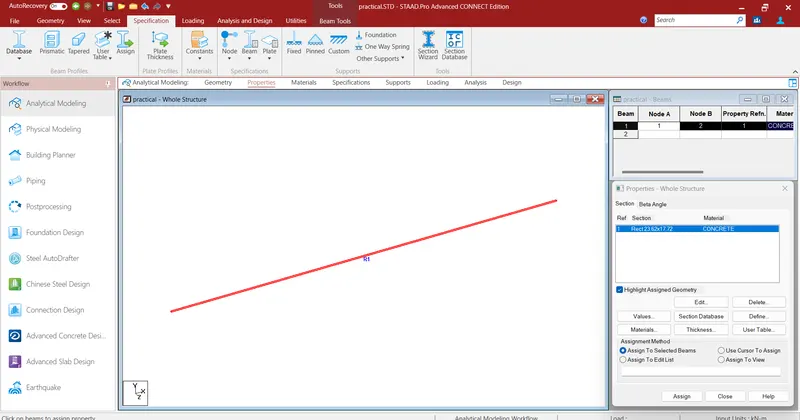
- Open a new file in STAAD Pro and enter the details
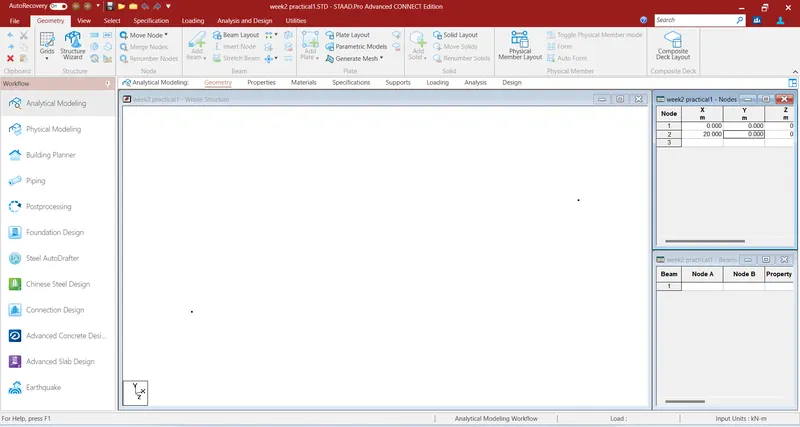
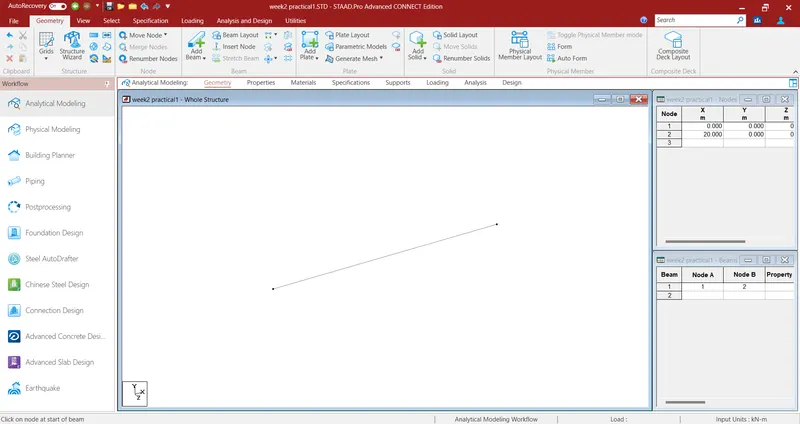
- Go to geometry and create nodes of 0 and 20m span which is length of the beam
- Select add beam and draw the beam by joining two nodes using the beam cursor
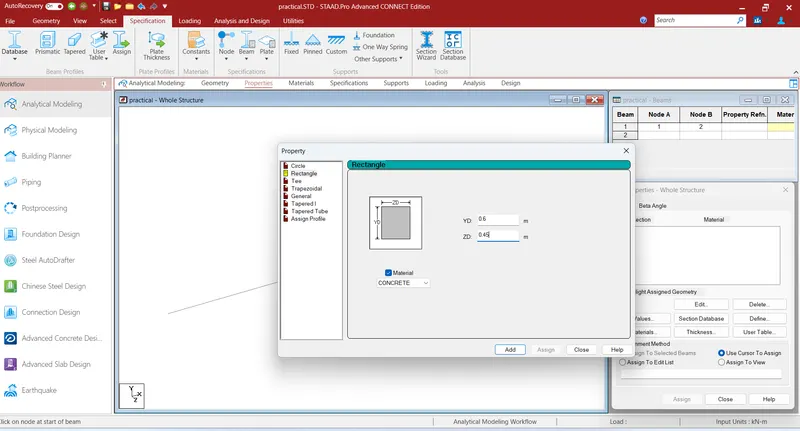
- Go to properties tab and then select define and give rectanglular dimensions of the beam
- Select the created beam and assign the rectangular properties of the beam
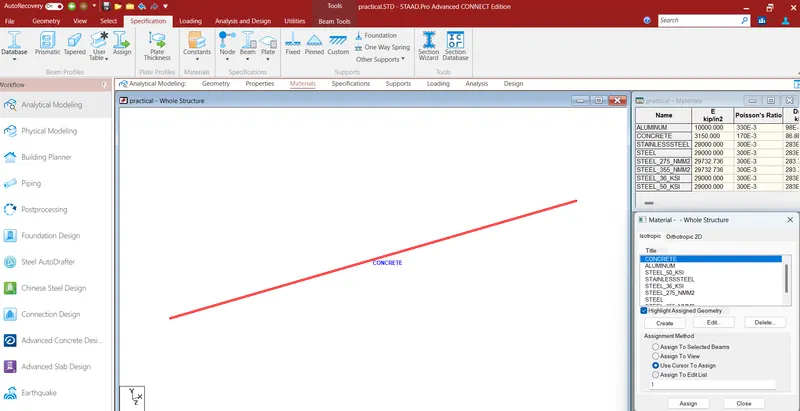
- Go to materials tab and click on concrete and assign the material property to the beam
- Go to support tab and add the fixed but support
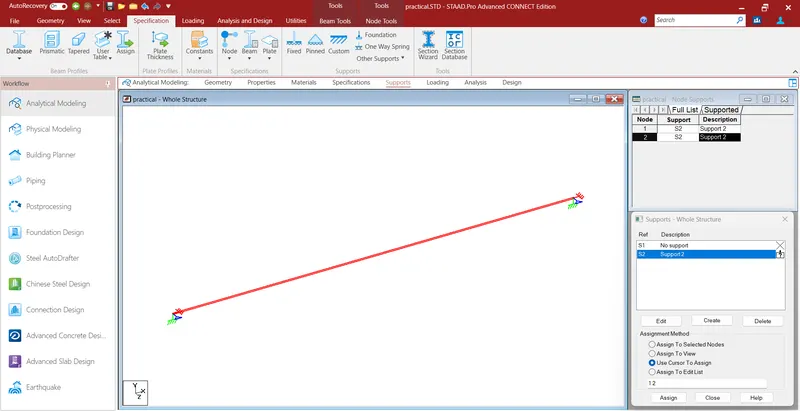
- Select the support and assign the support to the ends of the beam
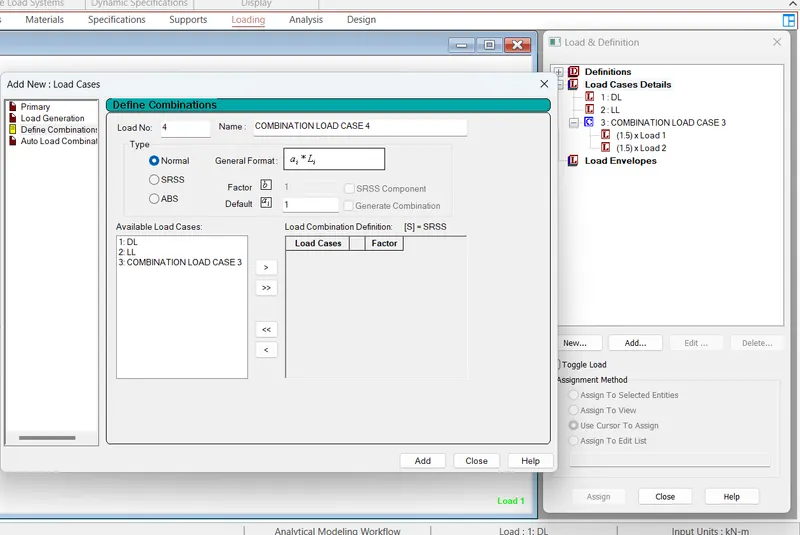
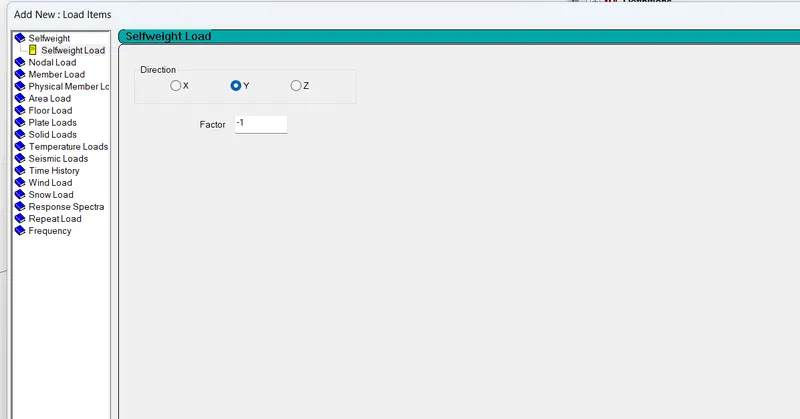
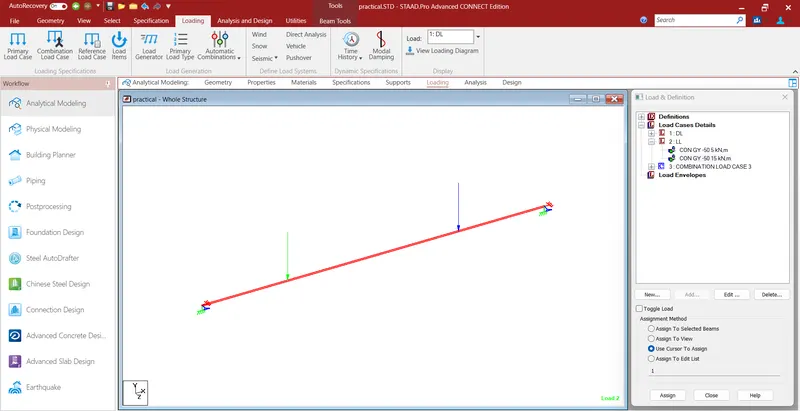
- Go to loading tab and add the load cases
- Assign the load cases to the beam using cursor to assign
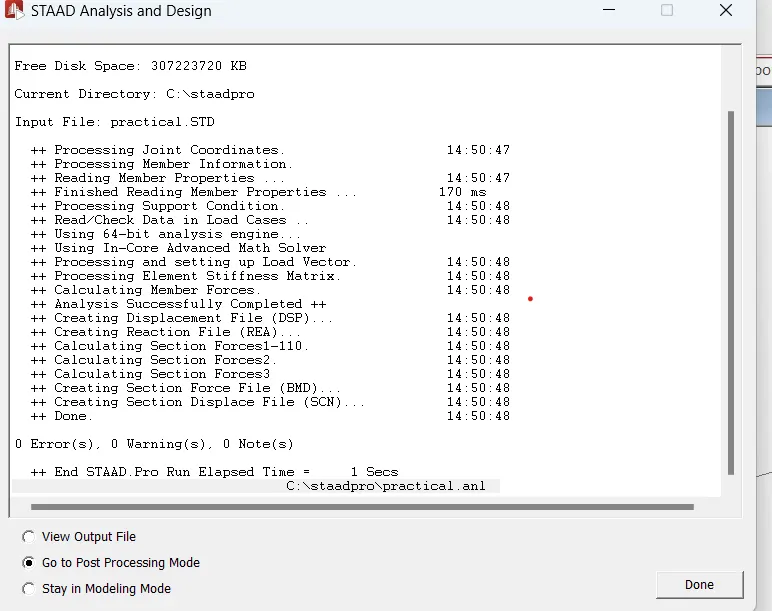
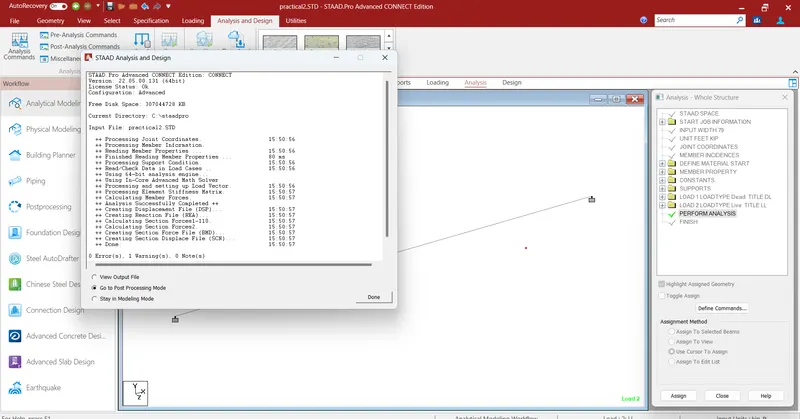
- Go to analysis tab and select analysis command and click on perform analysis and run the analysis
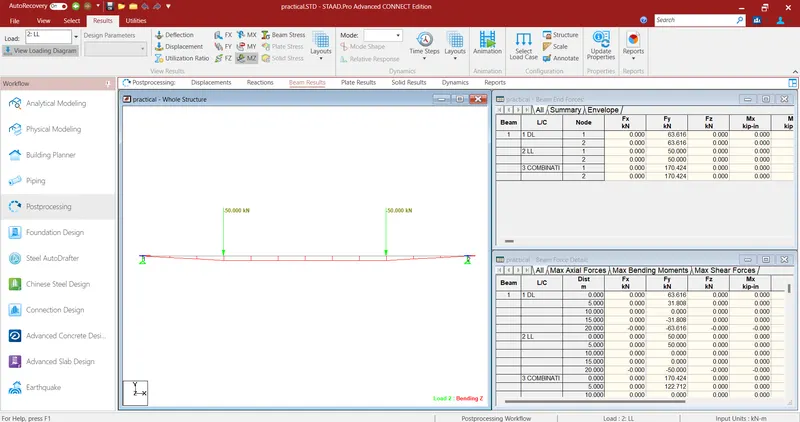
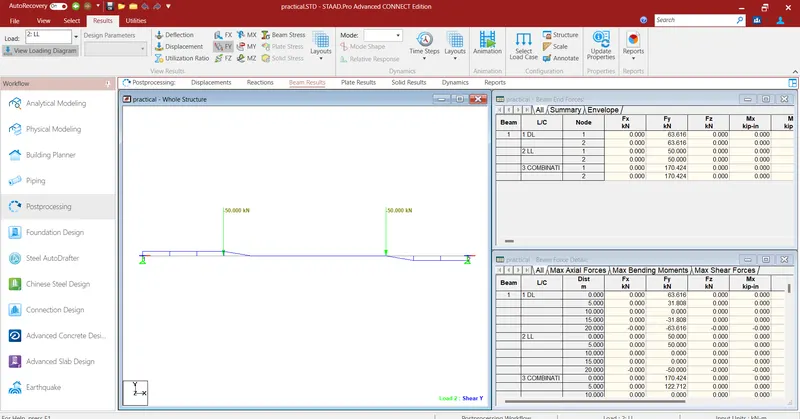
- After the analysis with the zero errors and warnings click on post processing mode and apply the load2
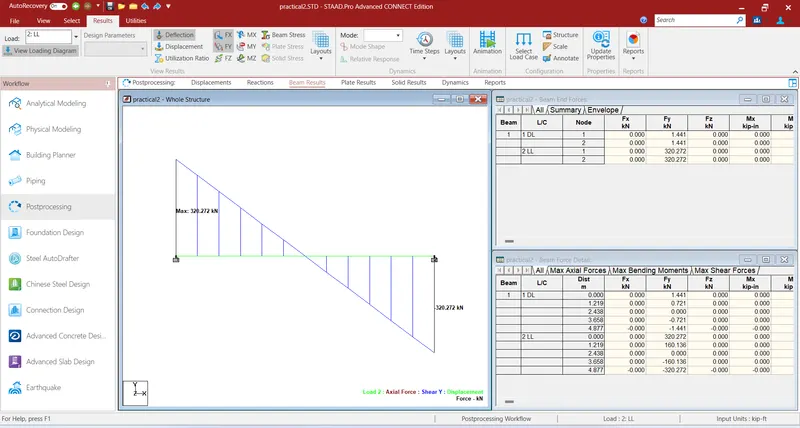
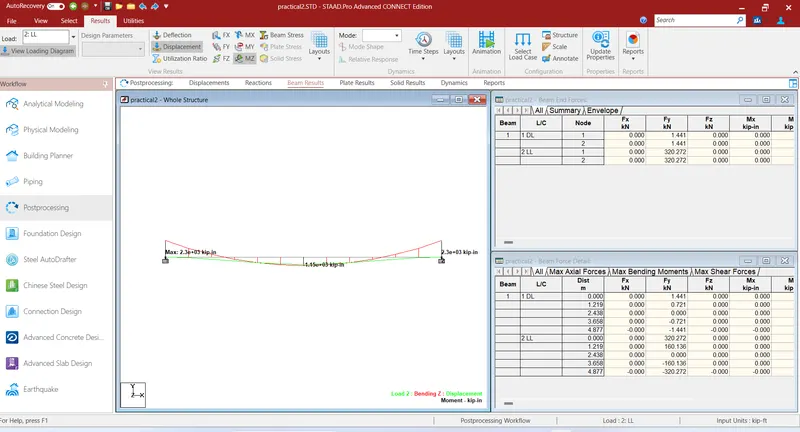
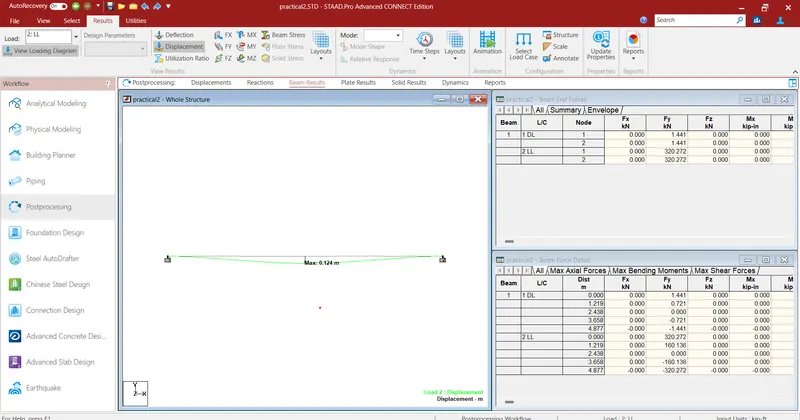
- Bending moment, shear force and displacement and beam results are aquired in the post processing mode.
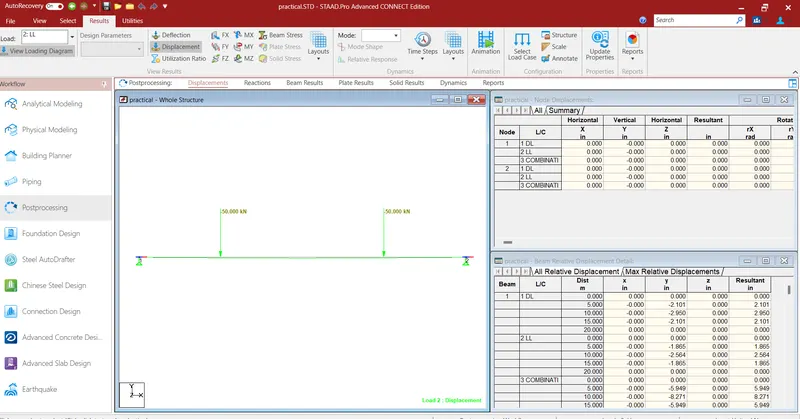
RESULT:
B.Fixed Beam
a. Span L = 16m
b. Uniformly Distributed Load w=9kN/m
PROCEDURE:
- Open a new file in STAAD Pro and enter the details
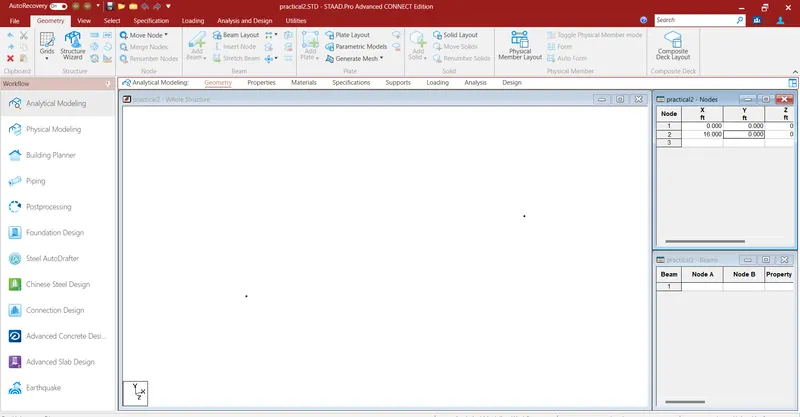
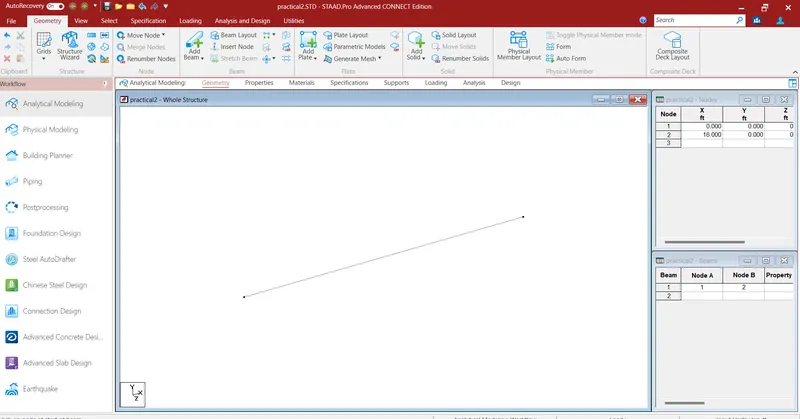
- Go to geometry and create nodes of 0 and 16m span which is length of the beam
- Select add beam and draw the beam by joining two nodes using the beam cursor
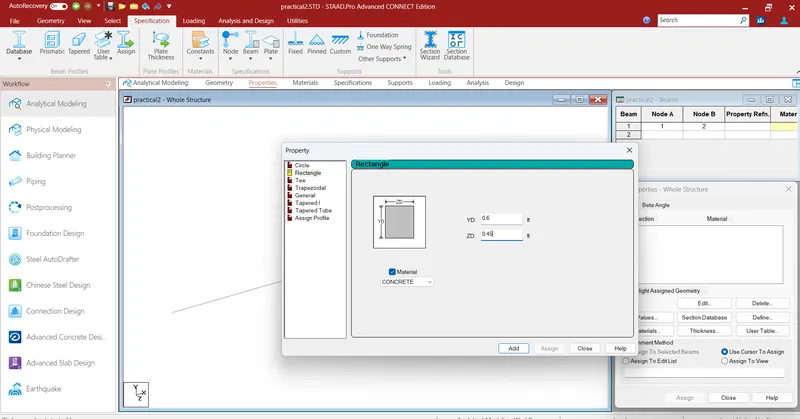
- Go to properties tab and then select define and give rectanglular dimensions of the beam
- Select the created beam and assign the rectangular properties of the beam
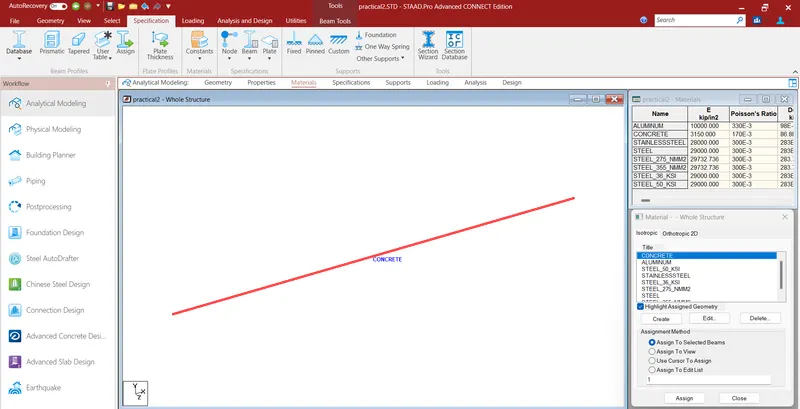
- Go to materials tab and click on concrete and assign the material property to the beam
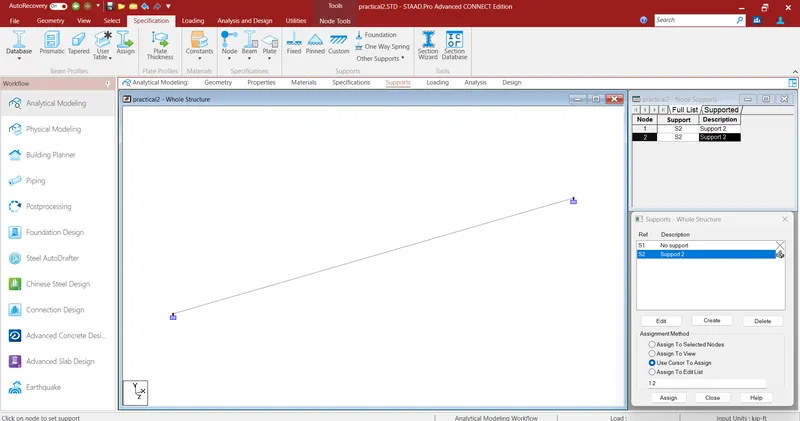
- Go to support tab and add the fixed support
- Select the support and assign the support to the ends of the beam
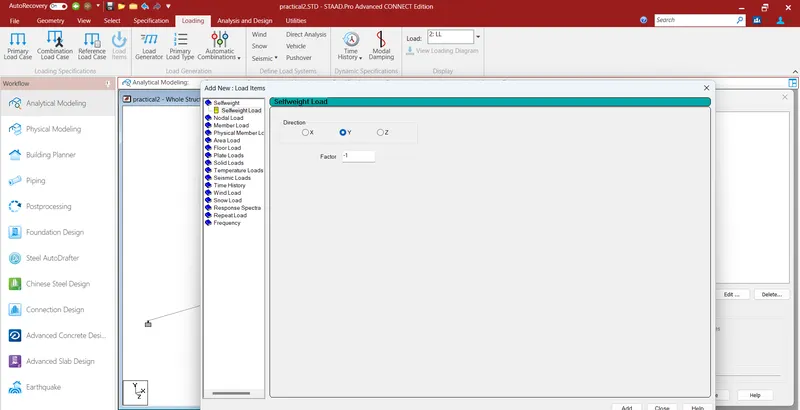
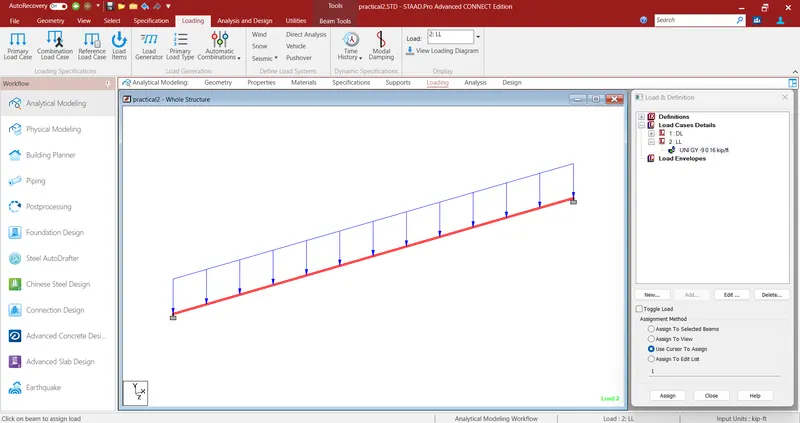
- Go to loading tab and add the load cases
- Assign the load cases to the beam using cursor to assign
- Go to analysis tab and select analysis command and click on perform analysis and run the analysis
- After the analysis with the zero errors and warnings click on post processing mode and apply the load2
- Bending moment, shear force and displacement and beam results are aquired in the post processing mode.
RESULT: