Underbody Coating
objective:
To study and obtain umderbody coating.
To prepare report pros cons.
procedure:
An undercoating is a spraying accessory that protects the vehicle’s body underneath.
Rust Proofing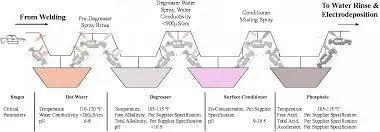
Applying a protective layer of wax or other coatings on corrosion-prone areas outside the vehicle is rustproofing. This layer is mainly applied to fenders, weld points, upper body panels, and tailgates.
Rust Protection
Rust protection is often confused with rust proofing. However, when a rust inhibitor is applied during the manufacturing process, it is called rust protection. A rust inhibitor blocks the circulation of electrical current stopping rust from developing in the first place.
Such ingredients are applied to almost every vehicle, car, truck, and SUV by mixing into its materials during the manufacturing process. On the other hand, rust-resistant material is also used for manufacturing cars these days.
working:
You have a few options to select from while considering an undercoating for your vehicle. Obviously, if you are getting it done through an authorized dealer, then you would have no choice as they have their own preferences.
1. Spray
The spray is the most common method used by dealers. The spray consists of a tar-like substance that is applied to the undercarriage. It functions as a barrier for salt, moisture, and oxygen, which causes corrosion.
You can also purchase it as a DIY product, but the whole magic lies behind the method of application, so it’s better to do the job with a dealer, especially if you have a new vehicle.
2. Electronic
Removing the electrical current capacity of items underneath the vehicles is another method for applying to undercoat. A weak electric current circulates through the material, reducing the chances of rusting.
For using this method, a DIY solution wouldn’t work; you would need an expert.
3. Drip Oil Spray
If you want to do it yourself, then drip oil spray is the best option. This can be messy but incredibly effective at protecting the undercarriage. It covers every nook and corner of the chassis, forming a robust layer of protection.
Time is the factor where you have to show patience in this method. It takes a long time to dry. In some cases, it drips around48 hours to a week. 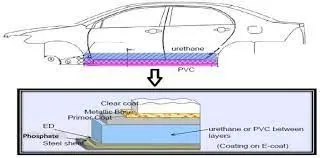
4. Dripless Oil Spray
Coming to the last option, the dripless oil spray. This waxy substance is applied to the body and undercarriage, forming a strong protective layer. It doesn’t take much time to dry; however, the layer can easily wear and tear than the other counter methods.
Benefits of Undercoating Car:
Most of the vehicles manufactured these days are rust proofed, especially in rainy and cold regions. When your car is exposed to saltwater and other common electrolytes, investing in an undercoating from an authorized dealer is a smart investment. It does cost a few hundred dollars, but it’s worth it. It will keep your ride in good condition for five years.
1. It extends the lifespan of your car
The protection against rusting gives you the biggest advantage, which is the long-life of the vehicle. If undercoating is done the right way, then it will provide protection for up to 10 years. In some cases, the time span is more than ten years, which extends the lifespan of your vehicle.
2. No more loud road noise
The undercoating serves as an extra layer of insulation, reducing the noise from penetrating inside components. Thus padding acts as a barrier between you and the source of the noise. If the road noise bothers you while driving your car, truck, or SUV, then applying to undercoat can help you.
What Are The Disadvantages of Undercoating?
Nothing comes for free in this world. The same goes for undercoating. The undercoating or rustproofing spray is heavy in pockets. However, it is nothing when you compare it with the cost of replacing a vehicle after corrosion.
How to Apply a DIY Undercoating with a Rust Proofing Spray?
You can apply undercoating on your own without a problem. Several DIY products are available in the market to apply on the undercarriage. This can be messy as you have to leave your vehicle untouched for some days while it stops dripping. This takes a lot of time as compared to the amount of money you can give it to pro to take care of it.
Here is the tip. Each underbody spray is unique, so you need to follow specific steps required to complete it. For this, check with the manufacture to know about the method before starting.
Your list of undercoating supplies:
- Degreasing products
- A disc grinder and pads
- Air hose
- Eye protection
- Protective gloves
- Sandpaper ( od 200 grit)
- Scraper
- The Undercoating & reliable application products
A hydraulic lift (for removal and spraying)
Step 1 – Cleaning the Underbody
You have to remove all debris and contaminants from the chassis to start with the undercoating process. It is another way to maintain your car in routine. You will need a hydraulic hoist or lift to complete this step in the right manner.
Here is how you can clean the underbody.
Degreaser:
A high-quality commercial-grade degreaser would be helpful in removing oil and grime from the undercarriage. Follow the exact steps listed on the cover or recommended by the manufacturer. Spray the degreaser, then allow it to soak for a moment, then wipe it off with a microfiber towel or shop rag.
Grinding:
Now, grind the existing hard contaminants and rust from the undercarriage and other components that you want to treat. You can use a mild grinding pad to remove the debris easily, but remember to wear eye protection while doing it.
Sanding:
After degreasing and grinding, remove those scratches and other stubborn contaminants using a 200 to 400 grit.
Use a Tack Rag or IPA solution:
To wind up the cleaning process, wipe down the area with a tack rag or IPA solution.
Step 2 – Applying Priming
You will need a primer for applying DIY consumers. Primers serve as a basecoat. You need to follow the instructions listed by the manufacturer for expected results. The recommended primers usually contain a high level of zinc. Zinc helps in reducing rusting, even if the protective layer is penetrated.
Step 3 – Applying Undercoating
This is the final step. The undercoating sprays are similar to bed liners. Most products are applied in two steps as dual layers. The first layer should be thin, covering the entire surface. Allow it to rest at least for an hour, especially if you are applying a rubberized undercoating.
After this layer has been dried, you can apply the second coat generously. Don’t forget to apply it as per the instructions given by the manufacturer. It will take a few hours to days for curing.
When you are done with the process, you need to look after the undercarriage to protect it from saltwater, road grime, or mag chloride as these contaminants are corrosive and result in oxidation and rusting.
The Right Way to Protect Your Vehicle From Corrosion
There are different rustproofing sprays available in the market which you can apply without a mess; however, they would last only for a year or even less just like a paint sealant. We would recommend a DIY ceramic coating if you want a long-lasting solution to apply on body panels, plastic materials, headlights, vinyl, and PPF.
The ceramic coating is a concentrated polymer made from quartz (silica dioxide or SiO2). This automotive coating is available in a liquid formulation, which seeps in the clear coat or porous surface, creating a flat and hydrophobic surface.
The coating dries off, creating a strong and semi-permeant protective layer. This layer blocks UV rays from penetrating into the coating and paint surface. The layer is transparent, so it enhances the shine of the natural color of your car paint, blocking electrolytes and reducing the chances of corrosion at the same time.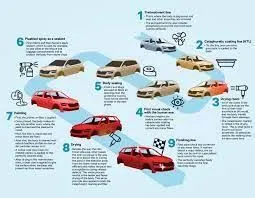
Putting a Stop On The Rusting Undercarriage
Corrosion is real, especially for people living in coastal communities. Protecting your car underbody is a smart way of reducing the corrosion build-up. It extends your car’s life. Don’t forget the rest of your car while going for the car underbody coating.
A ceramic coating like Armor Shield IX adds value to your car by protecting its shine and keeping the surface cleaner for a long time. Investing in a quality DIY ceramic coating to extend your car life by saving it from rusting.
Types of Undercoating:
-
Rubberized Underbody Coating
This is generally thought of as the best underbody coating for your car. It preserves the underbody well, protecting it from scratches. Applying this to the undercarriage is not much of a hassle either.
-
Wax Based Underbody Coating
This – more or less – ephemeral undercoating will wear away in a few months’ time. On the upside, wax-based undercoating puts up a big fight against moisture. It is also the most affordable option out there.
-
Asphalt Based Automotive Undercoating
Best suited for lorries, trucks and large vehicles this provides a greater degree of protection compared to rubber-based coatings. However, asphalt-based coatings contain little amounts of rubber for sound-insulation purposes. The process of applying this coating is a bit time-consuming though.
Polyurethane Underbody Coating
This coating closes up splits and fractures on the underbody of the vehicle. It offers up good protection against corrosion and also bonds with the metal. Unlike in the case of asphalt-based coating, you can paint over the polyurethane coating.
Conclusion:
In under body coating is protecting car body from rust and corrosion .it improves the life span of the car body espsecially in coastel area cars.