Roof Design
ROOF DESIGN:
OBJECTIVE:
1) For the given Roof styling and master section, develop the essential flanges and reinforcements, provide appropriate dimension and check for Draft analysis and also submit section inertia analysis report on 0-Y section
2) Creation of roof ditch area the tool opening angle is only 3 to 5 degrees.
3) Design and develop roof rails as per the given master sections
4) Perform section modulus study for the Master sections created for the Front roof rail, Rear roof rail, Bow Roof Rail and Rear Roof Rail.
5) To do a curvature study on the roof and perform calculations to determine the position of the Bow-roofs.
6) To perform Heat distortion criteria and Snow Load criteria tests on the designed roof and do optimization if necessary.
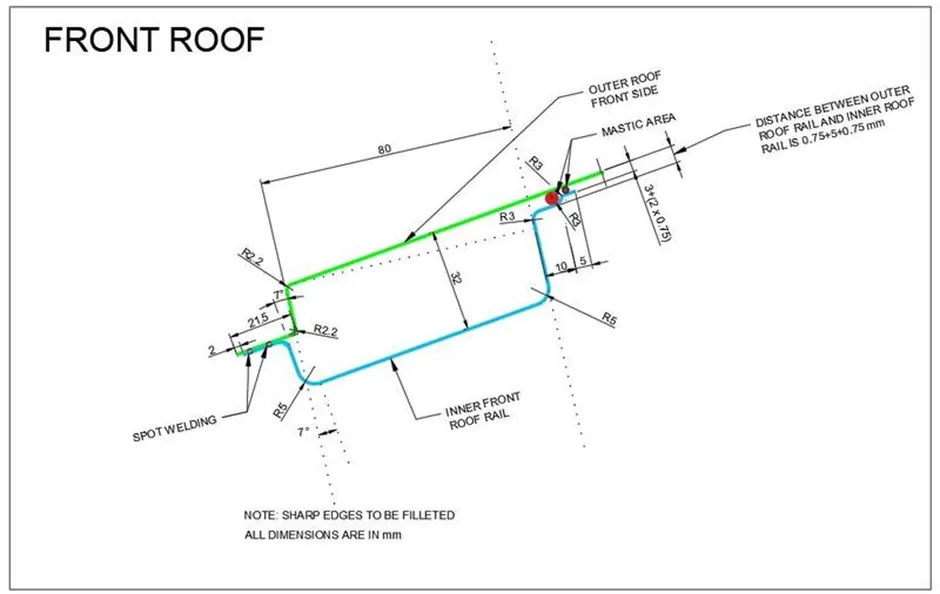
Front Roof Rail Master section:
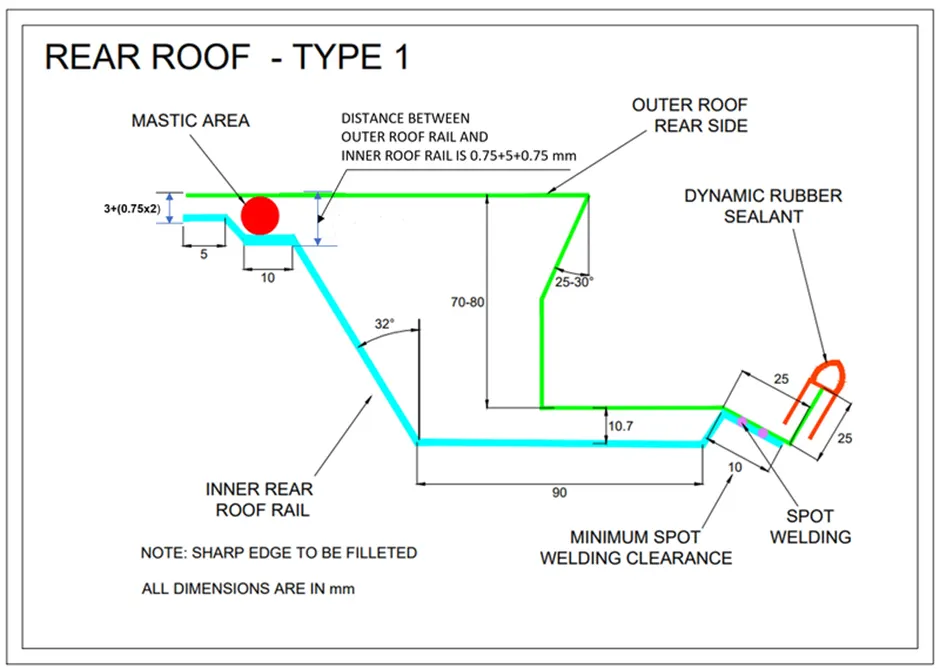
Master section of the Rear Roof Rail:
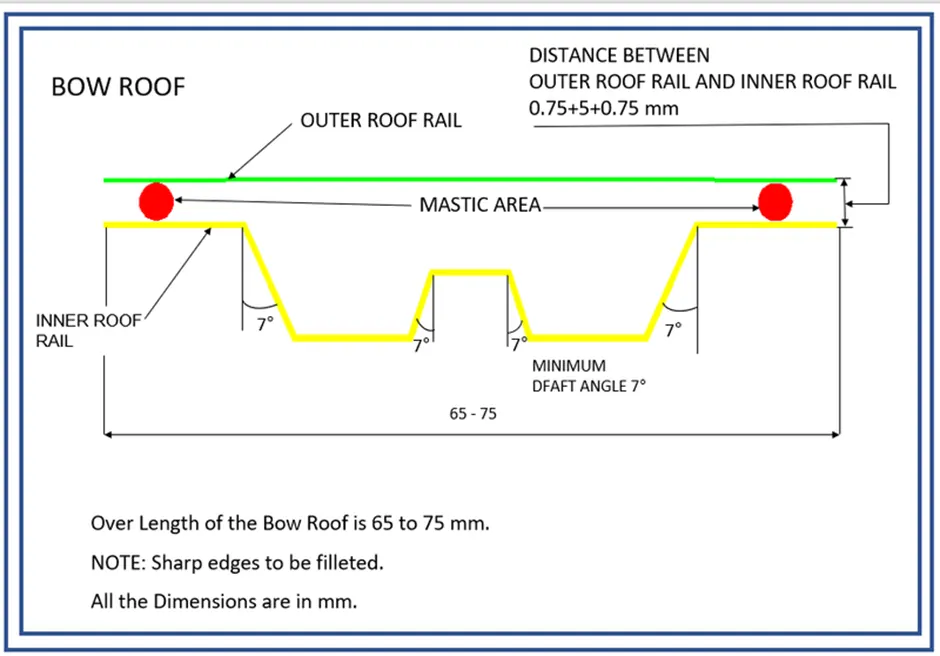
Master section of Bow Roof:
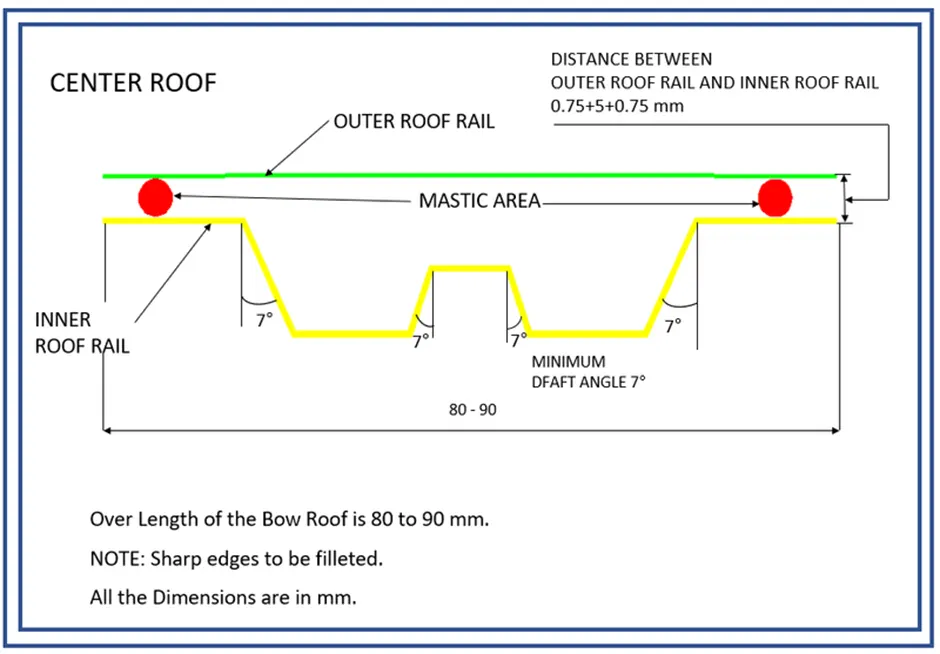
Master section of Centre Reinforcement Rail:
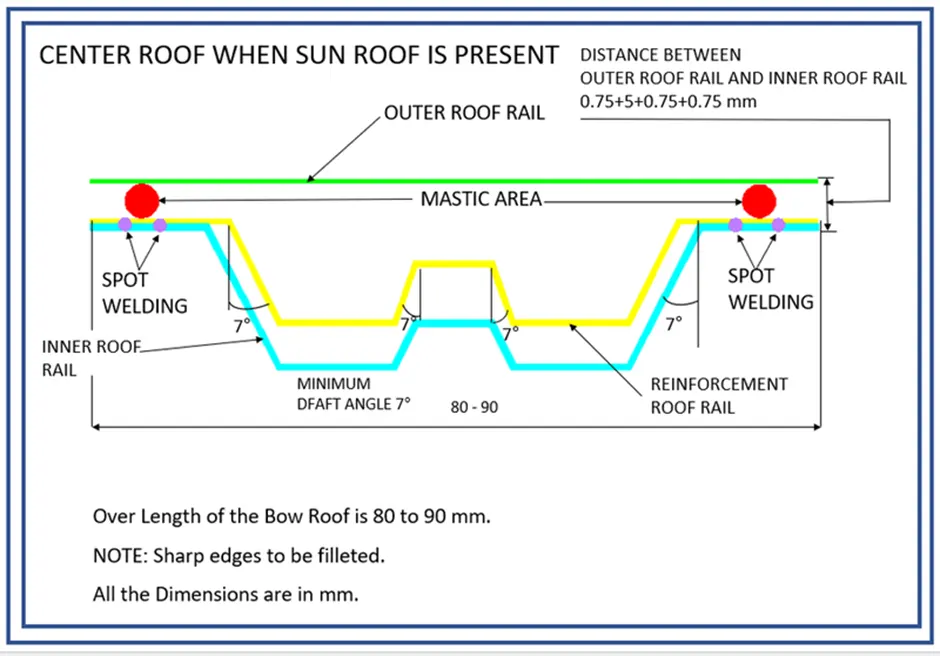
INTRODUCTION:
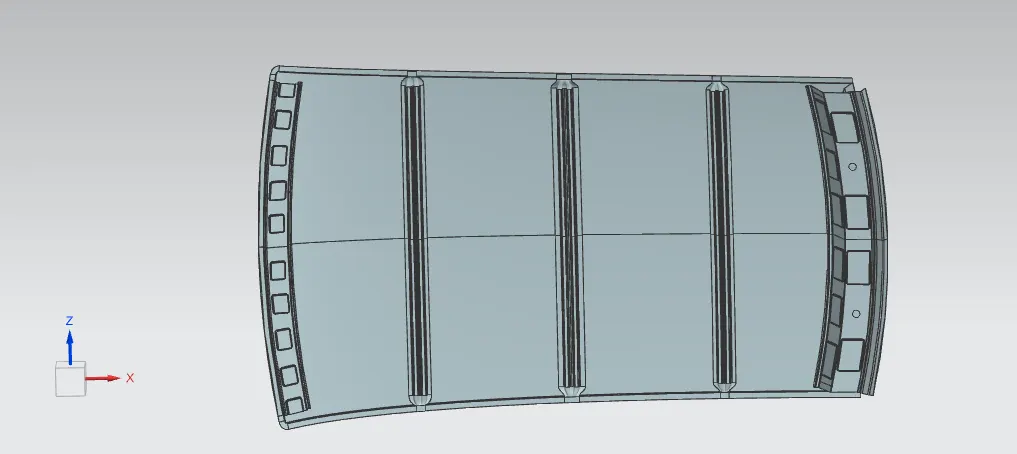
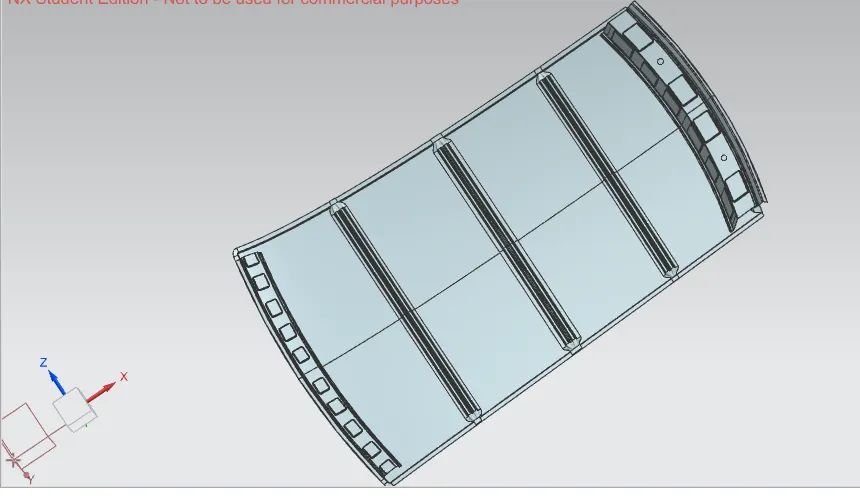
Roof is not a single element, it consists of Front roof rail, Rear Roof Rail, Bow Roof Rail, Centre Roof Rail. These Bow Roofs are placed in the most Flat area of the Panel. Rear Roof Rail joins with the Back door and Body side outer. Front Roof Rail joins with the Wind shield glass and body side. Here are some reinforcements used in the Roof.
FRONT ROOF RAIL:
The front roof rail is located on the front of the roof where the wind shield joins with the roof. The visibility criteria and the head room clearance of the passenger are taken into consideration for the bottom flange. One end of the rail is joined using spot welding while the other end is joined with the roof using mastic sealants for increased strength.
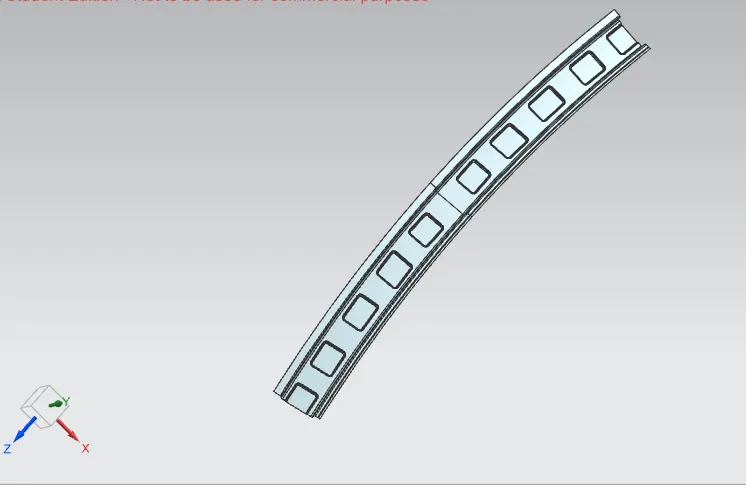
BOW ROOF 1:
Bow roof is an additional stiffening member for the roof to increase the strength and so that it can satisfy the norms. Both the ends are joined together using mastic sealants to increase strength and also since this would not affect the styling of the roof.
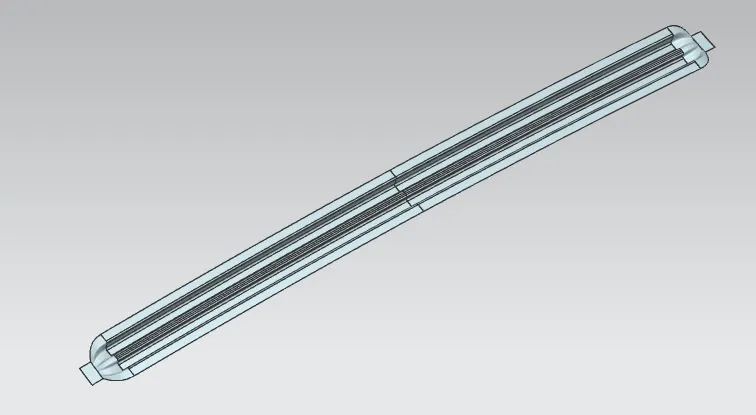
CENTRE ROOF RAIL:
Centre Roof rail or the reinforcement centre is located at the centre of the roof. The cross section of this is more since it needs to provide more strength to the roof. Here both are ends are joined together using mastic sealants.
Centre roof rail helps in providing effective support to the flat area of the roof as it is more susceptible to failure under the action of load. generally, the centre roof rail is placed at the centre of the roof and is connected to the B-pillar structure. This helps in adding the strength to the roof during the roll- over test.
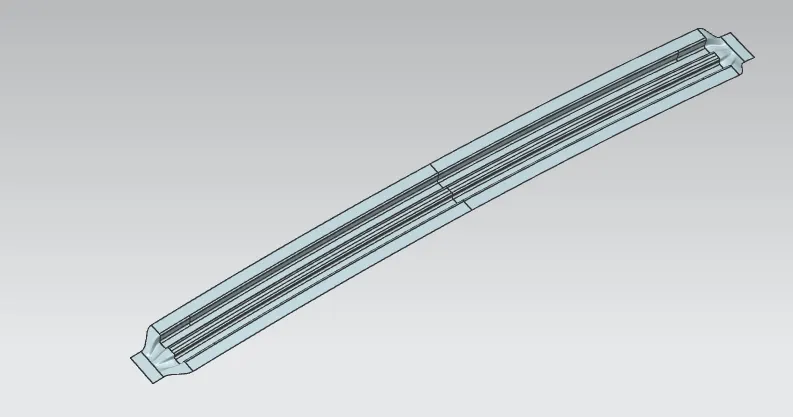
BOW ROOF 2:
This bow roof also has the same purpose as that of the first one. This one is located between the centre bow roof and rear roof rail.
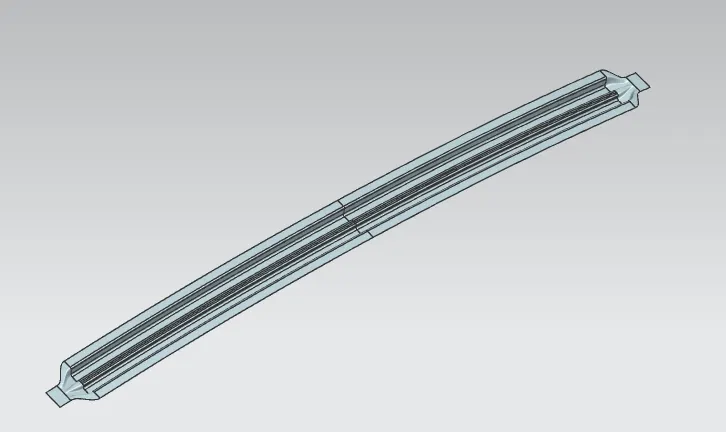
REAR ROOF RAIL:
This roof rail joins with the back door and the roof. Inputs from the backdoor are taken into consideration for designing this roof rail.
Here one end is joined using spot welding while the other end is joined using mastic sealants.
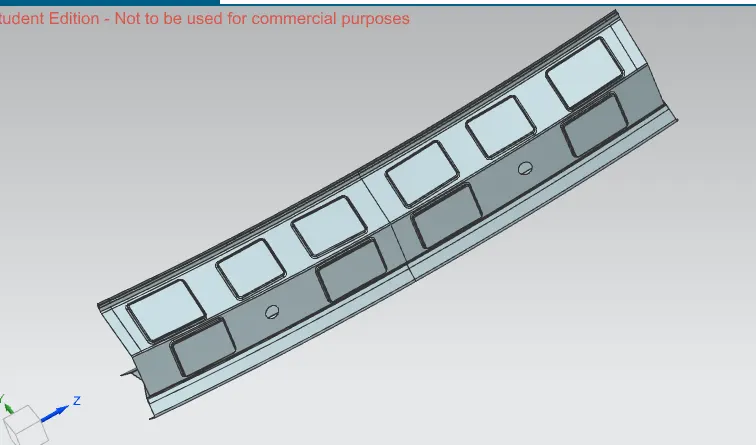
MANUFACTURING PROCESS:
Outside plate can be manufactured with the following process, first the open straight snips plate: first select applicable cold coiling specification, cold coiling is opened flat. Then according to production material specification it will be opened after flat and be cut into the iron plate of corresponding size. Finally, the iron plate after shear is cleaned into iron filings. Then its trimmed and punched. Then its flanged and punched. Finally, after punching completed it is carried out to the operation of side folding.
Bar shaped assembly and ring-shaped component are processed by blanking, stamps out iron plate the outline blank of many roof can’t rails, a ring-shaped component and a bar shaped assembly.
SPOT WELD:
Spot welding is a type of electric resistance welding. It is also known as resistance spot welding. The process of spot welding in sheet metals are made into contact with each other and pressure is applied on specified points. So, heat is generated from the resistance and weld is formed.
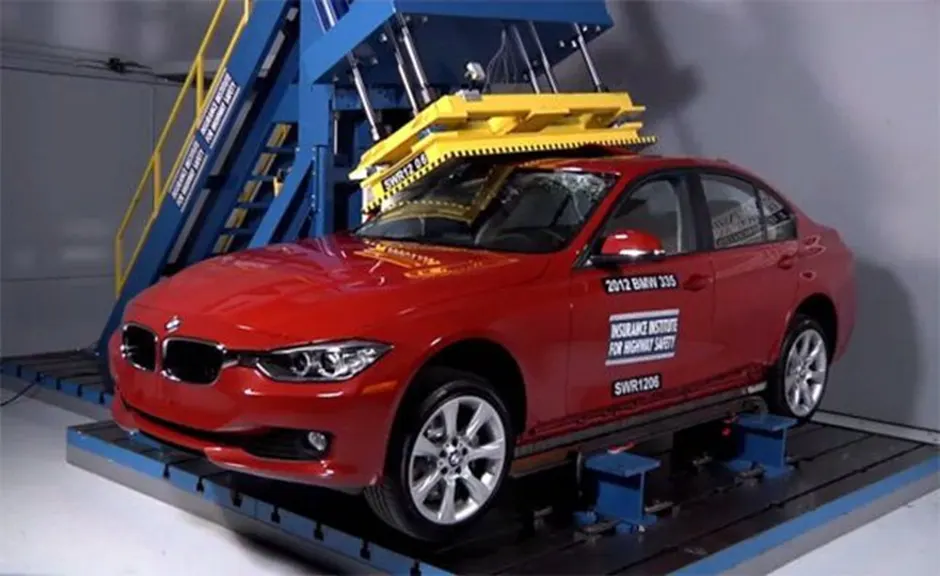
ROOF CRUSH TEST:
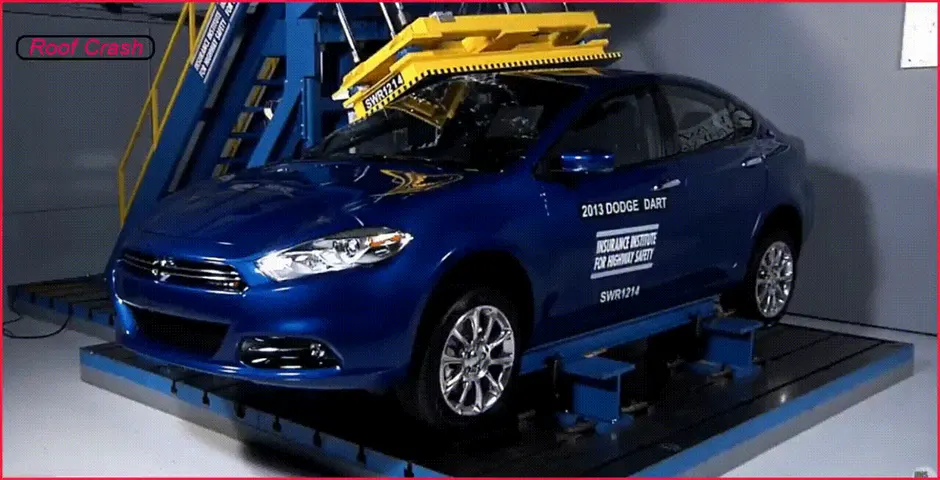
Roof crush test is the design given by the IIHS (insurance institute of highway safety) . After analysing the many accidents IIHS has then fixed some regulations, that how to perform the crush test .
IIHS gives the rating based up on this test . For this they consider two points while giving the rating
- How fast the car can reforms to its original shape after the roll over and
How deep is the protrusion after the roll over.
GOAL OF ROOF CRUSH TEST:
To minimize the protrusion into the occupant compartment , so that the seat belts and air bags can do there job in protecting the occupant.
CONDITIONS TO FOLLOW FOR ROOF CRUSH TEST:
There are two conditions that should be followed for the roof crush test , they are
1) INITIAL CONDITION
- Close and lock all the doors
- Close all the windows
2) SECOND CONDITION
Fix the body sill or chassis frame on a hard lever surface horizontally.
METHOD OF APPLYING THE FORCE:
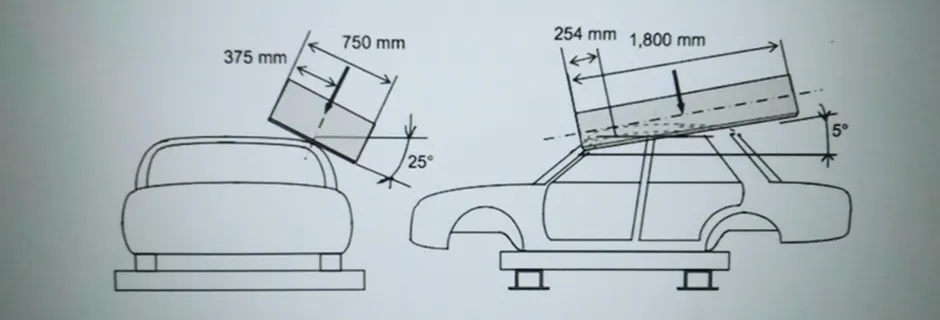
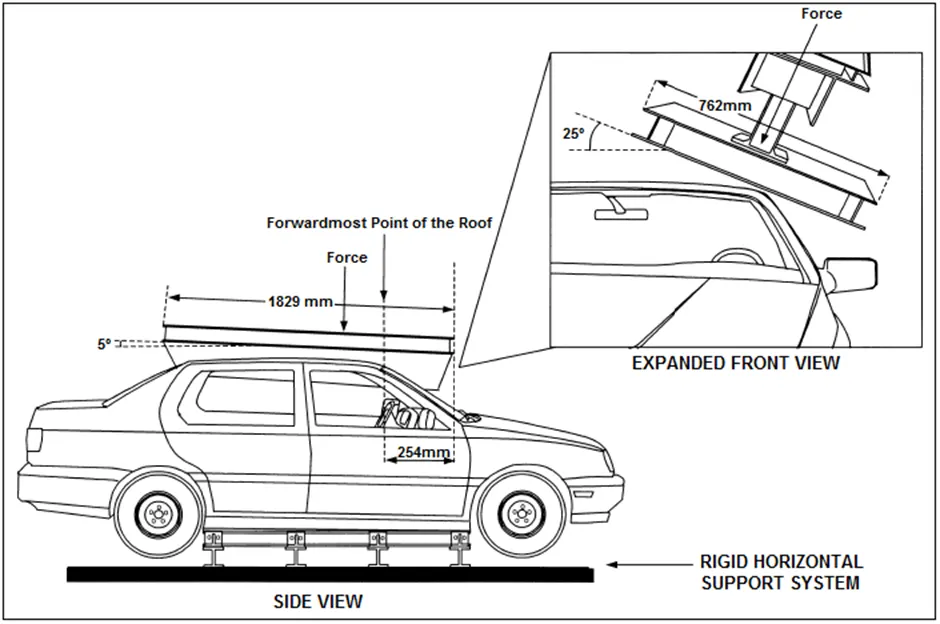
The load is applied in such a way that 5degree is tilted from the front end to the rear end and the load will be in 1800 mm in length and 750 mm in width . The load is applied at the position of 25degree from the flatness of the roof . The load is applied on the roof for almost 120 sec and the crush speed at which the load applied is 13 mm/sec or less than that.
RESULT:
If the displacements goes above the requirements level then we have to increase the bow roof thickness or add more mastics points to increase the strength . the stronger the roof the better it can protect the occupants in the roll over crashes.
POSITIONING OF BOW ROOFS:
Bow roofs are designed to give strength to the roof panel. It avoids the roof to bend due to snow load. Number of bow roofs needed are estimated with the design of the roof panel. if the length of the roof is large, we need more bow roof and if the roof panel is lesser in length, we need ideal number of bow roofs.
The positioning of Bow Roofs depends on the curvature of the roof panel. We add bow roof on flat region as bending is more possible here than the curved portion of the roof. Along with this we have Heat distortion criteria and Snow load Criteria for positioning the Bow roof.
HEAT DISTORTION CRITERIA:
The heat distortion test evaluates the ability of car roof to maintain its physical structure without deformation under elevated temperature conditions. Car roofs are exposed to sunlight at day time. Distortion of the car roof can create more susceptible to damage.
How to Calculate?
Here we have a formula for calculating it.
Bow–Roof Prediction Formula
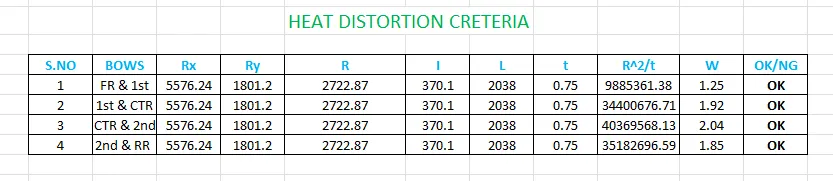
W = [1.73 x 10^(-3) x L] + [1.85 x 10^(-8) x (R^2)/t] + [ 1.10x10^(-3) x l] - 2.68
Where,
L = Roof Length in X-Direction[mm](Roof dimension in 0-Y)
R = Roof curvature
R = 2(Rx*Ry)/(Rx+Ry)
Rx = X curvature
Ry = Y curvature
t = Roof plate thickness [mm]
l = Bow Roof Span [mm]
Judgment Condition
OK< 2.7
By Following the Procedure and using the formula, We got the W value of below 2.7. And thus our Result is PASS. You can look at the table below for more details.
This study on Heat distortion criteria is used to predict the heat distortion temperature at where the material starts to soften when exposed to a fixed load at elevated temperature .By this way we can avoid bending or damages on the roof, based on the heat distortion temperature. Here we will predict the bow roof position which helps to strengthen the roof.
SNOW LOAD CRITERIA:
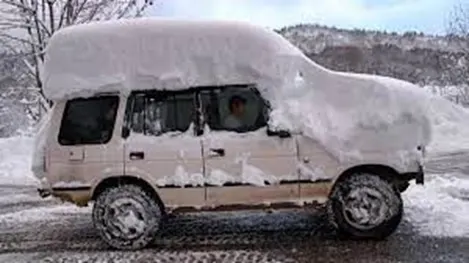
Unlike in India there are countries with heavy snowfall. In Alaska it was recorded a record-breaking 78" in 24 hours in 1963. So calculating and designing the roof of the car in such a way this snow does not cause serious damage to the car.
Snow Load Prediction Formula
Qr = [Iy x t2] / [α x s x [(Rx + Ry)/2]2 x 10-8]
Where,
α = My x Lx2 x 10-12 , My = Y(Ly-Y)
t = Roof plate thickness [mm]
Ly = Distance between the front and rear roof Rails on the Vehicle along with 0Y[mm]
Length of Roof panel with the centre point between Roof rail Front /Rear as the front and rear reference point.
Lx = Distance between the Left and Right end of the roof on the Roof BOW [mm]
The width of the roof panel is exposed on the surface.
Y = Distance front Front Roof Rail to Roof BOW [mm]
s = Distance for which Roof BOW bears divided load [mm]
s = L1/2 + L2/2
Iy = Geometrical moment of inertia of Roof BOW (Y cross-section) [mm4]
Rx = Lateral direction curvature radius of roof panel Y cross-section on Roof BOW [mm]
Roof panel curvature Radius of the Length Lx in Front view
Ry = Longitudinal Direction curvature radius of the Roof panel X cross-section on Roof BOW [mm]
Roof panel X curvature radius of length s in Side view
Judgment condition
Qr ≥ 3.1
250 ≤ s ≤ 380
Here is the detailed procedure to measure and calculate:
Step 1: Open sketch in NX and Draw a centreline which bisects the roof into two halves. This is the 0-Y line Shown in the picture.
Step 2: Draw a 100mm offset line at both sides of the 0-Y line.
Step 3: Draw a midpoint in the Front roof rail, Bow roof 1, Centre roof rail, Bow roof rail 2.
Step 4: Draw a midpoint between all the sections. Like between front roof rail and bow roof 1, between bow roof 1 to centre roof rail and centre roof rail to bow roof rail 2.
Step 5: Draw a vertical line on all the midpoints between sections we previously created.
Step 6: Draw an offset line with 100mm at both the sides of the midpoint vertical line drawn.
Step 7: Draw intersection points on the 0-Y, Midpoint vertical line and 100mm offset lines. As shown in the picture.
Step 8: Project the points on the roof and the radius measured between these intersection points are Rx and Ry. Rx is the X curvature radius and Ry is the Y curvature radius.
Step 9: Draw intersection points of Vertical midpoint lines and the outer roof edge.
Step 10: Project the points on the roof and the distance between these two points is the Lx value mentioned in the formula.
Step 11: Ly is the distance between the centre of Front roof rail to the centre of rear roof rail along the 0-Y line shown in the picture.
Step 12: measuring Y differs with sections. Say If you are calculating My between Front roof rail and bow roof 1. Y will be the distance between Front roof rail to the bow roof 1. If you are calculating between bow roof 1 and centre roof rail, Y will be the distance between front roof rail to centre roof rail. So, every Y value will be measured from the front roof rail.
Step 13: L1 and L2 also differ with sections. Say if you are calculating S value between Front roof rail and Bow roof, L1 will be the distance between Front roof rail and Bow roof 1 and L2 will be the distance between Bow roof rail 1 and centre roof rail. If you are calculating S value between Bow roof 1 and centre roof rail, L1 will be the distance between Bow roof 1 and centre roof rail and L2 will be the distance between centre roof rail to bow roof rail 2.
Step 14: Iy (moment of inertia) will be the value generated from NX for bow roof 1, bow roof 2 and centre roof rail . More Details on Moment of Inertia is mentioned later in this report.
Step 15: measure the required lengths and radius and fill in the formula to attain the result.
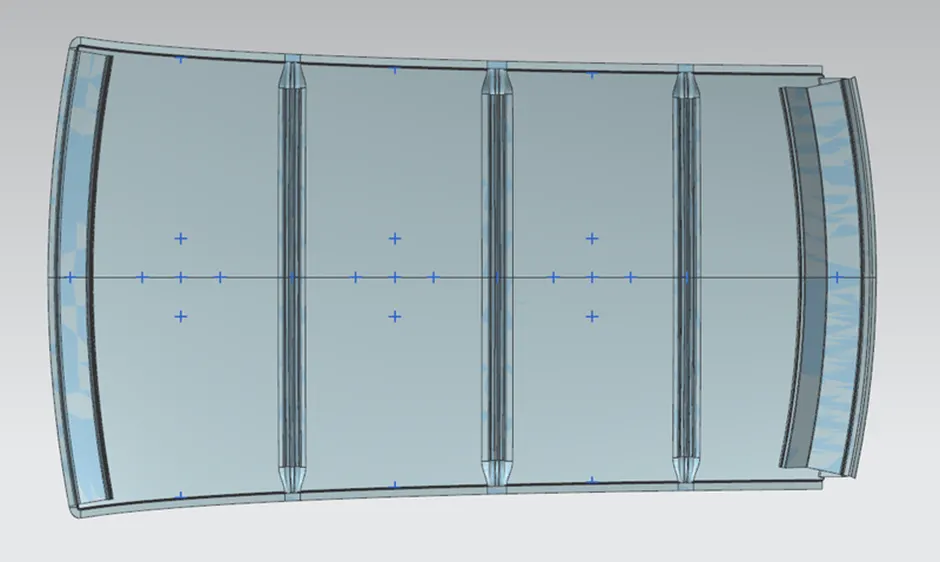
By Following the Procedure and using the formula, We got the Qr value of Above 3.1. And thus our Result is PASS. You can look at the table below for more details.

This test is done to know about the roof behavior when there is snow over the car roof. This snow weight will cause a dent on the roof. But the roof should be designed in such a way that when the snow is removed the roof should go to its original position. This is the basic requirements for snow load criteria.
Moment of inertia:
Moment of inertia is defined as the quantity expressed by the body resisting angular acceleration which is the sum of the product of the mass of every particle with its square of a distance from the axis of rotation. Section moment of inertia is used to predict the amount of deformation and deflection of a part. Higher the moment of inertia lesser the amount of deflection. Thickness, flanges and embosses will increase the section inertia. Here NX software used to find the moment of inertia using section inertia Analysis.
BOW ROOF 1:
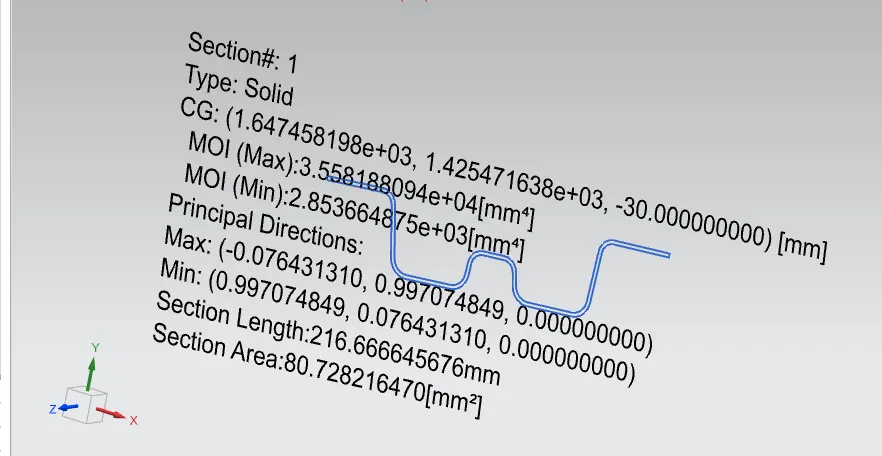
BOW ROOF 2:
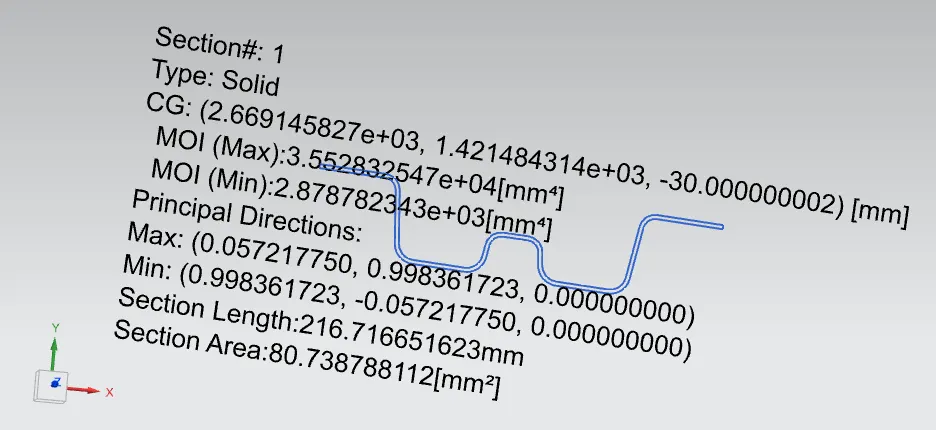
CENTER ROOF:
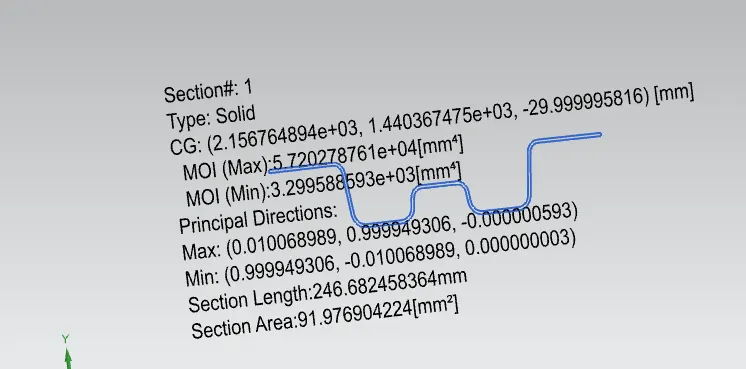
Here are the parts that are made as per the master section and also clearing the draft analysis.
FRONT ROOF:
BOW ROOF1:
BOW ROOF 2:
CENTER ROOF:
REAR ROOF RAIL:
TOP ROOF:
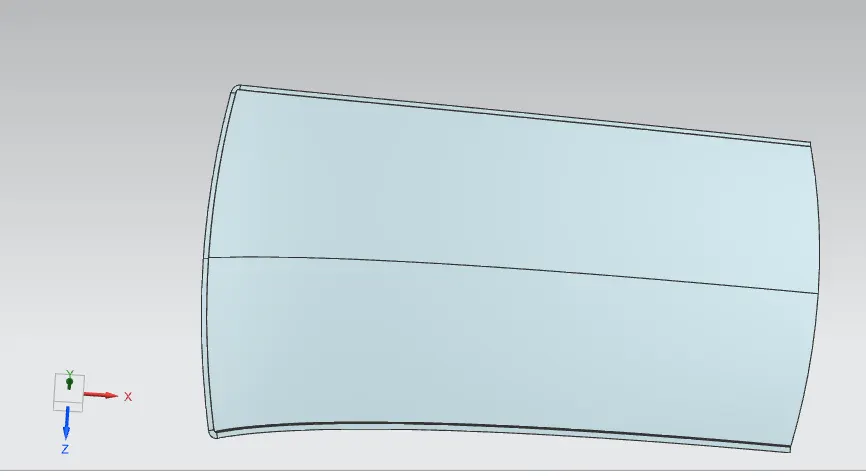
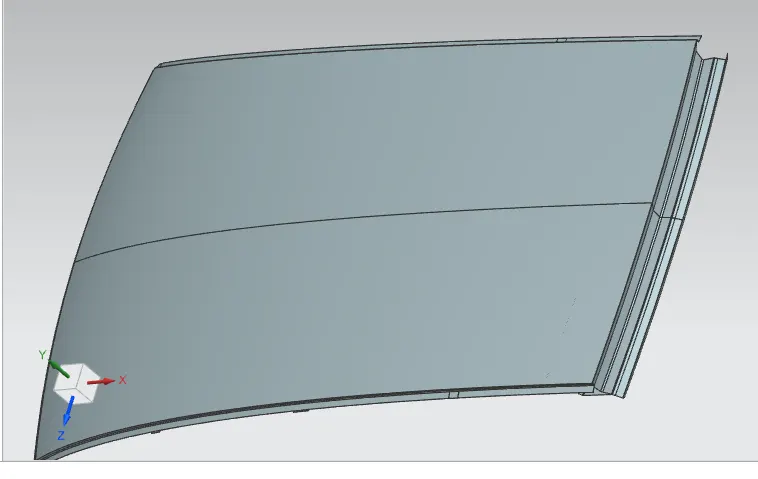
FINAL ROOF MODEL:
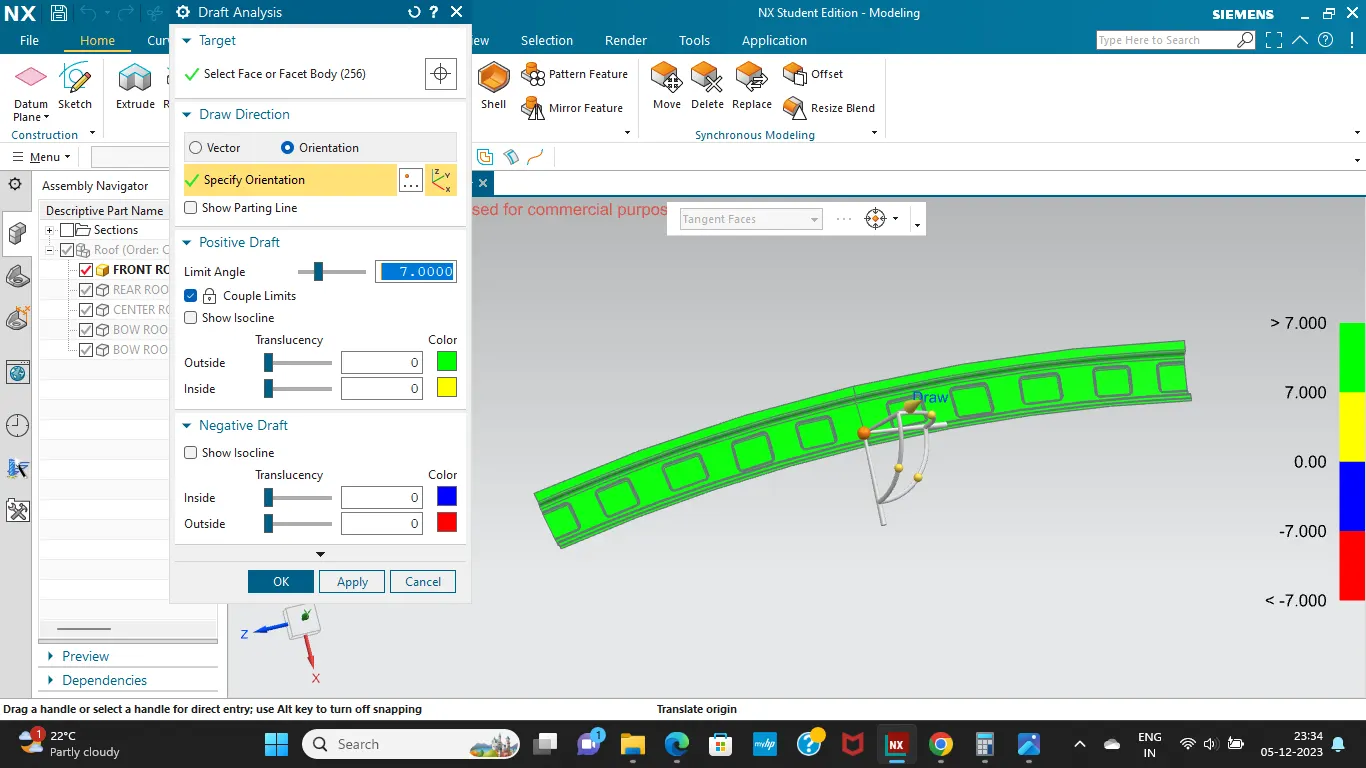
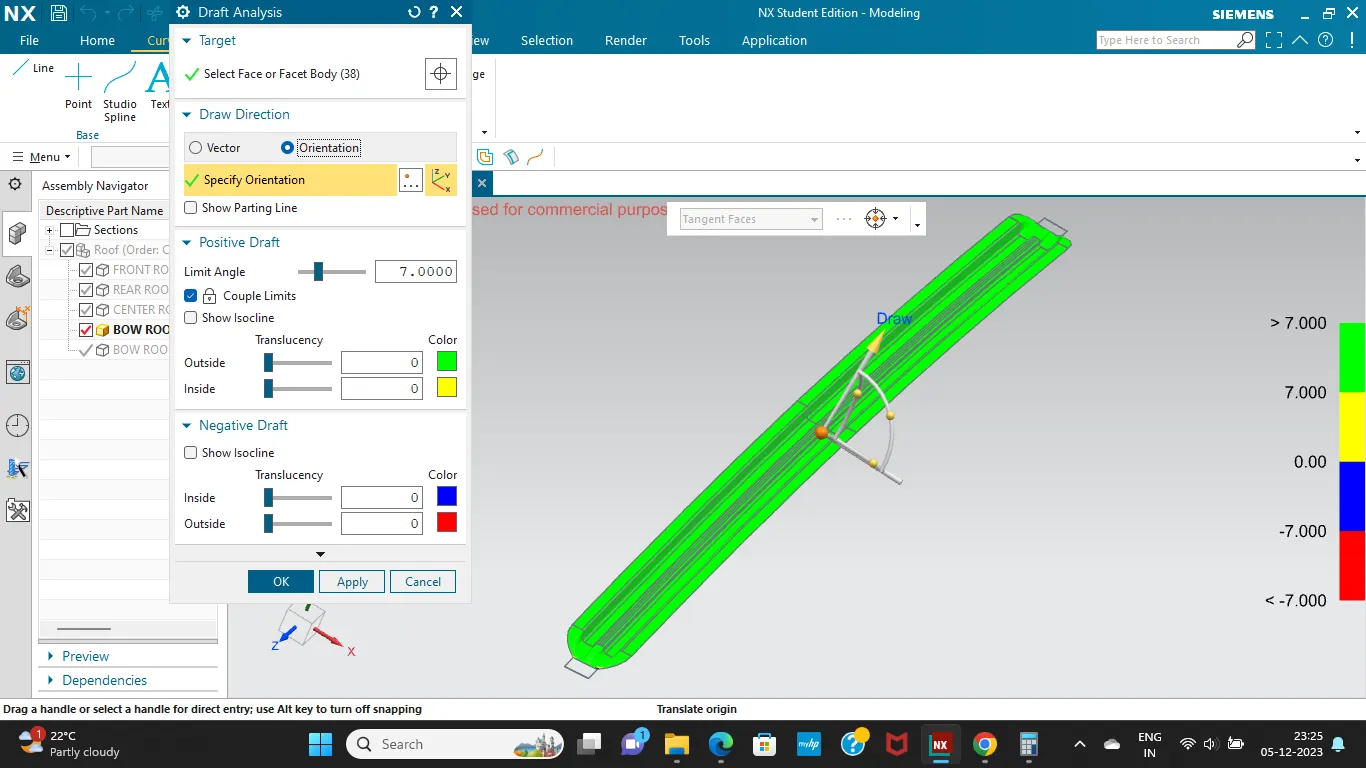
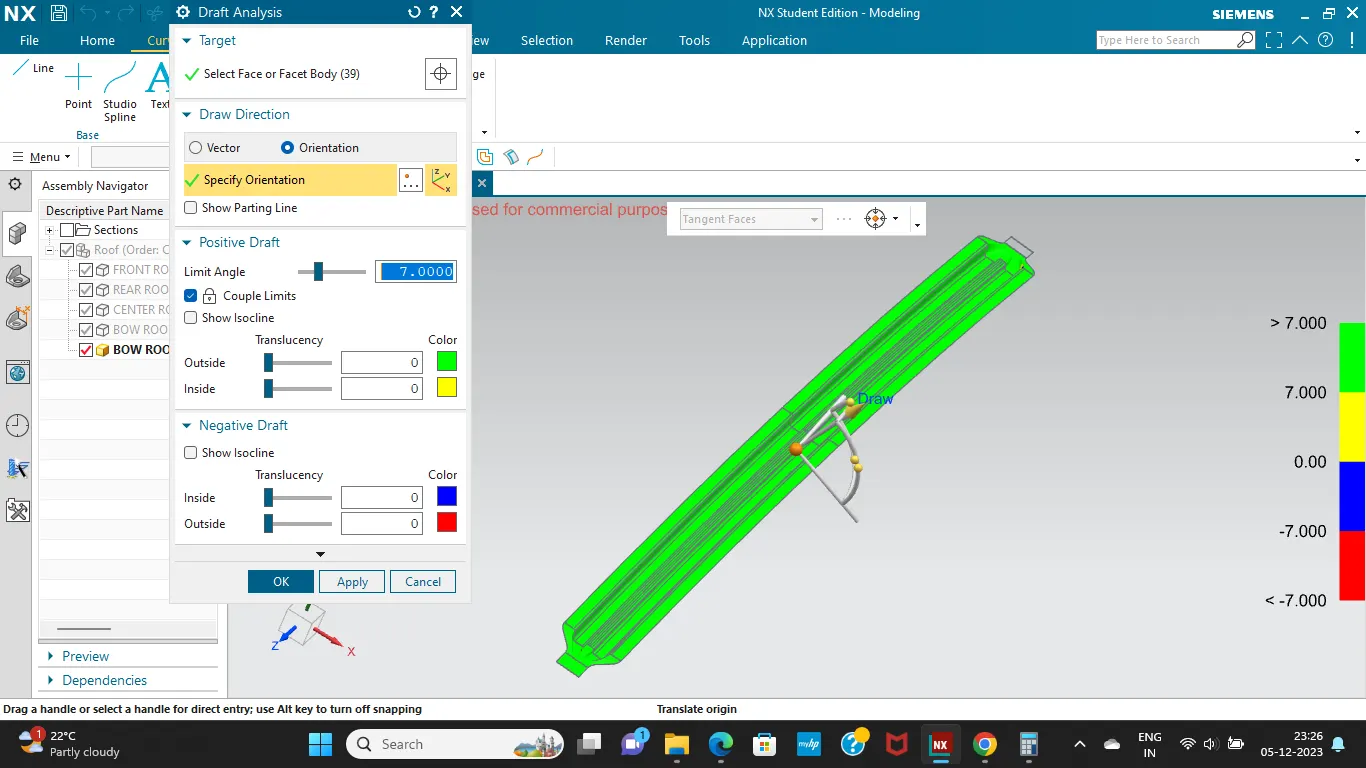
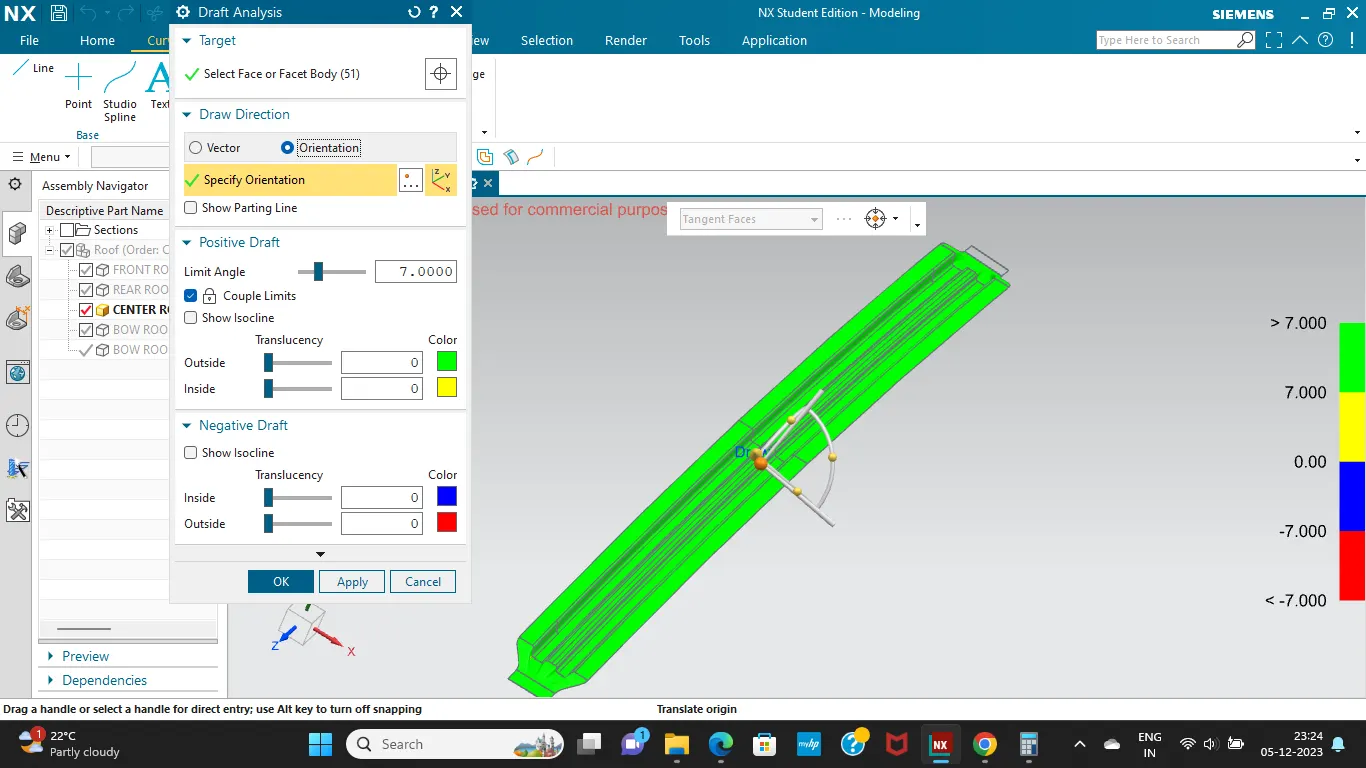
DRAFT ANALYSIS:
FRONT ROOF RAIL:
BOW ROOF 1:
BOW ROOF 2:
CENTER ROOF:
REAR ROOF:
TOP ROOF :
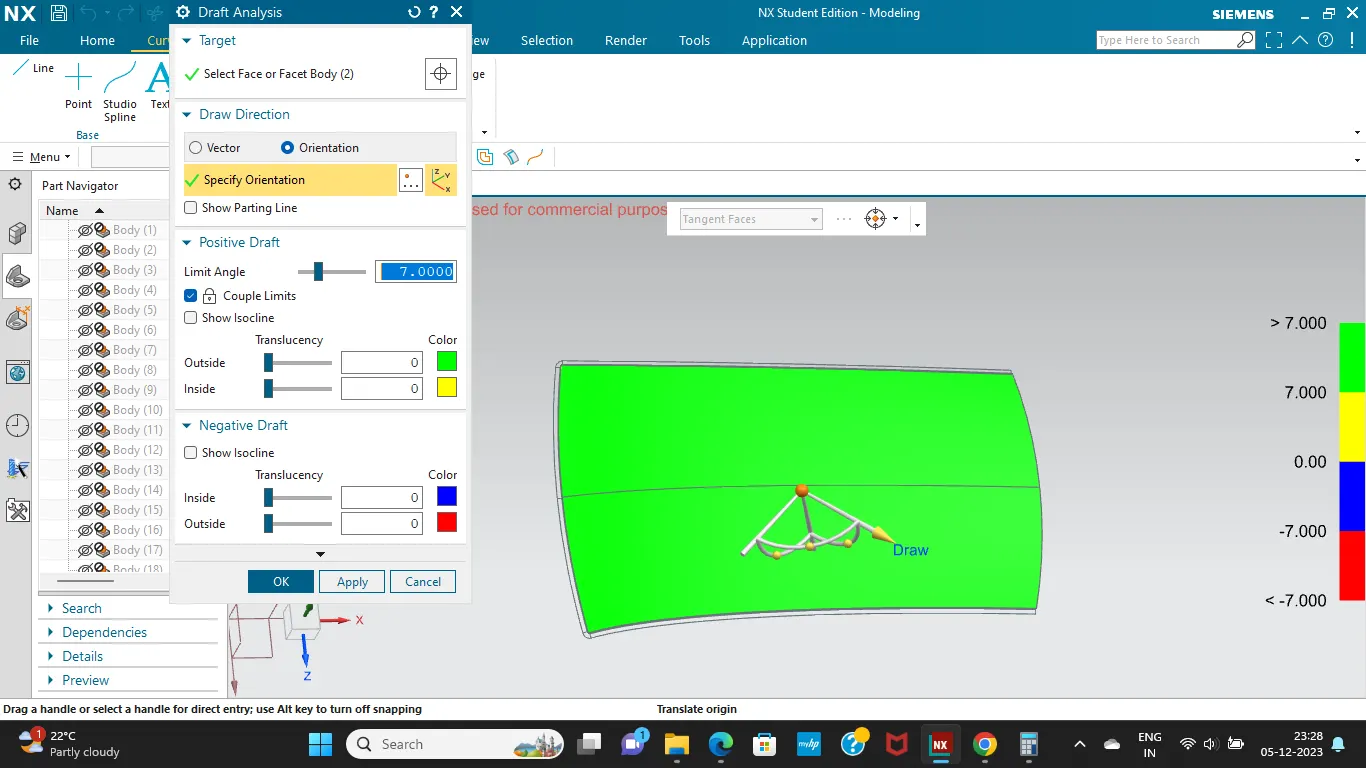
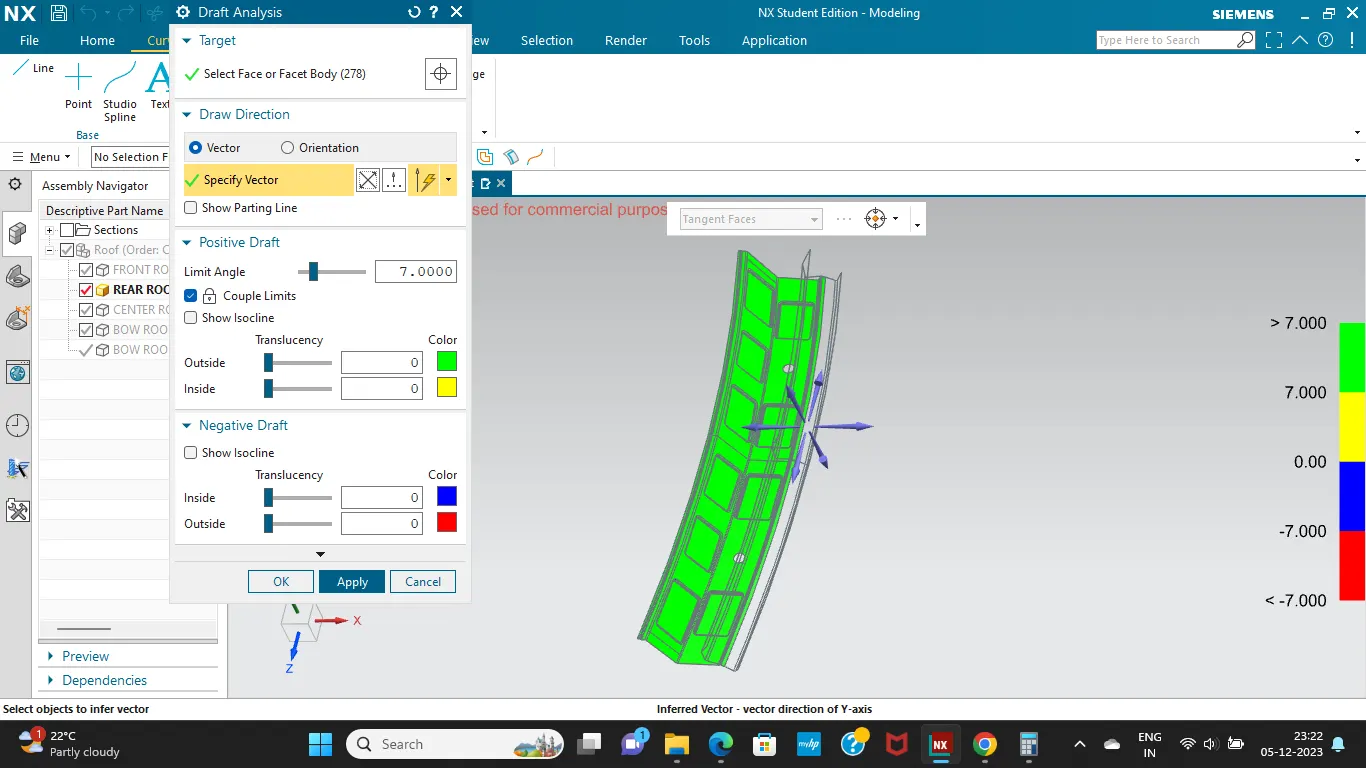
Draft analysis is done in NX software. We can change the draft angle and analyze is it clearing the required criteria. It is shown is different color zones. So identifying it will be easier. It will let us know that the part can be removed easily during manufacturing or not. Minimum draft angle of 7 Degree is considered for analysis. green color infer on the parts that all face along the tooling direction has positive draft angle greater than 7 degree and passed in analysis.
CONCLUSION:
- The results obtained after doing a curvature study on the roof was adequate.
- The position of the bow roofs can be arranged better (over the flat areas) which helps in increasing the strength of the roof.
- Embossments are added to improve the strength & Areodynamics of the roof but can be avoided if not necessary as it increases the cost of manufacturing.
.