Project 10
Object detection/Image segmentation using Mask_RCNN Architecture.
Object detection:
- In computer vision, object detection involves both localizing one or more objects within an image and classifying each object in the image.
- For localizing the object we draw bounding boxes around each detected object in the image(frame).
- And for object classification, the model predicts the correct class of the localized object.
Object segmentation :
- Object segmentation is an extension of object detection that involves marking the specific pixels in the image that belong to each detected object instead of using coarse bounding boxes during object localization.
- The Region-Based Convolutional Neural Network, or R-CNN, is a family of convolutional neural network models designed for object detection.
- There are four versions of it: R-CNN `rArr`Fast-RCNN `rArr` Faster- RCNN `rArr` Mask R-CNN.
- Mask R-CNN: Extension of Faster R-CNN that adds an output model for predicting a mask for each detected object.
Mask-RCNN:
- Using Mask R-CNN perform both Object detection & for each object in an image.
- Instance segmentation enables us to obtain a pixel-wise mask for each individual object in an image.
- Here, I am going to use pre-trained model architecture to perform object detection on custom images.
- In this, I am using Mask R-CNN-Tf2 which is tested against TensorFlow 2.0.0, Keras 2.2.4 (also Keras 2.3.1), and Python 3.7.3.
- I downloaded this model from the given google drive link and it is available on GitHub also.
- This contains (mrcnn) folder which contains the main five files: (model.py, config.py,utils.py, and visualize.py)
- (model.py,config.py,utils.py)These files contain the main Mask RCNN implementation.
- I am not going to use the (visualize.py)file to display the results.
- I created a new (visualize_cv2.py )using OpenCV to visualize the results as an Assignment task.
- Installed required packages & setup using: pip install -r requirements.txt & python setup.py install
- After installation, Let's start to implement Mask R-CNN
Implementing Mask R-CNN
**Importing required packages**
import os
import sys
import random
import itertools
import colorsys
import numpy as np
import cv2

import mrcnn
import mrcnn.config
import mrcnn.model
#import mrcnn.visualize_cv2
from mrcnn import utils


#config from mrcnn is used to create a custom subclass for our configuration.
#model from mrcnn is used to model for inference and then load the weights
#utils fromm mrcnn help create bounding boxes, find IOU, Non-max suppression, download pre-trained weight, and so on...
#visualize_cv2 from mrcnn used to visualize the bounding box, label, score, and mask for each object in the image.
import tensorflow
import keras
print(tensorflow.__version__)
print(keras.__version__)
2.0.0
2.3.1
Setting path
# Root directory of the project

root_dr = os.path.abspath("./")

#Import Mask R-CNN

sys.path.append(root_dr)  # To find the local version of the library

#Directory to save logs and trained model
model_dr = os.path.join(root_dr, "logs")

# Local path to trained weights file
COCO_MODEL_PATH = os.path.join(root_dr, "mask_rcnn_coco.h5")

# Download COCO-trained weights from Releases if needed
if not os.path.exists(COCO_MODEL_PATH):
    utils.download_trained_weights(COCO_MODEL_PATH)

# Directory of images to run detection on
img_dr = os.path.join(root_dr, "images")
Class label list
#set of 80 class labels and 1 BG
CLASS_NAMES = ['BG', 'person', 'bicycle', 'car', 'motorcycle', 'airplane', 'bus', 'train',
               'truck', 'boat', 'traffic light', 'fire hydrant', 'stop sign', 'parking meter',
               'bench', 'bird', 'cat', 'dog', 'horse', 'sheep', 'cow', 'elephant', 'bear', 'zebra',
               'giraffe', 'backpack', 'umbrella', 'handbag', 'tie', 'suitcase', 'frisbee', 'skis',
               'snowboard', 'sports ball', 'kite', 'baseball bat', 'baseball glove', 'skateboard',
               'surfboard', 'tennis racket', 'bottle', 'wine glass', 'cup', 'fork', 'knife', 'spoon',
               'bowl', 'banana', 'apple', 'sandwich', 'orange', 'broccoli', 'carrot', 'hot dog', 'pizza',
               'donut', 'cake', 'chair', 'couch', 'potted plant', 'bed', 'dining table', 'toilet', 'tv',
               'laptop', 'mouse', 'remote', 'keyboard', 'cell phone', 'microwave', 'oven', 'toaster', 'sink',
               'refrigerator', 'book', 'clock', 'vase', 'scissors', 'teddy bear', 'hair drier', 'toothbrush']
Construct inference configuration
class SimpleConfig(mrcnn.config.Config):
    # Give the configuration a recognizable name
    NAME = "coco_inference"

    # set the number of GPUs to use along with the number of images per GPU
    GPU_COUNT = 1
    IMAGES_PER_GPU = 1

    # Number of classes = number of classes + 1 (+1 for the background).
    # The background class is named BG
    NUM_CLASSES = len(CLASS_NAMES)

config = SimpleConfig()
config.display()

# displaying the configuration using the display() function from the Config class
# NUM_CLASSES is set equal to the length of the CLASS_NAMES from the above list
Configurations:
BACKBONE resnet101
BACKBONE_STRIDES [4, 8, 16, 32, 64]
BATCH_SIZE 1
BBOX_STD_DEV [0.1 0.1 0.2 0.2]
COMPUTE_BACKBONE_SHAPE None
DETECTION_MAX_INSTANCES 100
DETECTION_MIN_CONFIDENCE 0.7
DETECTION_NMS_THRESHOLD 0.3
FPN_CLASSIF_FC_LAYERS_SIZE 1024
GPU_COUNT 1
GRADIENT_CLIP_NORM 5.0
IMAGES_PER_GPU 1
IMAGE_CHANNEL_COUNT 3
IMAGE_MAX_DIM 1024
IMAGE_META_SIZE 93
IMAGE_MIN_DIM 800
IMAGE_MIN_SCALE 0
IMAGE_RESIZE_MODE square
IMAGE_SHAPE [1024 1024 3]
LEARNING_MOMENTUM 0.9
LEARNING_RATE 0.001
LOSS_WEIGHTS {'rpn_class_loss': 1.0, 'rpn_bbox_loss': 1.0, 'mrcnn_class_loss': 1.0, 'mrcnn_bbox_loss': 1.0, 'mrcnn_mask_loss': 1.0}MASK_POOL_SIZE 14 MASK_SHAPE [28, 28] MAX_GT_INSTANCES 100 MEAN_PIXEL [123.7 116.8 103.9] MINI_MASK_SHAPE (56, 56) NAME coco_inference NUM_CLASSES 81 POOL_SIZE 7 POST_NMS_ROIS_INFERENCE 1000 POST_NMS_ROIS_TRAINING 2000 PRE_NMS_LIMIT 6000 ROI_POSITIVE_RATIO 0.33 RPN_ANCHOR_RATIOS [0.5, 1, 2] RPN_ANCHOR_SCALES (32, 64, 128, 256, 512) RPN_ANCHOR_STRIDE 1 RPN_BBOX_STD_DEV [0.1 0.1 0.2 0.2] RPN_NMS_THRESHOLD 0.7 RPN_TRAIN_ANCHORS_PER_IMAGE 256 STEPS_PER_EPOCH 1000 TOP_DOWN_PYRAMID_SIZE 256 TRAIN_BN False TRAIN_ROIS_PER_IMAGE 200 USE_MINI_MASK True USE_RPN_ROIS True VALIDATION_STEPS 50 WEIGHT_DECAY 0.0001
Initializing the Mask R-CNN model for inference & loading weights
#This step builds the Keras model architecture.
#config=SimpleConfig() This initiates the inference configuration.
#mode = "Inference" means for prediction not for  training


Model = mrcnn.model.MaskRCNN(mode="inference",
                             config=SimpleConfig(),
                             model_dir=model_dr)

# Loading the weights into the model.
Model.load_weights(COCO_MODEL_PATH, by_name=True)
Performing detection and instance segmentation
#load the input image, OpenCV by default reads the image in BGR format.

image = cv2.imread("traffic.png")

image_rgb = cv2.cvtColor(image, cv2.COLOR_BGR2RGB)

'''
convert input images from BGR to RGB channel,
our model expects images in RGB format so
we use cv2.cvtColor to swap the color channels'''

#Perform a forward pass of the network to obtain the results.

result = Model.detect([image_rgb]) # takes RGB format

''
By performing a forward pass of images through the network,
the model makes predictions of both object detections &
pixel-wise mask predictions
'''
Results
#Get the results(dictionary) for the first image prediction.

r = result[0]
#print('result',r)

#Insights from the prediction
print('Number of instances N :',r['rois'].shape[0])
print('Mask shape:',r["masks"].shape)
print('Class_ids shape:',r["class_ids"].shape)
print('Class ids:',r["class_ids"])
Number of instances N : 23 Mask shape: (1080, 1624, 23) Class_ids shape: (23,) Class ids: [4 1 1 1 1 1 1 1 4 1 4 6 1 1 8 4 1 1 3 1 4 4 8]
Creating visualization module using openCV
visualize_cv2.py
#Same visualize_cv2.py available in mrcnn folder
import os
import sys
import random
import itertools
import colorsys
import numpy as np
import cv2

#Create a List of colors as an array
#This function generates random (but visually distinct )colors for each class.

def random_colors(N, bright=True):
    """
    Generate random colors.
    To get visually distinct colors, generate them in HSV space then
    convert to RGB.
    """
    brightness = 1.0 if bright else 0.7
    hsv = [(i / N, 1, brightness) for i in range(N)]
    colors = list(map(lambda c: colorsys.hsv_to_rgb(*c), hsv)) # converts hsv to rgb and make list of colors
    random.shuffle(colors)
    #print(type(colors))
    return colors


def apply_mask(image, mask, color, alpha=0.5):
    """Apply the given mask to the image.
    """
    for c in range(3):
        #This create a mask of
        image[:, :, c] = np.where(mask == 1,image[:, :, c] *(1 - alpha) +
                                  alpha * color[c] * 255,image[:, :, c])
    return image


def display_instances(image, boxes, masks, class_ids, class_names,
                      scores=None, title="",
                      figsize=(16, 16), ax=None,
                      show_mask=True, show_bbox=True,
                      colors=None, captions=None):
    # Number of instances
    N = boxes.shape[0] # which is equal to (r['rois'].shape[0])

    if not N:
        print(" No instances to display ")
    else:
        assert boxes.shape[0] == masks.shape[-1] == class_ids.shape[0]

    # Generate random colors for N instances
    colors = colors or random_colors(N)

    for i in range(N):
        # Bounding box
        # convert the color numpy array as a list and apply to text and box
        box_color = [int(c) for c in np.array(colors[i]) * 255]
        #print('box_color',box_color)

        if not np.any(boxes[i]):
            # Skip this instance. Has no bbox.Likely lost in image cropping.
            continue
        #bounding box end coordinates
        y1, x1, y2, x2 = boxes[i]

        # draw rectangles in the image
        image = cv2.rectangle(image, (x1, y1), (x2, y2),box_color, 2)

        #label
        label = class_names[class_ids[i]]
        score = scores[i]
        caption = '{} {:.2f}'.format(label, score)

        # draw text in the image
        image = cv2.putText(image, caption, (x1, y1), cv2.FONT_HERSHEY_COMPLEX, 0.6,(255,255,255),2)

        #extracting mask for i detection
        mask = masks[:, :, i]
        #get a mask color from the numpy array of colors
        mask_color = colors[i]
        if show_mask:
            masked_image = apply_mask(image, mask, mask_color)

    return masked_image
Explaination
- display_instances function takes six arguments:image,boxes(box coordinates),mask,class_ids,class_names,scores
- Above all the arguments are obtained after performing forward pass the image through the network, we get all that parameters.
***This function does the following task.***
- there are N instances detected by the model
**1.Drawing bounding boxes around the detections**
- We draw N bounding boxes around N instances.
- We need N colors also We create N random colors for N instances by using the random_colors() function.
- Bounding box end coordinates : y1, x1, y2, x2 = boxes[i]
- Then by using OpenCV inbuilt function:cv2.rectangle(image, (x1, y1), (x2, y2),box_color, thickness).
- we draw the bounding boxes around each instance. It takes coordinates,box_color, and thickness of the rectangle.
- box_color for each instances : box_color = [int(c) for c in np.array(colors[i]) * 255]
- From random_function() we get RGB color in the range from (0 to 1) but to display on the screen.
- so we need to scale RGB values in the range from 0 to 255 which is uint8.
- By multiplying by 255 the RGB value is simply scaled to 255 to determine the color of a pixel on the screen.
**2. Putting text(predicted class label, score) for N instance**
- To this, we extract the bounding box information: class ID, label, score(predicted probability), and visualization color.
- Then we pass this information to OpenCV's inbuilt function:
- cv2.putText(image, caption, (x1, y1),font,font scale,color,thickness)
- In caption = (label,score) & I have used white color(255,255,255) for text.
**3. Applying mask on detections using apply_mask() function**
- This task is achieved by extracting mask for current(i) detection:mask = masks[:, :, i]
- Determine the color used to visualize the mask:mask_color = colors[i]
- Then apply a pixel-wise mask on the object using a semi-transparent alpha channel.
Visualization of results
- Visualize the detected objects.
- Show images with bounding boxes, masks, class labels, and scores
detected_image = display_instances(image=image,
                                  boxes=r['rois'],
                                  masks=r['masks'],
                                  class_ids=r['class_ids'],
                                  class_names=CLASS_NAMES,
                                  scores=r['scores'])
cv2.imwrite('object_detection_traffic.png',detected_image)
#cv2.imshow('Detection_window', detected_image)
#terminate while loop if 'q' key is pressed
#cv2.waitKey(0)
#cv2.destroyAllWindows()
Instance segmentation output image:
traffic image
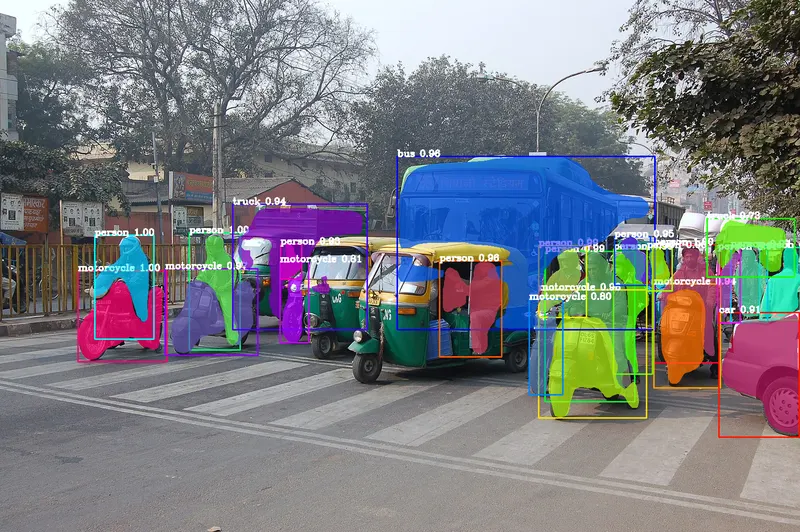
traffic image 1
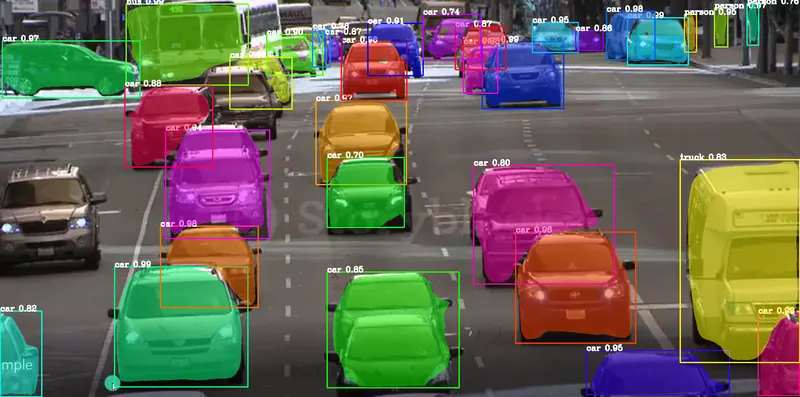
Google drive link for project file & all data
https://drive.google.com/drive/folders/1y8AXZF9kxVOsn1BjGNrMMP-1xAsfUBuu?usp=sharing
Google drive link for project file
https://drive.google.com/file/d/1fa5ajta1dwFa8IfjEw74Kd9Ocjs-lXjO/view?usp=sharing