Project 1 (Mini Project on Vehicle Direction Detection
EV BATCH - 16
Project 1: (Mini Project on Vehicle Direction Detection)
Vehicle direction detection: With the introduction of autonomous driving and advanced driving features with reliable security features, the vehicle direction detection process has become of unavoidable importance. Camera sensors, RADAR, and LIDAR sensors are used in a full-fledged Vehicle Direction Detection System. This VDD system works in conjunction with ADAS, AutoPilot, or Cruise control and is an irreplaceable parameter.
The camera reads the road signs & stores them into its memory with unique values for a left turn, right turn & straight drive. Depending on the direction it is taking, the final indication is given to the driver – as an indication if he is driving in the recommended direction or not.
Vehicle Direction Determination can also be coupled alongside features like GPS systems to identify whether the vehicle is reaching its destination in an optimized manner. This sub-feature can also be used along with Lane Detection, Highway Warning, Ramp Entry / Exit in Wrong Way Detection, etc.
Here we are modeling a vehicle direction detection algorithm using Simulink with a provided initiation file for inputs
Aim: To create an MBD-compliant MATLAB Simulink model for Vehicle Direction Detection as per the specified requirements.
Objective:
- Development of MATLAB Simulink model as per requirement.
- Tag the requirements to the Simulink model; tagging requirement 1 & requirement 2 to their corresponding subsystems is fine.
- MBD compliant changes, Data Dictionary creation & code generation is added advantage, and that is not the scope of this project.
- If choosing code generation, Storage class for Input signals: ImportedExtern; Storage class for Output signal: Export to File; Storage class for local signals: localizable; Storage class for calibration signals: Const.
- Choose sample time for all signals as 0.01s
Modeling Requirements:
Requirement - 1:
- Steering wheel input as yaw rate (Signal name: SteeringWheel_YawDegreeInput) is the input for this system.
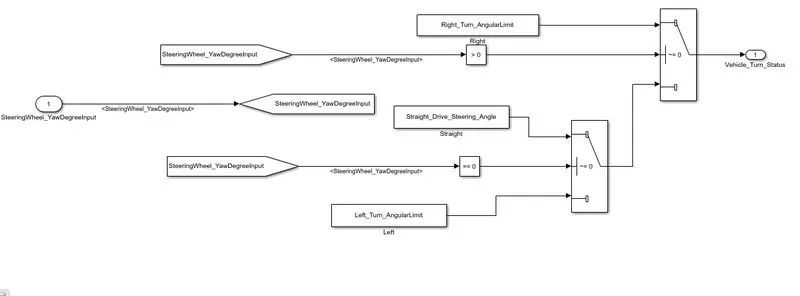
- This is compared against 3 angular values, one each for left turn, right turn & straight drive (Calibration Values: Right_Turn_AngularLimit, Left_Turn_AngularLimit, Straight_Drive_Steering_Angle) to say which specific direction the steering wheel is turning towards.
- Use switch blocks to compare & develop this requirement. Keep this requirement in a subsystem & output of this requirement is a local signal (Signal Name: Vehicle_Turn_Status).
Requirement – 2:
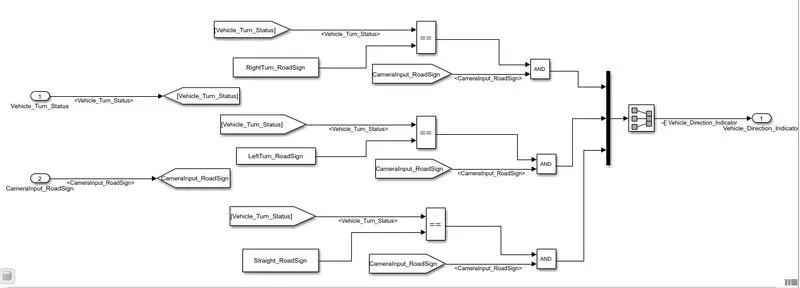
- Keep this requirement as a separate subsystem. Inputs to this requirement are local signal from requirement 1 (Signal Name: Vehicle_Turn_Status) & an input signal from camera (Signal Name: CameraInput_RoadSign), which confirms the occurrence of a road sign.
- Signal Vehicle_Turn_Status is compared against calibration values (Calibration Values: RightTurn_RoadSign, LeftTurn_RoadSign, Straight_RoadSign), if each of them is found equal, then each of the three corresponding output is compared against the camera input signal,
- Using a logical operator block, only one among them is finally given as output signal (Signal Name: Vehicle_Direction_Indicator).
Signals and calibration data
|
Signal / Calibration Name |
Signal Type |
Data Type |
Dimension |
Min |
Max |
Initial Value |
Units |
|
SteeringWheel_YawDegreeInput |
Input |
Int16 |
1 |
-180 |
180 |
- |
Deg |
|
CameraInput_RoadSign |
Input |
Boolean |
1 |
0 |
1 |
- |
- |
|
Vehicle_Turn_Status |
Local |
Int16 |
1 |
-180 |
180 |
- |
Deg |
|
Right_Turn_AngularLimit |
Calibration |
Int16 |
[1 1] |
-180 |
180 |
30 |
Deg |
|
Left_Turn_AngularLimit |
Calibration |
Int16 |
[1 1] |
-180 |
180 |
-120 |
Deg |
|
Straight_Drive_Steering_Angle |
Calibration |
Int16 |
[1 1] |
-180 |
180 |
0 |
Deg |
|
RightTurn_RoadSign |
Calibration |
Int16 |
[1 1] |
-180 |
180 |
30 |
|
|
LeftTurn_RoadSign |
Calibration |
Int16 |
[1 1] |
-180 |
180 |
-120 |
|
|
Straight_RoadSign |
Calibration |
Int16 |
[1 1] |
-180 |
180 |
0 |
|
|
Vehicle_Direction_Indicator |
Output |
Boolean |
1 |
0 |
1 |
- |
- |
Steps involved in modeling:
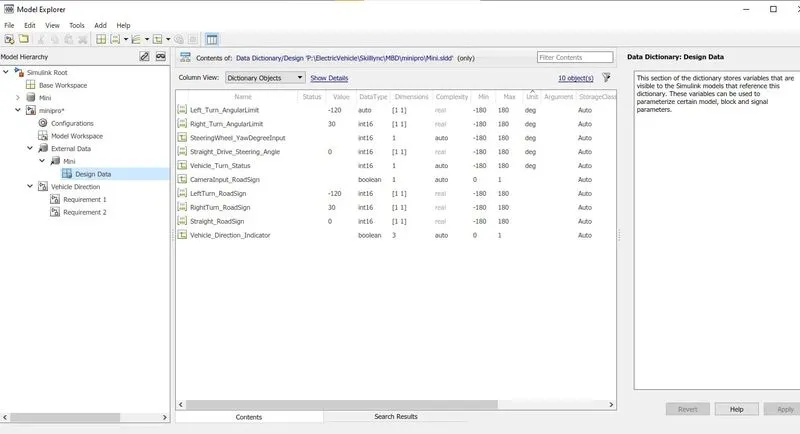
1. SLDD file creation and linking
- Create a blank Simulink model and save it
- Create a new SLDD file and link it to the model
- Go to model explorer > Open design data from model folders and subfolders > create signals and constants required
- Add signal and constant parameters as specified in the document (provided as signals and calibration data list)
2. Creating Simulink model
- Create the model by adding a subsystem with the name Vehicle_Direction and add inport and outport
- VDD model
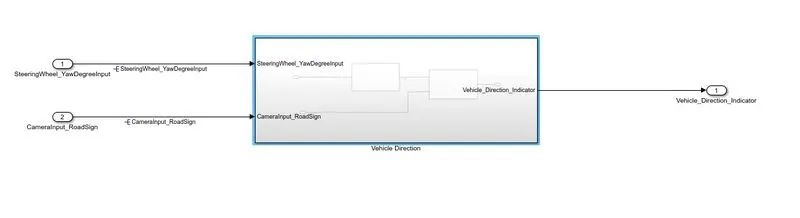
- VDD model
- Add 2 more subsystems inside it and name them as Requirement_1 and Requirement_2.
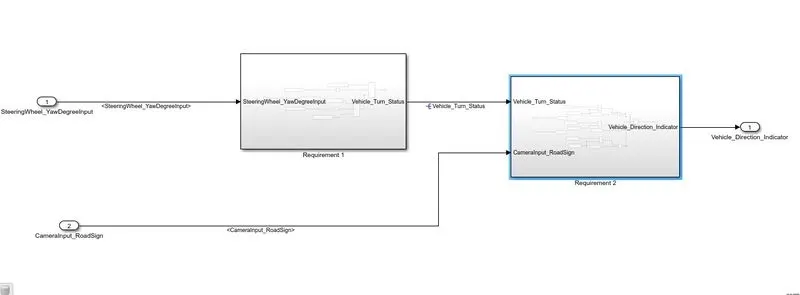
- Requirement_1
- Requirement_2
- Vehicle_Direction block and logic:
- Requirement_1 model and logic:
- Requirement_2 model and logic:
3) Signal resolving and propagation
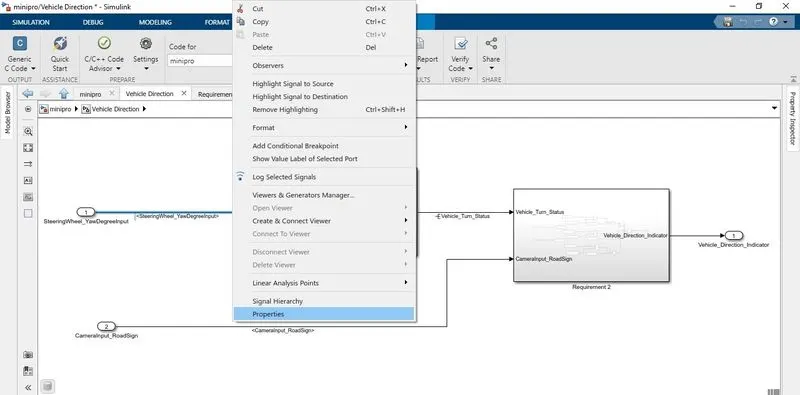
- Name the imports and signals by method of signal resolving and propagation.
- A signal is resolved when it appears for the first time and the signal is then propagated then onwards
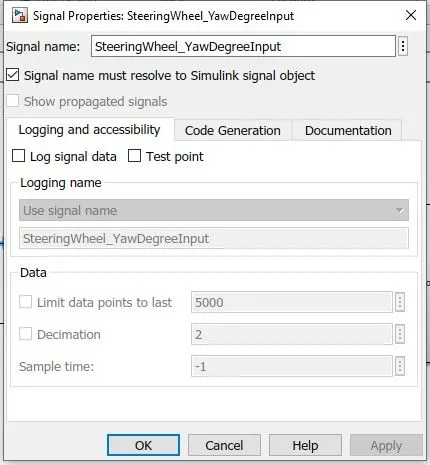
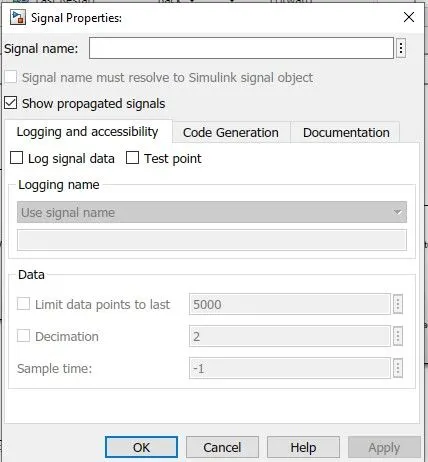
- Signal resolving: Right Click on the signal > properties > enter a valid name and click on the SLDD suggestion > check the resolve signal box > OK
- Signal propagation: Double click on the signal, add <>, and press enter.
- The resolved signal will be propagated
- Avoid signal overlapping by using the goto and from blocks
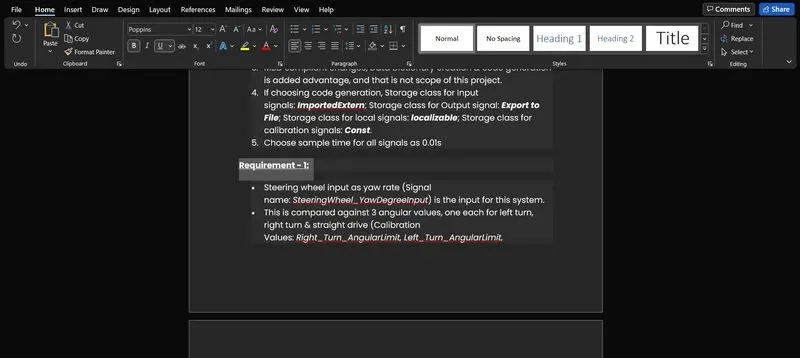
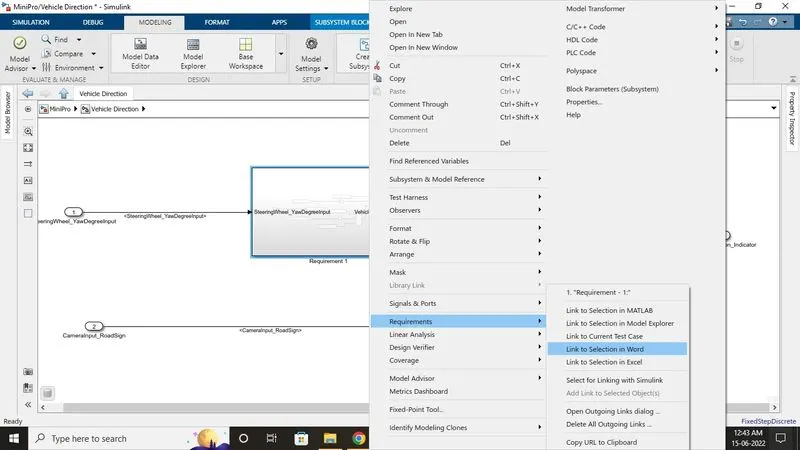
4) Requirement tagging
- Require tagging is the process of linking the model with a document or a file that explains the model requirements by just clicking on the name
- The word document with requirement details is opened.
- Select the heading and highlight it.
- Right Click on the subsystem that explains the highlighted portion > requirements > Link to selection in word
- We can now see in the requirement section that the subsystem is linked to the word document.
- If anyone clicks on the requirement tag, the word document containing its details will be opened.
5)Configuration of Solver settings and Code generation
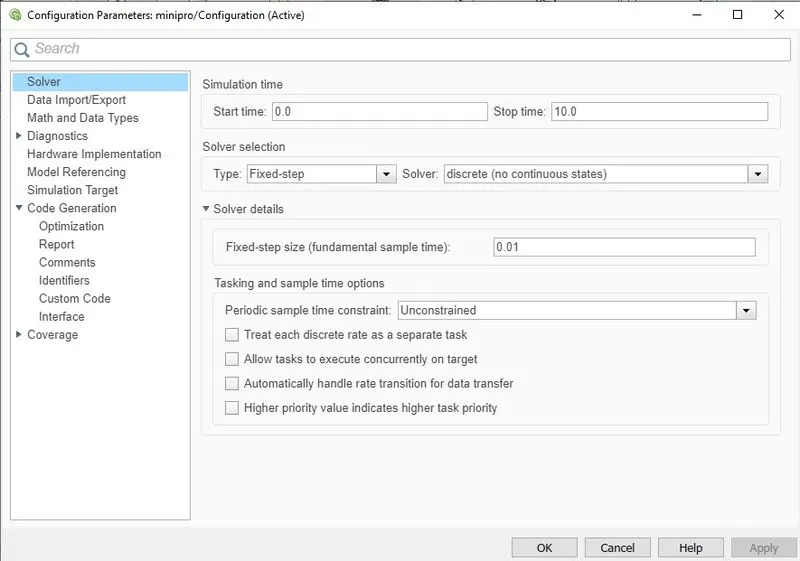
- Go to model settings > Solver > select type: Fixed step ; solver: discrete (no continuous states) ;Fixed step size:0.01 > OK
- Solver configuration
- Solver configuration
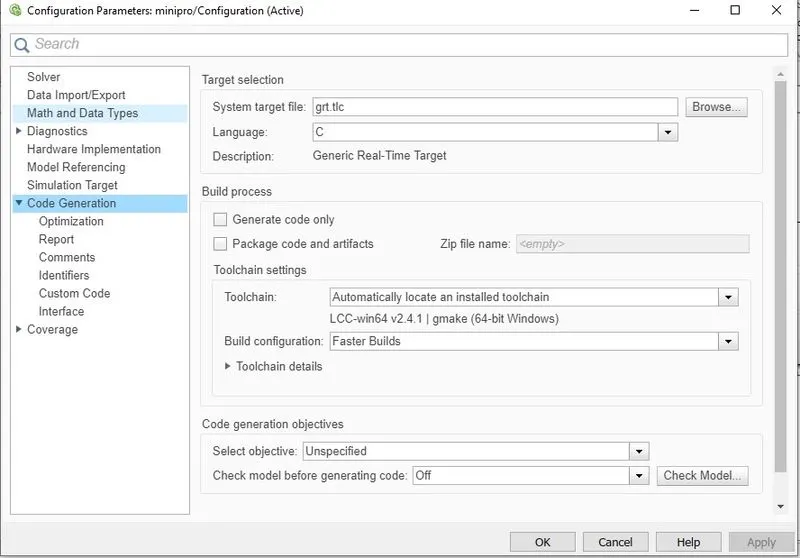
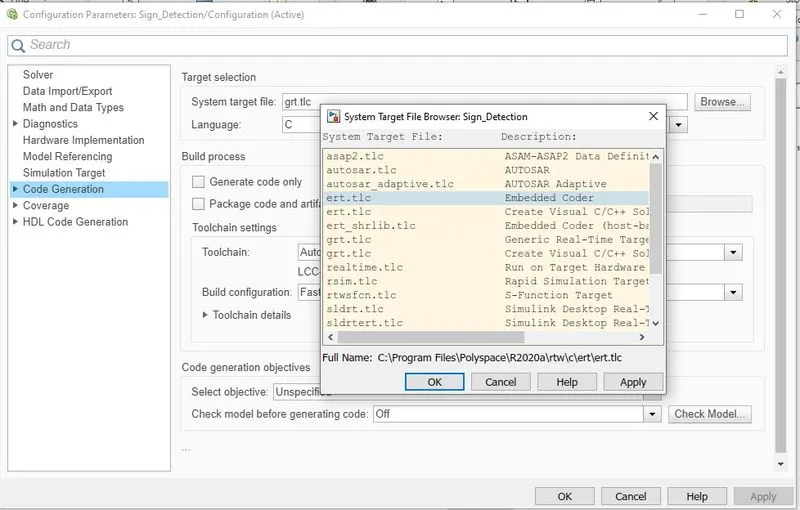
- Go to code generation > system target file:select ert.tlc >OK
- ert.tlc is the embedded coder used for C-code generation
6) Model advisor check:
- Model advisor checks are done to check compliance of the model with different guidelines
- Run the model and check for any errors
- If the model is error-free, we can proceed with the advisor check
- Here we are just performing the model advisor check on MAB standards
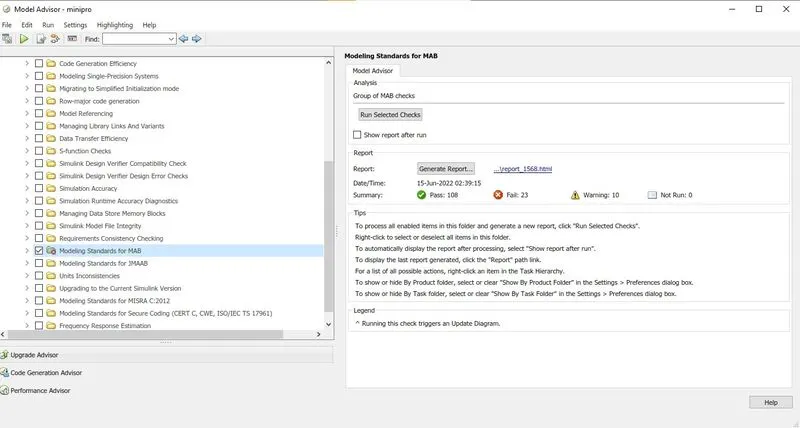
- Go to model advisor > select the whole system >OK
- Model advisor > select "By task"
- Select "modeling standards for MAB"
-
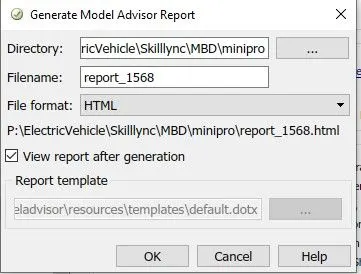
- Click on generate report. The file name and the location where the generated file will be stored are displayed there
- Once the report is generated, the advisor results can be seen with the total number of the pass, fail, warnings and tasks.
- The errors must be eliminated to 0 numbers
- The warnings must be reduced to maximum
- To correct a warning, select the folder for which the warning is shown > select sub folder with warning sign > The warning parameters and correction methods as shown there
- Follow the correction recommendation and click OK when done correcting
- Now the warning number can be seen reduced.
7) Code generation:
- Once the warnings are reduced to the maximum, we can generate a C code for the model created
- Go to model explorer > open requirement 2 > set the parameters
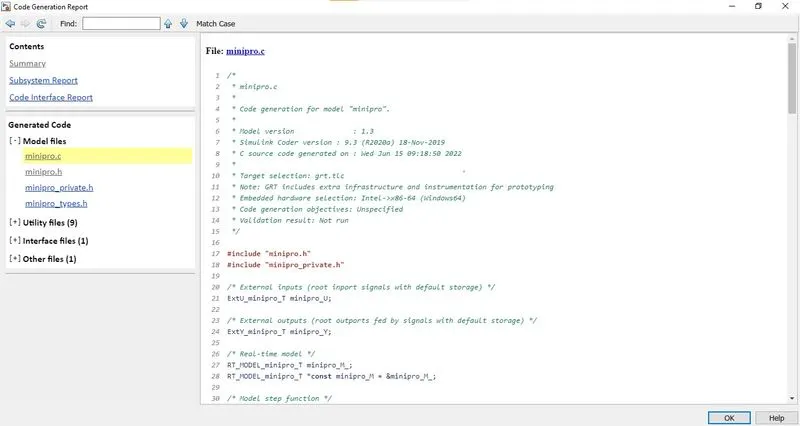
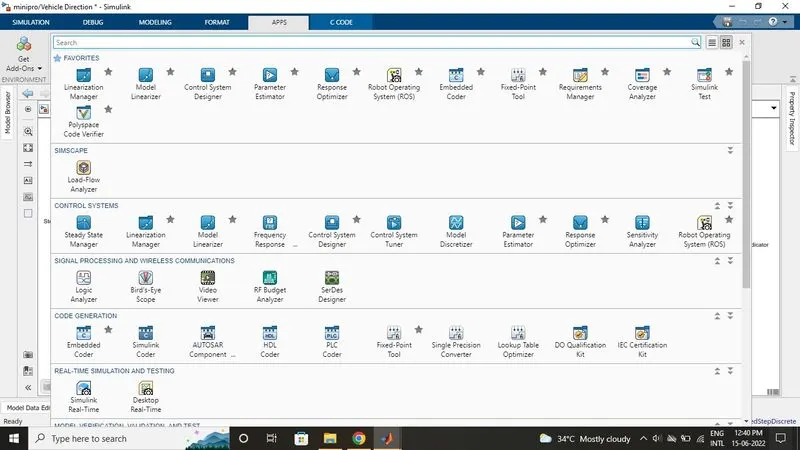
- Go to APPS tab > Code generation> Embedded coder > Select the model name >Generate code /Build
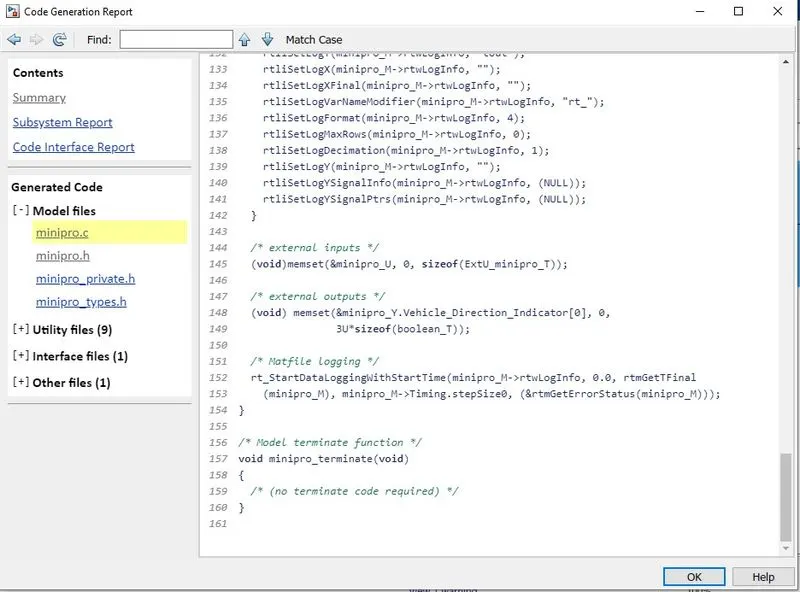
- The code will be displayed and it's also saved in the selected directory.
Result:
- Model advisor report
- A model advisor report is generated based on the MAB guidelines
- Generated C code
- C code files are generated for the Simulink model
The Simulink model, the model word document, SLDD file, and advisor report are attached in the form of a zip file below