Project 1 - Interfacing a 16*2 LCD with Arduino using I2C protocol
16*2 LCD WITH ARDUINO INTERFACING
MASTER SLAVE COMMUNICATION NETWORKING
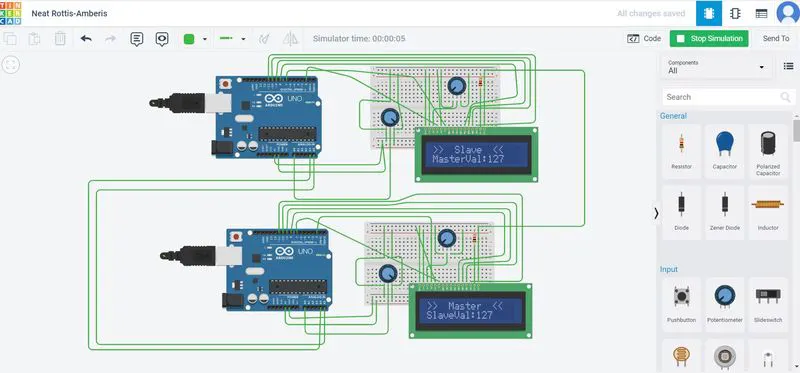
Master code:
#include //Library for LCD display function
LiquidCrystal lcd(12, 11, 5, 4, 3, 2); //Define LCD Module Pins (RS,EN,D4,D5,D6,D7)
int val1=A4;
int val2=A5;
void setup()
{
lccd.begin(16,2);
}
void loop()
{
lcd.setCursor(0,0); //Sets Cursor at line one of LCD
lcd.print(">> Master <<"); //Prints >> Master << at LCD
lcd.setCursor(0,1); //Sets Cursor at line two of LCD
lcd.Print("SlaveVal: 99"); //Prints SlaveVal: in LCD
LCD
delay(1000);
}
Slave Code:
#include //Library for LCD Display Function
LiquidCrystal lcd(12, 11, 5, 4, 3, 2); //Define LCD
Module Pins(RS,EN,D4,D5,D6,D7)
int val1=A4;
int val2=A5;
void setup()
{
lcd.begin(16,2);
}
void loop()
{
lcd.setCursor(0,0); //Sets Cursor at line one of LCD
lcd.print(">> Slave <<"); //Prints >> Slave << at LCD
lcd.setCursor?(0,1); // Sets Cursor ar line two of LCD
lcd.print("MasterVal: 100"); //Prints MasterVal: in LCD
delay(1000);
}
Now we will write a program which will enable a master to control an LED on the Slave Arduino. User will write in the serial monitor of the Master BlueOn or BlueOff to toggle the LED on the Slave. Simple enough, so let's write the code.
Here you can copy the master code or simply download it from the attachment down below. The attached code has an explanation for each line of the code, but in the next step of the tutorial we will explain the code in detail.
#include
String readString;
byte I2C_OnOff;
void setup()
{
  Wire.begin();
  Serial.begin(9600);
  Serial.println("Type On to turn on the LED and Off to shut it down!");
}
void loop()
{
  while (Serial.available())
  {
    delay(2);
    char c = Serial.read();
    readString += c;
  }
  if (readString == "BlueOn" or readString == "BLUEON" or readString == "blueon")
  {
    I2C_OnOff = 1;
  }
  else if (readString == "BlueOff" or readString == "BLUEOFF" or readString == "blueoff")
  {
    I2C_OnOff = 0;
  }
  if (readString.length() > 0)
  {
    Serial.println(readString);
    readString = "";
  }
  Wire.beginTransmission(1);
  Wire.write(I2C_OnOff);
  Wire.endTransmission();
}
Here you can copy the slave code or simply download it from the attachment down below.
#include
int DO_Blink = 13;
byte I2C_OnOff;
void setup()
{
  pinMode(DO_Blink, OUTPUT);
  Wire.begin(1);
  Wire.onReceive(BlinkLED);
}
void loop()
{
delay(100);
}
void BlinkLED(int Press)
{
  I2C_OnOff = Wire.read();
  if (I2C_OnOff == 1)
  {
   digitalWrite(DO_Blink, HIGH);
  }
  else if (I2C_OnOff == 0)
  {
   digitalWrite(DO_Blink, LOW);
  }
}
STEP 3: CODE EXPALINED: TWO ARDUINOS
1. We include the wire library for I2C in our master code, we define a string variable called readString this variable will be used to store on or off commands given in the serial monitor.
#include
String readString;
2. We define a byte variable called I2C_OnOFF with which we will send information to the slave via I2C. We start the I2C communication and Serial communication, and write on the monitor for note for a user.
byte I2C_OnOff;
void setup()
{
  Wire.begin();
  Serial.begin(9600);
  Serial.println("Type On to turn on the LED and Off to shut it down!");
}
3. Now we have to check if the user has inserted anything in the serial monitor and read it. We store this information through char c variable letter by letter and move these characters inside a readString string.
while (Serial.available())
  {
    delay(2);
    char c = Serial.read();
    readString += c;
  }
4. Now we create an if statement which will determine the value of a I2C_OnOff variable depending on the users input. If the user inserts "BlueOn", "BLUEON" or "blueon" the I2C_OnOff variable will store number 1. If the user inserts "BlueOff", "BLUEOFF" or "blueoff" the I2C_OnOff variable will store 0.
if(readString == "BlueOn" or readString == "BLUEON" or readString == "blueon")
  {
    I2C_OnOff = 1;
  }
  else if(readString == "BlueOff" or readString == "BLUEOFF" or readString == "blueoff")
  {
    I2C_OnOff = 0;
  }
5. Now we write a if statement for displaying the users input on the Serial Monitor of the Master. If the readString string has any value display this value and empty the string.
if (readString.length() >0)
  {
    Serial.println(readString);
    readString="";
  }
6. Now we will open the transmission with the slave that has an address 1, send it a byte I2C_OnOff value and end the transmission.
  Wire.beginTransmission(1);
  Wire.write(I2C_OnOff);
  Wire.endTransmission();
}
Now we will talk about the Slave code, this same Slave code will be used in all of the Slaves later in the tutorial, we will only have to change the address of the Slave. Here the address of our first slave is 1.
1. We load the library as with the master, assign a variable to the digital pin 13 where our LED is connected (or built in). We define the same byte variable I2C_OnOff as in the master. This variable will be used with an if statement to toggle the LED.
#include
int DO_Blink = 13;
byte I2C_OnOff;
2. We need to set the pin mode of the LED as an Output, start the I2C communication by stating that our slave address is 1. Than we have to call register an event, here called BlinkLED.
void setup()
{
  pinMode(DO_Blink, OUTPUT);
  Wire.begin(1);
  Wire.onReceive(BlinkLED);
}
3. We place a delay inside a loop, so that we don't "overwhelm" the Arduino.
void loop()
{
delay(100);
}
4. We have to create a function for the event called BlinkLED which will output an integer Press.
void BlinkLED(int Press)
{
5. Than we read the data that the master sends to the slave, we store that data in the byte I2C_OnOff.
I2C_OnOff = Wire.read();
6. We write an if statement to turn on or off the LED depending on the received data from the master.
  if (I2C_OnOff == 1)
  {
   digitalWrite(DO_Blink, HIGH);
  }
  else if (I2C_OnOff == 0)
  {
   digitalWrite(DO_Blink, LOW);
  }
}
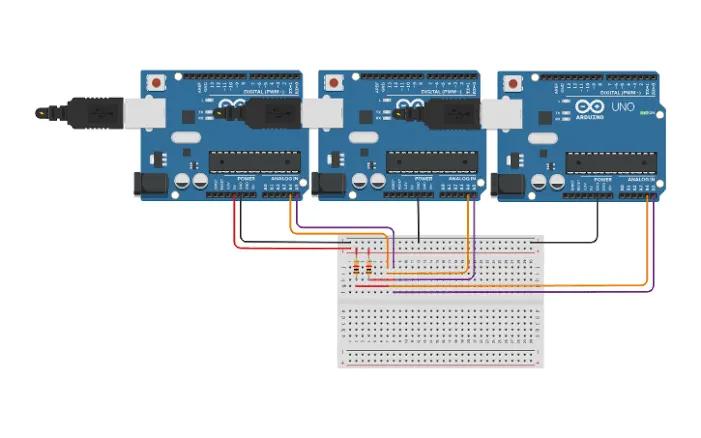
Now we have to simply connect the two Arduinos as before. After we have uploaded the code to both boards and made sure that both have grounds connected and that both are powered up, we will choose the port of the master and turn on the serial monitor. Here we input blueon or blueoff statements to toggle the LED.