Project 1 - Interfacing a 16*2 LCD with Arduino using I2C protocol
AIM: In this project implementing the Code for “Interfacing a 16*2 LCD with two Arduino’s (one for Master and one for Slave) using Inter-Integrated Circuit (I2C) communication protocol” by sending the message to LCD using I2C communication protocol and display the message on LCD screen by using Tinkercad.
Hardware Connection Processor:
- In order to build the circuit for interfacing LCD display with two Arduion boards in master and slave configuration, I have used 2 Arduino Uno boards and two I2C LCD display's.
- First analog pins A4 and A5 in arduino are used for used for I2C communication. The digital pin 2 is connected to RS of LCD. Digital pin 3 connected to E of LCD.
- I connected the A5 pin of the first board with the A5 pin of the second board and the A4 pin of the first board with the A4 pin of the second board using two wires.
- I connected the ground of the first board with the ground of the second board through the Bread-board.
- The Digital pins 4, 5, 6, 7 are connected to DB1, DB2, DB3, DB4 of LCD. Input supply 5v and Gnd are connected to the LCD's and Breadboards from arduino's. The potentiometer's is used to turn ON and OFF the LCD's.
- With this, all the hardware connection were complete and the circuit was ready to be programmed.
Implemantion of the Code:
Master Arduino:
- In the Master Arduino board, I included the header files, 'Wire.h' for I2C communication and 'LiquidCrystal.h' for the LCD.
- The master Arduino board, I initialized the I2C communication using 'Wire.begin()' in the setup function.
- In the loop function, I wrote the message to be transmitted using, 'Wire.requestFrom(8,16)'. I transmitted one text message, 'MASTER'. Then I ended the transmission using 'Wire.end()'.
- After this, I introduced a delay of 1000 msec to ensure that there is some time for processing the received information at the slave Arduino board.
Arduino Slave:
- In the slave Arduino board, I included the header files, 'Wire.h' for I2C communication and 'LiquidCrystal.h' for the LCD same as Master Ardunio Board.
- I initialized the I2C communication using 'Wire.begin(8)' in the setup function.
- In the loop function, I wrote the message to be transmitted using, 'Wire.requestFrom(16,2)'. I transmitted one text message, 'SLAVE'.
- I initialized the I2C reception by using the 'Wire.begin(1)' API tuned to the address '1' and also initialized the LCD display by using 'lcd_1.begin' in the setup function.
- In the loop function, I printed the received message after setting the cursor to (0,1) which is in the second line 'Message sent'.
- I declared the transmission of a message from the master board as an event using 'Wire.onReceive()'. The event was named, 'receiveEvent'.
- After writing the code in the loop function, I declared the new function named 'send' in which I send the text message "Slave Message".
Code:
//MASTER
#include
#include
LiquidCrystal lcd(2,3,4,5,6,7); //pins connected to LCD
char MasterReceive[16]; //String to get the message
void setup()
{
Serial.begin(9600);
Wire.begin(); //To begin I2C communication
lcd.begin(16,2);
lcd.clear();
}
void loop()
{
Wire.requestFrom(8,16);
lcd.setCursor(0,0);
lcd.print("MASTER"); //To print in display
lcd.setCursor(0,1);
int i=0;
while(0<Wire.available())
{
MasterReceive[i]=Wire.read(); //To print character by character
i++;
}
lcd.print(MasterReceive);
delay(1000);
Wire.end();
}
//SLAVE
#include
#include
LiquidCrystal lcd(2,3,4,5,6,7);
void setup()
{
Serial.begin(9600);
Wire.begin(8); //To begin I2C communication
Wire.onRequest(send);
lcd.begin(16,2); //To start the LCD display
lcd.clear(); //To clear the display
}
void loop()
{
lcd.setCursor(0,0);
lcd.print("SLAVE"); //To display in LCD
lcd.setCursor(0,1);
lcd.println("Message sent "); //To display in LCD
}
void send()
{
char ch[17]="Slave Message ";
Wire.write(ch);
}
CIRCUIT:-
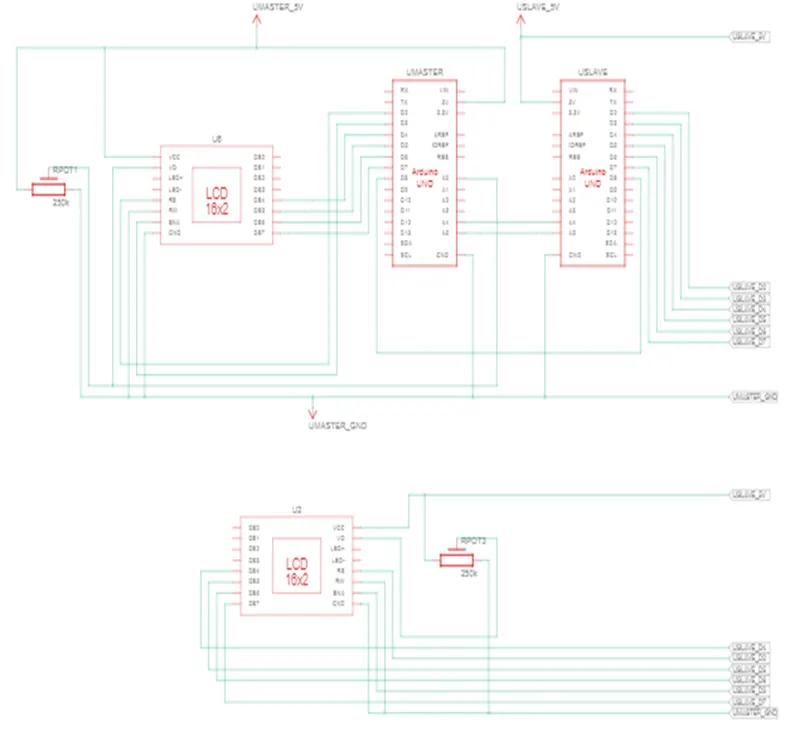
Conclusion: I have sendthe meaasge from slave to master using Inter-Integrated Circuit (I2C) communication protocol in arduino and display the message on 16*2 LCD's screen and have attached the screen-shot and link of the project for the reference purpose.