Preparing Schedule & Cost Estimation for a building using REVIT
- Question no.1.
- Ans -
- Aim - To Use the shortcut keys in Revit for task complition.
- Introduction - The various keyboard shortcuts in Revit can be categorized according to their function and the window in which they can be activated. They are categorized under the following headings: Annotate, Analyze, Architecture, Collaborate, Context Menu, Contextual Tabs, Create, Manage, Modify, Navigation Bar, Snaps, Structure, System, View, and View Control Bar. Here the shortcut key gives the command related to concept which is used. Shortcut key is useful for the easier and faster work in revit.
- Process -
- a.Using 3D model create a section box = BX.
- b.To create similar doors and windows in a floor plan layout = CS.
- c.To reduce the thickness of lines visible in plan views = TL.
- d.To apply override settings to a floor in the model section view = EOD.
- e.To increase the range of visibility in a plan view = VR.
- f.To select the previously selected items = CTRL+<-(Control plus left arrow).
- g.To add annotations to the model views = DI.
- h.To bring the model elements in line = AL.
- i.To rotate the model elements = RO.
- j.To move an object to another location = MV.
- k.To copy the a model element = CO.
- l.To mirror an element about an axis = MM.
- m.To create an array of model elements = AR.
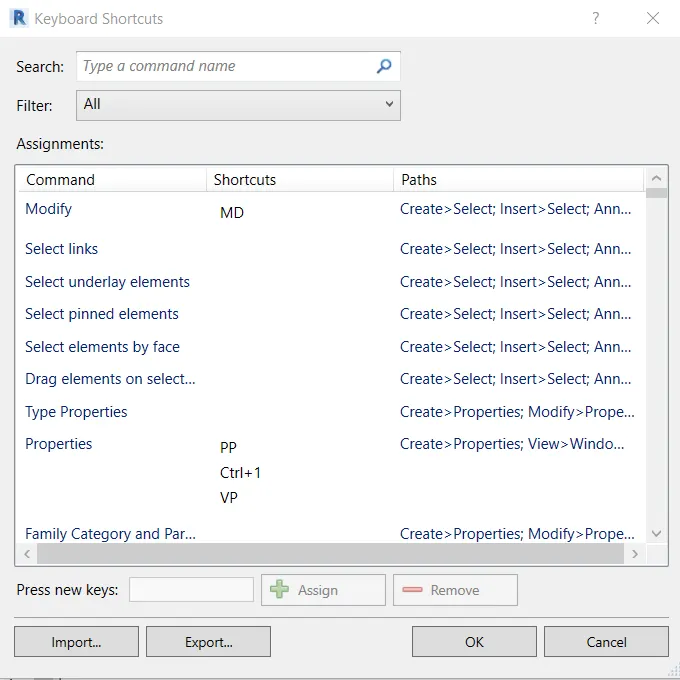
- Also there is another option for shortcut key
- Go to view toolbar ->Use interface->Keyboard shortcuts.
- Result -
- Here we we add shortcut keys given in question. These keys are used for faster and easier design of model in revit.
- Question no.2.
- Ans -
- Aim - To prepare a schedule of the project from the previous model link wall, doors, windows and materials-concrete/wood.
- Introduction - When you build or modify a schedule, you can add keys that automate creating new schedules.
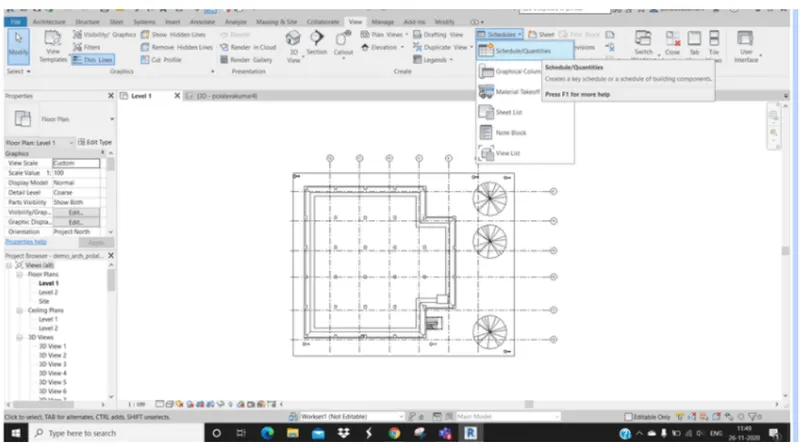
- Click View tabCreate panelSchedules drop-down
 Schedule/Quantities.
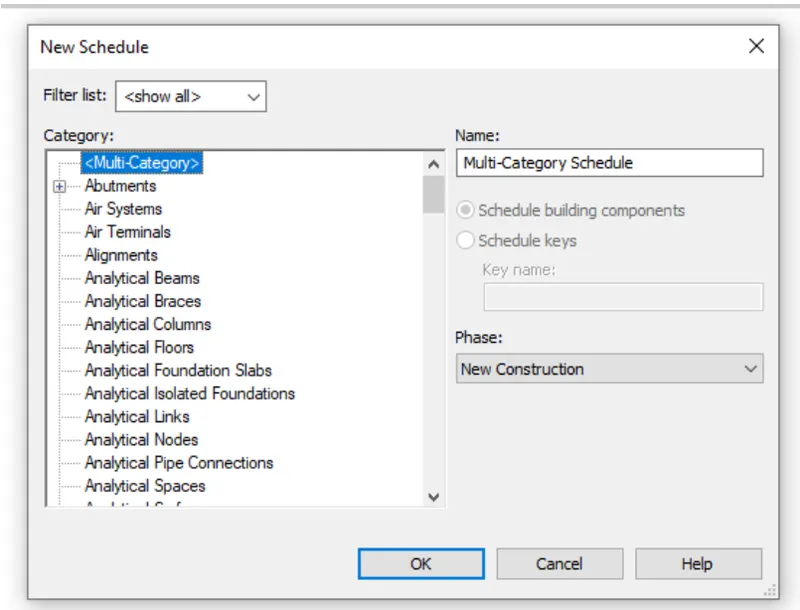
 - In the New Schedule dialog, select the element category for which you want to schedule keys.
- Select Schedule keys. Revit automatically fills in the Key name. This is the name that appears among the element's instance properties. If desired, enter a new name.
- Click OK.
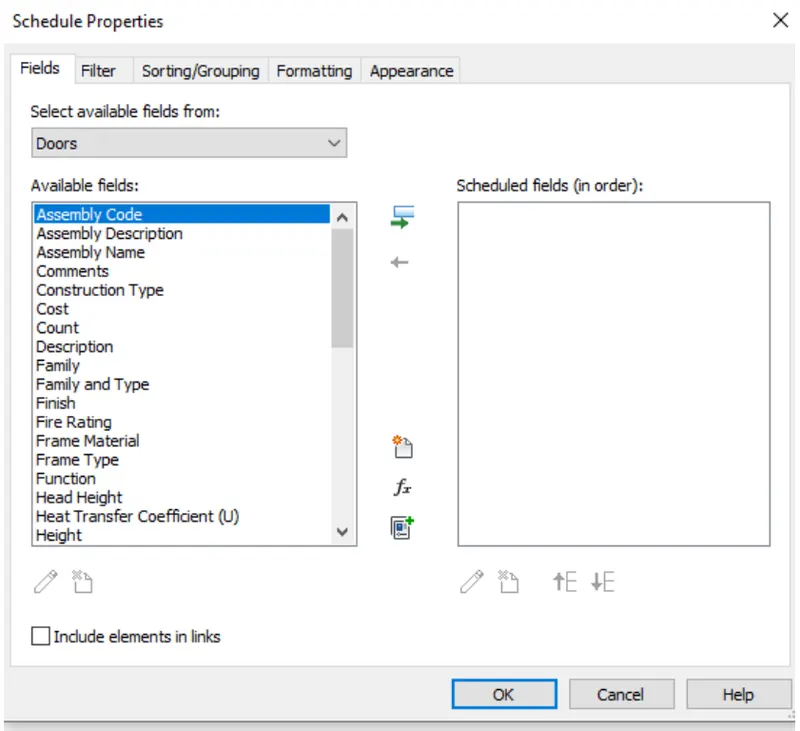
- In the Schedule Properties dialog, add the predefined fields for the style. For example, add ceiling finish, floor finish, and wall finish. Fields or parameters from the selected category can be scheduled using keys. Additional project parameters can be added to the category and scheduled. Click OK. The key schedule opens.
- Click Modify Schedule/Quantities tabRows panel
 (Insert Data Row) to add rows to the table. Each row creates a new value for the key. For example, if you are creating a room key schedule, you can create key values for executive conference room, small conference room, large conference room, executive office, standard office, and so on.
 - Fill in the appropriate information for each of the key values.
- Schedules in Revit are amazing, because they really harness the power of the I in BIM. Sadly, they are rarely used to their full potential. Some of the best features are not well understood, maybe because they tend to be hidden and not often discussed.
- Tools used -
- View.
- Schedule.
- Schedule properties.
- Schedule quantities.
- Process -
- Open the architectural template which we have used for our previous week.
- From the view toolbar select the quantities option available.
- Select all the components like doors, walls, windows, and materials concrete/wood.
- Then schedule tab dialog box appears then select the components that we want to display in schedules.
- Result -
- We have prepared the schedule of the project for doors similarly we can do it similarly for walls, window, and material - concrete/wood.
- Question no.3.
- Ans -
- Aim - To create areas and volume for each room using revit and assign appropriate room tags to each room and to prepare a schedule report for room area and volume of each room.
- Introduction - Here we can calculate the area and volume using schedule and quantities tools. Revit was given the accurate information related to area of rooms.
- Tools used -
- View.
- Schedules.
- Schedule properties.
- Schedule quantities.
- Process -
- Open the saved architectural project using file icon.
- From the view toolbar select schedule quantities option available.
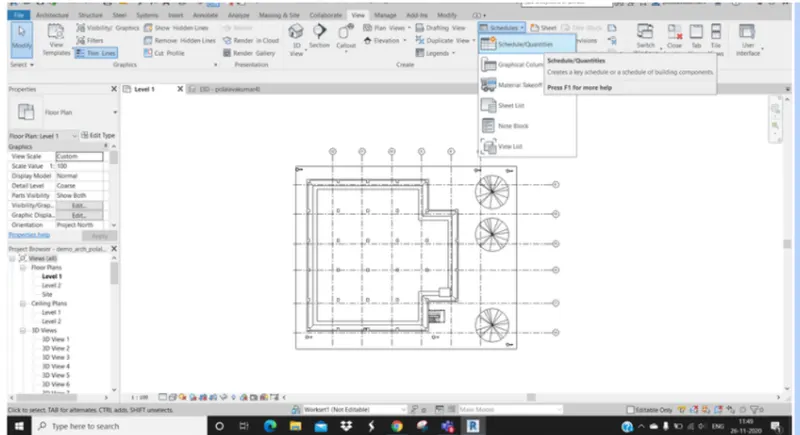
- The schedule dialog box appears. Then select required parameters like area, volume etc.
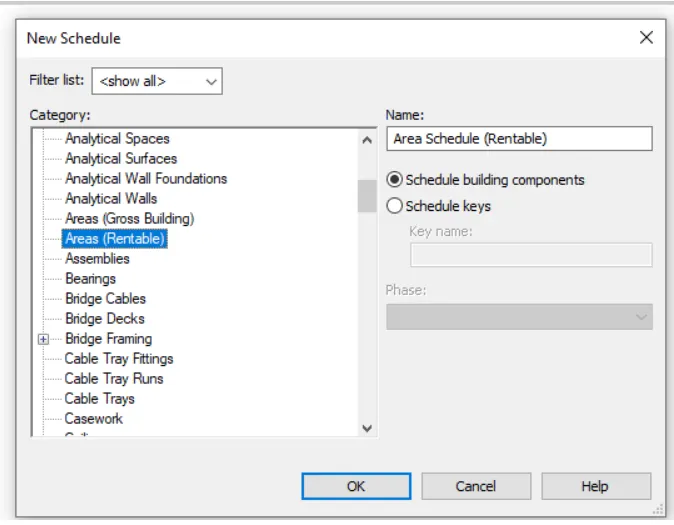
- Then click on ok option after selecting required parameters.
- Then we can obtain the room area and volume schedule.
- Result -
- Prepare schedule report for area and volume of each room and calculating area and volume of each room in the model with appropriate room tags applied to each room.
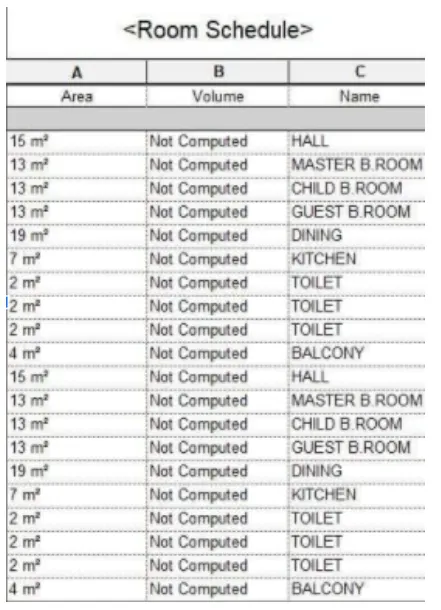
- Question no.4.
- Ans -
- Aim - To prepare the schedule of the total cost of material used in project.
- Introduction - Here we can schedule the total cost of materials. Such cost can be calculated by using schedule and quantities toolbar. The material total cost is a its cost given in properties browser.
- Tools used -
- View.
- Schedule.
- Schedule properties.
- Schedule quantities.
- Material takeoff.
- Process -
- Open the saved architectural template project.
- From the view toolbar select the shedule quantities option available.
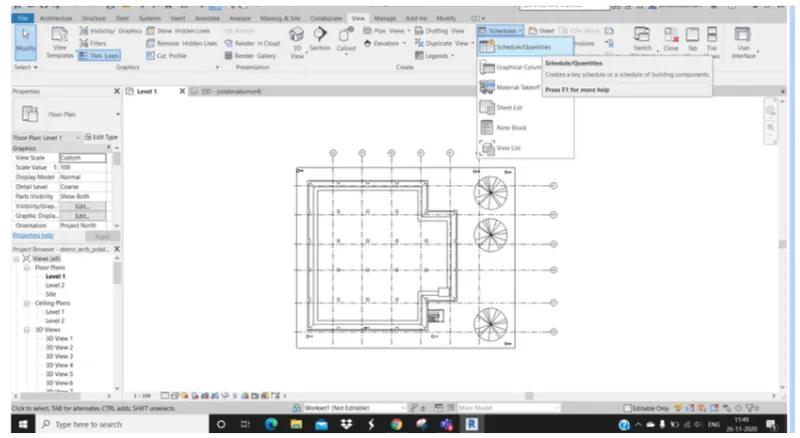
- The schedule dialog box appears.
- Then select the material take off option available and click on ok.
- Select the required parameters.
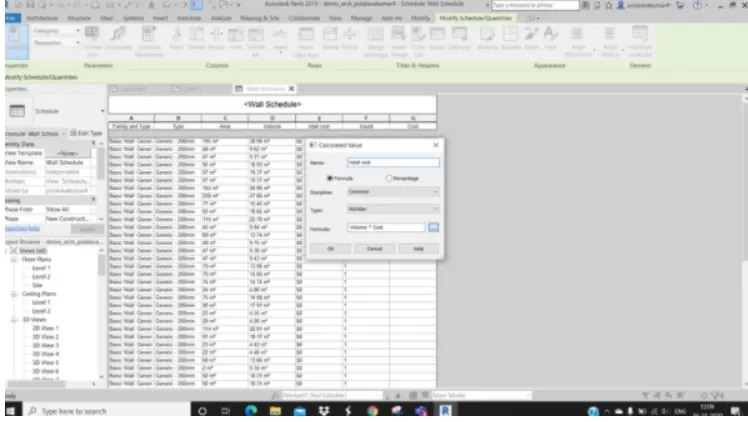
- Create a cost schedule and calculate the total cost.
- Result -
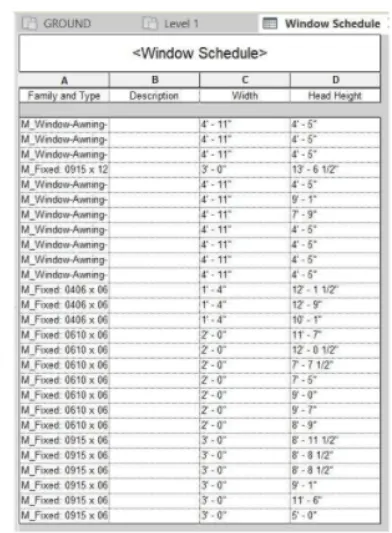
- We have created a schedule regarding the unit cost of the materials available in project.
- Question no.5.
- Ans -
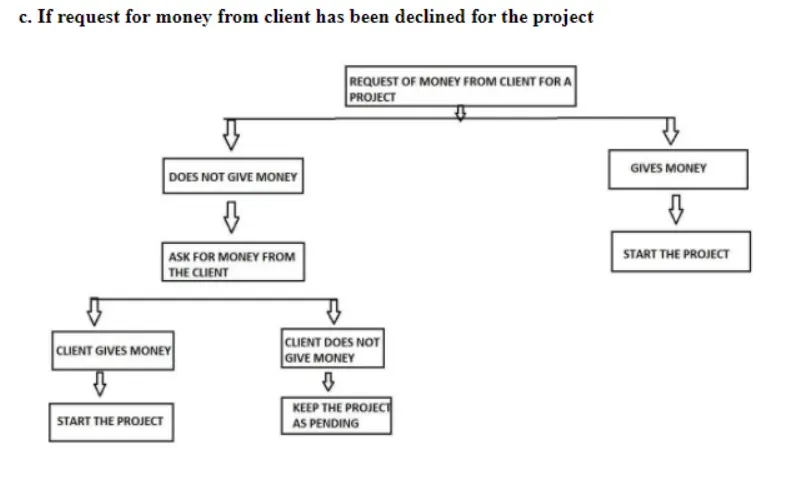
- Aim - To list the flow chart for visual programming.
- Introduction - Here we can use visual programming for flowchart. Various flow chart done by visual programe. Establishing visual, systemic, and geometric relationships between the different parts of a drawing is key to the design process. Workflows influence these relationships from the concept stage to final design. Similarly, programming allows us to establish a workflow, but through formalizing algorithms.
- Dynamo is a visual programming platform for Revit. Typically, programming is done with text. Visual programming replaces code with nodes and wires instead. In the end, you can achieve the same result by building a custom add-in than a Dynamo script. In the image below, the Visual and Textual programs both accomplish the same thing.
- One such program is Dynamo, a plug-in for Autodesk Revit. Dynamo is an open source visual programming language for Revit, written by designers and construction professionals. It is a programming language that allows you to type lines of code; while also creating an algorithm that consists of nodes.
- The user interface for Dynamo is organized into five main areas, the largest being the workspace where programs are processed. The user interface sections include:
• Main menu.
• Toolbar.
• Library.
• Workspace.
• Execution bar. - Process -
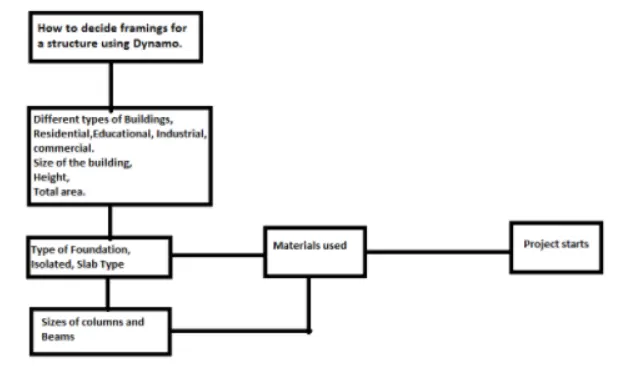
- a. Flow chart for framings the structure using Dynamo -
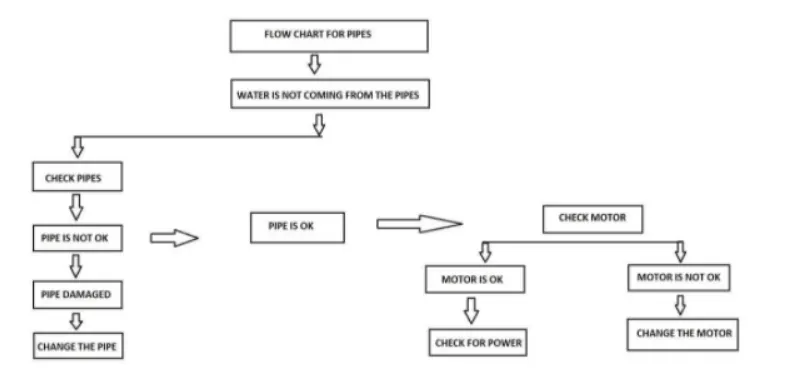
- b. Flow chart for the pipes when no water is coming.
- c. Flow chart for client declining the project request for money.
- Question no.6.
- Ans -
- Aim - To list the parameters associated with each model element.
- Introduction - Here we list the parameters for model element. such as wall, floor, door, window, table, building. List gives the various parts of parameters.
- Process -
- a. Walls -
- Type of wall.
- Length of wall.
- Width of wall.
- Height of wall.
- Cost estimate for wall.
- Thickness of wall.
- Material used for wall.
- b. Floor -
- Type of floor.
- Length of floor.
- Width of floor.
- Area of the floor.
- Volume of the floor.
- Cost of the floor.
- Thickness of the floor.
- c. Door -
- Height of door.
- Width of door.
- Length of door.
- Thickness of door.
- Material of door.
- Type of door.
- d. Window -
- Height of window.
- Width of window.
- Length of window.
- Thickness of window.
- Material of window.
- Type of window.
- e. Table -
- Length of table.
- Width of table.
- Height od table.
- Material of table.
- Type of table.
- Purpose of table.
- f. Building -
- Height of building.
- Type of building.
- Length of building.
- Width of building.
- No. of floors.
- Area of building.
- Set back of building.
- Result -
- These are the parameters associated with the model elements.