Creating Kitchen layout, Hatching of Architectural elements and sectional view of an Industrial Building in AutoCad
1)
Aim:
layouts of the Kitchen and provide hatches pattern. Also, use blocks wherever required. Provide appropriate dimensions in the plan
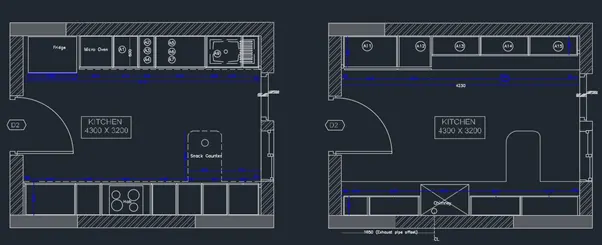
I. In command prompt type (startup:1)
II. Then file>new
III. Then create new drawing window select metric in default settings
IV. In advanced setup in units check on the decimal, angle in degrees, then ok
V. Go to insert toolbar and select the import pdf option and
VI. Import the required pdf
VII. Select the whole imported file and type scale in prompt bar to activate the scale option
VIII. By keeping the exterior wall as the reference calculate the scale factor
IX. Now select the basepoint
X. And enter the scale factor enter
XI. Now create a layer naming the reference and draw the lines and arc over the layout for the required floor plan with the help of the snapping
XII. Type qselect and select the layer of the reference and move them separately
XIII. Hence the floor plan is obtained
XIV. Select allt he objects and scale it with the referece option to obtain the required scalr
XV. Add a layer by name dim in blue colour and with dimcont measure the all required dimensions
XVI. For the interior dimensions of the show with dimlinear and the use the dimension break command for removing the over laying of the dimension linesalso use dimension baseline for the measurement of the dimensions reference to baseline
XVII. Add other layer with the for the annotation of red colour and provide all the namings of the floor plan
XVIII. Type ha in the command prompt and wher hatch option is popped
XIX. Select the required hatch and hatch the required area
XX. Now select the hatched region and change the scale of the hatched portion in the properties toolbar.
XXI. Select the lines that should be dotted and change its line tpyr to dotted by th loading the dotted line
XXII. Create blocks of the microoven,fridge and hob and place them in the respective positions
XXIII. Create the circular block by drawing the circle and type b in command prompt and select object
XXIV. And the with attdef define the attribute inside the circle
XXV. And update the block with the bedit option
XXVI. Now by adding this block there would be popup to define the attribute which helps in the assigning the block.
XXVII. Select the required hatch and hatch the required area over the column sections
XXVIII. Now select the hatched region and change the scale of the hatched portion in the properties toolbar.
XXIX. Add a layer by name dim in blue colour and with dimcont measure the all required dimensions
XXX. For the interior dimensions of the show with dimlinear and the use the dimension break command for removing the over laying of the dimension lines also use dimension
Result:
layouts of the Kitchen and hatches pattern was provided. Also, blocks were used wherever necessary.
2)
Aim:
the elevation of the plan created with proper hatch in the walls, doors, windows, and other architectural elements.
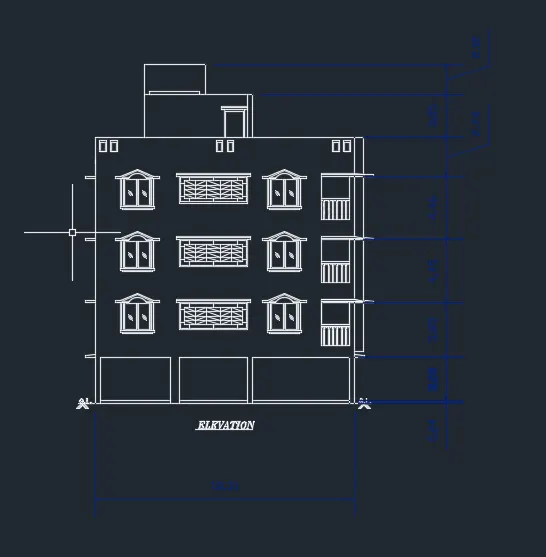
I. In command prompt type (startup:1)
II. Then file>new
III. Then create new drawing window select metric in default settings
IV. In advanced setup in units check on the decimal, angle in degrees, then ok
V. In command prompt type (xl enter h enter v) construction line horizontal and vertical respectively is obtained
VI. Next, in command prompt type (o and specify distance of offset as 150) and offset the horizontal line to top
VII. Next, in command prompt type (o and specify distance of offset as 2000) and offset the horizontal line to top
VIII. Next, in command prompt type (o and specify distance of offset as 530) and offset the horizontal line to top
IX. Next, in command prompt type (o and specify distance of offset as 2780) and offset the horizontal line to top
X. Next, in command prompt type (o and specify distance of offset as 2780) and offset the horizontal line to top
XI. Next, in command prompt type (o and specify distance of offset as 2948) and offset the horizontal line to top
XII. Next, in command prompt type (o and specify distance of offset as 3578) and offset the horizontal line to top
XIII. Next, in command prompt type (o and specify distance of offset as 1900) and offset the horizontal line to top
XIV. Next, in command prompt type (o and specify distance of offset as 150) and offset the horizontal line to top
XV. Next, in command prompt type (o and specify distance of offset as 1319) and offset the horizontal line to top
XVI. Next, in command prompt type (o and specify distance of offset as 240) and offset the vertical line to right
XVII. Next, in command prompt type (o and specify distance of offset as 3075) and offset the vertical line to right
XVIII. Next, in command prompt type (o and specify distance of offset as 380) and offset the vertical line to right
XIX. Next, in command prompt type (o and specify distance of offset as 2974) and offset the vertical line to right
XX. Next, in command prompt type (o and specify distance of offset as 240) and offset the vertical line to right
XXI. Next, in command prompt type (o and specify distance of offset as 4235) and offset the vertical line to right
XXII. Next, in command prompt type (o and specify distance of offset as 240) and offset the vertical line to right
XXIII. Next, in command prompt type (o and specify distance of offset as 1185) and offset the vertical line to right
XXIV. Next, in command prompt type (o and specify distance of offset as 1336) and offset the vertical line to right
XXV. Next, in command prompt type (o and specify distance of offset as 1185) and offset the vertical line to right
XXVI. Next, in command prompt type (o and specify distance of offset as 2974) and offset the vertical line to right
XXVII. Next, in command prompt type (o and specify distance of offset as 966) and offset the vertical line to right
XXVIII. Next, in command prompt type (o and specify distance of offset as 1336) and offset the vertical line to right
XXIX. Next, in command prompt type (o and specify distance of offset as 958) and offset the vertical line to right
XXX. Next, in command prompt type (o and specify distance of offset as 1218) and offset the vertical line to right
XXXI. Trim all the un wanted lines
XXXII. Creation of the window
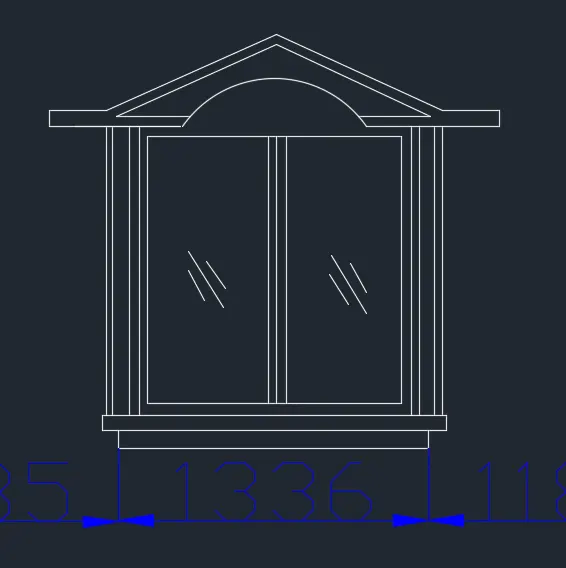
XXXIII. Next, in command prompt type (o and specify distance of offset as 75) and offset the horizontal line to top
XXXIV. Next, in command prompt type (o and specify distance of offset as 60) and offset the horizontal line to top
XXXV. Next, in command prompt type (o and specify distance of offset as 50) and offset the horizontal line to top
XXXVI. Next, in command prompt type (o and specify distance of offset as 1150) and offset the horizontal line to top
XXXVII. Next, in command prompt type (o and specify distance of offset as 40) and offset the horizontal line to top
XXXVIII. Next, in command prompt type (o and specify distance of offset as 60) and offset the horizontal line to top
XXXIX. Next, in command prompt type (o and specify distance of offset as 240) and offset the vertical line to right
XL. Next, in command prompt type (o and specify distance of offset as 25) and offset the vertical line to right
XLI. Next, in command prompt type (o and specify distance of offset as 75) and offset the vertical line to right
XLII. Next, in command prompt type (o and specify distance of offset as 30) and offset the vertical line to right
XLIII. Next, in command prompt type (o and specify distance of offset as 520) and offset the vertical line to right
XLIV. Next, in command prompt type (o and specify distance of offset as 30) and offset the vertical line to right
XLV. Trim all the unwanted lines
XLVI. Using mi command mirror aal the required objects
XLVII. Create a triangle of the 310 height and 1336 breadth
XLVIII. Offset it by 40 outwards
XLIX. Draw an arc on the 800 in between with height of 200
L. Trim all unwanted lines
LI. Copy the whole window for the @6400<0
LII. Create the rectangle of the 3000*1160
LIII. And offset it inwards to the 50
LIV. And again, offset for the 150
LV. Offset the top line for 100,40
LVI. And the trim all the unwanted lines
LVII. Railings
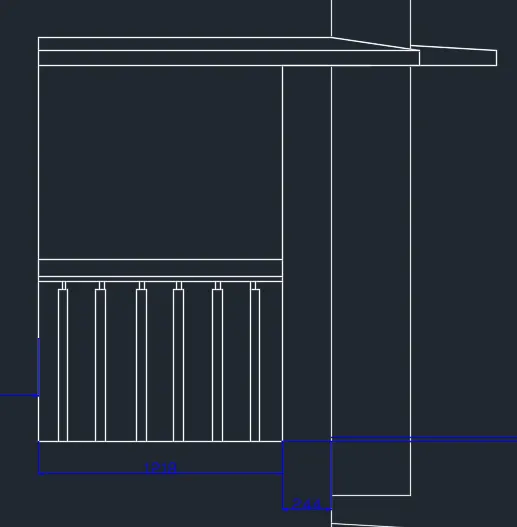
LVIII. Create rectangle of 1218*1873 and x explode the rectangle
LIX. Offset the bottom line to the 900,825,800
LX. And place rectangle of 40*750 at 150 spacing from corner
LXI. And draw small rectangle on top attaching top line
LXII. Now array the railings on the bottom-line path with 150 spacing
LXIII. Hatch all the required closed area with the proper scale and required pattern
LXIV. Copy whole windows and railings
LXV. And place it with the required spacing 2 times
LXVI. Next, in command prompt type (o and specify distance of offset as 1900) and offset the horizontal line to top
LXVII. Next, in command prompt type (o and specify distance of offset as 150) and offset the horizontal line to top
LXVIII. Next, in command prompt type (o and specify distance of offset as 1300) and offset the horizontal line to top
LXIX. Next, in command prompt type (o and specify distance of offset as 1168) and offset the horizontal line to top
LXX. Next, in command prompt type (o and specify distance of offset as 60) and offset the horizontal line to top
LXXI. Next, in command prompt type (o and specify distance of offset as 100) and offset the horizontal line to top
LXXII. Next, in command prompt type (o and specify distance of offset as 60) and offset the horizontal line to top
LXXIII. Next, in command prompt type (o and specify distance of offset as 240) and offset the vertical line to right
LXXIV. Next, in command prompt type (o and specify distance of offset as 2200) and offset the vertical line to right
LXXV. Next, in command prompt type (o and specify distance of offset as 240) and offset the vertical line to right
LXXVI. Next, in command prompt type (o and specify distance of offset as 720) and offset the vertical line to right
LXXVII. Next, in command prompt type (o and specify distance of offset as 120) and offset the vertical line to right
LXXVIII. Next, in command prompt type (o and specify distance of offset as 50) and offset the vertical line to right
LXXIX. Next, in command prompt type (o and specify distance of offset as 775) and offset the vertical line to right
LXXX. Next, in command prompt type (o and specify distance of offset as 50) and offset the vertical line to right
LXXXI. Next, in command prompt type (o and specify distance of offset as 120) and offset the vertical line to right
LXXXII. Next, in command prompt type (o and specify distance of offset as 240) and offset the vertical line to right240
LXXXIII. Trim all the excess lines
Result:
the elevation of the plan created with proper hatch in the walls, doors, windows, and other architectural elements.
3)
Aim:
section view of an industrial building with appropriate hatches and dimensions and annotations
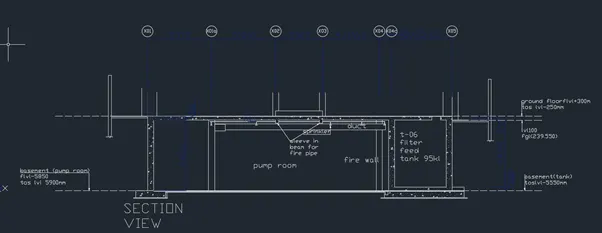
I. In command prompt type (startup:1)
II. Then file>new
III. Then create new drawing window select metric in default settings
IV. In advanced setup in units check on the decimal, angle in degrees, then ok
V. In command prompt type (xl enter h enter v) construction line horizontal and vertical respectively is obtained
VI. Next, in command prompt type (o and specify distance of offset as 50) and offset the horizontal line to top
VII. Next, in command prompt type (o and specify distance of offset as 550) and offset the horizontal line to top
VIII. Next, in command prompt type (o and specify distance of offset as 50) and offset the horizontal line to top
IX. Next, in command prompt type (o and specify distance of offset as 300) and offset the horizontal line to top
X. Next, in command prompt type (o and specify distance of offset as 5550) and offset the horizontal line to top
XI. Next, in command prompt type (o and specify distance of offset as 300) and offset the horizontal line to top
XII. Next, in command prompt type (o and specify distance of offset as 25) and offset the horizontal line to top
XIII. Next, in command prompt type (o and specify distance of offset as 5315) and offset the vertical line to right
XIV. Next, in command prompt type (o and specify distance of offset as 5320) and offset the vertical line to right
XV. Next, in command prompt type (o and specify distance of offset as 3900) and offset the vertical line to right
XVI. Next, in command prompt type (o and specify distance of offset as 4719) and offset the vertical line to right
XVII. Next, in command prompt type (o and specify distance of offset as 1020) and offset the vertical line to right
XVIII. Next, in command prompt type (o and specify distance of offset as 5025) and offset the vertical line to right
XIX. Now, offset all the vertical lines with the 250 on both sides
XX. Offset the bottom top horizontal line by 200,25,15,300
XXI. And trim al the unwanted lines
XXII. Create the sprinkler with the poly line command and create the block
XXIII. Now place this or insert the block at all required positions
XXIV. Select the required hatch and hatch the required area over the column sections
XXV. Now select the hatched region and change the scale of the hatched portion in the properties toolbar.
XXVI. Add a layer by name dim in blue colour and with dimcont measure the all required dimensions
XXVII. For the interior dimensions of the show with dimlinear and the use the dimension break command for removing the over laying of the dimension lines also use dimension
XXVIII. Place the leader command with the typing the mlead and create the leader in all required positions
XXIX. By typing lead change the leaderstyle by changing the text size and arrow size
XXX. Create a circle and the inscribe the attribute bt atdef and then crete it as the block
XXXI. Place this block in all desired positions by enering the value for the attributes
XXXII. With dtext create all the headdings required
Result:
section view of an industrial building with appropriate hatches and dimensions and annotations with the AutoCAD drawings.