Creating Conceptual mass in REVIT and Creation of Sinusoidal curve and a Parametric stadium using Dynamo
1. Creating Sinusoidal Points, Curve, and Surface
Steps:
Generate Sinusoidal Points:
- Use the
Code Blocknode to define the range and sinusoidal function. - Example:
x = 0..10..#100; y = Math.Sin(x); - Create points using the
Point.ByCoordinatesnode.
- Use the
Create a Curve:
- Use the
Curve.ByPointsnode to create a curve from the generated points.
- Use the
Create a Surface:
- Create a secondary set of points offset in another direction (e.g., z-axis).
- Use the
Surface.ByLoftnode to create a surface from the original curve and the offset curve.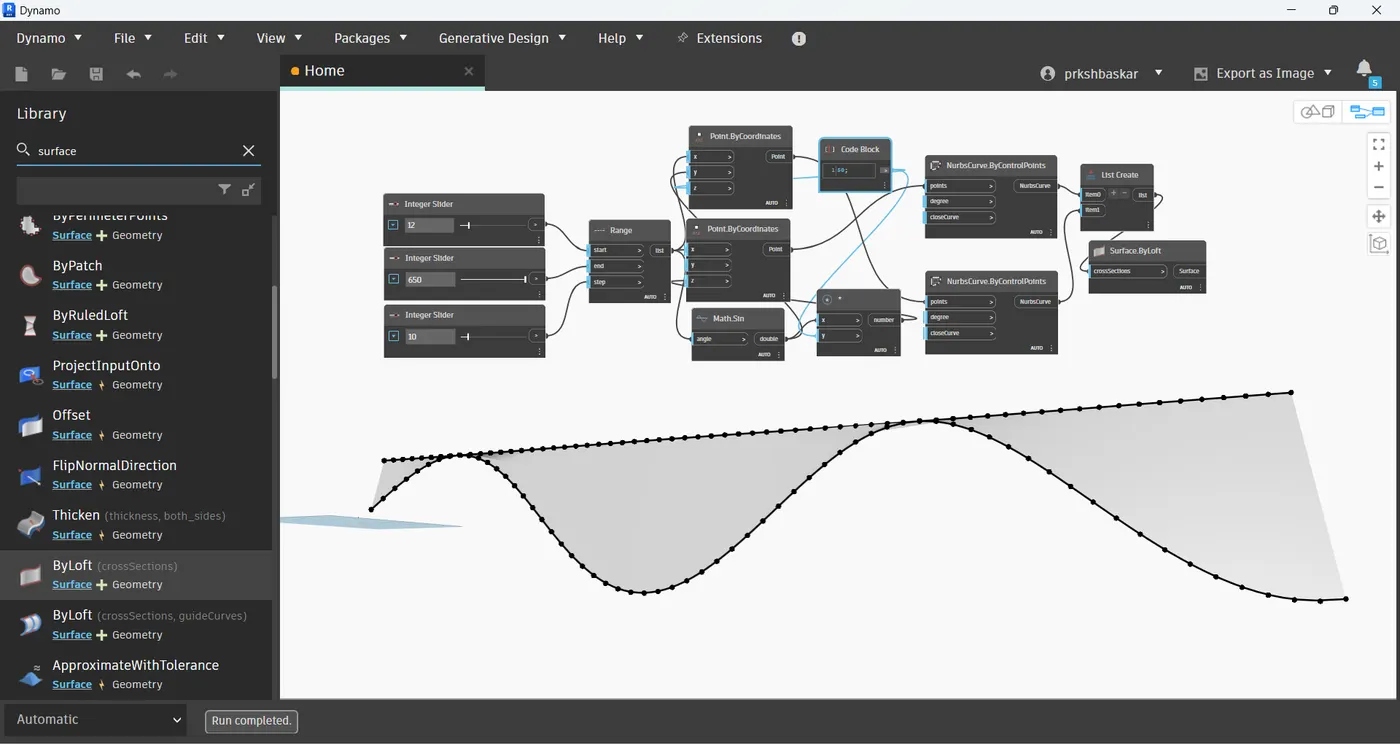
2. Conceptual Floor Plan with Walls in Dynamo and Revit
Steps:
Draw Lines in Dynamo:
- Use
Line.ByStartPointEndPointto create lines representing the walls.
- Use
Link to Revit Elements:
- Use the
Wall.ByCurveAndHeightnode to convert lines to Revit walls. - Use sliders (
Number Slider) to control the wall height and length dynamically.
- Use the
Adjust Wall Properties:
- Use the
Element.SetParameterByNamenode to set wall type and other parameters. - Link sliders to these nodes for dynamic control.
- Use the
3. Array of Model Elements in Revit with Varying Properties
Steps:
Create Model Elements:
- Define a base element in Revit.
Array Elements in Dynamo:
- Use
List.LaceShortestandGeometry.Translatenodes to array the elements. - Use sliders to control the spacing and number of elements.
- Use
Vary Properties:
- Use the
Element.SetParameterByNamenode with sliders to vary properties like height, width, or material.
- Use the
4. Parametric Column Using Conceptual Mass in Revit
Steps:
Create Conceptual Mass:
- Create a mass in Revit and bring it into Dynamo.
Divide Surfaces:
- Use the
Surface.DivideEquallynode to divide the mass surface into grids.
- Use the
Create Panels:
- Use nodes like
Panel.ByPointsto create triangular or square panels.
- Use nodes like
Apply to Column:
- Use the divided points to create the parametric column with the desired panel shapes.
5. Parametric Stadium Using Visual Programming in Dynamo
Parameters to Consider:
- Stadium radius
- Number of tiers
- Seat dimensions
- Stair width
- Entry/exit points
Steps:
Define Stadium Outline:
- Use the
Circle.ByCenterPointRadiusnode to define the base outline.
- Use the
Create Tiers:
- Use loops or
List.Mapto create multiple tiers with varying radii and heights. - Use sliders to control the number of tiers and their dimensions.
- Use loops or
Seating Arrangement:
- Use
Point.ByCoordinatesandFamilyInstance.ByPointto place seats. - Control seat spacing and arrangement with sliders.
- Use
Stairs and Entry/Exit Points:
- Use the
Line.ByStartPointEndPointandWall.ByCurveAndHeightnodes to create staircases and entry/exit paths.
- Use the
Assemble the Stadium:
- Combine all elements into a coherent model using
Geometry.Unionand other appropriate nodes.
- Combine all elements into a coherent model using
Tips:
- Visualization: Use
Watch 3Dnode frequently to visualize your model as you develop it. - Parameter Control: Use sliders and
Code Blocknodes to control parameters dynamically. - Revit Integration: Use Dynamo nodes specific to Revit (like
Wall.ByCurveAndHeight) to ensure your Dynamo models translate correctly into Revit elements.
These steps outline the basic workflow for each task. As you work through each project, you'll need to adjust and refine your approach based on the specific requirements and complexities of your model.