Creating a Layout, Section and Elevation with dimensions using AutoCad
Measure the room
Using the tape measure, take a corner to corner measurement of the rooms. If there is baseboard available, run the tape on top of the baseboard. But if there is none, run your tape along the floor. You can request for help and have someone hold the other end of the tape to facilitate accuracy.
2. Add measurement to a rough sketch
A pencil and blank paper can simply be used here. Jot down your room measurements in a free sketch. For rectangular rooms, write the measurements close to corresponding walls.
If closets and angled corners are present in the room, fill their measurement in the right spot. Fests or inches measurements should be written like 15̎ or 15' and metric measurements as 5.2m or 5.25m.
3. Draft with an architect's scale
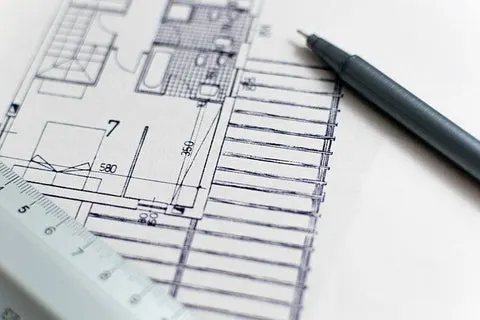
House plans usually use a scale of ¼ inch to one foot. They’re often represented as 1/4̎: This means that you draw quarter-inch to represent one foot of the real house. Using an architectural scale is not difficult. For instance, if you need to draw a 30-feet long exterior or interior wall, follow these steps.
- Lay the architectural scale on the paper or graph
- By the zero marks on the scale, make a small pencil mark on the paper. Make the same mark on your paper by the 30 marks on the scale
- Then use the straight edge to draw a line according to the two marks
The line you have drawn should measure 7.5 inches, which represents 30 feet of the real house. Accuracy is crucial in this stage. Measure all lines correctly.
4. The blueprint
Lay a sheet of paper of 24̎ by 36̎ on a working surface. The longest edge should be horizontal. Save the lower right corner for your title block, which should contain the name of the view, scale, house name, designer's name, and date. The date is very important because it's easier for the builder, designer, or buyer to know how recently the plan was drawn or edited.
5. The exterior walls
It’s time to layout the shape and dimensions of the house. For simplicity, we will use a rectangular shape, which is a fundamental shape. It is standard to have the door at the lower side of the sheet. But if your home has a different shape, you can alter this and draw what you have. Follow these steps for a start;
- Draw a total dimension of the first wall with a straight edge, pencil, and architectural scale until it meets another wall
- The next wall should be drawn with a T-square and architect's scale. Continue until you have drawn the inside framing walls of the building
- Then, draw the outside framing. Let's say you are framing with 2 by 6s; your exterior will be 5.1/2 inches thick
6. Interior walls
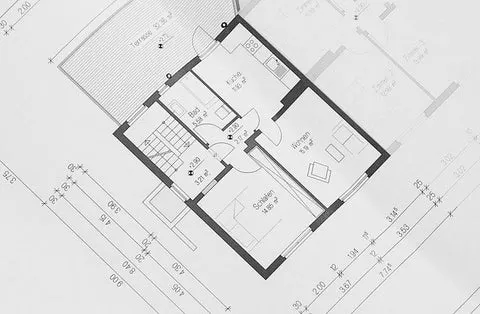
If you are using 2 by 4s for interior walls, the actual thickness will be 3.1/2 inches. This is because they are run through with a half-inch of both their width and thickness. If there are stairwells in the house, draw a wall around them so that they can be visualized as a room. Not all stairwells have a wall around them. If yours fall under the category of those that don't need a wall, you can just draw a fault dotted lines to mark the area.
7. Add doors and windows
Your plan is now set for windows and doors. But before you draw the doors and windows, ice the scale to locate their positions. The door placement should be dimensioned from the center of the wall placement. Doors are usually 2 feet 8 inches. As for windows, it is necessary to maintain reasonable spacing and size. They are also dimensioned from the center of the wall. Then, label the rooms at the center—label everywhere, including open closets and entrance.
8. Draw Dimensions
Add dimensions to the floor plan; this is to be done thoroughly. Nothing should be left without a scale. There have to be a dimension for rooms, closets, cabinet depths, distance from the wall to back of the toilet, sizes of tubs, and distances from walls to edge of any appliance or fixtures. One dimension line should run along each exterior wall for window opening and door openings.
SECTION OF DRAWING
1. Choose a Cross Section Line
To create a cross section, first draw a line on your floor plan that cuts through a section of the house for which you need to show cross section detail.
On the floor plan drawing above, at the upper and lower left there are two "A"s surrounded by circular icons with an arrow. These icons indicate that the construction drawings will contain a detailed cross section for this slice of the house. The arrow indicates in which direction the cross section "looks". Note that cross sections are also indicated for sections B-B, C-C and D-D.
The drawing below is the resulting A-A cross section. This tutorial will demonstrate how to draw this cross section.
The purpose of the A-A cross section is to show the basic shell of the house, the structural posts holding up the roof beam, the rough opening height of the windows and ceiling heights, including a lowered ceiling in the entrance. These structural posts, beams and windows will show up in other drawings but from a top-down view. These views combine to make the house more understandable as well as give further design details.
2. Draw the House Envelope
Start by drawing the width of the outer envelope of your house design through a given cross section line. Use the measurements on the floor plan drawings, house elevations and your other design notes to create accurate and to scale lines. Include the:
- House footings
- Foundation walls
- Above ground exterior walls
- Any windows that the section cuts through
- Exterior roof lines
3. Draw Floors and Ceilings
Next draw both the upper and lower lines of all floors and ceilings. You need to know the thickness of the flooring or ceiling joists and any attached flooring (usually plywood, oriented strand board or chip board). The heights from each floor to the ceiling or floor joists above must be accurately drawn to scale. Only include the framing materials in this drawing, not the finished ceiling and floor materials.
4. Side Wall Windows, Doors and Framing
For the two side walls at either side of the drawing, draft in any exterior window or door headers, sills or wall plates as well as the inside dimension of all of the above elements in the first step. See the drawing above.
5. Interior Walls and Structural Elements
Next draft interior walls, including their plates and any structural posts or beams visible in this section. See the cross section drawing above.
6. Facing Wall Windows and Doors
Next draw the rough openings of all the facing doors and windows. The cross section above shows window glazing as well but not the trim.
7. Variances in Ceiling or Floor Heights
Add in any dropped or raised floors or ceilings. See the drawing in the next step below.
8. Labeling
Finally label the rough openings for all doors and windows. Label the height of the windows, either from the floor or ceiling. Also detail ceiling heights, area names and any other elements to lend clarity to the drawing. See the figure above.
It is important that all elements are accurately drawn to scale since builders at the job site will often use an architect's scale to determine where to situate rough openings of windows or doors, ceiling heights, etc. It is not good enough to label these numbers. They need to be accurately drawn.
9. Add a Title Block
Add a title block in the lower right hand corner which indicates the:
- Name of the house or project
- Date
- Designer's name
- View name
- Drawing scale
Additional Cross Section Examples
Use the same technique to create your remaining cross sections. For cross sections spanning the entire width or length of the house, start with the building envelope and work your way in. The drawing below shows section D-D shown on the floor plan from Step 1 "Choose a Cross Section Line".
For wall layers, simply start from either the left or right hand side and work your way across, drawing each layer exactly to scale. You will want to use a much larger scale for wall layers. It is not necessary to show the entire height of any given wall. A single segment with all layers is sufficient. The drawing below shows a cross section detail for the walls, roof and the house foundation of a different home than our example above.
Some drawings may also be required for individual elements such decorative roof overhang supports or elaborate trim work required in a particular room.
ELEVATION
Drawing Main Floor Wall Baseline
To draw the initial baseline for the main floor,
- Using your floor plan drawings and starting at the extreme left end of any walls on this side of the house on the ground floor, measure the horizontal distance of this wall. Make sure you are including the thickness of any siding material for the exterior side walls for this level. This siding can be very thin in the case of parging or thick in the case of stone or brick.
- Draw a faint line the same length of this wall towards the bottom left third of your page. This faint horizontal line will later be erased since it will not be visible from the outside of the house (unless the exterior finish of the house changes at this exact point). It is drawn now only as a reference from which to measure to the top of the next floor or roof line.
- Make a small upward tick mark at the end of this wall.
- If there is another exterior wall at the same elevation to the right of this wall (for example a wall that bumps out or recedes in from this first wall), measure this wall in the same way as the first.
- Draw this next line as a continuation of the first line. Do not erase the tick mark that indicates the division between these walls.
- Continue on marking walls in this way until you reach the end of walls on this side of the house.
Determining and Drawing Wall Heights
Next you will draw the vertical lines for the exterior walls on this side. For each of the wall bases:
- Determine how high the wall will be above its unfinished floor height. To do this you will need to consider the height of the ceiling of the rooms within this section of the house and add to that the height of any floor or ceiling joists above it. Also add on the height of any sub-flooring, if there are floors above.
- Draw faint vertical lines up from each of the wall base lines to the height you have determined in the previous step. (Later you will draw a darker line which includes the finished material on the outside of the home.)
- Draw a faint horizontal line at the level of the upper ceiling joists or subfloor above this level.
- If there is another floor above this level, continue on to the step 5. Otherwise move on to the next section, Draw Window and Door Outlines.
- Using the floor plans for the next level up, perform steps 1 through 3 again making tick marks where you will need to draw any vertical walls. Once again determine the heights of these walls then draw a faint horizontal line to show the level of the top of the sub-flooring or ceiling joists for the next level.
- Continue repeating the above steps until you have no floors above the current level. Then move on to the next section, Draw Window and Door Outlines.
Draw Window and Door Outlines
For all of your windows and doors, measure from the horizontal lines of your floors to position the exterior doors and windows. Your construction drawings, usually the cross-sections, will detail the height at which each window should be placed. A separate window and door schedule gives the dimensions for all your windows and doors.
At this point, using your architect's scale for accuracy, draw just the outline of the window and door outside dimensions to the same scale as your walls, floors and roof. Later you will draw the exterior window and door trim.
Drawing the Roofs
The roof lines can be of many styles: gable, shed, hip, gambrel, etc.
To draw the roof for each elevation view, first consider whether your roof will overhang and drop below the exterior wall on the elevation plan you are currently drafting. For a shed or gable roof with eaves, the roof on two sides will drop lower than where it connects with the wall. From the view of the other two sides it will stay at one level. Take a look at the elevations at the very top of this page to see an illustration of this.
Dropping Roofs
If this level has an overhanging roof that slopes down over the wall, you will need to do some calculations for roof overhang before you draw the horizontal line for the wall top.
If there is a roof overhang at this level which drops down over the wall, calculate how much the roof will drop in the actual overhang area. To do this,
- Take the slope or pitch of your roof, which is usually described as the rise over run in the form of 5:12, 6:12, 14:12, etc. The first number refers to how many inches (or centimetres) the roof will rise (or drop) over a horizontal distance indicated by the second number (which in North America is usually 12 inches).
- Take your horizontal roof overhang to determine what the vertical roof overhand drop will be. For instance if you have a 5:12 roof pitch and a 12 inch horizontal roof overhang, the roof will drop a total of 5 inches. If your horizontal roof overhang was 18 inches, the roof would drop 18/12 x 5 = 1.5 x 5 inches = 7.5 inches.
- Now you will need to subtract this drop from the height of the wall that you previously calculated since in the elevation drawing this roof line will drop below the top of the wall height. Using this new calculated height, draw the line showing the lower edge of the roof line.
Non-Dropping Roof Lines
For an end gable wall or a shed wall, determine the highest point of the wall below your roof. To do this you need to know the slope of the roof. First read the section above on roof pitch, then calculate the height of top most point of your roof above the current floor in the following way.
- Measure the horizontal distance from one of the side walls of the house in this elevation view to where the peak of the roof will be. For some houses this will be the center of the house, for other roof styles it may not be the center. We'll call this Distance to Peak.
- Then calculate Distance to Peak x Roof slope where roof slope is the rise/run. For example for a 5:12 roof slope and a distance of 13 feet the height for the peak of the roof (above the current floor) would be: 12 feet x 5 / 12 = 5 feet.
- Mark a tick on the floor surface to indicate the spot above which will lie the roof peak. Extend a faint vertical line up from this point.
- Measure up this line to the height you have just calculated above.
- Now join this roof peak to the outside edge of the house.
- If the roof slopes directly down to the other side of the house you can draw another line from the roof peak to the other edge of the house as well.
Next determine the thickness of your actual roof including all framing and the roof itself and draw this onto your elevation drawing.
Make sure that you have included all roofs that are visible from this house face. Notice in the elevation above, the small portion of shed roof which covers a bumpout on the right side is visible.
Basements, Foundations and Chimneys
Next add on the basement, crawl space or foundation. For the elevation views you need only show the parts of this level which are visible above ground. Other drawings, called cross-sections, will provide further building details for this part of the home.
For the lower level or foundation, first determine if the lower wall, without any finished surface such as siding or stucco, will protrude from the upper wall. Then consider what type of finishing will be on the foundation and what will be on the upper levels. For some homes the concrete foundation may have parging or stucco and the upper level(s) may have a different finishing. If the whole house will have the same finish type hopefully your home design is such that the lower foundation wall is flush to the upper wall(s). If not, now is the time to adjust your foundation plans so that they will be flush.
If the sidings will change, consider whether you want them flush, the finished foundation wall protruding, or inset. There is no correct way to do it but in general an inset foundation wall could give your home a somewhat unstable look. If you are building a traditional wood framed home you have a bit of latitude as to where on the thick foundation wall you will set the wood framing for the floor above. In this way you can decide exactly how your upper finished walls will or will not line up.
Once you have determined where the foundation wall will sit, draw a faint line from the main floor downwards to slightly below what you think will be your finished ground height.
Now you can also add any chimneys. As with the walls you have drawn, make sure that you include the thickness of any finishing materials that may be on the chimney, be it wood siding, brick or stone.
Detail Exterior Finishing
- If you will have wood or another type of siding (horizontal, vertical or cedar shake) draw these lines to indicate the finish. For a stucco wall you need not draw any surface. For a brick or stone wall, the finish should be drawn. Make sure you include any trim bands, belt lines, etc.
- Using your architect's scale, draft in all window and door trim as well as detail any window or door lites, and exterior knobs or handles.
Decks, Porches and Railings and Finished Ground Level
- Now draw in any decks or porches, their railings and stairways. This can be fiddly work, especially drawing the railings. Use your scale to make sure your drawing is accurate.
- Then add on any other architectural features such as fascia, gutters or downspouts.
- Next do an accurate measurement of what you plan to have as the difference of your main floor height to the final level of the landscaping around the house. This may be fairly flat around the whole house or it may leave a portion of the basement or foundation completely above ground with another part almost completely buried.
- Draw this finished landscaping line along the walls of this elevation view.
- Finally, clearly label the drawing to indicate exact finishing materials to be used on exterior surfaces, this includes roofing materials and siding.
Repeat this process for the other three sides of the home.
As with the floor plan drawings, it is necessary to include a title block on the page which specifies the house name, the date, and the scale used. The title block is generally in one corner of the drawing.