Challenge 12 : Rendering Project
Renderer Type
The type of renderer used: Raycaster, Raytracer, Hidden Line, Powercaster, or Powertracer. The icon in the Rendering Options window changes if you change Renderer Type. If Renderer Type is Powercaster or Powertracer, the Processors parameter becomes available. The default setting is Raycaster.
With Powercaster or Powertracer, multiple renders on the same multi-processor machine may produce the message /usr/temp/sgi_mp_rt_locks permission denied. As a workaround, use the command setenvALIAS_PLACE_LOCKS_IN_SWAP.
Processors
Determines whether the renderer uses all available processors (All), or only a certain number of the available processors (User Defined). This parameter is available only when Renderer Type is Powercaster or Powertracer. If Processors is User Defined, the Num Processors parameter becomes available. The default setting is All.
Num Processors
The number or processors the renderer uses. This parameter is only available if Renderer Type is Powercaster or Powertracer, and Processors is User Defined. If you select User Defined, the initial value is 1. The valid/slider range is 1 to 32. The value you set will be saved in User Prefs.
Test Render
Automatically names the rendered image file testrender_nnnnnn, where nnnnnn is a six-digit number. If Test Render is ON, the Test Resolution parameter becomes available. The default setting is Off.
Test Resolution
A scaling factor applied to the X Resolution and Y Resolution values in the Render > Globals  window. The slider range is 0.1 to 1. The default setting is 0.5.
Rendering Options window buttons
Reset
Resets all Rendering Options to their default settings.
Save
Saves the current Rendering Options settings for use by all subsequent renders.
Exit
Closes the Rendering Options window. The scene is not rendered, and any changes you have made to the Rendering Options are not saved.
Go
Renders the scene using the current Rendering Options settings.
Visualization
Describes improvements to rendering.
Replace Shader by Name
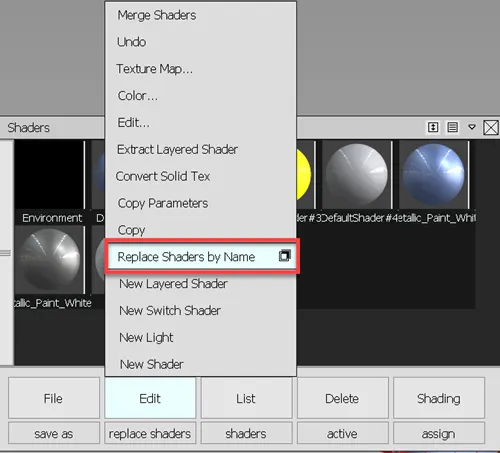
You can now replace shaders in the scene with shaders or materials of the same name from a specified Shader Library of directory. For example, if your current scene contains imported geometry with non-Alias shaders, you can replace one or more of the shaders with Alias shaders or other materials. To replace shaders using the new Replace Shaders by Name feature, both shader names must be identical. You can choose to replace all shaders used in the scene or select the shaders you want to replace.
Access the Replace Shader by Name from the Multi-lister (Render > Multi-lister) Edit menu. For more information, see Replace a shader by name.
Anti-Alias updates
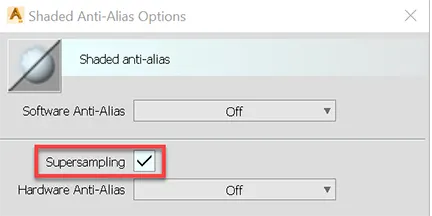
There are now separate Anti-Alias option windows for wireframe (WindowDisplay > Anti-Alias > Wireframe Anti-Alias) and shaded (WindowDisplay > Anti-Alias > Shaded Anti-Alias). We've also added the following improvements to the Shaded Anti-Alias options:
- A new Supersampling option improves the anti-alias quality by a factor of four, which results in overall quality of 64x when Hardware Anti-Alias in set to 16x. Note that using Supersampling affects rendering performance.
- You no longer need to restart Alias when setting Hardware Anti-Alias to 16x.
Dynamic Section Improvements
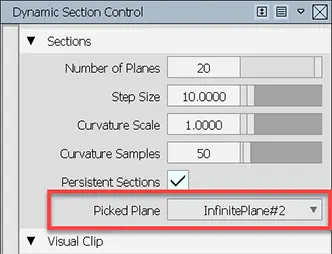
You can now drive the sections and visual clipping using a construction plane. Selecting a construction plane in your scene now defines the object clipping. A new Picked Plane option indicates that a connection exists between the selected plane and the geometry to drive the sections and the clipping.
BoxMode shader additions
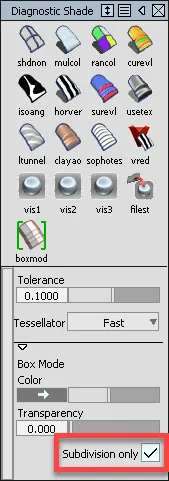
A new Subdivision only option for the BoxMode shader lets you isolate the shader's effect to subdivision bodies only. For example, if your scene includes both NURBS surfaces and subdivision objects, only the subdivision objects are shaded in BoxMode. This option is on by default.
Render > Apply Shaders
Simplifies the workflow for assigning shaders.
The Render > Apply Shaders  tool provides two menus that display when you click the
  and
and  . Use these menus to assign shaders to your models quickly and easily.
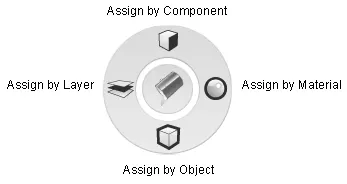
Using the , you can assign shaders using four different filters.
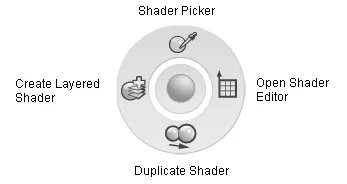
The provides four tools that perform shading functions.
Shade Control Options
Select the layout and define which interface components display in decorate mode (when the Shade Control tool is selected.
Show Visualization Panel
Shows the Visualization control panel.
Maximize Current View
Maximizes the current view.
Use FullScreen Mode
Displays the view in Full Screen mode.
When the tool is selected, press Esc to exit Full Screen mode.
Hide Main Menu UI
Hides the menu bar in Full Screen mode.
Hide Title Bar
Hides the title bar in Full Screen mode.
Hide Palette/Shelf
Hides the Palette and Shelf in Full Screen mode.